
User Guide
Page 8
...that of mobile object identification systems (premises radio station and specified low-power radio station). Please contact your product, visit www.reuse.toshiba.com. VCCI Class B Information Taiwan Article 14 Article 17 Unless approved, for second generation low-power data communication systems such as ...working with telecommunication laws and regulations. Any use of -life strategies for recovery and recycling. This Directive applies to EU member countries only and does not apply to end users in Europe, Toshiba is in other partners to 2,483.5 MHz for any model accredited low...
...that of mobile object identification systems (premises radio station and specified low-power radio station). Please contact your product, visit www.reuse.toshiba.com. VCCI Class B Information Taiwan Article 14 Article 17 Unless approved, for second generation low-power data communication systems such as ...working with telecommunication laws and regulations. Any use of -life strategies for recovery and recycling. This Directive applies to EU member countries only and does not apply to end users in Europe, Toshiba is in other partners to 2,483.5 MHz for any model accredited low...
User Guide
Page 23
...the main battery 44 Using the computer for the first time 44 Initial setup 45 Setting up your software 45 Registering your computer with Toshiba 45 To Shut down your computer 46 To Restart your computer 46 To place your computer in Sleep mode 47 Adding optional external ...(optional 48 Installing a memory module 48 Removing a memory module 54 Checking total memory 56 Recovering the Internal Storage Drive 57 Creating recovery media 58 Restoring from recovery media 60 Refresh your PC (with user's data 61 Reset your PC 64 Installing drivers and applications 66 Using the touch pad ...
...the main battery 44 Using the computer for the first time 44 Initial setup 45 Setting up your software 45 Registering your computer with Toshiba 45 To Shut down your computer 46 To Restart your computer 46 To place your computer in Sleep mode 47 Adding optional external ...(optional 48 Installing a memory module 48 Removing a memory module 54 Checking total memory 56 Recovering the Internal Storage Drive 57 Creating recovery media 58 Restoring from recovery media 60 Refresh your PC (with user's data 61 Reset your PC 64 Installing drivers and applications 66 Using the touch pad ...
User Guide
Page 26
26 Contents Chapter 5: Utilities 113 Desktop Assist 114 Media & Entertainment 115 Tools & Utilities 116 Support & Recovery 117 eco Utility 118 Setting passwords 119 Using a supervisor password 119 Using a user password 121 Deleting a user password 121 System Settings 122 Sleep... 125 Sleep and Music 126 HDD Protection Utility 127 Function Key 128 PC Diagnostic Tool Utility 129 PC Health Monitor 130 Recovery Media Creator 131 Service Station 131 TOSHIBA Application Installer 132 Chapter 6: If Something Goes Wrong 133 Problems that are easy to fix 133 Problems when you turn ...
26 Contents Chapter 5: Utilities 113 Desktop Assist 114 Media & Entertainment 115 Tools & Utilities 116 Support & Recovery 117 eco Utility 118 Setting passwords 119 Using a supervisor password 119 Using a user password 121 Deleting a user password 121 System Settings 122 Sleep... 125 Sleep and Music 126 HDD Protection Utility 127 Function Key 128 PC Diagnostic Tool Utility 129 PC Health Monitor 130 Recovery Media Creator 131 Service Station 131 TOSHIBA Application Installer 132 Chapter 6: If Something Goes Wrong 133 Problems that are easy to fix 133 Problems when you turn ...
User Guide
Page 57
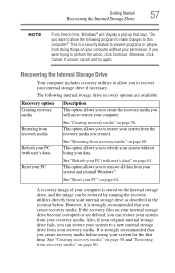
...PC See "Refresh your PC (with user's data) See "Restoring from recovery media" on your internal storage drive become corrupted or are available: Recovery option Creating recovery media Description This option allows you to create the recovery media you will display a pop-up that you want to allow you to...PC" on page 60. See "Reset your system and reinstall Windows®. However, it is a security feature to remove all data from recovery media" on page 64. Also, if your internal storage drive as described in the sections below. This option allows you to restore your system...
...PC See "Refresh your PC (with user's data) See "Restoring from recovery media" on your internal storage drive become corrupted or are available: Recovery option Creating recovery media Description This option allows you to create the recovery media you will display a pop-up that you want to allow you to...PC" on page 60. See "Reset your system and reinstall Windows®. However, it is a security feature to remove all data from recovery media" on page 64. Also, if your internal storage drive as described in the sections below. This option allows you to restore your system...
User Guide
Page 58
...external media using Windows® or another backup program. You will need for storing your work " on page 82. If the recovery files on your internal storage drive become corrupted or are deleted, you can restore your system from this process. for storing the... recovery files varies by computer model. NOTE During the recovery process your recovery media. Any files that you created are not restored during this media. The amount of a certain minimum ...
...external media using Windows® or another backup program. You will need for storing your work " on page 82. If the recovery files on your internal storage drive become corrupted or are deleted, you can restore your system from this process. for storing the... recovery files varies by computer model. NOTE During the recovery process your recovery media. Any files that you created are not restored during this media. The amount of a certain minimum ...
User Guide
Page 59
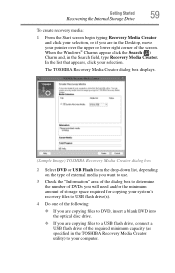
...; Charms appear click the Search ( ) Charm and, in the TOSHIBA Recovery Media Creator utility) to a USB flash drive, connect a USB flash drive of the required minimum capacity (as specified in the Search field, type Recovery Media Creator. In the list that appears, click your pointer over the...a blank DVD into the optical disc drive. ❖ If you are in the Desktop, move your selection. The TOSHIBA Recovery Media Creator dialog box displays. (Sample Image) TOSHIBA Recovery Media Creator dialog box 2 Select DVD or USB Flash from the drop-down list, depending on the type of external...
...; Charms appear click the Search ( ) Charm and, in the TOSHIBA Recovery Media Creator utility) to a USB flash drive, connect a USB flash drive of the required minimum capacity (as specified in the Search field, type Recovery Media Creator. In the list that appears, click your pointer over the...a blank DVD into the optical disc drive. ❖ If you are in the Desktop, move your selection. The TOSHIBA Recovery Media Creator dialog box displays. (Sample Image) TOSHIBA Recovery Media Creator dialog box 2 Select DVD or USB Flash from the drop-down list, depending on the type of external...
User Guide
Page 60
...you restore your external media to another backup program. For example, if your original internal storage drive fails, you can restore your system from recovery media" on page 60. For more information, see "Backing up your work " on page 82). 60 Getting Started Recovering the Internal ...DVDs or USB flash drive(s) will know in which order to label each DVD in the TOSHIBA Recovery Media Creator utility dialog box. 6 Follow the on-screen prompts to external media using the Recovery media you can restore your system, you have created to complete the copy process. Restoring...
...you restore your external media to another backup program. For example, if your original internal storage drive fails, you can restore your system from recovery media" on page 60. For more information, see "Backing up your work " on page 82). 60 Getting Started Recovering the Internal ...DVDs or USB flash drive(s) will know in which order to label each DVD in the TOSHIBA Recovery Media Creator utility dialog box. 6 Follow the on-screen prompts to external media using the Recovery media you can restore your system, you have created to complete the copy process. Restoring...
User Guide
Page 61
...F12 key immediately after pressing the power button. NOTE During the recovery process your computer must be deleted and rewritten. For more information, see "Backing up your data. Please make a complete back up . Toshiba does not guarantee successful data back-up of the following: &#...10070; If your recovery files are on DVDs, insert the first recovery DVD into your optical disc drive. ❖ If your recovery files are using, and then press the ENTER key...
...F12 key immediately after pressing the power button. NOTE During the recovery process your computer must be deleted and rewritten. For more information, see "Backing up your data. Please make a complete back up . Toshiba does not guarantee successful data back-up of the following: &#...10070; If your recovery files are on DVDs, insert the first recovery DVD into your optical disc drive. ❖ If your recovery files are using, and then press the ENTER key...

User Guide
Page 62
... "Refresh your PC without affecting your pointer over the upper or lower right corner of the data will be moved to this folder during the recovery process, however the current directory structure will be retained. 1 From the Start or Desktop screen, move your files," and click Get Started. 62 Getting Started...
... "Refresh your PC without affecting your pointer over the upper or lower right corner of the data will be moved to this folder during the recovery process, however the current directory structure will be retained. 1 From the Start or Desktop screen, move your files," and click Get Started. 62 Getting Started...
User Guide
Page 63
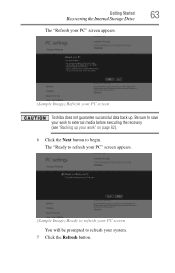
The "Ready to refresh your PC" screen appears. (Sample Image) Ready to refresh your PC screen You will be prompted to begin. Getting Started 63 Recovering the Internal Storage Drive The "Refresh your PC" screen appears. (Sample Image) Refresh your system. 7 Click the Refresh button. Be sure to save your work to external media before executing the recovery (see "Backing up your work" on page 82). 6 Click the Next button to refresh your PC screen Toshiba does not guarantee successful data back up.
The "Ready to refresh your PC" screen appears. (Sample Image) Ready to refresh your PC screen You will be prompted to begin. Getting Started 63 Recovering the Internal Storage Drive The "Refresh your PC" screen appears. (Sample Image) Refresh your system. 7 Click the Refresh button. Be sure to save your work to external media before executing the recovery (see "Backing up your work" on page 82). 6 Click the Next button to refresh your PC screen Toshiba does not guarantee successful data back up.
User Guide
Page 64
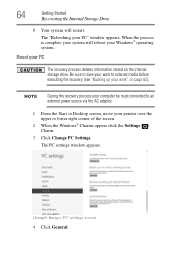
Reset your work to external media before executing the recovery (see "Backing up your PC The recovery process deletes information stored on page 82). Be sure to an external power source via the AC adaptor. 1 From the Start or Desktop screen, move ... upper or lower right corner of the screen. 2 When the Windows® Charms appear click the Settings ( ) Charm. 3 Click Change PC Settings. NOTE During the recovery process your computer be must connected to save your work " on the internal storage drive. When the process is complete your system will restart.
Reset your work to external media before executing the recovery (see "Backing up your PC The recovery process deletes information stored on page 82). Be sure to an external power source via the AC adaptor. 1 From the Start or Desktop screen, move ... upper or lower right corner of the screen. 2 When the Windows® Charms appear click the Settings ( ) Charm. 3 Click Change PC Settings. NOTE During the recovery process your computer be must connected to save your work " on the internal storage drive. When the process is complete your system will restart.

User Guide
Page 82
... save your work Back up several files at regular intervals. TECHNICAL NOTE: Your optical disc drive is one time, use a high-capacity file recovery system, such as an external hard drive. Digital versatile discs (DVDs) provide a significant increase in the format of computing. The drive will ..., the drive will allow you to play DVDs from region 1 to region 2 and back to use the Microsoft® Windows® file recovery program preinstalled on the computer's internal storage drive. You may take a considerable amount of media such as two changes. You can back up ...
... save your work Back up several files at regular intervals. TECHNICAL NOTE: Your optical disc drive is one time, use a high-capacity file recovery system, such as an external hard drive. Digital versatile discs (DVDs) provide a significant increase in the format of computing. The drive will ..., the drive will allow you to play DVDs from region 1 to region 2 and back to use the Microsoft® Windows® file recovery program preinstalled on the computer's internal storage drive. You may take a considerable amount of media such as two changes. You can back up ...

User Guide
Page 114
114 Utilities Desktop Assist ❖ PC Health Monitor ❖ Recovery Media Creator ❖ Service Station ❖ TOSHIBA Application Installer Desktop Assist The Desktop Assist provides quick access to computer functions and allows you to customize a range of computer settings. To access Desktop ... icon. The Desktop Assist window appears. (Sample Image) Desktop Assist window The Desktop Assist offers several options: ❖ Media & Entertainment ❖ Tools & Utilities ❖ Support & Recovery
114 Utilities Desktop Assist ❖ PC Health Monitor ❖ Recovery Media Creator ❖ Service Station ❖ TOSHIBA Application Installer Desktop Assist The Desktop Assist provides quick access to computer functions and allows you to customize a range of computer settings. To access Desktop ... icon. The Desktop Assist window appears. (Sample Image) Desktop Assist window The Desktop Assist offers several options: ❖ Media & Entertainment ❖ Tools & Utilities ❖ Support & Recovery
User Guide
Page 117
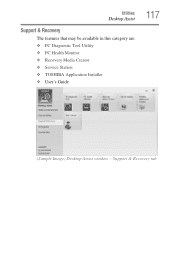
Utilities Desktop Assist Support & Recovery The features that may be available in this category are: ❖ PC Diagnostic Tool Utility ❖ PC Health Monitor ❖ Recovery Media Creator ❖ Service Station ❖ TOSHIBA Application Installer ❖ User's Guide 117 (Sample Image) Desktop Assist window - Support & Recovery tab
Utilities Desktop Assist Support & Recovery The features that may be available in this category are: ❖ PC Diagnostic Tool Utility ❖ PC Health Monitor ❖ Recovery Media Creator ❖ Service Station ❖ TOSHIBA Application Installer ❖ User's Guide 117 (Sample Image) Desktop Assist window - Support & Recovery tab
User Guide
Page 129
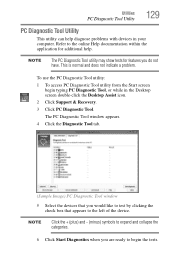
... Diagnostic Tool utility may show tests for additional help diagnose problems with devices in the Desktop screen double-click the Desktop Assist icon. 2 Click Support & Recovery. 3 Click PC Diagnostic Tool. NOTE Click the + (plus) and - (minus) symbols to expand and collapse the categories. 6 Click Start Diagnostics when you do not have...
... Diagnostic Tool utility may show tests for additional help diagnose problems with devices in the Desktop screen double-click the Desktop Assist icon. 2 Click Support & Recovery. 3 Click PC Diagnostic Tool. NOTE Click the + (plus) and - (minus) symbols to expand and collapse the categories. 6 Click Start Diagnostics when you do not have...

User Guide
Page 131
... Station will alert you when updates are available, and you can be used to return your computer. Utilities Recovery Media Creator 131 Recovery Media Creator The Recovery Media Creator utility enables you to create recovery media that can then choose to install the updates if you wish. For detailed information on using the utility...
... Station will alert you when updates are available, and you can be used to return your computer. Utilities Recovery Media Creator 131 Recovery Media Creator The Recovery Media Creator utility enables you to create recovery media that can then choose to install the updates if you wish. For detailed information on using the utility...

User Guide
Page 132
... Desktop screen double-click the Desktop Assist icon. 2 Click Support & Recovery. 3 Click TOSHIBA Application Installer. The TOSHIBA Application Installer window appears. 4 Click Next. (Sample Image) TOSHIBA Application Installer screen 5 Click the item you to complete the installation process. 132 Utilities TOSHIBA Application Installer TOSHIBA Application Installer The TOSHIBA Application Installer allows you want to install. (Sample Image...
... Desktop screen double-click the Desktop Assist icon. 2 Click Support & Recovery. 3 Click TOSHIBA Application Installer. The TOSHIBA Application Installer window appears. 4 Click Next. (Sample Image) TOSHIBA Application Installer screen 5 Click the item you to complete the installation process. 132 Utilities TOSHIBA Application Installer TOSHIBA Application Installer The TOSHIBA Application Installer allows you want to install. (Sample Image...
User Guide
Page 135
... the computer on, insert the battery, and then leave the computer running on the computer 135 The computer displays the WARNING RESUME FAILURE/Windows Error Recovery - This can be interrupted, and the AC power light will be replaced. If the computer starts normally, the AC adaptor may be affected. Leave the...
... the computer on, insert the battery, and then leave the computer running on the computer 135 The computer displays the WARNING RESUME FAILURE/Windows Error Recovery - This can be interrupted, and the AC power light will be replaced. If the computer starts normally, the AC adaptor may be affected. Leave the...
User Guide
Page 138
... installed during the Windows® boot process: ❖ Enable low resolution video mode Restarts Windows® using a specific image provided by the user System Image Recovery Windows® will automatically look for advanced users. Command Prompt The command prompt is a very powerful tool for problems and repair them if possible. Startup...
... installed during the Windows® boot process: ❖ Enable low resolution video mode Restarts Windows® using a specific image provided by the user System Image Recovery Windows® will automatically look for advanced users. Command Prompt The command prompt is a very powerful tool for problems and repair them if possible. Startup...

User Guide
Page 148
... press the manual eject button. Press gently until it from ejecting. If you need to remove a disc and cannot turn on the computer (for file recovery procedures. Many software packages automatically create backup files. Replace the disc in the drive. Make sure the computer is connected to the optical disc drive...
... press the manual eject button. Press gently until it from ejecting. If you need to remove a disc and cannot turn on the computer (for file recovery procedures. Many software packages automatically create backup files. Replace the disc in the drive. Make sure the computer is connected to the optical disc drive...


