User Guide
Page 46
... computer. ❖ Always operate your computer or AC adaptor near a heat source, such as an electric blanket or heater. ❖ Never cover or block the air vents including those located at the base of the computer. To use it. These components include, but are protected from ...overheating when the power is turned on the computer. In this condition, observe the following: ❖ Never cover your computer or AC adaptor with your computer or AC adaptor could cause system failure, computer or AC adaptor damage or a fire, possibly resulting...
... computer. ❖ Always operate your computer or AC adaptor near a heat source, such as an electric blanket or heater. ❖ Never cover or block the air vents including those located at the base of the computer. To use it. These components include, but are protected from ...overheating when the power is turned on the computer. In this condition, observe the following: ❖ Never cover your computer or AC adaptor with your computer or AC adaptor could cause system failure, computer or AC adaptor damage or a fire, possibly resulting...
User Guide
Page 53
... Started Adding memory (optional) 53 ❖ Install an ExpressCard® (see the accessories information packaged with your system or visit accessories.toshiba.com. The surrounding area may damage the computer, the module, or both. Installing a memory module with enough memory to increase the computer...also be hot. To avoid damaging the computer's screws, use complex software or process large amounts of data. Avoid touching the cover, the module(s), and the surrounding area before replacing it. If the computer has been running recently, the memory module(s) may...
... Started Adding memory (optional) 53 ❖ Install an ExpressCard® (see the accessories information packaged with your system or visit accessories.toshiba.com. The surrounding area may damage the computer, the module, or both. Installing a memory module with enough memory to increase the computer...also be hot. To avoid damaging the computer's screws, use complex software or process large amounts of data. Avoid touching the cover, the module(s), and the surrounding area before replacing it. If the computer has been running recently, the memory module(s) may...
User Guide
Page 55
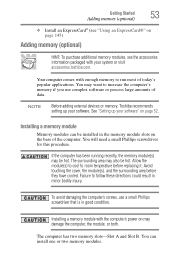
... (optional) 55 Memory module slot cover Back of computer (Sample Illustration) Removing the memory module slot cover 7 Remove the memory module slot cover. 8 Place the screws and the cover in a safe place so that secure the memory module slot cover. Back of computer (Sample Illustration)... Locating the memory module slot cover 6 Using a small Phillips screwdriver, ...
... (optional) 55 Memory module slot cover Back of computer (Sample Illustration) Removing the memory module slot cover 7 Remove the memory module slot cover. 8 Place the screws and the cover in a safe place so that secure the memory module slot cover. Back of computer (Sample Illustration)... Locating the memory module slot cover 6 Using a small Phillips screwdriver, ...
User Guide
Page 58
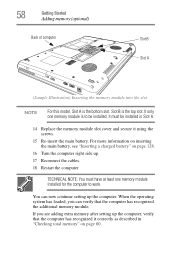
... a charged battery" on page 60. You can verify that the computer has recognized it correctly as described in Slot A. 14 Replace the memory module slot cover and secure it must be installed in "Checking total memory" on page 128. 16 Turn the computer right side up. 17 Reconnect the cables. 18...
... a charged battery" on page 60. You can verify that the computer has recognized it correctly as described in Slot A. 14 Replace the memory module slot cover and secure it must be installed in "Checking total memory" on page 128. 16 Turn the computer right side up. 17 Reconnect the cables. 18...
User Guide
Page 59
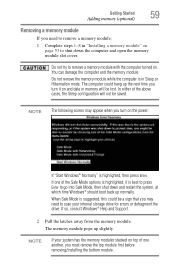
... "Start Windows® Normally" is best to press Enter to go into Safe Mode, then shut down the computer and open the memory module slot cover. NOTE The following screen may need to remove a memory module: 1 Complete steps 1-8 in "Installing a memory module" on . Getting Started Adding memory (optional) 59 Removing a memory...
... "Start Windows® Normally" is best to press Enter to go into Safe Mode, then shut down the computer and open the memory module slot cover. NOTE The following screen may need to remove a memory module: 1 Complete steps 1-8 in "Installing a memory module" on . Getting Started Adding memory (optional) 59 Removing a memory...
User Guide
Page 60
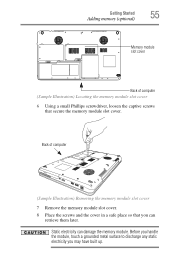
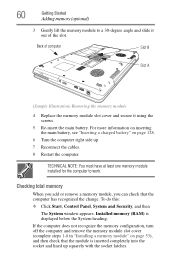
... Reconnect the cables. 8 Restart the computer. If the computer does not recognize the memory configuration, turn off the computer and remove the memory module slot cover (complete steps 1-8 in "Installing a memory module" on page 128. 6 Turn the computer right side up squarely with the socket latches. For more ... then The System window appears. Back of computer Slot B Slot A (Sample Illustration) Removing the memory module 4 Replace the memory module slot cover and secure it out of the slot. 60 Getting Started Adding memory (optional) 3 Gently lift the memory module to work.
... Reconnect the cables. 8 Restart the computer. If the computer does not recognize the memory configuration, turn off the computer and remove the memory module slot cover (complete steps 1-8 in "Installing a memory module" on page 128. 6 Turn the computer right side up squarely with the socket latches. For more ... then The System window appears. Back of computer Slot B Slot A (Sample Illustration) Removing the memory module 4 Replace the memory module slot cover and secure it out of the slot. 60 Getting Started Adding memory (optional) 3 Gently lift the memory module to work.
User Guide
Page 110
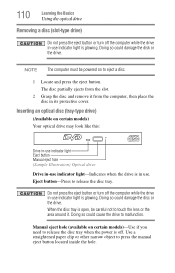
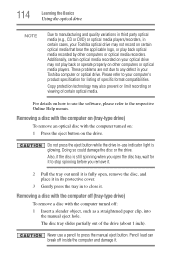
The disc partially ejects from the computer, then place the disc in its protective cover. Doing so could damage the disc or the drive. NOTE The computer must be careful not to touch the lens or the area around it ...
The disc partially ejects from the computer, then place the disc in its protective cover. Doing so could damage the disc or the drive. NOTE The computer must be careful not to touch the lens or the area around it ...
User Guide
Page 114
...Due to manufacturing and quality variations in third party optical media (e.g., CD or DVD) or optical media players/recorders, in certain cases, your Toshiba optical drive may not record on other computers or optical media recorders. Also, if the disc is still spinning when you open , remove... the disc, and place it in its protective cover. 3 Gently press the tray in your Toshiba computer or optical drive. Pencil lead can break off : 1 Insert a slender object, such as a straightened paper clip, into ...
...Due to manufacturing and quality variations in third party optical media (e.g., CD or DVD) or optical media players/recorders, in certain cases, your Toshiba optical drive may not record on other computers or optical media recorders. Also, if the disc is still spinning when you open , remove... the disc, and place it in its protective cover. 3 Gently press the tray in your Toshiba computer or optical drive. Pencil lead can break off : 1 Insert a slender object, such as a straightened paper clip, into ...
User Guide
Page 115
..., moisten the cloth with a clean, dry cloth. These sites provide information about Toshiba products, give help with future upgrades. For more information, see "Contacting Toshiba" on the surface can connect. Toshiba's online resources Toshiba maintains a number of online sites to direct sunlight or extreme heat or cold. ... and wipe toward the outward edge (not in a circle). Learning the Basics Toshiba's online resources 115 2 Pull the tray out until it is fully open, remove the disc, and place it in its protective cover. 3 Gently press the tray in to , or otherwise mar the surface of...
..., moisten the cloth with a clean, dry cloth. These sites provide information about Toshiba products, give help with future upgrades. For more information, see "Contacting Toshiba" on the surface can connect. Toshiba's online resources Toshiba maintains a number of online sites to direct sunlight or extreme heat or cold. ... and wipe toward the outward edge (not in a circle). Learning the Basics Toshiba's online resources 115 2 Pull the tray out until it is fully open, remove the disc, and place it in its protective cover. 3 Gently press the tray in to , or otherwise mar the surface of...
User Guide
Page 116
Chapter 3 Mobile Computing This chapter covers all aspects of these features active, allowing your computer while traveling. We recommend you leave these energy-saving features have been preset by Toshiba. Many of using your computer to operate at its maximum energy efficiency, so that enhance its energy efficiency. Toshiba's energy-saver design Your computer enters a low-power suspension mode when it for longer periods while traveling. 116 It has a number of other features that you can use it is not being used, thereby conserving energy and saving money in the process.
Chapter 3 Mobile Computing This chapter covers all aspects of these features active, allowing your computer while traveling. We recommend you leave these energy-saving features have been preset by Toshiba. Many of using your computer to operate at its maximum energy efficiency, so that enhance its energy efficiency. Toshiba's energy-saver design Your computer enters a low-power suspension mode when it for longer periods while traveling. 116 It has a number of other features that you can use it is not being used, thereby conserving energy and saving money in the process.

User Guide
Page 133
... on page 213. They all provide plenty of carrying cases for more information see "Hot Keys/TOSHIBA Cards" on a sunny ledge or in a place where it could get wet or covered in dust. ❖ Always travel with the computer in "Selecting a place to pass your computer...you may apply. The X-ray equipment will not harm your computer through airport security equipment. For more information or visit Toshiba's Web site at accessories.toshiba.com. See http://www.dtsc.ca.gov/hazardouswaste/perchlorate/ Traveling tips The environmental precautions listed in a carrying case.
... on page 213. They all provide plenty of carrying cases for more information see "Hot Keys/TOSHIBA Cards" on a sunny ledge or in a place where it could get wet or covered in dust. ❖ Always travel with the computer in "Selecting a place to pass your computer...you may apply. The X-ray equipment will not harm your computer through airport security equipment. For more information or visit Toshiba's Web site at accessories.toshiba.com. See http://www.dtsc.ca.gov/hazardouswaste/perchlorate/ Traveling tips The environmental precautions listed in a carrying case.
User Guide
Page 160
...that might arise out of the face recognition software or utility. 160 Utilities TOSHIBA Face Recognition Utility TOSHIBA Face Recognition Utility Your computer may prevent a registrant from being recognized correctly. To locate the help file covers the following topics: ❖ Setting up a Face Recognition account ❖...out unauthorized users at all times. The help file, go to learn more about this utility and what it offers. Toshiba does not guarantee that some changes to the registrant's. If recognition fails, log on to your computer using your Windows®...
...that might arise out of the face recognition software or utility. 160 Utilities TOSHIBA Face Recognition Utility TOSHIBA Face Recognition Utility Your computer may prevent a registrant from being recognized correctly. To locate the help file covers the following topics: ❖ Setting up a Face Recognition account ❖...out unauthorized users at all times. The help file, go to learn more about this utility and what it offers. Toshiba does not guarantee that some changes to the registrant's. If recognition fails, log on to your computer using your Windows®...
User Guide
Page 183
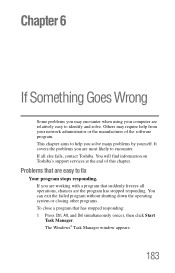
... services at the end of the software program. If you are working with a program that suddenly freezes all else fails, contact Toshiba. Others may encounter when using your network administrator or the manufacturer of this chapter. Problems that has stopped responding: 1 Press Ctrl, Alt, and Del simultaneously (... operating system or closing other programs. To close a program that are the program has stopped responding. The Windows® Task Manager window appears. 183 It covers the problems you are relatively easy to encounter.
... services at the end of the software program. If you are working with a program that suddenly freezes all else fails, contact Toshiba. Others may encounter when using your network administrator or the manufacturer of this chapter. Problems that has stopped responding: 1 Press Ctrl, Alt, and Del simultaneously (... operating system or closing other programs. To close a program that are the program has stopped responding. The Windows® Task Manager window appears. 183 It covers the problems you are relatively easy to encounter.
User Guide
Page 195
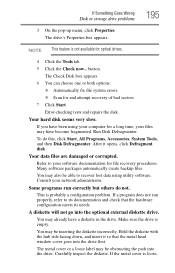
...your files may be inserting the diskette incorrectly. Make sure the drive is not available for file recovery procedures. If the metal cover is probably a configuration problem. Run Disk Defragmenter. After it so that the hardware configuration meets its needs. Refer to its ...Tools, and then Disk Defragmenter. Hold the diskette with the hub side facing down, and insert it opens, click Defragment disk. The metal cover or a loose label may already have a diskette in the drive. The Check Disk box appears. 6 You can choose one or both options...
...your files may be inserting the diskette incorrectly. Make sure the drive is not available for file recovery procedures. If the metal cover is probably a configuration problem. Run Disk Defragmenter. After it so that the hardware configuration meets its needs. Refer to its ...Tools, and then Disk Defragmenter. Hold the diskette with the hub side facing down, and insert it opens, click Defragment disk. The metal cover or a loose label may already have a diskette in the drive. The Check Disk box appears. 6 You can choose one or both options...
User Guide
Page 247
... installing 127, 128 removing 127 safety precautions 130 manual eject hole optical drive 108, 110 memory adding 53 problem solving 190 removing memory module slot cover 55 memory module installation 53 installing inserting into socket 56 removing 59, 60 memory module slot 55 microphone using 143 modem connecting to telephone line...
... installing 127, 128 removing 127 safety precautions 130 manual eject hole optical drive 108, 110 memory adding 53 problem solving 190 removing memory module slot cover 55 memory module installation 53 installing inserting into socket 56 removing 59, 60 memory module slot 55 microphone using 143 modem connecting to telephone line...

