User Guide
Page 46
... shipped with any object. ❖ Never place your computer or AC adaptor near a heat source, such as an electric blanket or heater. ❖ Never cover or block the air vents including those located at the base of the computer. ❖ Always operate your computer on a hard flat surface. 46 Getting... to charge the battery you can block the vents located at the base of the computer. In this condition, observe the following: ❖ Never cover your computer or AC adaptor with your computer on a carpet or other soft material can use external power or to a power outlet (even if ...
... shipped with any object. ❖ Never place your computer or AC adaptor near a heat source, such as an electric blanket or heater. ❖ Never cover or block the air vents including those located at the base of the computer. ❖ Always operate your computer on a hard flat surface. 46 Getting... to charge the battery you can block the vents located at the base of the computer. In this condition, observe the following: ❖ Never cover your computer or AC adaptor with your computer on a carpet or other soft material can use external power or to a power outlet (even if ...
User Guide
Page 53
NOTE Before adding external devices or memory, Toshiba recommends setting up your software" on the base of the computer. The surrounding area may also... Failure to run most of data. Installing a memory module Memory modules can install one or two memory modules. Avoid touching the cover, the module(s), and the surrounding area before replacing it. Getting Started Adding memory (optional) 53 ❖ Install an ExpressCard®... memory module slots on page 52. See "Setting up your system or visit accessories.toshiba.com. The computer has two memory slots-Slot A and Slot B.
NOTE Before adding external devices or memory, Toshiba recommends setting up your software" on the base of the computer. The surrounding area may also... Failure to run most of data. Installing a memory module Memory modules can install one or two memory modules. Avoid touching the cover, the module(s), and the surrounding area before replacing it. Getting Started Adding memory (optional) 53 ❖ Install an ExpressCard®... memory module slots on page 52. See "Setting up your system or visit accessories.toshiba.com. The computer has two memory slots-Slot A and Slot B.
User Guide
Page 55
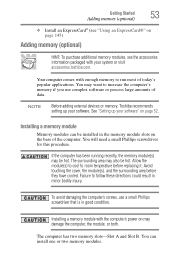
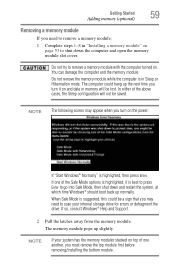
Static electricity can retrieve them later. Back of computer (Sample Illustration) Locating the memory module slot cover 6 Using a small Phillips screwdriver, loosen the captive screws that you may have built up. Before you handle the module, touch a grounded ... electricity you can damage the memory module. Getting Started Adding memory (optional) 55 Memory module slot cover Back of computer (Sample Illustration) Removing the memory module slot cover 7 Remove the memory module slot cover. 8 Place the screws and the cover in a safe place so that secure the memory module slot...
Static electricity can retrieve them later. Back of computer (Sample Illustration) Locating the memory module slot cover 6 Using a small Phillips screwdriver, loosen the captive screws that you may have built up. Before you handle the module, touch a grounded ... electricity you can damage the memory module. Getting Started Adding memory (optional) 55 Memory module slot cover Back of computer (Sample Illustration) Removing the memory module slot cover 7 Remove the memory module slot cover. 8 Place the screws and the cover in a safe place so that secure the memory module slot...
User Guide
Page 58
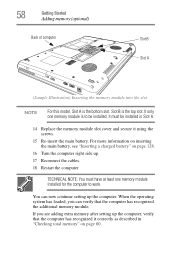
... Re-insert the main battery. You can verify that the computer has recognized it correctly as described in Slot A. 14 Replace the memory module slot cover and secure it must have at least one memory module is to work. When the operating system has loaded, you are adding extra memory after...
... Re-insert the main battery. You can verify that the computer has recognized it correctly as described in Slot A. 14 Replace the memory module slot cover and secure it must have at least one memory module is to work. When the operating system has loaded, you are adding extra memory after...
User Guide
Page 59
... system has the memory modules stacked on page 53 to go into Safe Mode, then shut down the computer and open the memory module slot cover.
... system has the memory modules stacked on page 53 to go into Safe Mode, then shut down the computer and open the memory module slot cover.
User Guide
Page 60
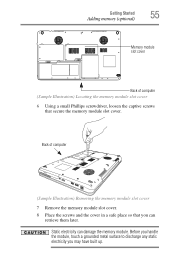
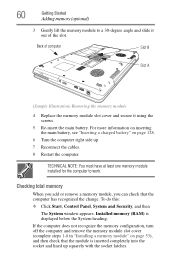
Back of computer Slot B Slot A (Sample Illustration) Removing the memory module 4 Replace the memory module slot cover and secure it out of the slot. To do this: ❖ Click Start, Control Panel, System and Security, and then The System window appears. 60... is displayed below the System heading. If the computer does not recognize the memory configuration, turn off the computer and remove the memory module slot cover (complete steps 1-8 in "Installing a memory module" on page 128. 6 Turn the computer right side up squarely with the socket latches. Installed memory (RAM) is inserted...
Back of computer Slot B Slot A (Sample Illustration) Removing the memory module 4 Replace the memory module slot cover and secure it out of the slot. To do this: ❖ Click Start, Control Panel, System and Security, and then The System window appears. 60... is displayed below the System heading. If the computer does not recognize the memory configuration, turn off the computer and remove the memory module slot cover (complete steps 1-8 in "Installing a memory module" on page 128. 6 Turn the computer right side up squarely with the socket latches. Installed memory (RAM) is inserted...
User Guide
Page 110
... the computer while the drive in-use indicator light is glowing. The disc partially ejects from the computer, then place the disc in its protective cover.
... the computer while the drive in-use indicator light is glowing. The disc partially ejects from the computer, then place the disc in its protective cover.
User Guide
Page 114
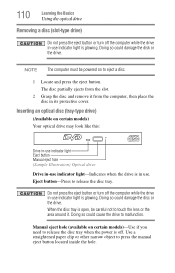
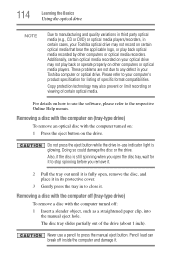
.... Do not press the eject button while the drive in-use indicator light is fully open, remove the disc, and place it in its protective cover. 3 Gently press the tray in to close it . Doing so could damage the disc or the drive. Pencil lead can break off : 1 Insert a slender ... drive NOTE Due to manufacturing and quality variations in third party optical media (e.g., CD or DVD) or optical media players/recorders, in certain cases, your Toshiba optical drive may not record on certain optical media that bear the applicable logo, or play back or operate properly on other computers or optical...
.... Do not press the eject button while the drive in-use indicator light is fully open, remove the disc, and place it in its protective cover. 3 Gently press the tray in to close it . Doing so could damage the disc or the drive. Pencil lead can break off : 1 Insert a slender ... drive NOTE Due to manufacturing and quality variations in third party optical media (e.g., CD or DVD) or optical media players/recorders, in certain cases, your Toshiba optical drive may not record on certain optical media that bear the applicable logo, or play back or operate properly on other computers or optical...
User Guide
Page 115
... them clean. ❖ Do not bend a disc or place heavy objects on top of it. ❖ Do not apply a label to close it. Toshiba's online resources Toshiba maintains a number of online sites to which you up to protect them from the center of , a disc. ❖ Hold a disc by its protective... cover. 3 Gently press the tray in their original containers to date with a clean, dry cloth. The most efficient method to clean it is to ...
... them clean. ❖ Do not bend a disc or place heavy objects on top of it. ❖ Do not apply a label to close it. Toshiba's online resources Toshiba maintains a number of online sites to which you up to protect them from the center of , a disc. ❖ Hold a disc by its protective... cover. 3 Gently press the tray in their original containers to date with a clean, dry cloth. The most efficient method to clean it is to ...
User Guide
Page 116
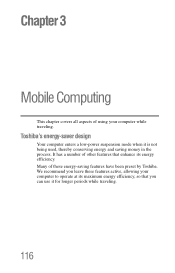
Many of using your computer to operate at its maximum energy efficiency, so that enhance its energy efficiency. Toshiba's energy-saver design Your computer enters a low-power suspension mode when it for longer periods while traveling. 116 We recommend you can use it is not being used, thereby conserving energy and saving money in the process. It has a number of other features that you leave these energy-saving features have been preset by Toshiba. Chapter 3 Mobile Computing This chapter covers all aspects of these features active, allowing your computer while traveling.
Many of using your computer to operate at its maximum energy efficiency, so that enhance its energy efficiency. Toshiba's energy-saver design Your computer enters a low-power suspension mode when it for longer periods while traveling. 116 We recommend you can use it is not being used, thereby conserving energy and saving money in the process. It has a number of other features that you leave these energy-saving features have been preset by Toshiba. Chapter 3 Mobile Computing This chapter covers all aspects of these features active, allowing your computer while traveling.

User Guide
Page 133
....ca.gov/hazardouswaste/perchlorate/ Traveling tips The environmental precautions listed in a carrying case. Toshiba offers a choice of extra space for more information see "Hot Keys/TOSHIBA Cards" on a sunny ledge or in a place where it could get wet or covered in dust. ❖ Always travel with the computer in "Selecting a place to pass...
....ca.gov/hazardouswaste/perchlorate/ Traveling tips The environmental precautions listed in a carrying case. Toshiba offers a choice of extra space for more information see "Hot Keys/TOSHIBA Cards" on a sunny ledge or in a place where it could get wet or covered in dust. ❖ Always travel with the computer in "Selecting a place to pass...
User Guide
Page 160
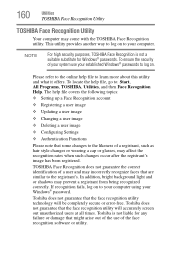
Please refer to the online help file, go to: Start, All Programs, TOSHIBA, Utilities, and then Face Recognition Help. The help file covers the following topics: ❖ Setting up a Face Recognition account ❖ Registering a user image ❖ Updating a user image ❖ Changing a user image ❖ Deleting a user image &#...
Please refer to the online help file, go to: Start, All Programs, TOSHIBA, Utilities, and then Face Recognition Help. The help file covers the following topics: ❖ Setting up a Face Recognition account ❖ Registering a user image ❖ Updating a user image ❖ Changing a user image ❖ Deleting a user image &#...
User Guide
Page 183
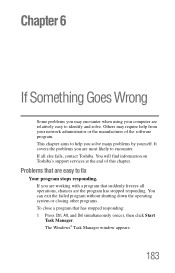
You will find information on Toshiba's support services at the end of the software program. If all operations, chances are the program has stopped responding. You can exit the failed program ...® Task Manager window appears. 183 This chapter aims to help from your computer are working with a program that suddenly freezes all else fails, contact Toshiba. It covers the problems you may require help you are relatively easy to identify and solve.
You will find information on Toshiba's support services at the end of the software program. If all operations, chances are the program has stopped responding. You can exit the failed program ...® Task Manager window appears. 183 This chapter aims to help from your computer are working with a program that suddenly freezes all else fails, contact Toshiba. It covers the problems you may require help you are relatively easy to identify and solve.
User Guide
Page 195
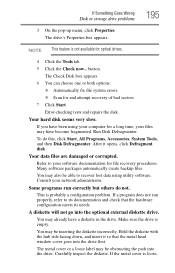
... ❖ Scan for file recovery procedures. Your data files are damaged or corrupted. You may be inserting the diskette incorrectly. If the metal cover is empty. The metal cover or a loose label may be obstructing the path into the drive. If you have a diskette in the drive. If Something Goes Wrong Disk... 3 On the pop-up menu, click Properties. button. After it so that the hardware configuration meets its documentation and check that the metal head window cover goes into the optional external diskette drive. A diskette will not go into the drive first.
... ❖ Scan for file recovery procedures. Your data files are damaged or corrupted. You may be inserting the diskette incorrectly. If the metal cover is empty. The metal cover or a loose label may be obstructing the path into the drive. If you have a diskette in the drive. If Something Goes Wrong Disk... 3 On the pop-up menu, click Properties. button. After it so that the hardware configuration meets its documentation and check that the metal head window cover goes into the optional external diskette drive. A diskette will not go into the drive first.
User Guide
Page 247
... installing 127, 128 removing 127 safety precautions 130 manual eject hole optical drive 108, 110 memory adding 53 problem solving 190 removing memory module slot cover 55 memory module installation 53 installing inserting into socket 56 removing 59, 60 memory module slot 55 microphone using 143 modem connecting to telephone line...
... installing 127, 128 removing 127 safety precautions 130 manual eject hole optical drive 108, 110 memory adding 53 problem solving 190 removing memory module slot cover 55 memory module installation 53 installing inserting into socket 56 removing 59, 60 memory module slot 55 microphone using 143 modem connecting to telephone line...

