User Guide
Page 2
Model: Satellite®/Satellite Pro® P70/P50/P40-A Series Recordable and/or ReWritable Drive(s) and Associated Software Warranty The computer system you must read and follow all set-up and usage instructions in the applicable user guides and/or manuals enclosed or provided electronically. TOSHIBA AMERICA INFORMATION SYSTEMS, INC. ("TOSHIBA"), ITS AFFILIATES AND SUPPLIERS DO NOT...
Model: Satellite®/Satellite Pro® P70/P50/P40-A Series Recordable and/or ReWritable Drive(s) and Associated Software Warranty The computer system you must read and follow all set-up and usage instructions in the applicable user guides and/or manuals enclosed or provided electronically. TOSHIBA AMERICA INFORMATION SYSTEMS, INC. ("TOSHIBA"), ITS AFFILIATES AND SUPPLIERS DO NOT...

User Guide
Page 17
... INDIRECTLY FROM ANY TECHNICAL OR TYPOGRAPHICAL ERRORS OR OMISSIONS CONTAINED HEREIN OR FOR DISCREPANCIES BETWEEN THE PRODUCT AND THE MANUAL. TOSHIBA CORPORATION AND TOSHIBA AMERICA INFORMATION SYSTEMS, INC. (TOSHIBA) PROVIDES NO WARRANTY WITH REGARD TO THIS MANUAL OR ANY OTHER INFORMATION CONTAINED HEREIN AND HEREBY EXPRESSLY DISCLAIMS ANY IMPLIED WARRANTIES OF MERCHANTABILITY OR FITNESS FOR...
... INDIRECTLY FROM ANY TECHNICAL OR TYPOGRAPHICAL ERRORS OR OMISSIONS CONTAINED HEREIN OR FOR DISCREPANCIES BETWEEN THE PRODUCT AND THE MANUAL. TOSHIBA CORPORATION AND TOSHIBA AMERICA INFORMATION SYSTEMS, INC. (TOSHIBA) PROVIDES NO WARRANTY WITH REGARD TO THIS MANUAL OR ANY OTHER INFORMATION CONTAINED HEREIN AND HEREBY EXPRESSLY DISCLAIMS ANY IMPLIED WARRANTIES OF MERCHANTABILITY OR FITNESS FOR...
User Guide
Page 27
Toshiba requires its computer component suppliers to meet RoHS requirements and verifies its retail version (if available), and may not include user manuals or all your home office, purchase products that have earned the ENERGY STAR® for all program functionality. Some software may differ from its suppliers' ...
Toshiba requires its computer component suppliers to meet RoHS requirements and verifies its retail version (if available), and may not include user manuals or all your home office, purchase products that have earned the ENERGY STAR® for all program functionality. Some software may differ from its suppliers' ...
User Guide
Page 29
... situation which , if not avoided, could result in personal injuries, damage to your equipment, or loss of data. Introduction Safety icons 29 Safety icons This manual contains safety instructions that must be observed to avoid potential hazards that could result in death or serious injury. Other icons used in the text.
... situation which , if not avoided, could result in personal injuries, damage to your equipment, or loss of data. Introduction Safety icons 29 Safety icons This manual contains safety instructions that must be observed to avoid potential hazards that could result in death or serious injury. Other icons used in the text.

User Guide
Page 71
... 4 Turn on the side of your computer, and then connect the other end of the cable to your television or display device. Refer to the manual that came with a built-in display, but you must purchase an HDMI™ cable. Using external display devices Your computer comes with the television or...
... 4 Turn on the side of your computer, and then connect the other end of the cable to your television or display device. Refer to the manual that came with a built-in display, but you must purchase an HDMI™ cable. Using external display devices Your computer comes with the television or...
User Guide
Page 84
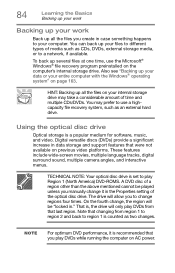
... on your internal storage drive may prefer to a network, if available. HINT: Backing up all the files you create in ." The drive will allow you manually change , the region will only play DVDs while running the computer on AC power.
... on your internal storage drive may prefer to a network, if available. HINT: Backing up all the files you create in ." The drive will allow you manually change , the region will only play DVDs while running the computer on AC power.
User Guide
Page 85
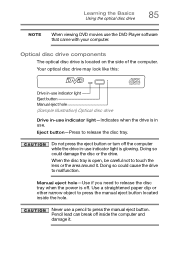
...could cause the drive to malfunction. Learning the Basics Using the optical disc drive 85 NOTE When viewing DVD movies use a pencil to press the manual eject button. Use a straightened paper clip or other narrow object to release the disc tray when the power is glowing. Do not press the ... button located inside the computer and damage it . Your optical disc drive may look like this: Drive in-use indicator light Eject button Manual eject hole (Sample Illustration) Optical disc drive Drive in-use indicator light-Indicates when the drive is in -use indicator light is off the ...
...could cause the drive to malfunction. Learning the Basics Using the optical disc drive 85 NOTE When viewing DVD movies use a pencil to press the manual eject button. Use a straightened paper clip or other narrow object to release the disc tray when the power is glowing. Do not press the ... button located inside the computer and damage it . Your optical disc drive may look like this: Drive in-use indicator light Eject button Manual eject hole (Sample Illustration) Optical disc drive Drive in-use indicator light-Indicates when the drive is in -use indicator light is off the ...
User Guide
Page 87
...❖ Read/write data and multi-media files to your disc, try using this method, try launching the optical disc manually. To do this happens, contact Toshiba support for assistance. For example, if it clicks into the optical disc drive and the Auto-Run feature does not automatically... start your computer's detailed specifications at support.toshiba.com. Recording optical media Depending on the disc. If your computer may jam the drive. Do not stack discs. If this , follow ...
...❖ Read/write data and multi-media files to your disc, try using this method, try launching the optical disc manually. To do this happens, contact Toshiba support for assistance. For example, if it clicks into the optical disc drive and the Auto-Run feature does not automatically... start your computer's detailed specifications at support.toshiba.com. Recording optical media Depending on the disc. If your computer may jam the drive. Do not stack discs. If this , follow ...
User Guide
Page 89
...help with technical questions and keep you can break off : 1 Insert a slender object, such as a straightened paper clip, into the manual eject hole. Learning the Basics Toshiba's online resources 89 Removing a disc with the computer off To remove a disc with the computer turned off inside the computer and damage it...it in its protective cover. 3 Gently press the tray in to close it. Never use a pencil to press the manual eject button. For more information, see "Contacting Toshiba" on page 167. The disc tray slides partially out of online sites to which you up to date with future ...
...help with technical questions and keep you can break off : 1 Insert a slender object, such as a straightened paper clip, into the manual eject hole. Learning the Basics Toshiba's online resources 89 Removing a disc with the computer off To remove a disc with the computer turned off inside the computer and damage it...it in its protective cover. 3 Gently press the tray in to close it. Never use a pencil to press the manual eject button. For more information, see "Contacting Toshiba" on page 167. The disc tray slides partially out of online sites to which you up to date with future ...

User Guide
Page 105
... batteries or how to dispose of them properly. Failure to do so could generate smoke or cause fire or rupture, possibly resulting in the User's Manual. Check with all applicable laws and regulations.
... batteries or how to dispose of them properly. Failure to do so could generate smoke or cause fire or rupture, possibly resulting in the User's Manual. Check with all applicable laws and regulations.

User Guide
Page 106
... - NOTE To enable or disable wireless communication, use the F12 key. special handling may be required to pass your computer. Toshiba offers a choice of the Rechargeable Battery Recycling Corporation, so you may apply. Contact your computer has wireless LAN capability. TECHNICAL ...NOTE: When traveling by sponsoring Call2Recycle™, a program of carrying cases for manuals, power cords, and compact discs. 106 Mobile Computing Traveling tips Toshiba is ON) if your authorized Toshiba representative for free drop-off locations, visit http://www.call2recycle.org/locator/ or...
... - NOTE To enable or disable wireless communication, use the F12 key. special handling may be required to pass your computer. Toshiba offers a choice of the Rechargeable Battery Recycling Corporation, so you may apply. Contact your computer has wireless LAN capability. TECHNICAL ...NOTE: When traveling by sponsoring Call2Recycle™, a program of carrying cases for manuals, power cords, and compact discs. 106 Mobile Computing Traveling tips Toshiba is ON) if your authorized Toshiba representative for free drop-off locations, visit http://www.call2recycle.org/locator/ or...
User Guide
Page 143
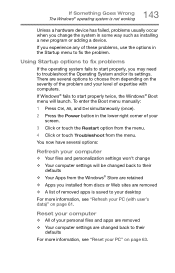
... Windows® fails to start properly, you installed from the menu. If you change ❖ Your computer settings will launch. To enter the Boot menu manually: 1 Press Ctrl, Alt, and Del simultaneously (once). 2 Press the Power button in the lower right corner of your screen. 3 Click or touch the Restart option...
... Windows® fails to start properly, you installed from the menu. If you change ❖ Your computer settings will launch. To enter the Boot menu manually: 1 Press Ctrl, Alt, and Del simultaneously (once). 2 Press the Power button in the lower right corner of your screen. 3 Click or touch the Restart option...
User Guide
Page 144
...: ❖ When new hardware or software is a very powerful tool for problems and repair them if possible. Command Prompt The command prompt is installed ❖ Manually by the user System Image Recovery Windows® will automatically look for advanced users. Startup Settings In previous Operating Systems the majority of options: System...
...: ❖ When new hardware or software is a very powerful tool for problems and repair them if possible. Command Prompt The command prompt is installed ❖ Manually by the user System Image Recovery Windows® will automatically look for advanced users. Startup Settings In previous Operating Systems the majority of options: System...
User Guide
Page 155
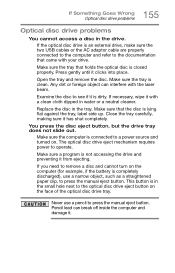
... computer is connected to a power source and turned on the computer (for example, if the battery is completely discharged), use a pencil to press the manual eject button. 155 If Something Goes Wrong Optical disc drive problems Optical disc drive problems You cannot access a disc in the small hole next to... is closed properly. Make sure the tray that came with your drive. Open the tray and remove the disc. Examine the disc to press the manual eject button. Make sure a program is lying flat against the tray, label side up. Never use a narrow object, such as a straightened paper clip, ...
... computer is connected to a power source and turned on the computer (for example, if the battery is completely discharged), use a pencil to press the manual eject button. 155 If Something Goes Wrong Optical disc drive problems Optical disc drive problems You cannot access a disc in the small hole next to... is closed properly. Make sure the tray that came with your drive. Open the tray and remove the disc. Examine the disc to press the manual eject button. Make sure a program is lying flat against the tray, label side up. Never use a narrow object, such as a straightened paper clip, ...
User Guide
Page 161
... experience a problem with the programs and devices you learn about how the computer and its software work together. Data and system configuration backup in the manuals. Click or touch Control Panel from loss. It is much more effective than uninstalling the hardware or software, which often leaves behind unwanted files and...
... experience a problem with the programs and devices you learn about how the computer and its software work together. Data and system configuration backup in the manuals. Click or touch Control Panel from loss. It is much more effective than uninstalling the hardware or software, which often leaves behind unwanted files and...
User Guide
Page 193
...82 moving the computer 75 N network accessing 113 connecting your computer 113 networking wireless 112 notification area 111 notifications 111 O online resources Toshiba 89 optical disc Auto-Run feature 87 handling 87 inserting 86 playing optical media 87 positioning 86 recording optical media 87 removing with computer...optical disc drive components 85 drive in-use indicator light 85 eject button 85 handling an optical disc 87 inserting an optical disc 86 manual eject hole 85 playing optical media 87 recording optical media 87 removing a disc 88, 89 troubleshooting 155 using 84, 85 optical ...
...82 moving the computer 75 N network accessing 113 connecting your computer 113 networking wireless 112 notification area 111 notifications 111 O online resources Toshiba 89 optical disc Auto-Run feature 87 handling 87 inserting 86 playing optical media 87 positioning 86 recording optical media 87 removing with computer...optical disc drive components 85 drive in-use indicator light 85 eject button 85 handling an optical disc 87 inserting an optical disc 86 manual eject hole 85 playing optical media 87 recording optical media 87 removing a disc 88, 89 troubleshooting 155 using 84, 85 optical ...


