

Satellite P30/P35 User's Guide (PDF)
Page 29
... 55 Scrolling with the TouchPad 56 Using the Scroll button 56 Using the Control buttons 56 Disabling or enabling the TouchPad 57 Installing additional memory (optional 58 Removing a memory module 62 Using a mouse 64 Connecting a local printer 64 Setting up your printer 65 Using external display devices 68 Connecting the display device...
... 55 Scrolling with the TouchPad 56 Using the Scroll button 56 Using the Control buttons 56 Disabling or enabling the TouchPad 57 Installing additional memory (optional 58 Removing a memory module 62 Using a mouse 64 Connecting a local printer 64 Setting up your printer 65 Using external display devices 68 Connecting the display device...

Satellite P30/P35 User's Guide (PDF)
Page 32
...145 Setting up a PC Card for your computer .........146 Hot swapping 146 Using the Bridge Media slot 147 Inserting Memory Stick or Memory Stick PRO media 147 Removing Memory Stick or Memory Stick PRO media 148 Inserting an SD™ Card 148 Removing an SD™ Card 149 Inserting an xD...-Picture Card 149 Removing an xD-Picture Card 150 Chapter 5: Toshiba Utilities 151 TOSHIBA Console 151 Customizing Your Computer 152 Network 152 Power ...
...145 Setting up a PC Card for your computer .........146 Hot swapping 146 Using the Bridge Media slot 147 Inserting Memory Stick or Memory Stick PRO media 147 Removing Memory Stick or Memory Stick PRO media 148 Inserting an SD™ Card 148 Removing an SD™ Card 149 Inserting an xD...-Picture Card 149 Removing an xD-Picture Card 150 Chapter 5: Toshiba Utilities 151 TOSHIBA Console 151 Customizing Your Computer 152 Network 152 Power ...
Satellite P30/P35 User's Guide (PDF)
Page 33
... can help you 162 Resolving a hardware conflict 163 A plan of action 163 Resolving hardware conflicts on your own .....164 Fixing a problem with Device Manager ...........165 Memory problems 167 Power and the batteries 168 Keyboard problems 169 Display problems 170 Disk drive problems 172 DVD-ROM or multi-function drive problems...174... Card problems 176 Printer problems 179 Modem problems 180 Develop good computing habits 180 If you need further assistance 181 Before you call 182 Contacting Toshiba 182 Other Toshiba Internet Web sites 183 Toshiba's worldwide offices 184
... can help you 162 Resolving a hardware conflict 163 A plan of action 163 Resolving hardware conflicts on your own .....164 Fixing a problem with Device Manager ...........165 Memory problems 167 Power and the batteries 168 Keyboard problems 169 Display problems 170 Disk drive problems 172 DVD-ROM or multi-function drive problems...174... Card problems 176 Printer problems 179 Modem problems 180 Develop good computing habits 180 If you need further assistance 181 Before you call 182 Contacting Toshiba 182 Other Toshiba Internet Web sites 183 Toshiba's worldwide offices 184
Satellite P30/P35 User's Guide (PDF)
Page 47
See "Connecting to , a mouse, keyboard, printer, memory, and PC Cards. Setting up your software The first time you turn on your computer, the Setup Wizard guides you through steps to set up ...
See "Connecting to , a mouse, keyboard, printer, memory, and PC Cards. Setting up your software The first time you turn on your computer, the Setup Wizard guides you through steps to set up ...
Satellite P30/P35 User's Guide (PDF)
Page 49
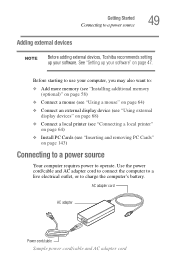
Getting Started Connecting to a power source 49 Adding external devices NOTE Before adding external devices, Toshiba recommends setting up your software" on page 143) Connecting to a power source Your computer requires power to operate. Before starting to use your ... computer's battery. Use the power cord/cable and AC adapter cord to connect the computer to a live electrical outlet, or to : ❖ Add more memory (see "Installing additional memory (optional)" on page 58) ❖ Connect a mouse (see "Using a mouse" on page 64) ❖ Connect an external display device (see "...
Getting Started Connecting to a power source 49 Adding external devices NOTE Before adding external devices, Toshiba recommends setting up your software" on page 143) Connecting to a power source Your computer requires power to operate. Before starting to use your ... computer's battery. Use the power cord/cable and AC adapter cord to connect the computer to a live electrical outlet, or to : ❖ Add more memory (see "Installing additional memory (optional)" on page 58) ❖ Connect a mouse (see "Using a mouse" on page 64) ❖ Connect an external display device (see "...
Satellite P30/P35 User's Guide (PDF)
Page 58
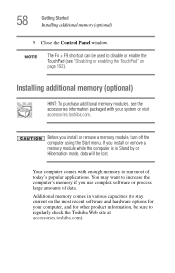
...the Start menu. NOTE The Fn + F9 shortcut can be lost. You may want to regularly check the Toshiba Web site at accessories.toshiba.com). Additional memory comes in Stand by or Hibernation mode, data will be used to stay current on page 192). 58 ... or enable the TouchPad (see the accessories information packaged with enough memory to run most recent software and hardware options for your system or visit accessories.toshiba.com. Installing additional memory (optional) HINT: To purchase additional memory modules, see "Disabling or enabling the TouchPad" on the most ...
...the Start menu. NOTE The Fn + F9 shortcut can be lost. You may want to regularly check the Toshiba Web site at accessories.toshiba.com). Additional memory comes in Stand by or Hibernation mode, data will be used to stay current on page 192). 58 ... or enable the TouchPad (see the accessories information packaged with enough memory to run most recent software and hardware options for your system or visit accessories.toshiba.com. Installing additional memory (optional) HINT: To purchase additional memory modules, see "Disabling or enabling the TouchPad" on the most ...

Satellite P30/P35 User's Guide (PDF)
Page 59
... to the computer. 4 Close the display panel and turn the computer upside down command" on page 99 for this happens, let the memory modules cool to room temperature before you use a standard Phillips no .1 screwdriver for more information. See "Using the Turn off computer.... If you replace them. otherwise, skip to locate the memory module slot cover. If this procedure. Getting Started Installing additional memory (optional) 59 There are two memory slots. To avoid damaging the computer's screws, use the computer for a long time, the...
... to the computer. 4 Close the display panel and turn the computer upside down command" on page 99 for this happens, let the memory modules cool to room temperature before you use a standard Phillips no .1 screwdriver for more information. See "Using the Turn off computer.... If you replace them. otherwise, skip to locate the memory module slot cover. If this procedure. Getting Started Installing additional memory (optional) 59 There are two memory slots. To avoid damaging the computer's screws, use the computer for a long time, the...

Satellite P30/P35 User's Guide (PDF)
Page 60
Sample removing the memory module slot cover 7 Place the cover in a safe place so that secure the expansion memory slot cover, then remove the memory slot cover. 60 Getting Started Installing additional memory (optional) Memory slot cover Sample locating the memory module slot cover 5 Remove the battery (see "Changing the main battery" on page 118). 6 Using a standard Phillips no. 1 screwdriver, unscrew the captive screws that you can retrieve it later.
Sample removing the memory module slot cover 7 Place the cover in a safe place so that secure the expansion memory slot cover, then remove the memory slot cover. 60 Getting Started Installing additional memory (optional) Memory slot cover Sample locating the memory module slot cover 5 Remove the battery (see "Changing the main battery" on page 118). 6 Using a standard Phillips no. 1 screwdriver, unscrew the captive screws that you can retrieve it later.

Satellite P30/P35 User's Guide (PDF)
Page 61
... bar (on the side you may have built up. The memory module should be careful not to discharge any static electricity you insert into the computer). 8 Remove the new memory module from its antistatic packaging. 9 Holding the memory module by its edges so that the gold connector bar faces ...the slot, fit the memory module into the socket. 10 Gently press down on the memory module connector until the clips snap into position. Do not force the memory module into place. To avoid damaging the memory module, be level when secured in place. Sample inserting...
... bar (on the side you may have built up. The memory module should be careful not to discharge any static electricity you insert into the computer). 8 Remove the new memory module from its antistatic packaging. 9 Holding the memory module by its edges so that the gold connector bar faces ...the slot, fit the memory module into the socket. 10 Gently press down on the memory module connector until the clips snap into position. Do not force the memory module into place. To avoid damaging the memory module, be level when secured in place. Sample inserting...

Satellite P30/P35 User's Guide (PDF)
Page 62
... the computer does not recognize the memory, shut down the computer, remove the memory slot cover, and make sure the memory module is seated properly, as described in "'Installing additional memory (optional)'" to shut down the computer and open the memory module cover. 2 Gently push the memory locks outward until the memory module pops up. 3 Carefully pull...
... the computer does not recognize the memory, shut down the computer, remove the memory slot cover, and make sure the memory module is seated properly, as described in "'Installing additional memory (optional)'" to shut down the computer and open the memory module cover. 2 Gently push the memory locks outward until the memory module pops up. 3 Carefully pull...

Satellite P30/P35 User's Guide (PDF)
Page 63
... appears and displays total memory. If the computer does not recognize the memory configuration, turn off the computer, remove the memory slot cover, and make sure the memory module is seated properly, as described in "Installing additional memory (optional)" on page 58. Getting Started Installing additional memory (optional) 63 Sample removing the memory module 4 Complete the procedure...
... appears and displays total memory. If the computer does not recognize the memory configuration, turn off the computer, remove the memory slot cover, and make sure the memory module is seated properly, as described in "Installing additional memory (optional)" on page 58. Getting Started Installing additional memory (optional) 63 Sample removing the memory module 4 Complete the procedure...
Satellite P30/P35 User's Guide (PDF)
Page 72
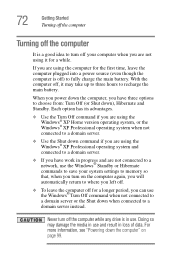
... a domain server instead. 72 Getting Started Turning off the computer Turning off the computer It is a good idea to turn off your system settings to memory so that, when you turn off the computer while any drive is in use the Windows® Standby or Hibernate commands to save your computer...
... a domain server instead. 72 Getting Started Turning off the computer Turning off the computer It is a good idea to turn off your system settings to memory so that, when you turn off the computer while any drive is in use the Windows® Standby or Hibernate commands to save your computer...
Satellite P30/P35 User's Guide (PDF)
Page 75
... saved. If the network you are using goes down and you must restart your computer to reconnect, or your work stays in the computer's temporary memory until you will lose all work " on page 83 for details. 75 HINT: Some programs have an automatic save it to the hard disk at...
... saved. If the network you are using goes down and you must restart your computer to reconnect, or your work stays in the computer's temporary memory until you will lose all work " on page 83 for details. 75 HINT: Some programs have an automatic save it to the hard disk at...

Satellite P30/P35 User's Guide (PDF)
Page 102
... discharges ❖ When starting up than restarting from Standby, because information is being retrieved from the hard disk rather than restoring it from memory Factors to consider when choosing Hibernation: ❖ While in which you start up again, Hibernation uses less time and battery power than does... battery power ❖ Because the mode of the computer to the hard disk. Restoring information from the hard disk takes longer than from memory. When you left it. 102 Learning the Basics Powering down completely, but it first saves the current mode of the system is held...
... discharges ❖ When starting up than restarting from Standby, because information is being retrieved from the hard disk rather than restoring it from memory Factors to consider when choosing Hibernation: ❖ While in which you start up again, Hibernation uses less time and battery power than does... battery power ❖ Because the mode of the computer to the hard disk. Restoring information from the hard disk takes longer than from memory. When you left it. 102 Learning the Basics Powering down completely, but it first saves the current mode of the system is held...

Satellite P30/P35 User's Guide (PDF)
Page 104
The computer returns to consider when choosing Standby: ❖ While in memory so that, when you restart the computer, you can start it , including all open programs and files you were previously using . Standby holds the current ...
The computer returns to consider when choosing Standby: ❖ While in memory so that, when you restart the computer, you can start it , including all open programs and files you were previously using . Standby holds the current ...

Satellite P30/P35 User's Guide (PDF)
Page 111
...; The battery is low, the real-time clock and calendar may vary by computer model. The RTC battery powers the System Time Clock and BIOS memory used to its full capacity, wait until it maintains this information for 24 hours. When fully charged, it reaches room temperature. ❖ The battery is...
...; The battery is low, the real-time clock and calendar may vary by computer model. The RTC battery powers the System Time Clock and BIOS memory used to its full capacity, wait until it maintains this information for 24 hours. When fully charged, it reaches room temperature. ❖ The battery is...
Satellite P30/P35 User's Guide (PDF)
Page 118
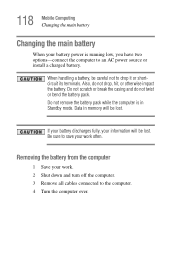
... battery Changing the main battery When your information will be lost . Data in Standby mode. If your battery discharges fully, your battery power is in memory will be careful not to the computer. 4 Turn the computer over. Be sure to an AC power source or install a charged battery. Do not remove...
... battery Changing the main battery When your information will be lost . Data in Standby mode. If your battery discharges fully, your battery power is in memory will be careful not to the computer. 4 Turn the computer over. Be sure to an AC power source or install a charged battery. Do not remove...

Satellite P30/P35 User's Guide (PDF)
Page 143
...: ❖ One Type I or Type II cards. Inserting and removing PC Cards PC Cards expand your computer, but are likely to the PCMCIA (Personal Computer Memory Card International Association) standard. You can work with your computer's capabilities and usefulness.
...: ❖ One Type I or Type II cards. Inserting and removing PC Cards PC Cards expand your computer, but are likely to the PCMCIA (Personal Computer Memory Card International Association) standard. You can work with your computer's capabilities and usefulness.

Satellite P30/P35 User's Guide (PDF)
Page 147
... of digital products: digital music players, cellular phones, PDAs, digital cameras, digital video camcorders, etc. Inserting Memory Stick or Memory Stick PRO media 1 Turn the Memory Stick so that the notched corner faces the back of Memory Stick or Memory Stick PRO media, Secure DigitalTM (SDTM) Cards, SmartMedia™ or xDPicture Cards. See "Removing a PC...
... of digital products: digital music players, cellular phones, PDAs, digital cameras, digital video camcorders, etc. Inserting Memory Stick or Memory Stick PRO media 1 Turn the Memory Stick so that the notched corner faces the back of Memory Stick or Memory Stick PRO media, Secure DigitalTM (SDTM) Cards, SmartMedia™ or xDPicture Cards. See "Removing a PC...

Satellite P30/P35 User's Guide (PDF)
Page 148
... out slightly. 3 Grasp the card and pull it . Even when the message "copying..." in the windows disappears, writing to go out. Removing Memory Stick or Memory Stick PRO media 1 Right-click the Safely Remove Hardware icon on the System tray. Inserting an SD™ Card 1 Turn the card so that...Wait for the indicator light to the media might still be in place. 148 Exploring Your Options Using the Bridge Media slot Sample inserting Memory Stick or Memory Stick PRO media Do not remove Memory Stick media while data is safe to remove. 2 Press the card inward to release it straight out.
... out slightly. 3 Grasp the card and pull it . Even when the message "copying..." in the windows disappears, writing to go out. Removing Memory Stick or Memory Stick PRO media 1 Right-click the Safely Remove Hardware icon on the System tray. Inserting an SD™ Card 1 Turn the card so that...Wait for the indicator light to the media might still be in place. 148 Exploring Your Options Using the Bridge Media slot Sample inserting Memory Stick or Memory Stick PRO media Do not remove Memory Stick media while data is safe to remove. 2 Press the card inward to release it straight out.


