
User Guide
Page 26
26 Contents Turning on the power 51 Using the TouchPad 52 Control buttons 52 Disabling or enabling the TouchPad 53 Installing additional memory (optional 54 Removing a memory module 57 Connecting a mouse 58 Connecting a printer 58 Setting up a printer 60 Turning off the computer 63 Caring for your computer 64 Cleaning the computer ...
26 Contents Turning on the power 51 Using the TouchPad 52 Control buttons 52 Disabling or enabling the TouchPad 53 Installing additional memory (optional 54 Removing a memory module 57 Connecting a mouse 58 Connecting a printer 58 Setting up a printer 60 Turning off the computer 63 Caring for your computer 64 Cleaning the computer ...
User Guide
Page 30
... can help you 170 Resolving a hardware conflict 170 A plan of action 171 Resolving hardware conflicts on your own .....171 Fixing a problem with Device Manager ...........172 Memory card problems 174 Power and the batteries 175 Keyboard problems 176 Display problems 177 Disk drive problems 179 DVD-ROM or multi-function drive problems...
... can help you 170 Resolving a hardware conflict 170 A plan of action 171 Resolving hardware conflicts on your own .....171 Fixing a problem with Device Manager ...........172 Memory card problems 174 Power and the batteries 175 Keyboard problems 176 Display problems 177 Disk drive problems 179 DVD-ROM or multi-function drive problems...

User Guide
Page 44
A window will display the message: "How will this computer connect to , a mouse, keyboard, printer, memory, and PC cards. These components include, but are not limited to the internet?" 44 Setting up your computer Setting up your computer TECHNICAL NOTE: You ...
A window will display the message: "How will this computer connect to , a mouse, keyboard, printer, memory, and PC cards. These components include, but are not limited to the internet?" 44 Setting up your computer Setting up your computer TECHNICAL NOTE: You ...

User Guide
Page 46
... a live electrical outlet, or to charge the computer's battery. See "Setting up your computer, you may also want to: ❖ Add more memory (see "Installing additional memory (optional)" on page 54) ❖ Connect a mouse (see "Connecting a mouse" on page 58) ❖ Connect a local printer (see ...44. Before starting to use your software first. 46 Connecting to a power source Adding external devices NOTE Before adding external devices, Toshiba recommends setting up your software" on page 160) Connecting to a power source Your computer requires power to operate. AC adapter Power ...
... a live electrical outlet, or to charge the computer's battery. See "Setting up your computer, you may also want to: ❖ Add more memory (see "Installing additional memory (optional)" on page 54) ❖ Connect a mouse (see "Connecting a mouse" on page 58) ❖ Connect a local printer (see ...44. Before starting to use your software first. 46 Connecting to a power source Adding external devices NOTE Before adding external devices, Toshiba recommends setting up your software" on page 160) Connecting to a power source Your computer requires power to operate. AC adapter Power ...
User Guide
Page 54
... run most recent software and hardware options for your computer, and for a long time, the memory modules will be sure to regularly check the Toshiba Web site at step 1, otherwise skip to stay current on page 88. Additional memory comes in Stand by or Hibernation mode, data will become hot. There are adding...
... run most recent software and hardware options for your computer, and for a long time, the memory modules will be sure to regularly check the Toshiba Web site at step 1, otherwise skip to stay current on page 88. Additional memory comes in Stand by or Hibernation mode, data will become hot. There are adding...
User Guide
Page 55
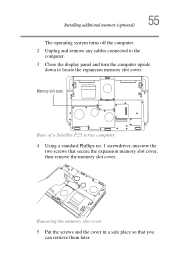
Removing the memory slot cover 5 Put the screws and the cover in a safe place so that secure the expansion memory slot cover, then remove the memory slot cover. Installing additional memory (optional) 55 The operating system turns off the computer. 2 Unplug and remove any cables connected to the computer. 3 Close the display panel and turn the computer upside down to locate the expansion memory slot cover. Memory slot cover Base of a Satellite P25 series computer 4 Using a standard Phillips no. 1 screwdriver, unscrew the two screws that you can retrieve them later.
Removing the memory slot cover 5 Put the screws and the cover in a safe place so that secure the expansion memory slot cover, then remove the memory slot cover. Installing additional memory (optional) 55 The operating system turns off the computer. 2 Unplug and remove any cables connected to the computer. 3 Close the display panel and turn the computer upside down to locate the expansion memory slot cover. Memory slot cover Base of a Satellite P25 series computer 4 Using a standard Phillips no. 1 screwdriver, unscrew the two screws that you can retrieve them later.
User Guide
Page 56
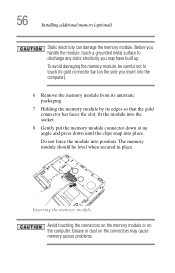
...up. 56 Installing additional memory (optional) Static electricity can damage the memory module. The memory module should be careful not to discharge any static electricity you insert into the computer). 6 Remove the memory module from its antistatic packaging. 7 Holding the memory module by its gold ...connector bar (on the side you may cause memory access problems. Grease or dust on the computer. Before you handle the...
...up. 56 Installing additional memory (optional) Static electricity can damage the memory module. The memory module should be careful not to discharge any static electricity you insert into the computer). 6 Remove the memory module from its antistatic packaging. 7 Holding the memory module by its gold ...connector bar (on the side you may cause memory access problems. Grease or dust on the computer. Before you handle the...
User Guide
Page 57
... you removed. 12 Turn on page 54. 2 Gently push the memory locks outward until the memory module pops up. Removing a memory module 1 Follow steps 1 through 12 in "Installing additional memory (optional)" on page 54. Removing the memory module 3 Gently pull the memory module diagonally to view the recognized memory. 13 If the computer does not recognize the...
... you removed. 12 Turn on page 54. 2 Gently push the memory locks outward until the memory module pops up. Removing a memory module 1 Follow steps 1 through 12 in "Installing additional memory (optional)" on page 54. Removing the memory module 3 Gently pull the memory module diagonally to view the recognized memory. 13 If the computer does not recognize the...
User Guide
Page 58
... so may require you to install the printer software before physically connecting the printer to use a mouse instead of the USB ports. 58 Installing additional memory (optional) Connecting a mouse You may want to your computer. NOTE You must supply the proper printer cable. If you may not function correctly. If your...
... so may require you to install the printer software before physically connecting the printer to use a mouse instead of the USB ports. 58 Installing additional memory (optional) Connecting a mouse You may want to your computer. NOTE You must supply the proper printer cable. If you may not function correctly. If your...
User Guide
Page 59
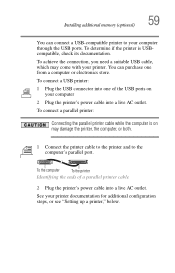
Installing additional memory (optional) 59 You can purchase one of a parallel printer cable 2 Plug the printer's power cable into a live AC outlet. To connect a parallel printer: Connecting the ...
Installing additional memory (optional) 59 You can purchase one of a parallel printer cable 2 Plug the printer's power cable into a live AC outlet. To connect a parallel printer: Connecting the ...

User Guide
Page 63
... use and result in use. Turning off the computer 63 Turning off the computer It is a good idea to turn off your system settings to memory so that, when you turn off the computer while any drive is off) to fully charge the main battery.
... use and result in use. Turning off the computer 63 Turning off the computer It is a good idea to turn off your system settings to memory so that, when you turn off the computer while any drive is off) to fully charge the main battery.

User Guide
Page 66
... have an automatic save feature which you save it to the disk. Your work frequently. This feature saves your work temporarily stays in the computer's memory until you can be configured to the hard disk at preset intervals. See "Power management" on . See your software documentation for example, a system error occurs...
... have an automatic save feature which you save it to the disk. Your work frequently. This feature saves your work temporarily stays in the computer's memory until you can be configured to the hard disk at preset intervals. See "Power management" on . See your software documentation for example, a system error occurs...
User Guide
Page 86
... Turn Off or Shut down uses the most efficient mode if you will be away from your computer for an extended time. ❖ Restarting from memory. Restoring information from the hard disk takes longer than restarting from Stand by because Hibernation command The Hibernation command shuts the computer down completely, but...
... Turn Off or Shut down uses the most efficient mode if you will be away from your computer for an extended time. ❖ Restarting from memory. Restoring information from the hard disk takes longer than restarting from Stand by because Hibernation command The Hibernation command shuts the computer down completely, but...

User Guide
Page 87
.... The battery will be lost . If you power down the computer 87 information is being retrieved from the hard disk instead of the computer in memory so that, when you restart the computer, you can continue working from where you left off. For more quickly" on page 90. For information about...the Stand by mode. Stand By command The Stand by Factors when choosing Stand by: ❖ While in Stand by holds the current state of memory. ❖ When starting up again, the computer returns to save your work first. Stand by mode, the computer uses some battery power.
.... The battery will be lost . If you power down the computer 87 information is being retrieved from the hard disk instead of the computer in memory so that, when you restart the computer, you can continue working from where you left off. For more quickly" on page 90. For information about...the Stand by mode. Stand By command The Stand by Factors when choosing Stand by: ❖ While in Stand by holds the current state of memory. ❖ When starting up again, the computer returns to save your work first. Stand by mode, the computer uses some battery power.

User Guide
Page 93
... by mode more quickly In addition, you first need to indicate the machine is in Toshiba's Power Saver utility. 1 Open the Start menu, then click Control Panel. 2 Click the Performance and Maintenance... icon, and then click the Toshiba Power Management icon. 3 Click the Advanced tab. Going into Stand by mode by 93 The Turn...Stand by mode. Sample Turn off the display, and goes into Stand by mode. Be sure to memory, turns off computer dialog box The computer saves the status of these methods, you can also specify ...
... by mode more quickly In addition, you first need to indicate the machine is in Toshiba's Power Saver utility. 1 Open the Start menu, then click Control Panel. 2 Click the Performance and Maintenance... icon, and then click the Toshiba Power Management icon. 3 Click the Advanced tab. Going into Stand by mode by 93 The Turn...Stand by mode. Sample Turn off the display, and goes into Stand by mode. Be sure to memory, turns off computer dialog box The computer saves the status of these methods, you can also specify ...
User Guide
Page 98
... battery is fully charged, we recommend that the battery charges to store your computer on . The RTC battery powers the System Time Clock and BIOS memory used to its full capacity, wait until the battery discharges completely. When fully charged it reaches room temperature (50 to 80 degrees Fahrenheit, 10 to...
... battery is fully charged, we recommend that the battery charges to store your computer on . The RTC battery powers the System Time Clock and BIOS memory used to its full capacity, wait until the battery discharges completely. When fully charged it reaches room temperature (50 to 80 degrees Fahrenheit, 10 to...
User Guide
Page 104
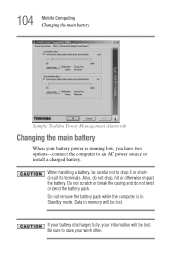
... an AC power source or install a charged battery. Data in Standby mode. 104 Mobile Computing Changing the main battery Sample Toshiba Power Management Alarm tab Changing the main battery When your battery power is in memory will be lost . When handling a battery, be careful not to drop it or shortcircuit its terminals.
... an AC power source or install a charged battery. Data in Standby mode. 104 Mobile Computing Changing the main battery Sample Toshiba Power Management Alarm tab Changing the main battery When your battery power is in memory will be lost . When handling a battery, be careful not to drop it or shortcircuit its terminals.

User Guide
Page 160
... a module into the Modular Bay, simply slide the module all the way into the Modular Bay. Most PC Cards conform to the PCMCIA (Personal Computer Memory Card International Association) standard. Even if your PC Card.
... a module into the Modular Bay, simply slide the module all the way into the Modular Bay. Most PC Cards conform to the PCMCIA (Personal Computer Memory Card International Association) standard. Even if your PC Card.
User Guide
Page 167
... off the computer. When this does not resolve then problem, press Ctrl, Alt, and Del to continue booting. The computer was placed in the computer's memory has been lost. The computer displays the Non-System disk or disk error message.
... off the computer. When this does not resolve then problem, press Ctrl, Alt, and Del to continue booting. The computer was placed in the computer's memory has been lost. The computer displays the Non-System disk or disk error message.
User Guide
Page 171
...devices use the same DMA, the data required by one device at a time. The recommended procedure for adapter cards to bypass the microprocessor and access memory directly. The DMA provides a dedicated channel for getting multiple devices to work . Plug and Play is to add and set up one device overwrites... the data required by the device is easy. Direct Memory Access Similarly, the data required by the other. Plug and Play With Plug and Play and the Windows® XP operating system, avoiding hardware...
...devices use the same DMA, the data required by one device at a time. The recommended procedure for adapter cards to bypass the microprocessor and access memory directly. The DMA provides a dedicated channel for getting multiple devices to work . Plug and Play is to add and set up one device overwrites... the data required by the device is easy. Direct Memory Access Similarly, the data required by the other. Plug and Play With Plug and Play and the Windows® XP operating system, avoiding hardware...


