

User Manual
Page 25
... Contents Keeping yourself comfortable 46 Precautions 49 Setting up your computer 51 Setting up your software 51 Registering your computer with Toshiba ..........53 Adding external devices 53 Connecting the AC adapter 54 Charging the main battery 56 Using the computer for the first...display panel 57 Turning on the power 57 Using the TouchPad 58 Control buttons 59 Disabling or enabling the TouchPad 59 Installing additional memory (optional 60 Removing a memory module 64 Connecting a mouse 65 Connecting a printer 65 Setting up a printer 66 Turning off the computer 70 Caring for ...
... Contents Keeping yourself comfortable 46 Precautions 49 Setting up your computer 51 Setting up your software 51 Registering your computer with Toshiba ..........53 Adding external devices 53 Connecting the AC adapter 54 Charging the main battery 56 Using the computer for the first...display panel 57 Turning on the power 57 Using the TouchPad 58 Control buttons 59 Disabling or enabling the TouchPad 59 Installing additional memory (optional 60 Removing a memory module 64 Connecting a mouse 65 Connecting a printer 65 Setting up a printer 66 Turning off the computer 70 Caring for ...

User Manual
Page 29
... can help you 175 Resolving a hardware conflict 175 A plan of action 176 Resolving hardware conflicts on your own .....176 Fixing a problem with Device Manager ...........177 Memory card problems 179 Power and the batteries 180 Keyboard problems 181
... can help you 175 Resolving a hardware conflict 175 A plan of action 176 Resolving hardware conflicts on your own .....176 Fixing a problem with Device Manager ...........177 Memory card problems 179 Power and the batteries 180 Keyboard problems 181

User Manual
Page 38
...an external device, such as a video camera. The i.LINK® port, also known as the IEEE 1394 port, allows transfers of large quantities of memory. For more information. The two stacked PC Card slots support up to a standard telephone line. The IR (infrared) port provides a cable-free connection ... the modem to a phone line" on a projector or TV that has a compatible infrared port. The SD® card slot holds a stamp-size flash memory card with various capacities of data between your computer. The S-video port lets you play DVD audio and video on page 90. 38 Finding Your...
...an external device, such as a video camera. The i.LINK® port, also known as the IEEE 1394 port, allows transfers of large quantities of memory. For more information. The two stacked PC Card slots support up to a standard telephone line. The IR (infrared) port provides a cable-free connection ... the modem to a phone line" on a projector or TV that has a compatible infrared port. The SD® card slot holds a stamp-size flash memory card with various capacities of data between your computer. The S-video port lets you play DVD audio and video on page 90. 38 Finding Your...

User Manual
Page 43
... lock Primary modular bay lock Wi-Fi Mini PCI Modem cover Expansion memory slot cover The Modular Bays let you insert additional memory. The secondary modular bay is shown in place. The expansion memory slot cover protects the two expansion memory slots where you use . Doing so may damage the media and..., see "Using the Modular Bay" on page 76. For more information, see "Using the numeric keypad overlay" on page 163. See "Installing additional memory (optional)" on the top of data. Finding Your Way Around Underside 43 printed on page 60 for the computer's main battery.
... lock Primary modular bay lock Wi-Fi Mini PCI Modem cover Expansion memory slot cover The Modular Bays let you insert additional memory. The secondary modular bay is shown in place. The expansion memory slot cover protects the two expansion memory slots where you use . Doing so may damage the media and..., see "Using the Modular Bay" on page 76. For more information, see "Using the numeric keypad overlay" on page 163. See "Installing additional memory (optional)" on the top of data. Finding Your Way Around Underside 43 printed on page 60 for the computer's main battery.

User Manual
Page 51
... or internal components to your computer. See Connecting the AC adapter for an internet connection, and you will this computer connect to , a mouse, keyboard, printer, memory, and PC cards. A window will display the message: "How will see the screen "Checking your software. 1 From the welcome screen, click Next to set up...
... or internal components to your computer. See Connecting the AC adapter for an internet connection, and you will this computer connect to , a mouse, keyboard, printer, memory, and PC cards. A window will display the message: "How will see the screen "Checking your software. 1 From the welcome screen, click Next to set up...

User Manual
Page 53
... : ❖ Add more memory (see "Installing additional memory (optional)" on page 60) ❖ Connect a mouse (see "Connecting a mouse" on page 65) ❖ Connect a local printer (see "Connecting a printer" on page 65) ❖ Install PC Cards (see "Using PC Cards" on page 51. Adding external devices Before adding external devices, Toshiba recommends setting up...
... : ❖ Add more memory (see "Installing additional memory (optional)" on page 60) ❖ Connect a mouse (see "Connecting a mouse" on page 65) ❖ Connect a local printer (see "Connecting a printer" on page 65) ❖ Install PC Cards (see "Using PC Cards" on page 51. Adding external devices Before adding external devices, Toshiba recommends setting up...

User Manual
Page 60
60 Getting Started Installing additional memory (optional) The Control Panel window appears. 2 Click Printers and Other Hardware. 3 Click Mouse or press the Fn + F9 hot keys. The Mouse Properties window closes. 8 .... 9 Close the Control Panel window. The Fn + F9 shortcut can be lost. If you install or remove a memory module, turn off the computer using the Start menu. Installing additional memory (optional) Before you install or remove a memory module while the computer is appropriate. 6 Click Apply. 7 Click OK. The Mouse Properties window appears. 4 Click...
60 Getting Started Installing additional memory (optional) The Control Panel window appears. 2 Click Printers and Other Hardware. 3 Click Mouse or press the Fn + F9 hot keys. The Mouse Properties window closes. 8 .... 9 Close the Control Panel window. The Fn + F9 shortcut can be lost. If you install or remove a memory module, turn off the computer using the Start menu. Installing additional memory (optional) Before you install or remove a memory module while the computer is appropriate. 6 Click Apply. 7 Click OK. The Mouse Properties window appears. 4 Click...

User Manual
Page 61
.... See "Using Turn Off or Shut down to locate the expansion memory slot cover. There are adding memory after you have both slots occupied. You need a standard Phillips no . 1 screwdriver that is in various capacities (visit Toshiba's website at step 1, otherwise skip to step 2. 1 Turn off... via the Start menu. Additional memory comes in good condition. If you use the computer, begin at toshiba.com for a long time, the memory modules will become hot. Getting Started Installing additional memory (optional) 61 Your computer comes with enough memory to run most of data. ...
.... See "Using Turn Off or Shut down to locate the expansion memory slot cover. There are adding memory after you have both slots occupied. You need a standard Phillips no . 1 screwdriver that is in various capacities (visit Toshiba's website at step 1, otherwise skip to step 2. 1 Turn off... via the Start menu. Additional memory comes in good condition. If you use the computer, begin at toshiba.com for a long time, the memory modules will become hot. Getting Started Installing additional memory (optional) 61 Your computer comes with enough memory to run most of data. ...
User Manual
Page 62
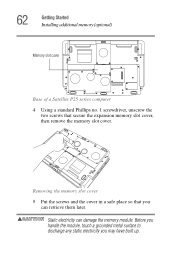
Removing the memory slot cover 5 Put the screws and the cover in a safe place so that secure the expansion memory slot cover, then remove the memory slot cover. 62 Getting Started Installing additional memory (optional) Memory slot cover Base of a Satellite P25 series computer 4 Using a standard Phillips no. 1 screwdriver, unscrew the two screws that you may have built up. Before you handle the module, touch a grounded metal surface to discharge any static electricity you can damage the memory module. Static electricity can retrieve them later.
Removing the memory slot cover 5 Put the screws and the cover in a safe place so that secure the expansion memory slot cover, then remove the memory slot cover. 62 Getting Started Installing additional memory (optional) Memory slot cover Base of a Satellite P25 series computer 4 Using a standard Phillips no. 1 screwdriver, unscrew the two screws that you may have built up. Before you handle the module, touch a grounded metal surface to discharge any static electricity you can damage the memory module. Static electricity can retrieve them later.
User Manual
Page 63
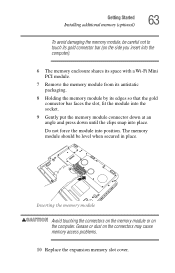
... cover. Do not force the module into place. Getting Started Installing additional memory (optional) 63 To avoid damaging the memory module, be level when secured in place. Grease or dust on the computer. The memory module should be careful not to touch its gold connector bar (on the side you ...insert into the computer). 6 The memory enclosure shares its space with a Wi-Fi Mini PCI module. 7 Remove the memory module from its antistatic packaging. 8 Holding the memory module by its edges so that the gold connector bar faces the slot, fit the...
... cover. Do not force the module into place. Getting Started Installing additional memory (optional) 63 To avoid damaging the memory module, be level when secured in place. Grease or dust on the computer. The memory module should be careful not to touch its gold connector bar (on the side you ...insert into the computer). 6 The memory enclosure shares its space with a Wi-Fi Mini PCI module. 7 Remove the memory module from its antistatic packaging. 8 Holding the memory module by its edges so that the gold connector bar faces the slot, fit the...
User Manual
Page 64
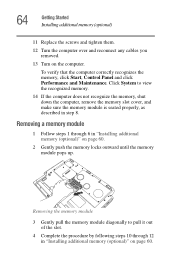
Removing the memory module 3 Gently pull the memory module diagonally to view the recognized memory. 14 If the computer does not recognize the memory, shut down the computer, remove the memory slot cover, and make sure the memory module is seated properly, as described in step 8. Click System to...it out of the slot. 4 Complete the procedure by following steps 10 through 6 in "Installing additional memory (optional)" on the computer. 64 Getting Started Installing additional memory (optional) 11 Replace the screws and tighten them. 12 Turn the computer over and reconnect any cables you...
Removing the memory module 3 Gently pull the memory module diagonally to view the recognized memory. 14 If the computer does not recognize the memory, shut down the computer, remove the memory slot cover, and make sure the memory module is seated properly, as described in step 8. Click System to...it out of the slot. 4 Complete the procedure by following steps 10 through 6 in "Installing additional memory (optional)" on the computer. 64 Getting Started Installing additional memory (optional) 11 Replace the screws and tighten them. 12 Turn the computer over and reconnect any cables you...

User Manual
Page 65
... ECP- Never connect the printer cable while the computer's power is an IEEE 1284 cable. If your printer cable is on. Getting Started Installing additional memory (optional) 65 Connecting a mouse You may damage the printer, the computer, or both. To connect a USB mouse, plug the mouse cable into one from an...
... ECP- Never connect the printer cable while the computer's power is an IEEE 1284 cable. If your printer cable is on. Getting Started Installing additional memory (optional) 65 Connecting a mouse You may damage the printer, the computer, or both. To connect a USB mouse, plug the mouse cable into one from an...

User Manual
Page 70
... the main battery. 70 Getting Started Turning off the computer Turning off the computer It is a good idea to turn off your system settings to memory so that, when you turn off , it may damage the media in use the Windows® Standby or Hibernate commands to save your computer when...
... the main battery. 70 Getting Started Turning off the computer Turning off the computer It is a good idea to turn off your system settings to memory so that, when you turn off , it may damage the media in use the Windows® Standby or Hibernate commands to save your computer when...

User Manual
Page 73
...: Some programs have an automatic save it to the hard disk at preset intervals. Label the backup copies clearly and store them in the computer's memory until you when the battery is running low. This feature saves your files to warn you save feature which you are working. Chapter 3 Learning the...
...: Some programs have an automatic save it to the hard disk at preset intervals. Label the backup copies clearly and store them in the computer's memory until you when the battery is running low. This feature saves your files to warn you save feature which you are working. Chapter 3 Learning the...

User Manual
Page 93
... see "Going into Hibernation mode more quickly" on the hard disk, no data is being retrieved from the hard disk instead of the computer in memory so that, when you restart the computer, you can continue working from where you left off. Stand By command The Stand by mode. Factors when... battery discharges, your data will eventually discharge in Stand by puts the computer into Hibernation mode more time and battery power than restoring it from memory. When you start up again, the computer returns to the state in which you left it, including all open programs and files you were ...
... see "Going into Hibernation mode more quickly" on the hard disk, no data is being retrieved from the hard disk instead of the computer in memory so that, when you restart the computer, you can continue working from where you left off. Stand By command The Stand by mode. Factors when... battery discharges, your data will eventually discharge in Stand by puts the computer into Hibernation mode more time and battery power than restoring it from memory. When you start up again, the computer returns to the state in which you left it, including all open programs and files you were ...

User Manual
Page 98
... all open programs and files to indicate the machine is in Stand by : 1 Click Start, select Turn off computer. The on/off light blinks to memory, turns off computer box appears. 2 Click Stand By.
... all open programs and files to indicate the machine is in Stand by : 1 Click Start, select Turn off computer. The on/off light blinks to memory, turns off computer box appears. 2 Click Stand By.

User Manual
Page 102
... AC power and battery modes. The RTC battery powers the RTC memory, which stores your accessories information that shipped with the power management options preset to a configuration that will need to perform at : toshiba.com. Recharge time varies depending on battery power. To ensure that...battery life" on AC power, either through an AC adapter or a docking station (if applicable to your computer, or visit the Toshiba Web site at maximum capacity and will provide the most stable operating environment and optimum system performance for all batteries. This is turned off...
... AC power and battery modes. The RTC battery powers the RTC memory, which stores your accessories information that shipped with the power management options preset to a configuration that will need to perform at : toshiba.com. Recharge time varies depending on battery power. To ensure that...battery life" on AC power, either through an AC adapter or a docking station (if applicable to your computer, or visit the Toshiba Web site at maximum capacity and will provide the most stable operating environment and optimum system performance for all batteries. This is turned off...
User Manual
Page 165
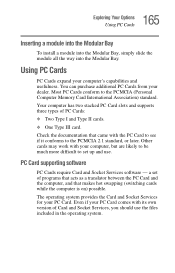
... computer is on) possible. Using PC Cards PC Cards expand your computer, but are likely to be much more difficult to the PCMCIA (Personal Computer Memory Card International Association) standard. Most PC Cards conform to set of programs that acts as a translator between the PC Card and the computer, and that...
... computer is on) possible. Using PC Cards PC Cards expand your computer, but are likely to be much more difficult to the PCMCIA (Personal Computer Memory Card International Association) standard. Most PC Cards conform to set of programs that acts as a translator between the PC Card and the computer, and that...

User Manual
Page 172
... Del to continue booting. The computer displays the WARNING RESUME FAILURE message. Press Enter to restart the computer. The computer was placed in the computer's memory has been lost. Data stored in Standby mode and the battery has discharged. To charge the battery, leave the computer plugged into a live wall outlet...
... Del to continue booting. The computer displays the WARNING RESUME FAILURE message. Press Enter to restart the computer. The computer was placed in the computer's memory has been lost. Data stored in Standby mode and the battery has discharged. To charge the battery, leave the computer plugged into a live wall outlet...

User Manual
Page 176
...provides a dedicated channel for getting multiple devices to work . These channels of communication are commonly referred to bypass the microprocessor and access memory directly. If the system or one device overwrites the data required by one of its attached devices isn't working, resolving the problem can...Plug and Play and the Windows® XP operating system, avoiding hardware conflicts is stored in a specific place or address in memory called the Direct Memory Access (DMA). 176 If Something Goes Wrong Resolving a hardware conflict A plan of action The smooth operation of the system ...
...provides a dedicated channel for getting multiple devices to work . These channels of communication are commonly referred to bypass the microprocessor and access memory directly. If the system or one device overwrites the data required by one of its attached devices isn't working, resolving the problem can...Plug and Play and the Windows® XP operating system, avoiding hardware conflicts is stored in a specific place or address in memory called the Direct Memory Access (DMA). 176 If Something Goes Wrong Resolving a hardware conflict A plan of action The smooth operation of the system ...


