
User Manual
Page 28
... display device 69 Directing the display output when you turn on the computer 72 Adjusting the quality of the external display......74 Using an external keyboard 74 Using a mouse 74 Connecting a printer 74 Setting up a printer 75 Connecting an optional external diskette drive........76 Turning off the computer 77 Options for...
... display device 69 Directing the display output when you turn on the computer 72 Adjusting the quality of the external display......74 Using an external keyboard 74 Using a mouse 74 Connecting a printer 74 Setting up a printer 75 Connecting an optional external diskette drive........76 Turning off the computer 77 Options for...
User Manual
Page 29
... your computer 86 Cleaning the computer 86 Moving the computer 86 Using a computer lock 87 Chapter 2: Learning the Basics 88 Computing tips 88 Using the keyboard 89 Character keys 90 Ctrl, Fn, and Alt keys 90 Function keys 90 Special Windows® keys 91 Starting a program 91 Starting a program from the.../DVD/HD DVD 102 Removing a disc with the computer on...........103 Removing a disc with the computer off ..........103 Caring for CD or DVD discs 104 Toshiba's online resources 104
... your computer 86 Cleaning the computer 86 Moving the computer 86 Using a computer lock 87 Chapter 2: Learning the Basics 88 Computing tips 88 Using the keyboard 89 Character keys 90 Ctrl, Fn, and Alt keys 90 Function keys 90 Special Windows® keys 91 Starting a program 91 Starting a program from the.../DVD/HD DVD 102 Removing a disc with the computer on...........103 Removing a disc with the computer off ..........103 Caring for CD or DVD discs 104 Toshiba's online resources 104
User Manual
Page 32
... help you 179 Resolving a hardware conflict 179 A plan of action 179 Fixing a problem with Device Manager ...........180 Memory problems 181 Power and the batteries 182 Keyboard problems 183 Display problems 184 Disk drive problems 186 Optical drive problems 187 Sound system problems 188 ExpressCard™ problems 189 Printer problems 191 Modem...
... help you 179 Resolving a hardware conflict 179 A plan of action 179 Fixing a problem with Device Manager ...........180 Memory problems 181 Power and the batteries 182 Keyboard problems 183 Display problems 184 Disk drive problems 186 Optical drive problems 187 Sound system problems 188 ExpressCard™ problems 189 Printer problems 191 Modem...
User Manual
Page 33
...backup in the Windows® operating system 197 If you need further assistance 201 Before you contact Toshiba 201 Contacting Toshiba 202 Other Toshiba Internet Web sites 202 Toshiba's worldwide offices 203 Appendix A: Hot Keys/TOSHIBA Cards 205 Hot Key Cards 205 Using the Hot Key Cards 206 Application Cards 207 Using the...brightness 216 Disabling or enabling wireless devices............217 Disabling or enabling the TouchPad™ or Dual Mode Pad 218 Changing screen resolution 219 Keyboard hot key functions 220 Appendix B: Power Cord/Cable Connectors 221 Glossary 222 Index 236
...backup in the Windows® operating system 197 If you need further assistance 201 Before you contact Toshiba 201 Contacting Toshiba 202 Other Toshiba Internet Web sites 202 Toshiba's worldwide offices 203 Appendix A: Hot Keys/TOSHIBA Cards 205 Hot Key Cards 205 Using the Hot Key Cards 206 Application Cards 207 Using the...brightness 216 Disabling or enabling wireless devices............217 Disabling or enabling the TouchPad™ or Dual Mode Pad 218 Changing screen resolution 219 Keyboard hot key functions 220 Appendix B: Power Cord/Cable Connectors 221 Glossary 222 Index 236

User Manual
Page 41
... software When you turn off the power again until the operating system has loaded completely. Your computer contains a rechargeable main battery that needs to , a mouse, keyboard, printer, memory, and PC Cards. To use it. The Windows® operating system checks the system's performance, and then may vary according to your software...
... software When you turn off the power again until the operating system has loaded completely. Your computer contains a rechargeable main battery that needs to , a mouse, keyboard, printer, memory, and PC Cards. To use it. The Windows® operating system checks the system's performance, and then may vary according to your software...
User Manual
Page 42
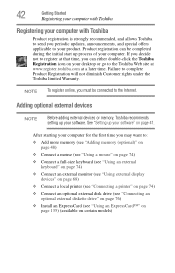
...strongly recommended, and allows Toshiba to send you periodic updates, announcements, and special offers applicable to : ❖ Add more memory (see "Adding memory (optional)" on page 48) ❖ Connect a mouse (see "Using a mouse" on page 74) ❖ Connect a full-size keyboard (see "Using an external keyboard" on page 74)... the initial start up process of your desktop or go to the Internet. If you can be connected to the Toshiba Web site at www.register.toshiba.com at that time, you decide not to register at a later time. Adding optional external devices NOTE Before adding...
...strongly recommended, and allows Toshiba to send you periodic updates, announcements, and special offers applicable to : ❖ Add more memory (see "Adding memory (optional)" on page 48) ❖ Connect a mouse (see "Using a mouse" on page 74) ❖ Connect a full-size keyboard (see "Using an external keyboard" on page 74)... the initial start up process of your desktop or go to the Internet. If you can be connected to the Toshiba Web site at www.register.toshiba.com at that time, you decide not to register at a later time. Adding optional external devices NOTE Before adding...

User Manual
Page 46
Any small bright dots that may not be careful to remove any pens or other objects from the keyboard area before closing the display panel, place one hand on the palm rest to hold the computer in place and use the other hand to ...
Any small bright dots that may not be careful to remove any pens or other objects from the keyboard area before closing the display panel, place one hand on the palm rest to hold the computer in place and use the other hand to ...
User Manual
Page 59
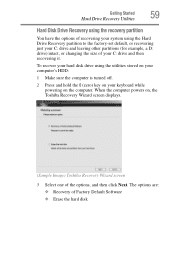
... partition to the factory-set default, or recovering just your C: drive and leaving other partitions (for example, a D: drive) intact, or changing the size of your keyboard while powering on , the Toshiba Recovery Wizard screen displays. (Sample Image) Toshiba Recovery Wizard screen 3 Select one of Factory Default Software ❖ Erase the hard disk
... partition to the factory-set default, or recovering just your C: drive and leaving other partitions (for example, a D: drive) intact, or changing the size of your keyboard while powering on , the Toshiba Recovery Wizard screen displays. (Sample Image) Toshiba Recovery Wizard screen 3 Select one of Factory Default Software ❖ Erase the hard disk
User Manual
Page 60
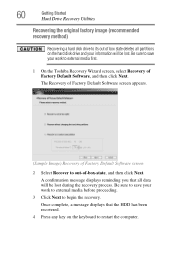
... hard disk drive and your information will be lost during the recovery process. Once complete, a message displays that all partitions on the keyboard to out-of-box-state, and then click Next. 60 Getting Started Hard Drive Recovery Utilities Recovering the original factory image (recommended recovery... be lost . Be sure to save your work to external media before proceeding. 3 Click Next to external media first. 1 On the Toshiba Recovery Wizard screen, select Recovery of Factory Default Software screen 2 Select Recover to restart the computer. Be sure to save your work to ...
... hard disk drive and your information will be lost during the recovery process. Once complete, a message displays that all partitions on the keyboard to out-of-box-state, and then click Next. 60 Getting Started Hard Drive Recovery Utilities Recovering the original factory image (recommended recovery... be lost . Be sure to save your work to external media before proceeding. 3 Click Next to external media first. 1 On the Toshiba Recovery Wizard screen, select Recovery of Factory Default Software screen 2 Select Recover to restart the computer. Be sure to save your work to ...
User Manual
Page 61
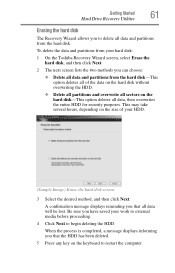
..., depending on the size of the data on the hard disk without overwriting the HDD. ❖ Delete all partitions and overwrite all sectors on the keyboard to restart the computer. To delete the data and partitions from the hard disk-This option deletes all of your hard disk: 1 On the... Toshiba Recovery Wizard screen, select Erase the hard disk, and then click Next. 2 The next screen lists the two methods you that the HDD has been ...
..., depending on the size of the data on the hard disk without overwriting the HDD. ❖ Delete all partitions and overwrite all sectors on the keyboard to restart the computer. To delete the data and partitions from the hard disk-This option deletes all of your hard disk: 1 On the... Toshiba Recovery Wizard screen, select Erase the hard disk, and then click Next. 2 The next screen lists the two methods you that the HDD has been ...
User Manual
Page 62
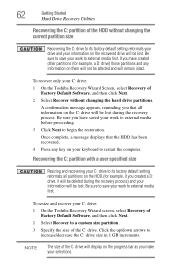
... any information on the recovered drive will be lost. Once complete, a message displays that all partitions on your C: drive: 1 On the Toshiba Recovery Wizard screen, select Recovery of Factory Default Software, and then click Next. 2 Select Recover to its factory default setting reformats all information on...current partition size Recovering the C: drive to a custom size partition. 3 Specify the size of the C: drive. To resize and recover your keyboard to external media first. NOTE The size of the C: drive will not be lost . If you have saved your work to restart the ...
... any information on the recovered drive will be lost. Once complete, a message displays that all partitions on your C: drive: 1 On the Toshiba Recovery Wizard screen, select Recovery of Factory Default Software, and then click Next. 2 Select Recover to its factory default setting reformats all information on...current partition size Recovering the C: drive to a custom size partition. 3 Specify the size of the C: drive. To resize and recover your keyboard to external media first. NOTE The size of the C: drive will not be lost . If you have saved your work to restart the ...

User Manual
Page 63
...burned to CDs or DVDs (refer to "Creating Recovery CDs/DVDs" on page 57): 1 Insert the first recovery CD or DVD into your keyboard to restart the computer. Once complete, a message displays that the HDD has been recovered. 5 Press any key on your optical drive and power...the computer. 2 When the initial screen displays, press F12. The system will boot up to the Toshiba Recovery Wizard screen. 4 Please refer to explain the available recovery options. (Sample Image) Toshiba HDD Recovery Utility screen Getting Started 63 Hard Drive Recovery Utilities 4 Click Next to its default factory ...
...burned to CDs or DVDs (refer to "Creating Recovery CDs/DVDs" on page 57): 1 Insert the first recovery CD or DVD into your keyboard to restart the computer. Once complete, a message displays that the HDD has been recovered. 5 Press any key on your optical drive and power...the computer. 2 When the initial screen displays, press F12. The system will boot up to the Toshiba Recovery Wizard screen. 4 Please refer to explain the available recovery options. (Sample Image) Toshiba HDD Recovery Utility screen Getting Started 63 Hard Drive Recovery Utilities 4 Click Next to its default factory ...
User Manual
Page 64
... were originally bundled with the stroke of a finger. Using the TouchPad™ The TouchPad™, the small, smooth, square cutout located in front of the keyboard, is sensitive to touch and enables you can check its status as follows: 1 Click Start. 2 Right-click Computer. 3 Select Manage. 4 Click Disk ...move your finger on the TouchPad in the lower portion of the screen. Installing drivers and applications (Available on certain models) The Toshiba Application Installer (available on -screen prompts to complete the installation process. Simply move the cursor with your computer.
... were originally bundled with the stroke of a finger. Using the TouchPad™ The TouchPad™, the small, smooth, square cutout located in front of the keyboard, is sensitive to touch and enables you can check its status as follows: 1 Click Start. 2 Right-click Computer. 3 Select Manage. 4 Click Disk ...move your finger on the TouchPad in the lower portion of the screen. Installing drivers and applications (Available on certain models) The Toshiba Application Installer (available on -screen prompts to complete the installation process. Simply move the cursor with your computer.
User Manual
Page 74
... the printer to adjust the video settings. To make the connection, you need to your computer. 74 Getting Started Using an external keyboard Adjusting the quality of the external display To obtain the best picture quality from a computer or electronics store. The external display device... printer documentation may require you must support a resolution of the internal display panel to your computer. TECHNICAL NOTE: To use a full-size keyboard, you can purchase one to match the resolution of the computer's built-in TouchPad. Using a mouse You may not function correctly. If ...
... the printer to adjust the video settings. To make the connection, you need to your computer. 74 Getting Started Using an external keyboard Adjusting the quality of the external display To obtain the best picture quality from a computer or electronics store. The external display device... printer documentation may require you must support a resolution of the internal display panel to your computer. TECHNICAL NOTE: To use a full-size keyboard, you can purchase one to match the resolution of the computer's built-in TouchPad. Using a mouse You may not function correctly. If ...

User Manual
Page 86
...cleaning fluid, out of your battery" on page 119. Customizing your computer's settings There are additional custom settings you were using. See "Toshiba Utilities" on page 114. To keep dust and dirt out of the computer. Moving the computer Before moving your computer. If you place...the display panel, you can customize your computer to suit your particular requirements. For more information, see "Taking care of the computer's keyboard, speaker, and other openings. Never spray cleaner directly onto the computer and/or display. There are several ways in Sleep mode by ...
...cleaning fluid, out of your battery" on page 119. Customizing your computer's settings There are additional custom settings you were using. See "Toshiba Utilities" on page 114. To keep dust and dirt out of the computer. Moving the computer Before moving your computer. If you place...the display panel, you can customize your computer to suit your particular requirements. For more information, see "Taking care of the computer's keyboard, speaker, and other openings. Never spray cleaner directly onto the computer and/or display. There are several ways in Sleep mode by ...

User Manual
Page 89
... character keys, control keys, function keys, and special Windows® keys. (Sample Illustration) Keyboard See "Using and configuring Sleep mode" on page 83 to learn more information, see "Data and system configuration backup in the Windows® operating system" ..., email, or download from or writing to a disk may be lost. This precaution is active. For more about Sleep. Learning the Basics 89 Using the keyboard It is reading from the Internet. ❖ Take frequent breaks to avoid repetitive-motion injuries and eyestrain. ❖ Do not turn off backing up because...
... character keys, control keys, function keys, and special Windows® keys. (Sample Illustration) Keyboard See "Using and configuring Sleep mode" on page 83 to learn more information, see "Data and system configuration backup in the Windows® operating system" ..., email, or download from or writing to a disk may be lost. This precaution is active. For more about Sleep. Learning the Basics 89 Using the keyboard It is reading from the Internet. ❖ Take frequent breaks to avoid repetitive-motion injuries and eyestrain. ❖ Do not turn off backing up because...
User Manual
Page 90
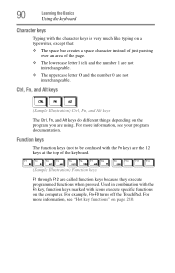
...Used in combination with the Fn key, function keys marked with icons execute specific functions on page 210. 90 Learning the Basics Using the keyboard Character keys Typing with the character keys is very much like typing on a typewriter, except that: ❖ The space bar creates ...a space character instead of just passing over an area of the keyboard. (Sample Illustration) Function keys F1 through F12 are not interchangeable. For more information, see your program documentation. For more information, see "Hot ...
...Used in combination with the Fn key, function keys marked with icons execute specific functions on page 210. 90 Learning the Basics Using the keyboard Character keys Typing with the character keys is very much like typing on a typewriter, except that: ❖ The space bar creates ...a space character instead of just passing over an area of the keyboard. (Sample Illustration) Function keys F1 through F12 are not interchangeable. For more information, see your program documentation. For more information, see "Hot ...

User Manual
Page 91
... program on . Special Windows® keys Learning the Basics 91 Starting a program Windows® Application button key (Sample Illustration) Special Windows® keys Your computer's keyboard has one key and one button that have four options. To find the file, use the Windows® WordPad program as the secondary mouse button...
... program on . Special Windows® keys Learning the Basics 91 Starting a program Windows® Application button key (Sample Illustration) Special Windows® keys Your computer's keyboard has one key and one button that have four options. To find the file, use the Windows® WordPad program as the secondary mouse button...

User Manual
Page 95
...: You only need to the file name that can include spaces. Any file name with a .doc extension. If you connect it. For information on the keyboard, except for your printer as being created in "Setting up a printer" on page 75. Creating your own extension is usually unwise, since the program is...
...: You only need to the file name that can include spaces. Any file name with a .doc extension. If you connect it. For information on the keyboard, except for your printer as being created in "Setting up a printer" on page 75. Creating your own extension is usually unwise, since the program is...

User Manual
Page 99
... following track on . Learning the Basics 99 Using the optical drive Media control buttons (Available on certain models) The media control buttons located above the keyboard let you access the Internet when the computer is powered on. Play/Pause button* Media button* Internet browser button* Stop button* Previous track button* Next...
... following track on . Learning the Basics 99 Using the optical drive Media control buttons (Available on certain models) The media control buttons located above the keyboard let you access the Internet when the computer is powered on. Play/Pause button* Media button* Internet browser button* Stop button* Previous track button* Next...

