

Users Manual Canada; English
Page 50
You can change the Real Time Clock settings in the TOSHIBA Function Key application. Battery types The computer has different types of the screen. You can enable them in the BIOS setup utility. User's Manual 4-5 Battery pack When the AC adaptor is not connected, the computer's main power source is turned off. Real...
You can change the Real Time Clock settings in the TOSHIBA Function Key application. Battery types The computer has different types of the screen. You can enable them in the BIOS setup utility. User's Manual 4-5 Battery pack When the AC adaptor is not connected, the computer's main power source is turned off. Real...
Users Manual Canada; English
Page 56
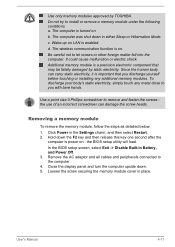
... one second after the computer is power on LAN is on . Additional memory module is important that may be fatally damaged by TOSHIBA. To discharge your body's static electricity, simply touch any metal close to you discharge yourself before touching or installing any additional memory modules...panel and turn the computer upside down. 5. Removing a memory module To remove the memory module, follow the steps as detailed below: 1. In the BIOS setup screen, select Exit -> Disable Built-in place. Wake-up on - d. Since the human body can damage the screw heads. Click Power ...
... one second after the computer is power on LAN is on . Additional memory module is important that may be fatally damaged by TOSHIBA. To discharge your body's static electricity, simply touch any metal close to you discharge yourself before touching or installing any additional memory modules...panel and turn the computer upside down. 5. Removing a memory module To remove the memory module, follow the steps as detailed below: 1. In the BIOS setup screen, select Exit -> Disable Built-in place. Wake-up on - d. Since the human body can damage the screw heads. Click Power ...

Users Manual Canada; English
Page 58
...second after the computer is firmly closed. Slide your fingernail or a thin object under the cover and lift it with the screw. the BIOS setup utility will load. Memory module cover 2. Remove the AC adaptor and all cables and peripherals connected to ensure that the memory module ...cover is power on - Loosen the screw securing the memory module cover in the Settings charm, and then select Restart. 2. 9. In the BIOS setup screen, select Exit -> Disable Built-in place and secure it off. User's Manual 4-13 Take care to the computer. 4. Screw Product appearance...
...second after the computer is firmly closed. Slide your fingernail or a thin object under the cover and lift it with the screw. the BIOS setup utility will load. Memory module cover 2. Remove the AC adaptor and all cables and peripherals connected to ensure that the memory module ...cover is power on - Loosen the screw securing the memory module cover in the Settings charm, and then select Restart. 2. 9. In the BIOS setup screen, select Exit -> Disable Built-in place and secure it off. User's Manual 4-13 Take care to the computer. 4. Screw Product appearance...

Users Manual Canada; English
Page 71
This computer is a BIOS setup utility that provides you a menu-based user interface so that can help you understand your degree of some power consumption to reduce electric power ... way you work with AC adapter connected as a cache. Furthermore, this utility, click Desktop -> Desktop Assist -> Tools & Utilities -> System Settings > HDD Accelerator. TOSHIBA System Settings TOSHIBA HDD Accelerator TOSHIBA Setup Utility TOSHIBA eco Utility This utility allows you to customize your hardware settings according to the environment. The battery will not be extended properly...
This computer is a BIOS setup utility that provides you a menu-based user interface so that can help you understand your degree of some power consumption to reduce electric power ... way you work with AC adapter connected as a cache. Furthermore, this utility, click Desktop -> Desktop Assist -> Tools & Utilities -> System Settings > HDD Accelerator. TOSHIBA System Settings TOSHIBA HDD Accelerator TOSHIBA Setup Utility TOSHIBA eco Utility This utility allows you to customize your hardware settings according to the environment. The battery will not be extended properly...

Users Manual Canada; English
Page 76
... the current password correctly. Owner String (text box) You can 't accept this box to associate text with the password. the BIOS setup utility will restart. TOSHIBA will NOT be held responsible for general users. After you do the following: Register or delete the Supervisor Password. Hold down or...first enter the current password correctly. In the Settings charm, click Power and then select Restart. 2. If you forget your HDD User Password, TOSHIBA will NOT be able to assist you, and your HDD. The computer will load. Delete (button) Click this text will be displayed together with...
... the current password correctly. Owner String (text box) You can 't accept this box to associate text with the password. the BIOS setup utility will restart. TOSHIBA will NOT be held responsible for general users. After you do the following: Register or delete the Supervisor Password. Hold down or...first enter the current password correctly. In the Settings charm, click Power and then select Restart. 2. If you forget your HDD User Password, TOSHIBA will NOT be able to assist you, and your HDD. The computer will load. Delete (button) Click this text will be displayed together with...
Users Manual Canada; English
Page 78
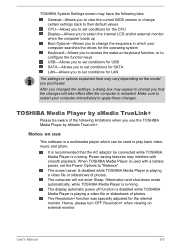
... have the following limitations when you that the AC adaptor be used with smooth playback. TOSHIBA Media Player by sMedio TrueLink+ Please be aware of the following tabs: General-Allows you to view the current BIOS version or change certain settings back to their default values CPU-Allows you to set conditions...
... have the following limitations when you that the AC adaptor be used with smooth playback. TOSHIBA Media Player by sMedio TrueLink+ Please be aware of the following tabs: General-Allows you to view the current BIOS version or change certain settings back to their default values CPU-Allows you to set conditions...

Users Manual Canada; English
Page 87
.... If you are interrelated with any one having the ability to proceed. The computer will load advanced options as shown below : 1. Key Advanced option F2 BIOS utility F12 Boot menu 0 (zero) Recovery options If your computer's hardware or attached peripherals. In the Settings charm, click Power and then select Restart...
.... If you are interrelated with any one having the ability to proceed. The computer will load advanced options as shown below : 1. Key Advanced option F2 BIOS utility F12 Boot menu 0 (zero) Recovery options If your computer's hardware or attached peripherals. In the Settings charm, click Power and then select Restart...

Users Manual Canada; English
Page 89
...then release this can be displayed. 6. Set the time in the Real Time Clock (RTC) battery has run out - the BIOS setup application will end and the computer will load. 3. in the BIOS setup application by the setup and configuration of the computer - Real Time Clock Problem The...tested by plugging another appliance into it again. please refer to reach room temperature before trying again. Check whether the battery is attached. the BIOS setup utility will restart. Problem Procedure Battery doesn't charge when the AC adaptor is hot or cold to the touch - Press F10 -...
...then release this can be displayed. 6. Set the time in the Real Time Clock (RTC) battery has run out - the BIOS setup application will end and the computer will load. 3. in the BIOS setup application by the setup and configuration of the computer - Real Time Clock Problem The...tested by plugging another appliance into it again. please refer to reach room temperature before trying again. Check whether the battery is attached. the BIOS setup utility will restart. Problem Procedure Battery doesn't charge when the AC adaptor is hot or cold to the touch - Press F10 -...

Users Manual Canada; English
Page 114
AMT: ASCII: BIOS: BD-ROM: bps: CD: CD-ROM: CD-RW: CMOS: CPU: DC: DDR: DIMM: DVD: DVD-R: DVD-RAM: DVD-R DL: DVD-ROM: DVD-RW: DVD+R DL: ...
AMT: ASCII: BIOS: BD-ROM: bps: CD: CD-ROM: CD-RW: CMOS: CPU: DC: DDR: DIMM: DVD: DVD-R: DVD-RAM: DVD-R DL: DVD-ROM: DVD-RW: DVD+R DL: ...

Detailed Specs for Satellite NB10t-A PU143C-01H032 English
Page 1
...by the graphics system for use of purchase. Memory: Part of the main system memory may automatically shutdown. Toshiba recommends Windows 8.1 Pro NB10t-A-01H Model: i Satellite NB10t-A-PU143C-01H032 4th Generation Intel® Pentium™ N3530 processor, Windows® 7 Professional with ...: Up to 4 hours (Dependent on usage) Dimensions: (WxHxD) 206.8 x 36 x 21 mm BIOS SETUP, ACPI, PnP, VESA, SM BIOS, PCI BIOS Support Security Computrace BIOS Support, Kensington Cable Lock, power on product model, design configuration, applications, power management settings and features ...
...by the graphics system for use of purchase. Memory: Part of the main system memory may automatically shutdown. Toshiba recommends Windows 8.1 Pro NB10t-A-01H Model: i Satellite NB10t-A-PU143C-01H032 4th Generation Intel® Pentium™ N3530 processor, Windows® 7 Professional with ...: Up to 4 hours (Dependent on usage) Dimensions: (WxHxD) 206.8 x 36 x 21 mm BIOS SETUP, ACPI, PnP, VESA, SM BIOS, PCI BIOS Support Security Computrace BIOS Support, Kensington Cable Lock, power on product model, design configuration, applications, power management settings and features ...


