User Guide
Page 22
... Using the computer for the first time 43 Setting up your software 44 Registering your computer with Toshiba 44 Adding optional external devices 44 Adding memory (optional 45 Installing a memory module 45 Removing a memory module 50 Checking total memory 53 Recovering the Internal Storage Drive 53 Recovering to out-of-box state (recommended recovery method...
... Using the computer for the first time 43 Setting up your software 44 Registering your computer with Toshiba 44 Adding optional external devices 44 Adding memory (optional 45 Installing a memory module 45 Removing a memory module 50 Checking total memory 53 Recovering the Internal Storage Drive 53 Recovering to out-of-box state (recommended recovery method...
User Guide
Page 24
24 Contents Chapter 3: Mobile Computing 92 Toshiba's energy-saver design 92 Running the computer on battery power 92 Battery Notice 93 ... when the main battery runs low .....98 Setting battery notifications 98 Conserving battery power 99 Power Plans 100 Using the TOSHIBA eco power plan 101 Changing the main battery 102 Removing the battery from the computer .......102 Inserting a charged battery ... Recording sounds 112 Using external speakers or headphones..........113 Using the Web Camera 113 Using the Memory card reader 114 Inserting memory media 114 Removing memory media 115
24 Contents Chapter 3: Mobile Computing 92 Toshiba's energy-saver design 92 Running the computer on battery power 92 Battery Notice 93 ... when the main battery runs low .....98 Setting battery notifications 98 Conserving battery power 99 Power Plans 100 Using the TOSHIBA eco power plan 101 Changing the main battery 102 Removing the battery from the computer .......102 Inserting a charged battery ... Recording sounds 112 Using external speakers or headphones..........113 Using the Web Camera 113 Using the Memory card reader 114 Inserting memory media 114 Removing memory media 115
User Guide
Page 26
26 Contents Memory problems 146 Power and the batteries 146 Keyboard problems 148 Display problems 148 Disk or storage drive problems 150 Error-checking 150 Optical disc drive ... Data and system configuration backup in the Windows® operating system 157 If you need further assistance 161 Contacting Toshiba 162 Other Toshiba Internet Web sites 162 Toshiba's worldwide offices 162 Appendix A: Hot Keys/TOSHIBA Cards 164 Hot Key Cards 164 Using the Hot Key Cards 165 Hot key functions 165 Volume Mute 166...
26 Contents Memory problems 146 Power and the batteries 146 Keyboard problems 148 Display problems 148 Disk or storage drive problems 150 Error-checking 150 Optical disc drive ... Data and system configuration backup in the Windows® operating system 157 If you need further assistance 161 Contacting Toshiba 162 Other Toshiba Internet Web sites 162 Toshiba's worldwide offices 162 Appendix A: Hot Keys/TOSHIBA Cards 164 Hot Key Cards 164 Using the Hot Key Cards 165 Hot key functions 165 Volume Mute 166...
User Guide
Page 40
.... These components include, but are not limited to avoid scratching or damaging the surface. NOTE Please handle your computer carefully to , a mouse, keyboard, printer, and memory.
.... These components include, but are not limited to avoid scratching or damaging the surface. NOTE Please handle your computer carefully to , a mouse, keyboard, printer, and memory.

User Guide
Page 44
... choices. Product registration can be completed by either visiting the Toshiba Web site at register.toshiba.com, or by clicking the Start button and, in which windows appear, may want to: ❖ Add more memory (see "Adding memory (optional)" on page 45) ❖ Connecting external devices...appears above, click on -screen instructions. See "Setting up your software. Adding optional external devices NOTE Before adding external devices or memory, Toshiba recommends setting up your software" on your computer for the first time, do not turn on page 44. After starting your ...
... choices. Product registration can be completed by either visiting the Toshiba Web site at register.toshiba.com, or by clicking the Start button and, in which windows appear, may want to: ❖ Add more memory (see "Adding memory (optional)" on page 45) ❖ Connecting external devices...appears above, click on -screen instructions. See "Setting up your software. Adding optional external devices NOTE Before adding external devices or memory, Toshiba recommends setting up your software" on your computer for the first time, do not turn on page 44. After starting your ...
User Guide
Page 45
... a Phillips screwdriver of today's popular applications. Failure to increase the computer's memory if you install or remove a memory module, turn off the computer using the Start menu. NOTE Before adding external devices or memory, Toshiba recommends setting up your system or visit accessories.toshiba.com. The surrounding area may want to follow these directions could...
... a Phillips screwdriver of today's popular applications. Failure to increase the computer's memory if you install or remove a memory module, turn off the computer using the Start menu. NOTE Before adding external devices or memory, Toshiba recommends setting up your system or visit accessories.toshiba.com. The surrounding area may want to follow these directions could...

User Guide
Page 46
... not be installed, it on the work surface to the computer, including the AC adaptor. You can damage the computer and the memory module. If the computer is to be saved. 4 Place a soft cloth on and data in Sleep or Hibernation mode. Start button Shut down button (...then turns off. 3 Unplug and remove any cables connected to prevent scratching the top cover of the Start menu. If only one memory module is on . NOTE To locate your memory module slot cover please refer to step 3. 1 Click the Start button. For information on removing the main battery, see "Removing the...
... not be installed, it on the work surface to the computer, including the AC adaptor. You can damage the computer and the memory module. If the computer is to be saved. 4 Place a soft cloth on and data in Sleep or Hibernation mode. Start button Shut down button (...then turns off. 3 Unplug and remove any cables connected to prevent scratching the top cover of the Start menu. If only one memory module is on . NOTE To locate your memory module slot cover please refer to step 3. 1 Click the Start button. For information on removing the main battery, see "Removing the...
User Guide
Page 47
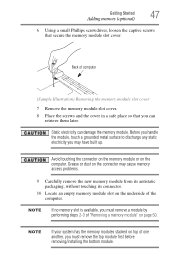
...connector may have built up. Avoid touching the connector on the memory module or on the underside of the computer. NOTE If your system has the memory modules stacked on page 50. Getting Started 47 Adding memory (optional) 6 Using a small Phillips screwdriver, loosen the ...captive screws that you may cause memory access problems. 9 Carefully remove the new memory module from its antistatic packaging, without touching...
...connector may have built up. Avoid touching the connector on the memory module or on the underside of the computer. NOTE If your system has the memory modules stacked on page 50. Getting Started 47 Adding memory (optional) 6 Using a small Phillips screwdriver, loosen the ...captive screws that you may cause memory access problems. 9 Carefully remove the new memory module from its antistatic packaging, without touching...
User Guide
Page 48
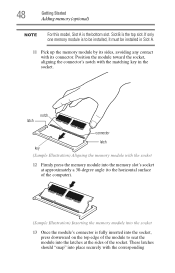
...should "snap" into the latches at approximately a 30-degree angle (to the horizontal surface of the computer). (Sample Illustration) Inserting the memory module into the socket 13 Once the module's connector is to seat the module into place securely with its sides, avoiding any contact with... the corresponding If only one memory module is fully inserted into the socket, press downward on the top edge of the socket. notch latch connector latch key (Sample Illustration...
...should "snap" into the latches at approximately a 30-degree angle (to the horizontal surface of the computer). (Sample Illustration) Inserting the memory module into the socket 13 Once the module's connector is to seat the module into place securely with its sides, avoiding any contact with... the corresponding If only one memory module is fully inserted into the socket, press downward on the top edge of the socket. notch latch connector latch key (Sample Illustration...
User Guide
Page 49
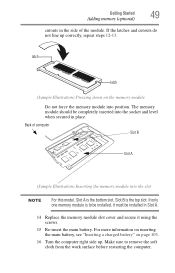
...the main battery. Back of the module. For more information on inserting the main battery, see "Inserting a charged battery" on the memory module Do not force the memory module into the socket and level when secured in place. Slot B is the bottom slot. latch latch (Sample Illustration) Pressing down ...slot NOTE For this model, Slot A is the top slot. The memory module should be installed in Slot A. 14 Replace the memory module slot cover and secure it must be completely inserted into position. If only one memory module is to remove the soft cloth from the work surface before ...
...the main battery. Back of the module. For more information on inserting the main battery, see "Inserting a charged battery" on the memory module Do not force the memory module into the socket and level when secured in place. Slot B is the bottom slot. latch latch (Sample Illustration) Pressing down ...slot NOTE For this model, Slot A is the top slot. The memory module should be installed in Slot A. 14 Replace the memory module slot cover and secure it must be completely inserted into position. If only one memory module is to remove the soft cloth from the work surface before ...
User Guide
Page 50
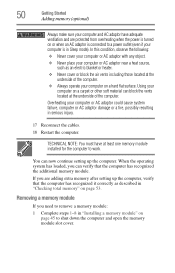
... work. Overheating your computer or AC adaptor could cause system failure, computer or AC adaptor damage or a fire, possibly resulting in "Installing a memory module" on a hard flat surface. In this condition, observe the following: ❖ Never cover your computer or AC adaptor with any object....described in Sleep mode). You can block the vents located at the underside of the computer. Using your computer is connected to remove a memory module: 1 Complete steps 1-8 in serious injury. 17 Reconnect the cables. 18 Restart the computer. If you are protected from overheating when...
... work. Overheating your computer or AC adaptor could cause system failure, computer or AC adaptor damage or a fire, possibly resulting in "Installing a memory module" on a hard flat surface. In this condition, observe the following: ❖ Never cover your computer or AC adaptor with any object....described in Sleep mode). You can block the vents located at the underside of the computer. Using your computer is connected to remove a memory module: 1 Complete steps 1-8 in serious injury. 17 Reconnect the cables. 18 Restart the computer. If you are protected from overheating when...
User Guide
Page 51
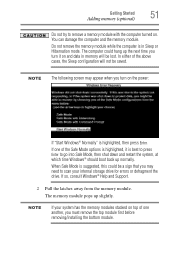
... highlighted, then press Enter. In either of the Safe Mode options is highlighted, it is best to press Enter to scan your system has the memory modules stacked on and data in Sleep or Hibernation mode. If so, consult Windows® Help and Support. 2 Pull the latches away from the... memory module. NOTE The following screen may need to go into Safe Mode, then shut down and restart the system, at which time Windows® should ...
... highlighted, then press Enter. In either of the Safe Mode options is highlighted, it is best to press Enter to scan your system has the memory modules stacked on and data in Sleep or Hibernation mode. If so, consult Windows® Help and Support. 2 Pull the latches away from the... memory module. NOTE The following screen may need to go into Safe Mode, then shut down and restart the system, at which time Windows® should ...
User Guide
Page 52
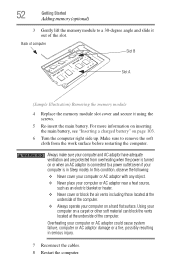
... in serious injury. 7 Reconnect the cables. 8 Restart the computer. 52 Getting Started Adding memory (optional) 3 Gently lift the memory module to a 30-degree angle and slide it out of computer Slot B Slot A (Sample Illustration) Removing the memory module 4 Replace the memory module slot cover and secure it using the screws. 5 Re-insert the main...
... in serious injury. 7 Reconnect the cables. 8 Restart the computer. 52 Getting Started Adding memory (optional) 3 Gently lift the memory module to a 30-degree angle and slide it out of computer Slot B Slot A (Sample Illustration) Removing the memory module 4 Replace the memory module slot cover and secure it using the screws. 5 Re-insert the main...
User Guide
Page 53
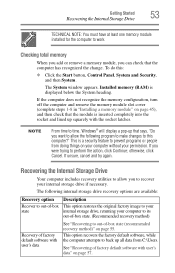
...) Recovery of factory default software with user's data See "Recovering to perform the action, click Continue; Checking total memory When you add or remove a memory module, you were trying to out-of factory default software with the socket latches. Getting Started 53 Recovering the Internal... Storage Drive TECHNICAL NOTE: You must have at least one memory module installed for the computer to this : ❖ Click the Start button, Control Panel, System and Security, and then System....
...) Recovery of factory default software with user's data See "Recovering to perform the action, click Continue; Checking total memory When you add or remove a memory module, you were trying to out-of factory default software with the socket latches. Getting Started 53 Recovering the Internal... Storage Drive TECHNICAL NOTE: You must have at least one memory module installed for the computer to this : ❖ Click the Start button, Control Panel, System and Security, and then System....
User Guide
Page 81
... for details. 81 See "Saving your battery runs out of charge while you are working, you will lose all work stays in the computer's temporary memory until you save feature that can be activated. If the network you are using goes down and you last saved. HINT: Some programs have an...
... for details. 81 See "Saving your battery runs out of charge while you are working, you will lose all work stays in the computer's temporary memory until you save feature that can be activated. If the network you are using goes down and you last saved. HINT: Some programs have an...
User Guide
Page 93
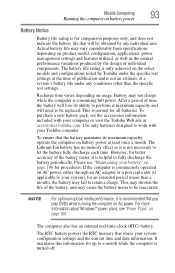
...(if applicable to your battery" on page 106 for comparison purposes only, and does not indicate the battery life that stores your Toshiba computer. It maintains this information for an extended period (more information about Windows® power plans, see the accessories information included ...the computer is turned off. However, for all batteries. The RTC battery powers the RTC memory that will lose its maximum capacity, operate the computer on battery power at accessories.toshiba.com. Please see "Maintaining your system), for up to fully discharge the battery periodically. ...
...(if applicable to your battery" on page 106 for comparison purposes only, and does not indicate the battery life that stores your Toshiba computer. It maintains this information for an extended period (more information about Windows® power plans, see the accessories information included ...the computer is turned off. However, for all batteries. The RTC battery powers the RTC memory that will lose its maximum capacity, operate the computer on battery power at accessories.toshiba.com. Please see "Maintaining your system), for up to fully discharge the battery periodically. ...

User Guide
Page 95
... charged, it charges while the computer is on. NOTE Depending on your computer's configuration settings. The RTC battery powers the System Time Clock and BIOS memory used while the RTC battery is being charged, although the charging status of your computer was shipped, resulting in a CMOS error message during startup. The...
... charged, it charges while the computer is on. NOTE Depending on your computer's configuration settings. The RTC battery powers the System Time Clock and BIOS memory used while the RTC battery is being charged, although the charging status of your computer was shipped, resulting in a CMOS error message during startup. The...
User Guide
Page 114
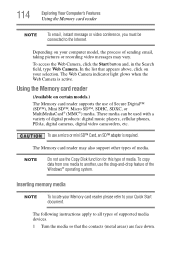
...contacts (metal areas) are face down. To access the Web Camera, click the Start button and, in the Search field, type Web Camera. Inserting memory media NOTE To locate your computer model, the process of supported media devices. 1 Turn the media so that appears above, click on certain models.) ... or MultiMediaCard® (MMC®) media. NOTE Do not use a micro or mini SD™ Card, an SD™ adapter is active. Using the Memory card reader (Available on your Quick Start document. To use the Copy Disk function for this type of the Windows® operating system. The...
...contacts (metal areas) are face down. To access the Web Camera, click the Start button and, in the Search field, type Web Camera. Inserting memory media NOTE To locate your computer model, the process of supported media devices. 1 Turn the media so that appears above, click on certain models.) ... or MultiMediaCard® (MMC®) media. NOTE Do not use a micro or mini SD™ Card, an SD™ adapter is active. Using the Memory card reader (Available on your Quick Start document. To use the Copy Disk function for this type of the Windows® operating system. The...
User Guide
Page 115
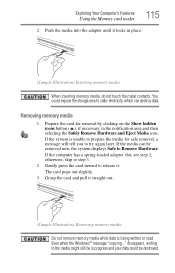
...area and then selecting the Safely Remove Hardware and Eject Media icon. Exploring Your Computer's Features Using the Memory card reader 115 2 Push the media into the adapter until it . Removing memory media 1 Prepare the card for safe removal, a message will tell you to Remove Hardware. You could...is being written or read. The card pops out slightly. 3 Grasp the card and pull it straight out. (Sample Illustration) Removing memory media Do not remove memory media while data is unable to prepare the media for removal by clicking on the Show hidden icons button ( ), if necessary, ...
...area and then selecting the Safely Remove Hardware and Eject Media icon. Exploring Your Computer's Features Using the Memory card reader 115 2 Push the media into the adapter until it . Removing memory media 1 Prepare the card for safe removal, a message will tell you to Remove Hardware. You could...is being written or read. The card pops out slightly. 3 Grasp the card and pull it straight out. (Sample Illustration) Removing memory media Do not remove memory media while data is unable to prepare the media for removal by clicking on the Show hidden icons button ( ), if necessary, ...
User Guide
Page 137
... the use restrictions above, the data logged on certain models). Subject to help diagnose problems should the computer require service by TOSHIBA or TOSHIBA's authorized service providers. It may not have the same data protection laws or data protection levels as power consumption, the cooling... a notification of system conditions that may use , and also computer and device usage (e.g.: power settings, battery temperature and recharging, CPU, memory, and temperatures for quality assurance analysis. It alerts users to install the updates if you wish. The stored data uses a very small ...
... the use restrictions above, the data logged on certain models). Subject to help diagnose problems should the computer require service by TOSHIBA or TOSHIBA's authorized service providers. It may not have the same data protection laws or data protection levels as power consumption, the cooling... a notification of system conditions that may use , and also computer and device usage (e.g.: power settings, battery temperature and recharging, CPU, memory, and temperatures for quality assurance analysis. It alerts users to install the updates if you wish. The stored data uses a very small ...


