User Guide
Page 52
... has been running recently, the memory module(s) may be hot. Installing a memory module Memory modules can be installed in the memory module slots on page 50. You will need a small Phillips screwdriver for this procedure. Installing a memory module with your system or visit accessories.toshiba.com. 52 Getting Started Adding memory (optional) Adding memory (optional) HINT: To purchase additional...
... has been running recently, the memory module(s) may be hot. Installing a memory module Memory modules can be installed in the memory module slots on page 50. You will need a small Phillips screwdriver for this procedure. Installing a memory module with your system or visit accessories.toshiba.com. 52 Getting Started Adding memory (optional) Adding memory (optional) HINT: To purchase additional...
User Guide
Page 53
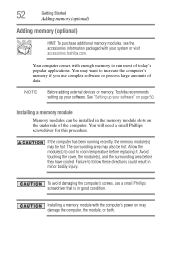
... will be installed in the lower-right corner of the computer, and then place the computer upside down button in Slot A. Getting Started 53 Adding memory (optional) The computer has two memory slots-Slot A and Slot B. The computer closes all open programs, shuts down the operating system, and then turns off the computer using the Start...
... will be installed in the lower-right corner of the computer, and then place the computer upside down button in Slot A. Getting Started 53 Adding memory (optional) The computer has two memory slots-Slot A and Slot B. The computer closes all open programs, shuts down the operating system, and then turns off the computer using the Start...
User Guide
Page 54
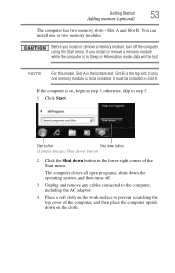
For information on removing the main battery, see "Removing the battery from the computer" on page 130. 54 Getting Started Adding memory (optional) 5 Remove the main battery. L730 series Memory module slot cover Front of computer L740 series L750 series Memory module slot cover L770 series Front of computer (Sample Illustration) Locating the memory module slot cover
For information on removing the main battery, see "Removing the battery from the computer" on page 130. 54 Getting Started Adding memory (optional) 5 Remove the main battery. L730 series Memory module slot cover Front of computer L740 series L750 series Memory module slot cover L770 series Front of computer (Sample Illustration) Locating the memory module slot cover
User Guide
Page 55
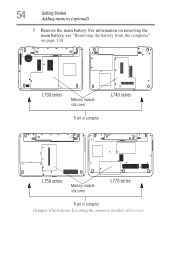
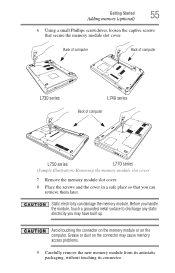
...discharge any static electricity you can damage the memory module. Back of computer Back of computer L730 series L740 series Back of computer L750 series L770 series (Sample Illustration) Removing the memory module slot cover 7 Remove the memory module slot cover. 8 Place the screws and the ...cover in a safe place so that secure the memory module slot cover. Avoid touching the connector on the memory module or on the connector may have ...
...discharge any static electricity you can damage the memory module. Back of computer Back of computer L730 series L740 series Back of computer L750 series L770 series (Sample Illustration) Removing the memory module slot cover 7 Remove the memory module slot cover. 8 Place the screws and the ...cover in a safe place so that secure the memory module slot cover. Avoid touching the connector on the memory module or on the connector may have ...
User Guide
Page 56
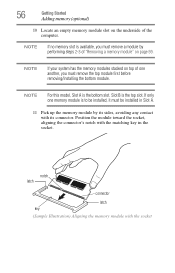
... any contact with its connector. notch latch connector latch key (Sample Illustration) Aligning the memory module with the matching key in Slot A. 11 Pick up the memory module by performing steps 2-3 of "Removing a memory module" on page 59. Slot B is the bottom slot. Position the module toward the socket, aligning the connector's notch with the socket...
... any contact with its connector. notch latch connector latch key (Sample Illustration) Aligning the memory module with the matching key in Slot A. 11 Pick up the memory module by performing steps 2-3 of "Removing a memory module" on page 59. Slot B is the bottom slot. Position the module toward the socket, aligning the connector's notch with the socket...

User Guide
Page 57
... socket, press downward on the memory module Do not force the memory module into position. If the latches and cutouts do not line up correctly, repeat steps 12-13. Getting Started 57 Adding memory (optional) 12 Firmly press the memory module into the memory slot's socket at the sides of the... module. The memory module should "snap"...
... socket, press downward on the memory module Do not force the memory module into position. If the latches and cutouts do not line up correctly, repeat steps 12-13. Getting Started 57 Adding memory (optional) 12 Firmly press the memory module into the memory slot's socket at the sides of the... module. The memory module should "snap"...
User Guide
Page 58
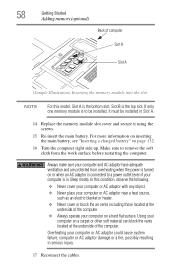
If only one memory module is to remove the soft cloth from overheating when the power is the bottom slot. In this model, Slot A is turned on a carpet or other soft material can block the vents located at the underside of the computer. Overheating your ... and secure it using the screws. 15 Re-insert the main battery. 58 Getting Started Adding memory (optional) Back of computer Slot B Slot A (Sample Illustration) Inserting the memory module into the slot NOTE For this condition, observe the following: ❖ Never cover your computer or AC adaptor with any object. ❖ ...
If only one memory module is to remove the soft cloth from overheating when the power is the bottom slot. In this model, Slot A is turned on a carpet or other soft material can block the vents located at the underside of the computer. Overheating your ... and secure it using the screws. 15 Re-insert the main battery. 58 Getting Started Adding memory (optional) Back of computer Slot B Slot A (Sample Illustration) Inserting the memory module into the slot NOTE For this condition, observe the following: ❖ Never cover your computer or AC adaptor with any object. ❖ ...
User Guide
Page 59
... need to shut down the computer and open the memory module slot cover. You can damage the computer and the memory module. Removing a memory module If you turn it correctly as described in "Installing a memory module" on page 52 to remove a memory module: 1 Complete steps 1-8 in "Checking total memory" on and data in Sleep or Hibernation mode...
... need to shut down the computer and open the memory module slot cover. You can damage the computer and the memory module. Removing a memory module If you turn it correctly as described in "Installing a memory module" on page 52 to remove a memory module: 1 Complete steps 1-8 in "Checking total memory" on and data in Sleep or Hibernation mode...
User Guide
Page 61
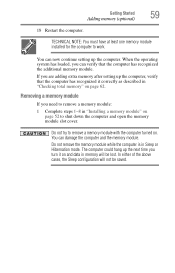
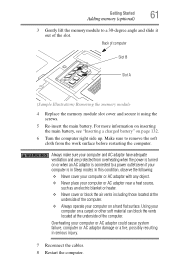
... an electric blanket or heater. ❖ Never cover or block the air vents including those located at the underside of computer Slot B Slot A (Sample Illustration) Removing the memory module 4 Replace the memory module slot cover and secure it out of the computer. ❖ Always operate your computer on or when an AC adaptor is connected...
... an electric blanket or heater. ❖ Never cover or block the air vents including those located at the underside of computer Slot B Slot A (Sample Illustration) Removing the memory module 4 Replace the memory module slot cover and secure it out of the computer. ❖ Always operate your computer on or when an AC adaptor is connected...
User Guide
Page 62
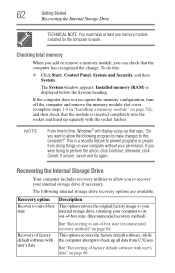
... state (recommended recovery method)" on page 66. If the computer does not recognize the memory configuration, turn off the computer and remove the memory module slot cover (complete steps 1-8 in "Installing a memory module" on your computer without your permission. This option recovers the factory default software,... installed for the computer to out-of factory default software with user's data" on page 64. Checking total memory When you add or remove a memory module, you were trying to this : ❖ Click Start, Control Panel, System and Security, and then System. ...
... state (recommended recovery method)" on page 66. If the computer does not recognize the memory configuration, turn off the computer and remove the memory module slot cover (complete steps 1-8 in "Installing a memory module" on your computer without your permission. This option recovers the factory default software,... installed for the computer to out-of factory default software with user's data" on page 64. Checking total memory When you add or remove a memory module, you were trying to this : ❖ Click Start, Control Panel, System and Security, and then System. ...
User Guide
Page 145
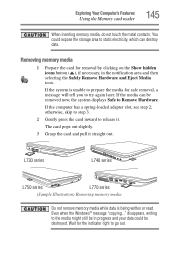
... a spring-loaded adapter slot, see step 2; The card pops out slightly. 3 Grasp the card and pull it . Wait for safe removal, a message will tell you to the media might still be destroyed. L730 series L740 series L750 series L770 series (Sample Illustration) Removing memory media Do not remove memory media while data is...
... a spring-loaded adapter slot, see step 2; The card pops out slightly. 3 Grasp the card and pull it . Wait for safe removal, a message will tell you to the media might still be destroyed. L730 series L740 series L750 series L770 series (Sample Illustration) Removing memory media Do not remove memory media while data is...
User Guide
Page 177
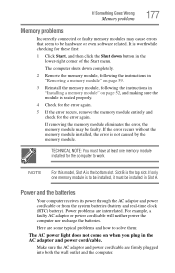
..." on page 52, and making sure the module is not caused by the memory module. Slot B is the bottom slot. The computer shuts down button in Slot A. If only one memory module installed for the computer to be installed, it must be hardware or even software related. Make sure the AC adaptor and... power cord/cable are interrelated. NOTE For this model, Slot A is the top slot. Power problems are firmly plugged into both the wall outlet and the computer. TECHNICAL NOTE: You must have at least one memory module is to work. For example, a faulty AC adaptor or power ...
..." on page 52, and making sure the module is not caused by the memory module. Slot B is the bottom slot. The computer shuts down button in Slot A. If only one memory module installed for the computer to be installed, it must be hardware or even software related. Make sure the AC adaptor and... power cord/cable are interrelated. NOTE For this model, Slot A is the top slot. Power problems are firmly plugged into both the wall outlet and the computer. TECHNICAL NOTE: You must have at least one memory module is to work. For example, a faulty AC adaptor or power ...
User Guide
Page 230
... lock computer, using 101 M maintaining your battery 134 manual eject hole optical disc drive 115 memory adding (optional) 52 check total memory 62 removing memory module slot cover 55 Memory card reader inserting memory media 144 removing memory media 145 using 144 memory module installation 52 inserting into socket 56 removing 59, 61 microphone using 142 monitor connecting... 159 moving the computer 101 N network accessing 141 connecting your computer 141 networking wireless 140 notification area 140 O ON/OFF indicator light 125 online resources Toshiba 119 optical disc Auto-Run feature 117
... lock computer, using 101 M maintaining your battery 134 manual eject hole optical disc drive 115 memory adding (optional) 52 check total memory 62 removing memory module slot cover 55 Memory card reader inserting memory media 144 removing memory media 145 using 144 memory module installation 52 inserting into socket 56 removing 59, 61 microphone using 142 monitor connecting... 159 moving the computer 101 N network accessing 141 connecting your computer 141 networking wireless 140 notification area 140 O ON/OFF indicator light 125 online resources Toshiba 119 optical disc Auto-Run feature 117
User Guide
Page 232
... 51 removing an optical disc with computer on 118 and optical disc with computer off 118 battery from the computer 130 memory module 59 memory module slot cover 55 restarting computer 94 restore points troubleshooting 190 restoring your work 112 running computer on battery power 120 S safety ... selecting a place to work 42 power plan options 128 video cables 85 setting low battery notifications 126 setting up AC adaptor 46 adding memory (optional) 52 communications 140 computer 45 software Setup Wizard 50 work environment 42 setting up a connection 141 settings customize computer settings 100 ...
... 51 removing an optical disc with computer on 118 and optical disc with computer off 118 battery from the computer 130 memory module 59 memory module slot cover 55 restarting computer 94 restore points troubleshooting 190 restoring your work 112 running computer on battery power 120 S safety ... selecting a place to work 42 power plan options 128 video cables 85 setting low battery notifications 126 setting up AC adaptor 46 adding memory (optional) 52 communications 140 computer 45 software Setup Wizard 50 work environment 42 setting up a connection 141 settings customize computer settings 100 ...


