User Guide
Page 28
... trademarks or registered trademarks of Sony Corporation. Bluetooth word mark and logos are owned by Toshiba is a registered trademark of Synaptics, Inc. Computer Disposal Information The LCD display lamp in this product may contain mercury. 28 Trademarks Satellite and eco Utility are either registered trademarks or trademarks of Adobe Systems Incorporated in the...
... trademarks or registered trademarks of Sony Corporation. Bluetooth word mark and logos are owned by Toshiba is a registered trademark of Synaptics, Inc. Computer Disposal Information The LCD display lamp in this product may contain mercury. 28 Trademarks Satellite and eco Utility are either registered trademarks or trademarks of Adobe Systems Incorporated in the...
User Guide
Page 30
30 Contents Using the computer for the first time 48 Opening the display panel 48 Turning on the power 49 Setting up your software 49 Registering your computer with Toshiba 50 Adding optional external devices 50 Adding memory (optional 51 Installing a memory module 51 Removing ... Disabling or enabling the TouchPad 80 Using external display devices 80 Selecting video cables 81 Connecting an HDMI™-compatible television or external display device............81 Connecting an external monitor or projector.....81 Directing the display output when you turn on the computer 82 ...
30 Contents Using the computer for the first time 48 Opening the display panel 48 Turning on the power 49 Setting up your software 49 Registering your computer with Toshiba 50 Adding optional external devices 50 Adding memory (optional 51 Installing a memory module 51 Removing ... Disabling or enabling the TouchPad 80 Using external display devices 80 Selecting video cables 81 Connecting an HDMI™-compatible television or external display device............81 Connecting an external monitor or projector.....81 Directing the display output when you turn on the computer 82 ...
User Guide
Page 31
... turning off the computer 85 Using the Shut down command 87 Using and configuring Hibernation mode .........90 Using and configuring Sleep mode 92 Closing the display panel 95 Customizing your computer's settings 95 Caring for your computer 95 Cleaning the computer 95 Moving the computer 96 Using a computer lock 96 Chapter...
... turning off the computer 85 Using the Shut down command 87 Using and configuring Hibernation mode .........90 Using and configuring Sleep mode 92 Closing the display panel 95 Customizing your computer's settings 95 Caring for your computer 95 Cleaning the computer 95 Moving the computer 96 Using a computer lock 96 Chapter...
User Guide
Page 34
...help you 168 Fixing a problem with Device Manager 169 Checking device properties 169 Memory problems 170 Power and the batteries 170 Keyboard problems 172 Display problems 172 Disk or storage drive problems 174 Error-checking 174 Optical disc drive problems 175 Sound system problems 178 Modem problems 178 Wireless networking... habits 181 Data and system configuration backup in the Windows® operating system 182 If you need further assistance 186 Before you contact Toshiba 186 Contacting Toshiba 187 Other Toshiba Internet Web sites 188 Toshiba's worldwide offices 188
...help you 168 Fixing a problem with Device Manager 169 Checking device properties 169 Memory problems 170 Power and the batteries 170 Keyboard problems 172 Display problems 172 Disk or storage drive problems 174 Error-checking 174 Optical disc drive problems 175 Sound system problems 178 Modem problems 178 Wireless networking... habits 181 Data and system configuration backup in the Windows® operating system 182 If you need further assistance 186 Before you contact Toshiba 186 Contacting Toshiba 187 Other Toshiba Internet Web sites 188 Toshiba's worldwide offices 188
User Guide
Page 35
Contents 35 Appendix A: Hot Keys/TOSHIBA Cards 190 Hot Key Cards 190 Using the Hot Key Cards 191 Application Cards 192 Using the Application Cards 193 Card Case 193 Hot key functions 194 Volume Mute 194 Lock (Instant security 195 Power plan 196 Sleep mode 197 Hibernation mode 198 Output (Display switch 199 Display brightness 200 Disabling or enabling wireless devices............201 Disabling or enabling the TouchPad 202 Zoom (Display resolution 203 Keyboard hot key functions 204 Appendix B: Power Cord/Cable Connectors 205 Glossary 206 Index 221
Contents 35 Appendix A: Hot Keys/TOSHIBA Cards 190 Hot Key Cards 190 Using the Hot Key Cards 191 Application Cards 192 Using the Application Cards 193 Card Case 193 Hot key functions 194 Volume Mute 194 Lock (Instant security 195 Power plan 196 Sleep mode 197 Hibernation mode 198 Output (Display switch 199 Display brightness 200 Disabling or enabling wireless devices............201 Disabling or enabling the TouchPad 202 Zoom (Display resolution 203 Keyboard hot key functions 204 Appendix B: Power Cord/Cable Connectors 205 Glossary 206 Index 221

User Guide
Page 36
... designed this and other energy saving features active, so that will operate at its maximum energy efficiency. We recommend that you go. Toshiba is labeled with the power management options preset to a configuration that your computer is set to meet the latest ENERGY STAR® ...efficiency. You can accompany you wherever you leave this computer to enter the low-power Sleep mode which shuts down the system and display within 15 minutes of powerful, portable, multimedia computing. To conserve energy, your computer will provide the most stable operating environment and optimum...
... designed this and other energy saving features active, so that will operate at its maximum energy efficiency. We recommend that you go. Toshiba is labeled with the power management options preset to a configuration that your computer is set to meet the latest ENERGY STAR® ...efficiency. You can accompany you wherever you leave this computer to enter the low-power Sleep mode which shuts down the system and display within 15 minutes of powerful, portable, multimedia computing. To conserve energy, your computer will provide the most stable operating environment and optimum...
User Guide
Page 48
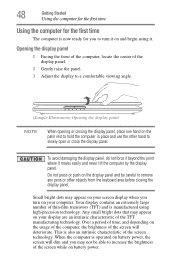
...not be careful to remove any pens or other hand to a comfortable viewing angle. (Sample Illustration) Opening the display panel NOTE When opening or closing the display panel, place one hand on your display are an intrinsic characteristic of the TFT manufacturing technology. Over a period of time, and depending on and begin ...for you to turn it on the usage of the computer, the brightness of the screen will dim and you may appear on your screen display when you turn on the palm rest to hold the computer in place and use the other objects from the keyboard area before closing the...
...not be careful to remove any pens or other hand to a comfortable viewing angle. (Sample Illustration) Opening the display panel NOTE When opening or closing the display panel, place one hand on your display are an intrinsic characteristic of the TFT manufacturing technology. Over a period of time, and depending on and begin ...for you to turn it on the usage of the computer, the brightness of the screen will dim and you may appear on your screen display when you turn on the palm rest to hold the computer in place and use the other objects from the keyboard area before closing the...
User Guide
Page 49
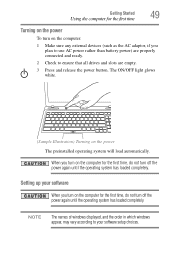
... external devices (such as the AC adaptor, if you turn on the power The preinstalled operating system will load automatically. NOTE The names of windows displayed, and the order in which windows appear, may vary according to ensure that all drives and slots are empty. 3 Press and release the power button...
... external devices (such as the AC adaptor, if you turn on the power The preinstalled operating system will load automatically. NOTE The names of windows displayed, and the order in which windows appear, may vary according to ensure that all drives and slots are empty. 3 Press and release the power button...
User Guide
Page 50
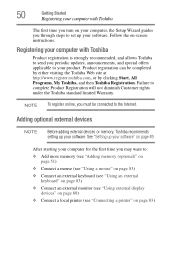
...software" on your computer, the Setup Wizard guides you through steps to set up your software. Registering your computer with Toshiba The first time you turn on page 49. Product registration can be connected to the Internet. See "Setting up ... Connect an external monitor (see "Using external display devices" on page 80) ❖ Connect a local printer (see "Connecting a printer" on -screen instructions. 50 Getting Started Registering your computer with Toshiba Product registration is strongly recommended, and allows Toshiba to send you periodic updates, announcements, and...
...software" on your computer, the Setup Wizard guides you through steps to set up your software. Registering your computer with Toshiba The first time you turn on page 49. Product registration can be connected to the Internet. See "Setting up ... Connect an external monitor (see "Using external display devices" on page 80) ❖ Connect a local printer (see "Connecting a printer" on -screen instructions. 50 Getting Started Registering your computer with Toshiba Product registration is strongly recommended, and allows Toshiba to send you periodic updates, announcements, and...
User Guide
Page 60
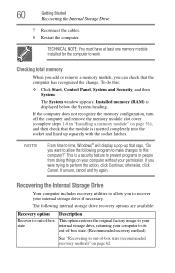
... out-of -box state (recommended recovery method)" on page 51), and then check that says, "Do you to time, Windows® will display a pop-up that the module is displayed below the System heading. Recovering the Internal Storage Drive Your computer includes recovery utilities to allow you want to allow the following...
... out-of -box state (recommended recovery method)" on page 51), and then check that says, "Do you to time, Windows® will display a pop-up that the module is displayed below the System heading. Recovering the Internal Storage Drive Your computer includes recovery utilities to allow you want to allow the following...
User Guide
Page 63
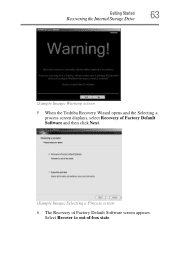
Getting Started 63 Recovering the Internal Storage Drive (Sample Image) Warning screen 5 When the Toshiba Recovery Wizard opens and the Selecting a process screen displays, select Recovery of Factory Default Software and then click Next. (Sample Image) Selecting a Process screen 6 The Recovery of -box state. Select Recover to out-of Factory Default Software screen appears.
Getting Started 63 Recovering the Internal Storage Drive (Sample Image) Warning screen 5 When the Toshiba Recovery Wizard opens and the Selecting a process screen displays, select Recovery of Factory Default Software and then click Next. (Sample Image) Selecting a Process screen 6 The Recovery of -box state. Select Recover to out-of Factory Default Software screen appears.
User Guide
Page 64
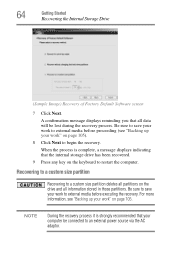
A confirmation message displays reminding you that all information stored in those partitions. Recovering to a custom size partition Recovering to restart the computer. For more information, see "Backing up ... save your work to external media before proceeding (see "Backing up your work" on page 105. NOTE During the recovery process it is complete, a message displays indicating that your work " on page 105). 8 Click Next to an external power source via the AC adaptor.
A confirmation message displays reminding you that all information stored in those partitions. Recovering to a custom size partition Recovering to restart the computer. For more information, see "Backing up ... save your work to external media before proceeding (see "Backing up your work" on page 105. NOTE During the recovery process it is complete, a message displays indicating that your work " on page 105). 8 Click Next to an external power source via the AC adaptor.
User Guide
Page 66
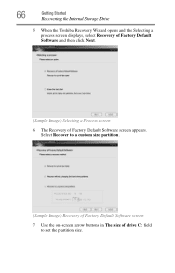
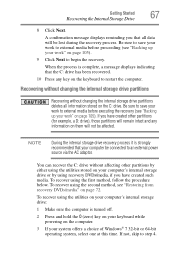
66 Getting Started Recovering the Internal Storage Drive 5 When the Toshiba Recovery Wizard opens and the Selecting a process screen displays, select Recovery of Factory Default Software and then click Next. (Sample Image) Selecting a Process screen 6 The Recovery of drive C: field to a custom size partition. (Sample Image) Recovery of Factory Default Software screen 7 Use the on-screen arrow buttons in The size of Factory Default Software screen appears. Select Recover to set the partition size.
66 Getting Started Recovering the Internal Storage Drive 5 When the Toshiba Recovery Wizard opens and the Selecting a process screen displays, select Recovery of Factory Default Software and then click Next. (Sample Image) Selecting a Process screen 6 The Recovery of drive C: field to a custom size partition. (Sample Image) Recovery of Factory Default Software screen 7 Use the on-screen arrow buttons in The size of Factory Default Software screen appears. Select Recover to set the partition size.
User Guide
Page 67
..." on the C: drive. To recover using the utilities on your computer's internal storage drive: 1 Make sure the computer is complete, a message displays indicating that all information stored on page 72. Be sure to save your work to begin the recovery. Be sure to save your work to...by either using the utilities stored on your computer's internal storage drive or by using the first method, follow the procedure below. A confirmation message displays reminding you have created such media. When the process is turned off. 2 Press and hold the 0 (zero) key on your keyboard while ...
..." on the C: drive. To recover using the utilities on your computer's internal storage drive: 1 Make sure the computer is complete, a message displays indicating that all information stored on page 72. Be sure to save your work to begin the recovery. Be sure to save your work to...by either using the utilities stored on your computer's internal storage drive or by using the first method, follow the procedure below. A confirmation message displays reminding you have created such media. When the process is turned off. 2 Press and hold the 0 (zero) key on your keyboard while ...
User Guide
Page 68
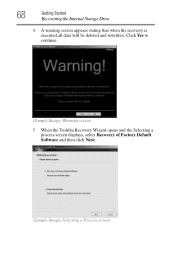
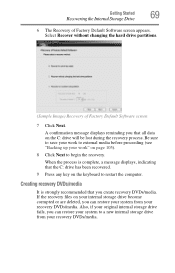
Click Yes to continue. (Sample Image) Warning screen 5 When the Toshiba Recovery Wizard opens and the Selecting a process screen displays, select Recovery of Factory Default Software and then click Next. (Sample Image) Selecting a Process screen 68 Getting Started Recovering the Internal Storage Drive 4 A warning screen appears stating that when the recovery is executed all data will be deleted and rewritten.
Click Yes to continue. (Sample Image) Warning screen 5 When the Toshiba Recovery Wizard opens and the Selecting a process screen displays, select Recovery of Factory Default Software and then click Next. (Sample Image) Selecting a Process screen 68 Getting Started Recovering the Internal Storage Drive 4 A warning screen appears stating that when the recovery is executed all data will be deleted and rewritten.
User Guide
Page 69
.../media. Be sure to save your work " on the C: drive will be lost during the recovery process. Creating recovery DVDs/media It is complete, a message displays, indicating that you that all data on page 105). 8 Click Next to external media before proceeding (see "Backing up your system to restart the computer...
.../media. Be sure to save your work " on the C: drive will be lost during the recovery process. Creating recovery DVDs/media It is complete, a message displays, indicating that you that all data on page 105). 8 Click Next to external media before proceeding (see "Backing up your system to restart the computer...
User Guide
Page 70
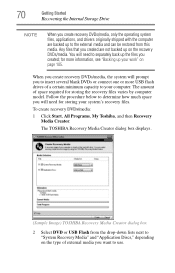
...Follow the procedure below to separately back up the files you created; To create recovery DVDs/media: 1 Click Start, All Programs, My Toshiba, and then Recovery Media Creator. Any files that you created are backed up to "System Recovery Media" and "Application Discs," depending on ...flash drives of a certain minimum capacity to use. You will need for storing your system's recovery files. The TOSHIBA Recovery Media Creator dialog box displays. (Sample Image) TOSHIBA Recovery Media Creator dialog box 2 Select DVD or USB Flash from the drop-down lists next to the external media...
...Follow the procedure below to separately back up the files you created; To create recovery DVDs/media: 1 Click Start, All Programs, My Toshiba, and then Recovery Media Creator. Any files that you created are backed up to "System Recovery Media" and "Application Discs," depending on ...flash drives of a certain minimum capacity to use. You will need for storing your system's recovery files. The TOSHIBA Recovery Media Creator dialog box displays. (Sample Image) TOSHIBA Recovery Media Creator dialog box 2 Select DVD or USB Flash from the drop-down lists next to the external media...
User Guide
Page 73
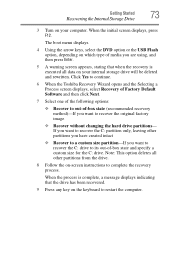
Click Yes to continue. 6 When the Toshiba Recovery Wizard opens and the Selecting a Process screen displays, select Recovery of Factory Default Software and then click Next. 7 Select one of the following options: ❖ Recover to out-of -box state and specify a ... option, depending on which type of media you are using, and then press Enter. 5 A warning screen appears, stating that when the recovery is complete, a message displays indicating that the drive has been recovered. 9 Press any key on the keyboard to its out-of -box state (recommended recovery method)-If you want...
Click Yes to continue. 6 When the Toshiba Recovery Wizard opens and the Selecting a Process screen displays, select Recovery of Factory Default Software and then click Next. 7 Select one of the following options: ❖ Recover to out-of -box state and specify a ... option, depending on which type of media you are using, and then press Enter. 5 A warning screen appears, stating that when the recovery is complete, a message displays indicating that the drive has been recovered. 9 Press any key on the keyboard to its out-of -box state (recommended recovery method)-If you want...
User Guide
Page 74
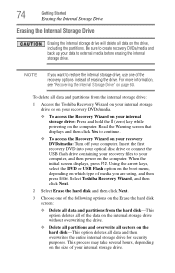
...options on the Erase the hard disk screen: ❖ Delete all data and then overwrites the entire internal storage drive for security purposes. Select Toshiba Recovery Wizard, and then click Next. 2 Select Erase the hard disk and then click Next. 3 Choose one of the recovery options instead ...size of media you want to continue. ❖ To access the Recovery Wizard on the drive, including the partitions. When the initial screen displays, press F12. Be sure to external media before erasing the internal storage drive. Insert the first recovery DVD into your optical disc drive ...
...options on the Erase the hard disk screen: ❖ Delete all data and then overwrites the entire internal storage drive for security purposes. Select Toshiba Recovery Wizard, and then click Next. 2 Select Erase the hard disk and then click Next. 3 Choose one of the recovery options instead ...size of media you want to continue. ❖ To access the Recovery Wizard on the drive, including the partitions. When the initial screen displays, press F12. Be sure to external media before erasing the internal storage drive. Insert the first recovery DVD into your optical disc drive ...
User Guide
Page 75
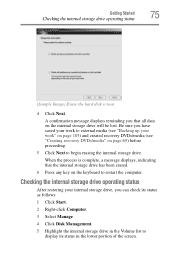
... the internal storage drive operating status (Sample Image) Erase the hard disk screen 4 Click Next. When the process is complete, a message displays, indicating that all data on the internal storage drive will be lost. Be sure you can check its status as follows: 1 Click Start.... 2 Right-click Computer. 3 Select Manage. 4 Click Disk Management. 5 Highlight the internal storage drive in the Volume list to display its status in the lower portion of the screen. Checking the internal storage drive operating status After restoring your internal storage drive, you have saved...
... the internal storage drive operating status (Sample Image) Erase the hard disk screen 4 Click Next. When the process is complete, a message displays, indicating that all data on the internal storage drive will be lost. Be sure you can check its status as follows: 1 Click Start.... 2 Right-click Computer. 3 Select Manage. 4 Click Disk Management. 5 Highlight the internal storage drive in the Volume list to display its status in the lower portion of the screen. Checking the internal storage drive operating status After restoring your internal storage drive, you have saved...


