
User Manual
Page 31
Contents 31 Turning on the power 50 Setting up your software 51 Registering your computer with Toshiba 51 Adding optional external devices 51 Adding memory (optional 52 Installing a memory module 52 Removing a memory module 57 Checking total memory 59 Recovering the Internal... display device 77 Directing the display output when you turn on the computer 78 Adjusting the quality of the external display......79 Using an external keyboard 79 Using a mouse 79 Connecting a printer 79 Setting up a printer 80 Turning off the computer 80 Options for turning off the computer 81 Using the...
Contents 31 Turning on the power 50 Setting up your software 51 Registering your computer with Toshiba 51 Adding optional external devices 51 Adding memory (optional 52 Installing a memory module 52 Removing a memory module 57 Checking total memory 59 Recovering the Internal... display device 77 Directing the display output when you turn on the computer 78 Adjusting the quality of the external display......79 Using an external keyboard 79 Using a mouse 79 Connecting a printer 79 Setting up a printer 80 Turning off the computer 80 Options for turning off the computer 81 Using the...

User Manual
Page 32
... your computer 90 Cleaning the computer 90 Moving the computer 91 Using a computer lock 91 Chapter 2: Learning the Basics 92 Computing tips 92 Using the keyboard 93 Character keys 94 Ctrl, Fn, and Alt keys 94 Function keys 94 Special Windows® keys 95 Starting a program 95 Starting a program from the... media 105 Recording optical media 106 Removing a disc with the computer on...........106 Removing a disc with the computer off ..........107 Caring for optical discs 107 Toshiba's online resources 107
... your computer 90 Cleaning the computer 90 Moving the computer 91 Using a computer lock 91 Chapter 2: Learning the Basics 92 Computing tips 92 Using the keyboard 93 Character keys 94 Ctrl, Fn, and Alt keys 94 Function keys 94 Special Windows® keys 95 Starting a program 95 Starting a program from the... media 105 Recording optical media 106 Removing a disc with the computer on...........106 Removing a disc with the computer off ..........107 Caring for optical discs 107 Toshiba's online resources 107

User Manual
Page 35
Contents 35 TOSHIBA Accessibility 158 TOSHIBA eco Utility 159 TOSHIBA Service Station 160 TOSHIBA PC Health Monitor 160 ConfigFree 161 Getting Started 161 ConfigFree® Utilities 162 Chapter 6: If Something Goes Wrong 165 Problems that are easy ... operating system can help you 171 Fixing a problem with Device Manager 172 Checking device properties 172 Memory problems 173 Power and the batteries 173 Keyboard problems 175 Display problems 175 Disk or storage drive problems 177 Error-checking 177 Optical drive problems 179 Sound system problems 180 ExpressCard® problems...
Contents 35 TOSHIBA Accessibility 158 TOSHIBA eco Utility 159 TOSHIBA Service Station 160 TOSHIBA PC Health Monitor 160 ConfigFree 161 Getting Started 161 ConfigFree® Utilities 162 Chapter 6: If Something Goes Wrong 165 Problems that are easy ... operating system can help you 171 Fixing a problem with Device Manager 172 Checking device properties 172 Memory problems 173 Power and the batteries 173 Keyboard problems 175 Display problems 175 Disk or storage drive problems 177 Error-checking 177 Optical drive problems 179 Sound system problems 180 ExpressCard® problems...

User Manual
Page 36
... in the Windows® operating system 187 If you need further assistance 191 Before you contact Toshiba 191 Contacting Toshiba 192 Other Toshiba Internet Web sites 192 Toshiba's worldwide offices 193 Appendix A: Hot Keys/TOSHIBA Cards 195 Hot Key Cards 195 Using the Hot Key Cards 196 Application Cards 197 Using the... (Display switch 204 Display brightness 205 Disabling or enabling wireless devices............206 Disabling or enabling the TouchPad 207 Zoom (Display resolution 208 Keyboard hot key functions 209 Appendix B: Power Cord/Cable Connectors 210 Glossary 211 Index 225
... in the Windows® operating system 187 If you need further assistance 191 Before you contact Toshiba 191 Contacting Toshiba 192 Other Toshiba Internet Web sites 192 Toshiba's worldwide offices 193 Appendix A: Hot Keys/TOSHIBA Cards 195 Hot Key Cards 195 Using the Hot Key Cards 196 Application Cards 197 Using the... (Display switch 204 Display brightness 205 Disabling or enabling wireless devices............206 Disabling or enabling the TouchPad 207 Zoom (Display resolution 208 Keyboard hot key functions 209 Appendix B: Power Cord/Cable Connectors 210 Glossary 211 Index 225
User Manual
Page 45
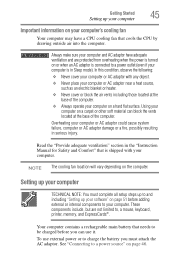
... computer. Your computer contains a rechargeable main battery that cools the CPU by drawing outside air into the computer. Using your computer. Setting up to , a mouse, keyboard, printer, memory, and ExpressCards®. Always make sure your computer and AC adaptor have a CPU cooling fan that needs to be charged before adding external...
... computer. Your computer contains a rechargeable main battery that cools the CPU by drawing outside air into the computer. Using your computer. Setting up to , a mouse, keyboard, printer, memory, and ExpressCards®. Always make sure your computer and AC adaptor have a CPU cooling fan that needs to be charged before adding external...
User Manual
Page 49
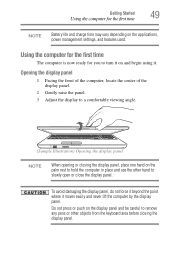
... Using the computer for you to turn it on the palm rest to hold the computer in place and use the other objects from the keyboard area before closing the display panel, place one hand on and begin using it.
... Using the computer for you to turn it on the palm rest to hold the computer in place and use the other objects from the keyboard area before closing the display panel, place one hand on and begin using it.

User Manual
Page 51
...first time you may vary according to your software setup choices. Adding optional external devices NOTE Before adding external devices or memory, Toshiba recommends setting up your computer for the first time, do not turn on your computer, the Setup Wizard guides you through steps...(see "Adding memory (optional)" on page 52) ❖ Connect a mouse (see "Using a mouse" on page 79) ❖ Connect an external keyboard (see "Using an external keyboard" on page 79) ❖ Connect an external monitor (see "Using external display devices" on page 76) ❖ Connect a local printer (see "...
...first time you may vary according to your software setup choices. Adding optional external devices NOTE Before adding external devices or memory, Toshiba recommends setting up your computer for the first time, do not turn on your computer, the Setup Wizard guides you through steps...(see "Adding memory (optional)" on page 52) ❖ Connect a mouse (see "Using a mouse" on page 79) ❖ Connect an external keyboard (see "Using an external keyboard" on page 79) ❖ Connect an external monitor (see "Using external display devices" on page 76) ❖ Connect a local printer (see "...

User Manual
Page 61
...the utilities on your computer's internal storage drive: 1 Make sure the computer is turned off. 2 Press and hold the 0 (zero) key on your keyboard while powering on your computer's internal storage drive or using recovery DVDs/media, if you create recovery DVDs/media before executing the recovery. If not..., skip to external media before using the second method, see "Creating recovery DVDs/media" on page 68. ❖ The Toshiba Recovery Wizard also provides the option of Windows® 7 32-bit or 64-bit operating system, select one at this time. Getting Started 61 ...
...the utilities on your computer's internal storage drive: 1 Make sure the computer is turned off. 2 Press and hold the 0 (zero) key on your keyboard while powering on your computer's internal storage drive or using recovery DVDs/media, if you create recovery DVDs/media before executing the recovery. If not..., skip to external media before using the second method, see "Creating recovery DVDs/media" on page 68. ❖ The Toshiba Recovery Wizard also provides the option of Windows® 7 32-bit or 64-bit operating system, select one at this time. Getting Started 61 ...
User Manual
Page 63
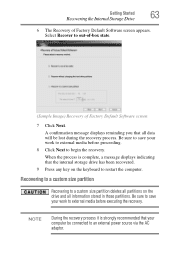
.... 8 Click Next to external media before executing the recovery. NOTE During the recovery process it is complete, a message displays indicating that all partitions on the keyboard to restart the computer. Select Recover to an external power source via the AC adaptor.
.... 8 Click Next to external media before executing the recovery. NOTE During the recovery process it is complete, a message displays indicating that all partitions on the keyboard to restart the computer. Select Recover to an external power source via the AC adaptor.

User Manual
Page 64
... such media. Click Yes to step 4. 4 A warning screen appears, stating that when the recovery is turned off. 2 Press and hold the 0 (zero) key on your keyboard while powering on your computer's internal storage drive: 1 Make sure the computer is executed all data will be deleted and rewritten. 64 Getting Started Recovering...
... such media. Click Yes to step 4. 4 A warning screen appears, stating that when the recovery is turned off. 2 Press and hold the 0 (zero) key on your keyboard while powering on your computer's internal storage drive: 1 Make sure the computer is executed all data will be deleted and rewritten. 64 Getting Started Recovering...
User Manual
Page 66
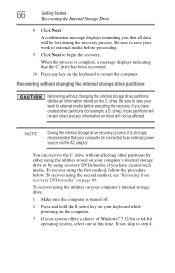
... Next to step 4. To recover using the second method, see "Restoring from recovery DVDs/media" on the keyboard to restart the computer. If not, skip to begin the recovery. Be sure to save your keyboard while powering on the C: drive. When the process is complete, a message displays indicating that the C: drive has...
... Next to step 4. To recover using the second method, see "Restoring from recovery DVDs/media" on the keyboard to restart the computer. If not, skip to begin the recovery. Be sure to save your keyboard while powering on the C: drive. When the process is complete, a message displays indicating that the C: drive has...

User Manual
Page 68
... storage drive recovery files to DVDs/media, which gives you may be lost during the recovery process. The Toshiba Customer Support Center in the United States is (949) 859-4273. Be sure to recover your system if... 6 The Recovery of Factory Default Software screen 7 Click Next. When the process is not a writable drive, contact Toshiba Customer Support to obtain the Recovery media for your work to external media before proceeding. 8 Click Next to restart the... optical disc drive is complete, a message displays, indicating that all data on the keyboard to begin the recovery.
... storage drive recovery files to DVDs/media, which gives you may be lost during the recovery process. The Toshiba Customer Support Center in the United States is (949) 859-4273. Be sure to recover your system if... 6 The Recovery of Factory Default Software screen 7 Click Next. When the process is not a writable drive, contact Toshiba Customer Support to obtain the Recovery media for your work to external media before proceeding. 8 Click Next to restart the... optical disc drive is complete, a message displays, indicating that all data on the keyboard to begin the recovery.
User Manual
Page 71
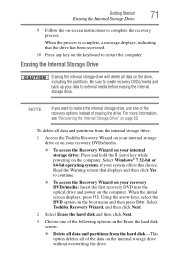
Getting Started 71 Erasing the Internal Storage Drive 9 Follow the on the keyboard to restart the computer. When the process is complete, a message ... internal storage drive will delete all data on the computer. When the initial screen displays, press F12. Select Toshiba Recovery Wizard, and then click Next. 2 Select Erase the hard disk and then click Next. 3 Choose one... the hard disk-This option deletes all data and partitions from the internal storage drive: 1 Access the Toshiba Recovery Wizard on your internal storage drive or on your recovery DVDs/media. ❖ To access the ...
Getting Started 71 Erasing the Internal Storage Drive 9 Follow the on the keyboard to restart the computer. When the process is complete, a message ... internal storage drive will delete all data on the computer. When the initial screen displays, press F12. Select Toshiba Recovery Wizard, and then click Next. 2 Select Erase the hard disk and then click Next. 3 Choose one... the hard disk-This option deletes all data and partitions from the internal storage drive: 1 Access the Toshiba Recovery Wizard on your internal storage drive or on your recovery DVDs/media. ❖ To access the ...
User Manual
Page 72
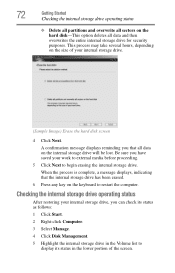
... storage drive for security purposes. 72 Getting Started Checking the internal storage drive operating status ❖ Delete all partitions and overwrite all sectors on the keyboard to begin erasing the internal storage drive. A confirmation message displays reminding you can check its status as follows: 1 Click Start. 2 Right-click Computer. 3 Select Manage...
... storage drive for security purposes. 72 Getting Started Checking the internal storage drive operating status ❖ Delete all partitions and overwrite all sectors on the keyboard to begin erasing the internal storage drive. A confirmation message displays reminding you can check its status as follows: 1 Click Start. 2 Right-click Computer. 3 Select Manage...
User Manual
Page 73
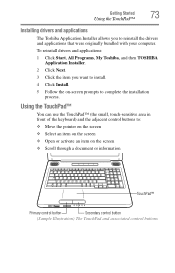
...reinstall the drivers and applications that were originally bundled with your computer. Getting Started 73 Using the TouchPad™ Installing drivers and applications The Toshiba Application Installer allows you want to install. 4 Click Install. 5 Follow the on the screen ❖ Scroll through a document or information...and associated control buttons Using the TouchPad™ You can use the TouchPad™ (the small, touch-sensitive area in front of the keyboard) and the adjacent control buttons to: ❖ Move the pointer on the screen ❖ Select an item on the screen ❖...
...reinstall the drivers and applications that were originally bundled with your computer. Getting Started 73 Using the TouchPad™ Installing drivers and applications The Toshiba Application Installer allows you want to install. 4 Click Install. 5 Follow the on the screen ❖ Scroll through a document or information...and associated control buttons Using the TouchPad™ You can use the TouchPad™ (the small, touch-sensitive area in front of the keyboard) and the adjacent control buttons to: ❖ Move the pointer on the screen ❖ Select an item on the screen ❖...
User Manual
Page 79
...Plug and Play, check its documentation. See the video device documentation for further instructions. The computer's USB ports support most USB-compatible keyboards. Refer to your printer, you need a suitable USB cable which may need to your printer. To make the connection, you can...compatible, check its documentation. You can use . If your computer through the USB ports. Getting Started 79 Using an external keyboard Adjusting the quality of the computer's built-in "Setting up the printer as instructed by the printer manufacturer, the printer may ...
...Plug and Play, check its documentation. See the video device documentation for further instructions. The computer's USB ports support most USB-compatible keyboards. Refer to your printer, you need a suitable USB cable which may need to your printer. To make the connection, you can...compatible, check its documentation. You can use . If your computer through the USB ports. Getting Started 79 Using an external keyboard Adjusting the quality of the computer's built-in "Setting up the printer as instructed by the printer manufacturer, the printer may ...
User Manual
Page 90
... 121. For information about taking care of your computer This section gives tips on page 140. To keep dust and dirt out of the computer's keyboard, speaker, and other openings. Never use harsh or caustic chemical products to avoid scratching or damaging the surface. See "Utilities" on cleaning and moving your...
... 121. For information about taking care of your computer This section gives tips on page 140. To keep dust and dirt out of the computer's keyboard, speaker, and other openings. Never use harsh or caustic chemical products to avoid scratching or damaging the surface. See "Utilities" on cleaning and moving your...

User Manual
Page 93
... new files for files you have a separate backup copy. It is active. Using the keyboard Your computer's keyboard contains character keys, control keys, function keys, and special Windows® keys. (Sample Illustration) Keyboard Learning the Basics 93 Using the keyboard ❖ Back up because it is reading from or writing to external media on...
... new files for files you have a separate backup copy. It is active. Using the keyboard Your computer's keyboard contains character keys, control keys, function keys, and special Windows® keys. (Sample Illustration) Keyboard Learning the Basics 93 Using the keyboard ❖ Back up because it is reading from or writing to external media on...
User Manual
Page 94
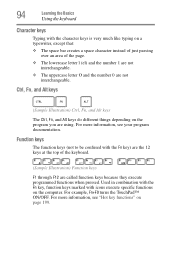
...For more information, see "Hot key functions" on page 199. For more information, see your program documentation. 94 Learning the Basics Using the keyboard Character keys Typing with the character keys is very much like typing on a typewriter, except that: ❖ The space bar creates a space ...character instead of just passing over an area of the keyboard. (Sample Illustration) Function keys F1 through F12 are called function keys because they execute programmed functions when pressed. Ctrl, Fn, and Alt keys...
...For more information, see "Hot key functions" on page 199. For more information, see your program documentation. 94 Learning the Basics Using the keyboard Character keys Typing with the character keys is very much like typing on a typewriter, except that: ❖ The space bar creates a space ...character instead of just passing over an area of the keyboard. (Sample Illustration) Function keys F1 through F12 are called function keys because they execute programmed functions when pressed. Ctrl, Fn, and Alt keys...
User Manual
Page 95
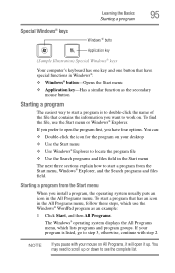
... groups. Learning the Basics 95 Starting a program Special Windows® keys Windows¬Æ butto Application key (Sample Illustration) Special Windows® keys Your computer's keyboard has one key and one button that have four options. If you prefer to open it will open the program first, you pause with step...
... groups. Learning the Basics 95 Starting a program Special Windows® keys Windows¬Æ butto Application key (Sample Illustration) Special Windows® keys Your computer's keyboard has one key and one button that have four options. If you prefer to open it will open the program first, you pause with step...

