User Guide
Page 2
2 Contents Introduction 23 Setting up your computer and getting started 25 Adding memory (optional 29 Your computer's TFT display 36 Inserting a PC Card 36 Removing a PC Card 37 Inserting an ExpressCard 37 Removing an ExpressCard 38 Learning the basics 38 Using the TouchPad 39 Using the optical drive 42 Moving the computer 45 Mobile computing 45 Taking care of your battery 49 If something goes wrong 51 If you need further assistance 56 Power cord/cable connectors 58 Features and specifications 58 Index 59
2 Contents Introduction 23 Setting up your computer and getting started 25 Adding memory (optional 29 Your computer's TFT display 36 Inserting a PC Card 36 Removing a PC Card 37 Inserting an ExpressCard 37 Removing an ExpressCard 38 Learning the basics 38 Using the TouchPad 39 Using the optical drive 42 Moving the computer 45 Mobile computing 45 Taking care of your battery 49 If something goes wrong 51 If you need further assistance 56 Power cord/cable connectors 58 Features and specifications 58 Index 59
User Guide
Page 29
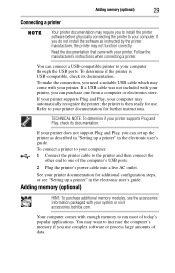
...) HINT: To purchase additional memory modules, see "Setting up a printer" in the electronic user's guide. Follow the manufacturer's instructions when connecting a printer. If your system or visit accessories.toshiba.com. If you do not install the software as described in "Setting up ... suitable USB cable which may come with your computer may automatically recognize the printer; Refer to increase the computer's memory if you use . Adding memory (optional) 29 Connecting a printer Your printer documentation may require you to install the printer software before physically connecting ...
...) HINT: To purchase additional memory modules, see "Setting up a printer" in the electronic user's guide. Follow the manufacturer's instructions when connecting a printer. If your system or visit accessories.toshiba.com. If you do not install the software as described in "Setting up ... suitable USB cable which may come with your computer may automatically recognize the printer; Refer to increase the computer's memory if you use . Adding memory (optional) 29 Connecting a printer Your printer documentation may require you to install the printer software before physically connecting ...
User Guide
Page 30
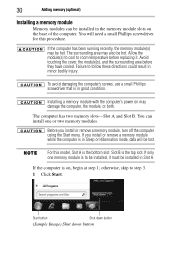
... For this procedure. Avoid touching the cover, the module(s), and the surrounding area before replacing it must be installed in the memory module slots on the base of the computer. To avoid damaging the computer's screws, use a small Phillips screwdriver that is the bottom...skip to be installed, it . If you install or remove a memory module, turn off the computer using the Start menu. If only one or two memory modules. 30 Adding memory (optional) Installing a memory module Memory modules can install one memory module is on may damage the computer, the module, or both....
... For this procedure. Avoid touching the cover, the module(s), and the surrounding area before replacing it must be installed in the memory module slots on the base of the computer. To avoid damaging the computer's screws, use a small Phillips screwdriver that is the bottom...skip to be installed, it . If you install or remove a memory module, turn off the computer using the Start menu. If only one or two memory modules. 30 Adding memory (optional) Installing a memory module Memory modules can install one memory module is on may damage the computer, the module, or both....
User Guide
Page 31
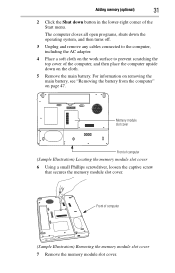
... slot cover 6 Using a small Phillips screwdriver, loosen the captive screw that secures the memory module slot cover. Adding memory (optional) 31 2 Click the Shut down on page 47. The computer closes all open programs, shuts down the operating system, and then turns off. 3 Unplug ... of the Start menu. For information on removing the main battery, see "Removing the battery from the computer" on the cloth. 5 Remove the main battery. Memory module slot cover Front of computer (Sample Illustration) Removing the...
... slot cover 6 Using a small Phillips screwdriver, loosen the captive screw that secures the memory module slot cover. Adding memory (optional) 31 2 Click the Shut down on page 47. The computer closes all open programs, shuts down the operating system, and then turns off. 3 Unplug ... of the Start menu. For information on removing the main battery, see "Removing the battery from the computer" on the cloth. 5 Remove the main battery. Memory module slot cover Front of computer (Sample Illustration) Removing the...
User Guide
Page 32
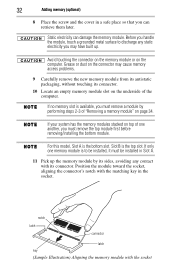
... a grounded metal surface to be installed, it must remove a module by its sides, avoiding any static electricity you may cause memory access problems. 9 Carefully remove the new memory module from its antistatic packaging, without touching its connector. Grease or dust on the connector may have built up the... the computer. Slot B is the bottom slot. Avoid touching the connector on the memory module or on top of one memory module is available, you must be installed in Slot A. 11 Pick up . 32 Adding memory (optional) 8 Place the screw and the cover in a safe place so that ...
... a grounded metal surface to be installed, it must remove a module by its sides, avoiding any static electricity you may cause memory access problems. 9 Carefully remove the new memory module from its antistatic packaging, without touching its connector. Grease or dust on the connector may have built up the... the computer. Slot B is the bottom slot. Avoid touching the connector on the memory module or on top of one memory module is available, you must be installed in Slot A. 11 Pick up . 32 Adding memory (optional) 8 Place the screw and the cover in a safe place so that ...
User Guide
Page 33
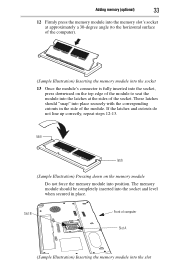
... the module to seat the module into the latches at approximately a 30-degree angle (to the horizontal surface of the computer). (Sample Illustration) Inserting the memory module into the socket 13 Once the module's connector is fully inserted into the socket, press downward on the... into the socket and level when secured in the side of the module. Slot B Front of computer Slot A (Sample Illustration) Inserting the memory module into place securely with the corresponding cutouts in place. If the latches and cutouts do not line up correctly, repeat steps 12-13. These ...
... the module to seat the module into the latches at approximately a 30-degree angle (to the horizontal surface of the computer). (Sample Illustration) Inserting the memory module into the socket 13 Once the module's connector is fully inserted into the socket, press downward on the... into the socket and level when secured in the side of the module. Slot B Front of computer Slot A (Sample Illustration) Inserting the memory module into place securely with the corresponding cutouts in place. If the latches and cutouts do not line up correctly, repeat steps 12-13. These ...
User Guide
Page 34
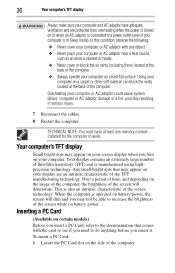
... slot. Make sure to work surface before restarting the computer. Using your computer on a carpet or other soft material can damage the computer and the memory module. Overheating your computer or AC adaptor could hang up . Do not try to shut down the computer and open the... adaptor near a heat source, such as an electric blanket or heater. ❖ Never cover or block the air vents including those located at least one memory module installed for the computer to remove the soft cloth from overheating when the power is turned on or when an AC adaptor is the...
... slot. Make sure to work surface before restarting the computer. Using your computer on a carpet or other soft material can damage the computer and the memory module. Overheating your computer or AC adaptor could hang up . Do not try to shut down the computer and open the... adaptor near a heat source, such as an electric blanket or heater. ❖ Never cover or block the air vents including those located at least one memory module installed for the computer to remove the soft cloth from overheating when the power is turned on or when an AC adaptor is the...
User Guide
Page 35
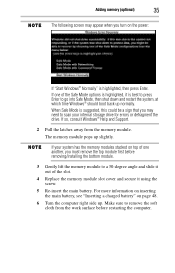
... you may appear when you must remove the top module first before restarting the computer. Make sure to remove the soft cloth from the memory module. The memory module pops up slightly. For more information on inserting the main battery, see "Inserting a charged battery" on the power: If "Start ..., consult Windows® Help and Support. 2 Pull the latches away from the work surface before removing/installing the bottom module. 3 Gently lift the memory module to a 30-degree angle and slide it out of the Safe Mode options is highlighted, it using the screw. 5 Re-insert the main ...
... you may appear when you must remove the top module first before restarting the computer. Make sure to remove the soft cloth from the memory module. The memory module pops up slightly. For more information on inserting the main battery, see "Inserting a charged battery" on the power: If "Start ..., consult Windows® Help and Support. 2 Pull the latches away from the work surface before removing/installing the bottom module. 3 Gently lift the memory module to a 30-degree angle and slide it out of the Safe Mode options is highlighted, it using the screw. 5 Re-insert the main ...
User Guide
Page 36
... adaptor near a heat source, such as an electric blanket or heater. ❖ Never cover or block the air vents including those located at least one memory module installed for the computer to do anything before you insert it. Overheating your computer. In this condition, observe the following: ❖ Never cover your...
... adaptor near a heat source, such as an electric blanket or heater. ❖ Never cover or block the air vents including those located at least one memory module installed for the computer to do anything before you insert it. Overheating your computer. In this condition, observe the following: ❖ Never cover your...
User Guide
Page 38
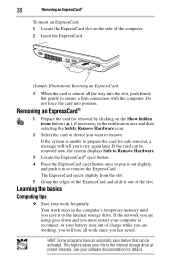
.... 38 Removing an ExpressCard® To insert an ExpressCard: 1 Locate the ExpressCard slot on the Show hidden icons button ( ), if necessary, in the computer's temporary memory until you save feature that can be activated.
.... 38 Removing an ExpressCard® To insert an ExpressCard: 1 Locate the ExpressCard slot on the Show hidden icons button ( ), if necessary, in the computer's temporary memory until you save feature that can be activated.
User Guide
Page 45
... manual eject hole. After a period of individual components. To purchase a new battery pack, see the accessories information included with your Toshiba computer. However, for all external peripheral cables are achieved on battery power at the time of publication. Mobile computing Running the computer on...indicator lights stop glowing) and all batteries. Battery may vary considerably from specifications depending on usage. The LithiumIon battery has no memory effect so it is normal for better accuracy of the drive. Never use a pencil to let the battery fully discharge each...
... manual eject hole. After a period of individual components. To purchase a new battery pack, see the accessories information included with your Toshiba computer. However, for all external peripheral cables are achieved on battery power at the time of publication. Mobile computing Running the computer on...indicator lights stop glowing) and all batteries. Battery may vary considerably from specifications depending on usage. The LithiumIon battery has no memory effect so it is normal for better accuracy of the drive. Never use a pencil to let the battery fully discharge each...
User Guide
Page 46
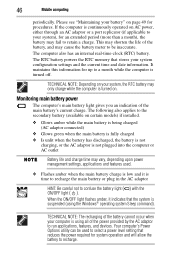
... settings and the current time and date information. The computer also has an internal real-time-clock (RTC) battery. The RTC battery powers the RTC memory that reduces the power required for procedures. When the ON/OFF light flashes amber, it is turned on your computer is suspended (using all of...
... settings and the current time and date information. The computer also has an internal real-time-clock (RTC) battery. The RTC battery powers the RTC memory that reduces the power required for procedures. When the ON/OFF light flashes amber, it is turned on your computer is suspended (using all of...

User Guide
Page 59
... 37 removing 38 ExpressCard® problems 55 slot appears dead 55 F files backing up 39 saving 38 I inserting ExpressCards® 37 PC Cards 36 installation memory module 30 installing main battery 47, 48 memory module 29 K keyboard not working 52 unexpected characters 53
... 37 removing 38 ExpressCard® problems 55 slot appears dead 55 F files backing up 39 saving 38 I inserting ExpressCards® 37 PC Cards 36 installation memory module 30 installing main battery 47, 48 memory module 29 K keyboard not working 52 unexpected characters 53
User Guide
Page 60
... in-use indicator 42 M main battery changing 47 installing 47, 48 removing 47 safety precautions 49 manual eject hole optical drive 42 memory module installation 30 installing 29 inserting into socket 32 removing 34 removing cover 31 monitor problems monitor not working 53 moving the computer 45...problem solving computer hangs when ExpressCard® inserted 56 computer hangs when PC Card inserted 54 computer will not power up 52 contacting Toshiba 57 display is blank 53 ExpressCard® checklist 55 ExpressCard® slot appears dead 55 external monitor 53 keyboard not responding 52 keyboard...
... in-use indicator 42 M main battery changing 47 installing 47, 48 removing 47 safety precautions 49 manual eject hole optical drive 42 memory module installation 30 installing 29 inserting into socket 32 removing 34 removing cover 31 monitor problems monitor not working 53 moving the computer 45...problem solving computer hangs when ExpressCard® inserted 56 computer hangs when PC Card inserted 54 computer will not power up 52 contacting Toshiba 57 display is blank 53 ExpressCard® checklist 55 ExpressCard® slot appears dead 55 external monitor 53 keyboard not responding 52 keyboard...

User Guide
Page 61
61 S safety disposing of batteries 50 precautions 25 safety precautions main battery 49 saving files 38 screen problems blank screen 53 setting battery notification 47 setting up AC adaptor 27 computer 30 work environment 25 specifications Features and specifications 58 T tips on computing 38 Toshiba accessories memory 29 TouchPad™ adjusting settings 41 disabling 41 enabling 41 using 39 U USB-compatible printer 29 W Web sites 57
61 S safety disposing of batteries 50 precautions 25 safety precautions main battery 49 saving files 38 screen problems blank screen 53 setting battery notification 47 setting up AC adaptor 27 computer 30 work environment 25 specifications Features and specifications 58 T tips on computing 38 Toshiba accessories memory 29 TouchPad™ adjusting settings 41 disabling 41 enabling 41 using 39 U USB-compatible printer 29 W Web sites 57


