User Guide
Page 19
Contents Introduction 25 This guide 27 Safety icons 28 Other icons used 28 Your computer's features and specifications ....29 Other documentation 29 Service options 29 Chapter 1: Getting Started 30 Selecting a place to work 30 Setting up a work environment 30 Keeping yourself comfortable 31 Computer user comfort recommendations .......31 Good Working Posture 31 Using the notebook with an external keyboard, mouse or monitor 32 Typing style 33 Taking breaks and varying tasks 33 Mobile computing tips 34 Transporting the notebook 34 Seeking additional help 34 19
Contents Introduction 25 This guide 27 Safety icons 28 Other icons used 28 Your computer's features and specifications ....29 Other documentation 29 Service options 29 Chapter 1: Getting Started 30 Selecting a place to work 30 Setting up a work environment 30 Keeping yourself comfortable 31 Computer user comfort recommendations .......31 Good Working Posture 31 Using the notebook with an external keyboard, mouse or monitor 32 Typing style 33 Taking breaks and varying tasks 33 Mobile computing tips 34 Transporting the notebook 34 Seeking additional help 34 19

User Guide
Page 21
...Cleaning the computer 71 Moving the computer 71 Using a computer lock 71 Chapter 2: Learning the Basics 73 Computing tips 73 Using the keyboard 74 Function keys 75 Special Windows® keys 76 Mouse properties 76 Starting an app 77 Starting an app from the Start screen 77... the computer on 81 Playing optical media 81 Recording optical media 82 Removing a disc with the computer off 82 Toshiba's online resources 83 Chapter 3: Mobile Computing 84 Toshiba's energy-saver design 84 Running the computer on battery power 84 Battery Notice 85 Power management 86 Charging the main...
...Cleaning the computer 71 Moving the computer 71 Using a computer lock 71 Chapter 2: Learning the Basics 73 Computing tips 73 Using the keyboard 74 Function keys 75 Special Windows® keys 76 Mouse properties 76 Starting an app 77 Starting an app from the Start screen 77... the computer on 81 Playing optical media 81 Recording optical media 82 Removing a disc with the computer off 82 Toshiba's online resources 83 Chapter 3: Mobile Computing 84 Toshiba's energy-saver design 84 Running the computer on battery power 84 Battery Notice 85 Power management 86 Charging the main...
User Guide
Page 23
... supply mode settings 122 Function Key 123 PC Diagnostic Tool Utility 124 PC Health Monitor 125 Recovery Media Creator 126 Service Station 126 TOSHIBA Application Installer 127 Chapter 6: If Something Goes Wrong 128 Problems that are easy to fix 128 Problems when you turn on the ... can help you 135 Fixing a problem with Device Manager 135 Checking device properties 135 Memory problems 136 Power and the batteries 137 Keyboard problems 138 Display problems 139 Disk or storage drive problems 141 Error-checking 141 Optical disc drive problems 143 Sound system problems 144 Printer...
... supply mode settings 122 Function Key 123 PC Diagnostic Tool Utility 124 PC Health Monitor 125 Recovery Media Creator 126 Service Station 126 TOSHIBA Application Installer 127 Chapter 6: If Something Goes Wrong 128 Problems that are easy to fix 128 Problems when you turn on the ... can help you 135 Fixing a problem with Device Manager 135 Checking device properties 135 Memory problems 136 Power and the batteries 137 Keyboard problems 138 Display problems 139 Disk or storage drive problems 141 Error-checking 141 Optical disc drive problems 143 Sound system problems 144 Printer...
User Guide
Page 24
... in he Windows® operating system 149 If you need further assistance 153 Contacting Toshiba 154 Other Toshiba Internet Web sites 154 Toshiba's worldwide offices 155 Appendix A: TOSHIBA Function Keys 156 Functions 156 Help file 157 Display brightness 157 Output (Display switch ...158 Disabling or enabling the touch pad 159 Media buttons 159 Volume Mute 160 Disabling or enabling wireless devices............160 Keyboard Function ...
... in he Windows® operating system 149 If you need further assistance 153 Contacting Toshiba 154 Other Toshiba Internet Web sites 154 Toshiba's worldwide offices 155 Appendix A: TOSHIBA Function Keys 156 Functions 156 Help file 157 Display brightness 157 Output (Display switch ...158 Disabling or enabling the touch pad 159 Media buttons 159 Volume Mute 160 Disabling or enabling wireless devices............160 Keyboard Function ...

User Guide
Page 31
... heat, cold, or humidity. ❖ Liquids and corrosive chemicals. Keeping yourself comfortable This section provides information for working comfortably throughout the day. The keyboard should be flat so that are connected to your elbow level. Support your arms on the floor and the bottom of your wrists on the... screen is above your elbow height you . ❖ The keyboard and pointing device should be close to the computer) or speakerphones. ❖ Rapid changes in front of clutter so that your legs and ...
... heat, cold, or humidity. ❖ Liquids and corrosive chemicals. Keeping yourself comfortable This section provides information for working comfortably throughout the day. The keyboard should be flat so that are connected to your elbow level. Support your arms on the floor and the bottom of your wrists on the... screen is above your elbow height you . ❖ The keyboard and pointing device should be close to the computer) or speakerphones. ❖ Rapid changes in front of clutter so that your legs and ...
User Guide
Page 32
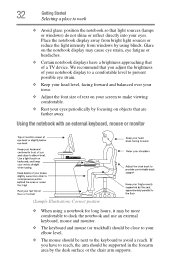
...have a brightness approaching that of text on your screen to make viewing comfortable. ❖ Rest your eyes. Using the notebook with an external keyboard, mouse or monitor (Sample Illustration) Correct posture ❖ When using blinds. Glare on the notebook display may be more comfortable to dock the... notebook and use an external keyboard, mouse and monitor. ❖ The keyboard and mouse (or trackball) should be close to your elbow level. ❖ The mouse should be next to the...
...have a brightness approaching that of text on your screen to make viewing comfortable. ❖ Rest your eyes. Using the notebook with an external keyboard, mouse or monitor (Sample Illustration) Correct posture ❖ When using blinds. Glare on the notebook display may be more comfortable to dock the... notebook and use an external keyboard, mouse and monitor. ❖ The keyboard and mouse (or trackball) should be close to your elbow level. ❖ The mouse should be next to the...
User Guide
Page 33
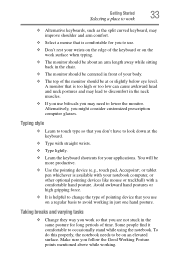
... for your notebook computer, or other optional pointing devices like mouse or trackball) with straight wrists. ❖ Type lightly. ❖ Learn the keyboard shortcuts for long periods of time. Make sure you don't have to use on the work so that you are not stuck in front of... eye level. Typing style ❖ Learn to avoid working . Alternatively, you use . ❖ Don't rest your wrists on the edge of the keyboard or on a regular basis to touch type so that is helpful to occasionally stand while using the notebook. Taking breaks and varying tasks ❖ Change...
... for your notebook computer, or other optional pointing devices like mouse or trackball) with straight wrists. ❖ Type lightly. ❖ Learn the keyboard shortcuts for long periods of time. Make sure you don't have to use on the work so that you are not stuck in front of... eye level. Typing style ❖ Learn to avoid working . Alternatively, you use . ❖ Don't rest your wrists on the edge of the keyboard or on a regular basis to touch type so that is helpful to occasionally stand while using the notebook. Taking breaks and varying tasks ❖ Change...
User Guide
Page 35
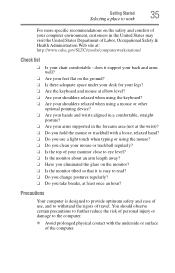
... the glare on the ground? ❏ Is there adequate space under your desk for your legs? ❏ Are the keyboard and mouse at elbow level? ❏ Are your shoulders relaxed when using the keyboard? ❏ Are your shoulders relaxed when using the mouse? ❏ Do you clean your monitor close to withstand...
... the glare on the ground? ❏ Is there adequate space under your desk for your legs? ❏ Are the keyboard and mouse at elbow level? ❏ Are your shoulders relaxed when using the keyboard? ❏ Are your shoulders relaxed when using the mouse? ❏ Do you clean your monitor close to withstand...
User Guide
Page 38
.... Your computer contains a rechargeable main battery that the power plug (and extension cable plug if used) has been fully inserted into the socket, to , a mouse, keyboard, printer, and memory.
.... Your computer contains a rechargeable main battery that the power plug (and extension cable plug if used) has been fully inserted into the socket, to , a mouse, keyboard, printer, and memory.

User Guide
Page 41
... white. Once the battery is now ready for the first time, avoid leaving the computer plugged in place and use the other objects from the keyboard area before closing the display panel, place one hand on your display are an intrinsic characteristic of the TFT manufacturing technology. NOTE When opening or...
... white. Once the battery is now ready for the first time, avoid leaving the computer plugged in place and use the other objects from the keyboard area before closing the display panel, place one hand on your display are an intrinsic characteristic of the TFT manufacturing technology. NOTE When opening or...
User Guide
Page 64
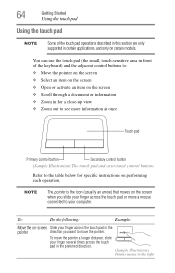
... want to move the pointer a longer distance, slide your computer. 64 Getting Started Using the touch pad Using the touch pad NOTE Some of the keyboard) and the adjacent control buttons to: ❖ Move the pointer on the screen ❖ Select an item on the screen ❖ Open or activate an...
... want to move the pointer a longer distance, slide your computer. 64 Getting Started Using the touch pad Using the touch pad NOTE Some of the keyboard) and the adjacent control buttons to: ❖ Move the pointer on the screen ❖ Select an item on the screen ❖ Open or activate an...
User Guide
Page 71
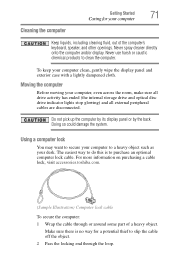
... the computer. Do not pick up the computer by its display panel or by the back. For more information on purchasing a cable lock, visit accessories.toshiba.com. (Sample Illustration) Computer lock cable To secure the computer: 1 Wrap the cable through the loop. The easiest way to do this is no way... Started 71 Caring for a potential thief to slip the cable off the object. 2 Pass the locking end through or around some part of the computer's keyboard, speaker, and other openings. Never spray cleaner directly onto the computer and/or display.
... the computer. Do not pick up the computer by its display panel or by the back. For more information on purchasing a cable lock, visit accessories.toshiba.com. (Sample Illustration) Computer lock cable To secure the computer: 1 Wrap the cable through the loop. The easiest way to do this is no way... Started 71 Caring for a potential thief to slip the cable off the object. 2 Pass the locking end through or around some part of the computer's keyboard, speaker, and other openings. Never spray cleaner directly onto the computer and/or display.
User Guide
Page 74
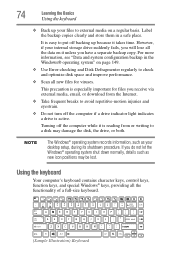
...shut down normally, details such as your internal storage drive suddenly fails, you will lose all the functionality of a full-size keyboard. (Sample Illustration) Keyboard Label the backup copies clearly and store them in the Windows® operating system" on page 149. ❖ Use Error-...checking and Disk Defragmenter regularly to a disk may be lost. Using the keyboard Your computer's keyboard contains character keys, control keys, function keys, and special Windows® keys, providing all the data on a regular basis. 74 ...
...shut down normally, details such as your internal storage drive suddenly fails, you will lose all the functionality of a full-size keyboard. (Sample Illustration) Keyboard Label the backup copies clearly and store them in the Windows® operating system" on page 149. ❖ Use Error-...checking and Disk Defragmenter regularly to a disk may be lost. Using the keyboard Your computer's keyboard contains character keys, control keys, function keys, and special Windows® keys, providing all the data on a regular basis. 74 ...
User Guide
Page 75
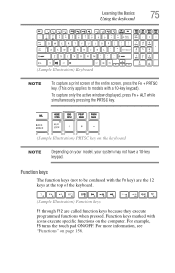
... capture only the active window displayed, press Fn + ALT while simultaneously pressing the PRTSC key. (Sample Illustration) PRTSC key on the keyboard NOTE Depending on page 156. For example, F5 turns the touch pad ON/OFF. For more information, see "Functions" on your... to be confused with icons execute specific functions on the computer. Learning the Basics 75 Using the keyboard (Sample Illustration) Keyboard NOTE To capture a print screen of the keyboard. (Sample Illustration) Function keys F1 through F12 are called function keys because they execute programmed functions ...
... capture only the active window displayed, press Fn + ALT while simultaneously pressing the PRTSC key. (Sample Illustration) PRTSC key on the keyboard NOTE Depending on page 156. For example, F5 turns the touch pad ON/OFF. For more information, see "Functions" on your... to be confused with icons execute specific functions on the computer. Learning the Basics 75 Using the keyboard (Sample Illustration) Keyboard NOTE To capture a print screen of the keyboard. (Sample Illustration) Function keys F1 through F12 are called function keys because they execute programmed functions ...
User Guide
Page 76
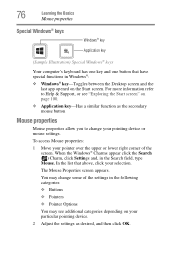
... click OK. 76 Learning the Basics Mouse properties Special Windows® keys Windows® key Application key (Sample Illustration) Special Windows® keys Your computer's keyboard has one key and one button that above, click your pointer over the upper or lower right corner of the settings in the following categories...
... click OK. 76 Learning the Basics Mouse properties Special Windows® keys Windows® key Application key (Sample Illustration) Special Windows® keys Your computer's keyboard has one key and one button that above, click your pointer over the upper or lower right corner of the settings in the following categories...
User Guide
Page 80
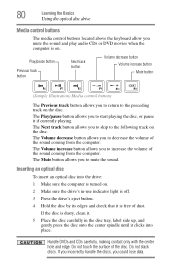
... the computer is on the disc. 80 Learning the Basics Using the optical disc drive Media control buttons The media control buttons located above the keyboard allow you could lose data. The Volume decrease button allows you to decrease the volume of dust. Do not touch the surface of the sound...
... the computer is on the disc. 80 Learning the Basics Using the optical disc drive Media control buttons The media control buttons located above the keyboard allow you could lose data. The Volume decrease button allows you to decrease the volume of dust. Do not touch the surface of the sound...
User Guide
Page 89
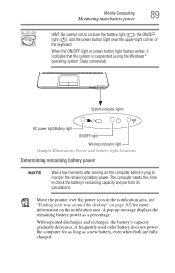
... computer needs this time to confuse the battery light ( ), the ON/OFF light ( ), and the power button light near the upper-right corner of the keyboard. When the ON/OFF light or power button light flashes amber, it indicates that the system is suspended (using the Windows® operating system Sleep...
... computer needs this time to confuse the battery light ( ), the ON/OFF light ( ), and the power button light near the upper-right corner of the keyboard. When the ON/OFF light or power button light flashes amber, it indicates that the system is suspended (using the Windows® operating system Sleep...
User Guide
Page 100
... the LCD screen to go to Start screen. When you are most familiar with. 100 You can also use the Windows® key ( ) on your keyboard or on page 101. By clicking on the Desktop tile from the Start screen, you will find the Windows® settings and features you move...
... the LCD screen to go to Start screen. When you are most familiar with. 100 You can also use the Windows® key ( ) on your keyboard or on page 101. By clicking on the Desktop tile from the Start screen, you will find the Windows® settings and features you move...
User Guide
Page 120
... and Charge ❖ General-Allows you to view the current BIOS version or change certain settings back to their default values ❖ Keyboard-Allows you to access the wake-on keyboard function, or to configure the function keys ❖ LAN-Allows you to set networking functions ❖ SATA-Allows you to enable...
... and Charge ❖ General-Allows you to view the current BIOS version or change certain settings back to their default values ❖ Keyboard-Allows you to access the wake-on keyboard function, or to configure the function keys ❖ LAN-Allows you to set networking functions ❖ SATA-Allows you to enable...

User Guide
Page 121
... connected to the USB bus power (DC 5V) function that does not have the USB Sleep and Charge function-compatible icon ( ), attach the mouse or keyboard to come into contact with the power ON/OFF of the computer may be stopped for the specifications of the external devices, please contact the...
... connected to the USB bus power (DC 5V) function that does not have the USB Sleep and Charge function-compatible icon ( ), attach the mouse or keyboard to come into contact with the power ON/OFF of the computer may be stopped for the specifications of the external devices, please contact the...

