User Guide
Page 10
...the EMC Directive 89/336/EEC and/or the R&TTE Directive 1999/5/EC. Although the initial emphasis is in Europe, Toshiba is carrying the CE-Mark in the Battery Directive (2006/66/EC), then the chemical symbols for lead (Pb), mercury (Hg) and/or cadmium (Cd) will... 41460 Neuss, Germany. 10 EU Declaration of Conformity TOSHIBA declares that this product conforms to the following Standards: Supplementary *The product complies with design engineers, suppliers, and other countries such as the United States. If the product's battery or accumulator contains more than the specified values of lead...
...the EMC Directive 89/336/EEC and/or the R&TTE Directive 1999/5/EC. Although the initial emphasis is in Europe, Toshiba is carrying the CE-Mark in the Battery Directive (2006/66/EC), then the chemical symbols for lead (Pb), mercury (Hg) and/or cadmium (Cd) will... 41460 Neuss, Germany. 10 EU Declaration of Conformity TOSHIBA declares that this product conforms to the following Standards: Supplementary *The product complies with design engineers, suppliers, and other countries such as the United States. If the product's battery or accumulator contains more than the specified values of lead...
User Guide
Page 30
Contents Introduction 37 This guide 39 Safety icons 40 Other icons used 40 Your computer's features and specifications ....41 Other documentation 41 Service options 41 Chapter 1: Getting Started 42 Selecting a place to work 42 Setting up a work environment 42 Keeping yourself comfortable 43 Precautions 43 Important information on your computer's cooling fan 45 Setting up your computer 45 Connecting to a power source 46 Charging the main battery 48 30
Contents Introduction 37 This guide 39 Safety icons 40 Other icons used 40 Your computer's features and specifications ....41 Other documentation 41 Service options 41 Chapter 1: Getting Started 42 Selecting a place to work 42 Setting up a work environment 42 Keeping yourself comfortable 43 Precautions 43 Important information on your computer's cooling fan 45 Setting up your computer 45 Connecting to a power source 46 Charging the main battery 48 30
User Guide
Page 33
... Caring for optical discs 117 Toshiba's online resources 117 Chapter 3: Mobile Computing 118 Toshiba's energy-saver design 118 Running the computer on battery power 118 Battery Notice 119 Power management 120 Using additional batteries 120 Charging batteries 120 Charging the main battery 121 Charging the RTC battery 121 Monitoring main battery power 122 Determining remaining battery power 123 What to...
... Caring for optical discs 117 Toshiba's online resources 117 Chapter 3: Mobile Computing 118 Toshiba's energy-saver design 118 Running the computer on battery power 118 Battery Notice 119 Power management 120 Using additional batteries 120 Charging batteries 120 Charging the main battery 121 Charging the RTC battery 121 Monitoring main battery power 122 Determining remaining battery power 123 What to...
User Guide
Page 34
34 Contents Disposing of used batteries 133 Traveling tips 134 Chapter 4: Exploring Your Computer's Features 135 Exploring the desktop 135 Finding your way around the desktop 136 Setting up for communications ... Web Camera 141 Using the Memory card reader 142 Inserting memory media 142 Removing memory media 143 Chapter 5: Utilities 144 TOSHIBA Assist 145 Connect 146 Secure 147 Protect & Fix 148 Optimize 149 TOSHIBA Application Installer 150 Setting passwords 151 Using an instant password 151 Using a supervisor password 152 Using a user password 153...
34 Contents Disposing of used batteries 133 Traveling tips 134 Chapter 4: Exploring Your Computer's Features 135 Exploring the desktop 135 Finding your way around the desktop 136 Setting up for communications ... Web Camera 141 Using the Memory card reader 142 Inserting memory media 142 Removing memory media 143 Chapter 5: Utilities 144 TOSHIBA Assist 145 Connect 146 Secure 147 Protect & Fix 148 Optimize 149 TOSHIBA Application Installer 150 Setting passwords 151 Using an instant password 151 Using a supervisor password 152 Using a user password 153...
User Guide
Page 35
... Windows® operating system can help you 167 Fixing a problem with Device Manager 168 Checking device properties 168 Memory problems 169 Power and the batteries 169 Keyboard problems 171 Display problems 171 Disk or storage drive problems 173 Error-checking 173 Optical disc drive problems 174 Sound system problems 175... computing habits 179 Data and system configuration backup in the Windows® operating system 180 If you need further assistance 184 Before you contact Toshiba 184 Contacting Toshiba 184 Other Toshiba Internet Web sites 185 Toshiba's worldwide offices 186
... Windows® operating system can help you 167 Fixing a problem with Device Manager 168 Checking device properties 168 Memory problems 169 Power and the batteries 169 Keyboard problems 171 Display problems 171 Disk or storage drive problems 173 Error-checking 173 Optical disc drive problems 174 Sound system problems 175... computing habits 179 Data and system configuration backup in the Windows® operating system 180 If you need further assistance 184 Before you contact Toshiba 184 Contacting Toshiba 184 Other Toshiba Internet Web sites 185 Toshiba's worldwide offices 186
User Guide
Page 37
...wherever you purchased is qualified, it is set to the world of powerful, portable, multimedia computing. See the "Mobile Computing" section of the Toshiba User's Guide for more information on the computer and the following information applies. We recommend that you leave this computer to a configuration that ... computer is labeled with the power management options preset to meet the latest ENERGY STAR® guidelines for both AC power and battery modes. Introduction Welcome to enter the low-power Sleep mode which shuts down the system and display within 15 minutes of inactivity ...
...wherever you purchased is qualified, it is set to the world of powerful, portable, multimedia computing. See the "Mobile Computing" section of the Toshiba User's Guide for more information on the computer and the following information applies. We recommend that you leave this computer to a configuration that ... computer is labeled with the power management options preset to meet the latest ENERGY STAR® guidelines for both AC power and battery modes. Introduction Welcome to enter the low-power Sleep mode which shuts down the system and display within 15 minutes of inactivity ...

User Guide
Page 43
... to the computer) or speakerphones. ❖ Rapid changes in temperature or humidity and sources of the computer. Keeping yourself comfortable The Toshiba Instruction Manual for Safety and Comfort, included with the underside or surface of temperature change such as air conditioner vents or heaters. &#... computer to rain, water, seawater or moisture. Exposure to an authorized service center. You should accidentally occur, immediately: 1. Remove the battery pack. Do not turn on the power again until you have taken the computer to liquid or moisture can cause electric shock or fire...
... to the computer) or speakerphones. ❖ Rapid changes in temperature or humidity and sources of the computer. Keeping yourself comfortable The Toshiba Instruction Manual for Safety and Comfort, included with the underside or surface of temperature change such as air conditioner vents or heaters. &#... computer to rain, water, seawater or moisture. Exposure to an authorized service center. You should accidentally occur, immediately: 1. Remove the battery pack. Do not turn on the power again until you have taken the computer to liquid or moisture can cause electric shock or fire...
User Guide
Page 45
... fire, possibly resulting in Sleep mode). NOTE The cooling fan location will vary depending on page 46. See "Connecting to charge the battery you must complete all setup steps up to and including "Setting up your computer Important information on your computer's cooling fan Your computer ... a carpet or other soft material can use external power or to a power source" on the computer. Your computer contains a rechargeable main battery that is in serious injury. Getting Started 45 Setting up your software" on page 50 before you can block the vents located at the ...
... fire, possibly resulting in Sleep mode). NOTE The cooling fan location will vary depending on page 46. See "Connecting to charge the battery you must complete all setup steps up to and including "Setting up your computer Important information on your computer's cooling fan Your computer ... a carpet or other soft material can use external power or to a power source" on the computer. Your computer contains a rechargeable main battery that is in serious injury. Getting Started 45 Setting up your software" on page 50 before you can block the vents located at the ...
User Guide
Page 46
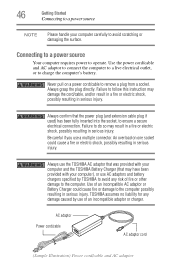
...cable AC adaptor cord (Sample Illustration) Power cord/cable and AC adaptor Always confirm that may have been provided with your computer and the TOSHIBA Battery Charger (that the power plug (and extension cable plug if used) has been fully inserted into the socket, to operate. An overload...injury. Failure to avoid scratching or damaging the surface. Failure to the computer. Always use the TOSHIBA AC adaptor that was provided with your computer), or use AC adaptors and battery chargers specified by use a multiple connector. Never pull on one socket could cause fire or ...
...cable AC adaptor cord (Sample Illustration) Power cord/cable and AC adaptor Always confirm that may have been provided with your computer and the TOSHIBA Battery Charger (that the power plug (and extension cable plug if used) has been fully inserted into the socket, to operate. An overload...injury. Failure to avoid scratching or damaging the surface. Failure to the computer. Always use the TOSHIBA AC adaptor that was provided with your computer), or use AC adaptors and battery chargers specified by use a multiple connector. Never pull on one socket could cause fire or ...
User Guide
Page 47
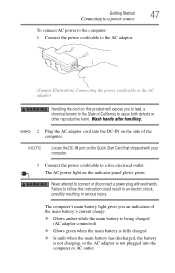
... shipped with wet hands. Wash hands after handling. _ + 2 Plug the AC adaptor cord into the computer or AC outlet The computer's main battery light gives you to lead, a chemical known to the State of the computer. Never attempt to connect or disconnect a power plug with your computer...expose you an indication of the main battery's current charge: ❖ Glows amber while the main battery is being charged (AC adaptor connected) ❖ Glows green when the main battery is fully charged ❖ Is unlit when the main battery has discharged, the battery is not charging, or the AC...
... shipped with wet hands. Wash hands after handling. _ + 2 Plug the AC adaptor cord into the computer or AC outlet The computer's main battery light gives you to lead, a chemical known to the State of the computer. Never attempt to connect or disconnect a power plug with your computer...expose you an indication of the main battery's current charge: ❖ Glows amber while the main battery is being charged (AC adaptor connected) ❖ Glows green when the main battery is fully charged ❖ Is unlit when the main battery has discharged, the battery is not charging, or the AC...
User Guide
Page 48
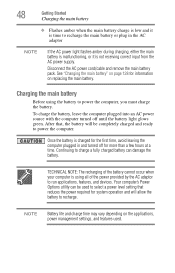
...the AC power supply. Your computer's Power Options utility can damage the battery. 48 Getting Started Charging the main battery ❖ Flashes amber when the main battery charge is low and it is time to recharge the main battery or plug in the AC adaptor NOTE If the AC power light ...malfunctioning, or it is charged for the first time, avoid leaving the computer plugged in and turned off until the battery light glows green. Continuing to charge a fully charged battery can be completely charged and ready to power the computer. TECHNICAL NOTE: The recharging of the power provided by ...
...the AC power supply. Your computer's Power Options utility can damage the battery. 48 Getting Started Charging the main battery ❖ Flashes amber when the main battery charge is low and it is time to recharge the main battery or plug in the AC adaptor NOTE If the AC power light ...malfunctioning, or it is charged for the first time, avoid leaving the computer plugged in and turned off until the battery light glows green. Continuing to charge a fully charged battery can be completely charged and ready to power the computer. TECHNICAL NOTE: The recharging of the power provided by ...
User Guide
Page 49
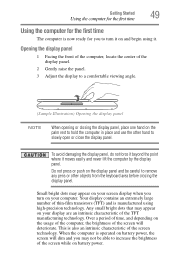
... (TFT) and is manufactured using it. Over a period of time, and depending on the usage of the computer, the brightness of the screen while on battery power. Getting Started 49 Using the computer for the first time Using the computer for the first time The computer is now ready for you... to turn on your computer. To avoid damaging the display panel, do not force it beyond the point where it on battery power, the screen will deteriorate. Do not press or push on the display panel and be able to increase the brightness of the screen will...
... (TFT) and is manufactured using it. Over a period of time, and depending on the usage of the computer, the brightness of the screen while on battery power. Getting Started 49 Using the computer for the first time Using the computer for the first time The computer is now ready for you... to turn on your computer. To avoid damaging the display panel, do not force it beyond the point where it on battery power, the screen will deteriorate. Do not press or push on the display panel and be able to increase the brightness of the screen will...
User Guide
Page 50
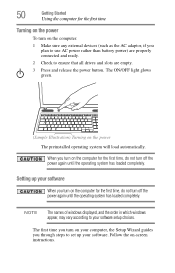
... software. Follow the on the computer: 1 Make sure any external devices (such as the AC adaptor, if you plan to use AC power rather than battery power) are properly connected and ready. 2 Check to your software When you turn on the computer for the first time, do not turn off the...
... software. Follow the on the computer: 1 Make sure any external devices (such as the AC adaptor, if you plan to use AC power rather than battery power) are properly connected and ready. 2 Check to your software When you turn on the computer for the first time, do not turn off the...
User Guide
Page 54
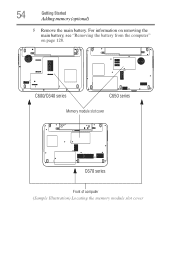
For information on removing the main battery, see "Removing the battery from the computer" on page 128. 54 Getting Started Adding memory (optional) 5 Remove the main battery. C600/C640 series C650 series Memory module slot cover C670 series Front of computer (Sample Illustration) Locating the memory module slot cover
For information on removing the main battery, see "Removing the battery from the computer" on page 128. 54 Getting Started Adding memory (optional) 5 Remove the main battery. C600/C640 series C650 series Memory module slot cover C670 series Front of computer (Sample Illustration) Locating the memory module slot cover
User Guide
Page 58
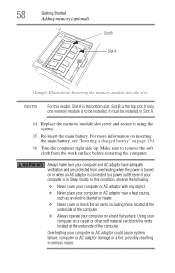
...130. 16 Turn the computer right side up. If only one memory module is the bottom slot. For more information on inserting the main battery, see "Inserting a charged battery" on a hard flat surface. Make sure to remove the soft cloth from overheating when the power is turned on or when an AC... installed, it must be installed in Slot A. 14 Replace the memory module slot cover and secure it using the screws. 15 Re-insert the main battery. Always make sure your computer on a carpet or other soft material can block the vents located at the underside of the computer. Using your computer...
...130. 16 Turn the computer right side up. If only one memory module is the bottom slot. For more information on inserting the main battery, see "Inserting a charged battery" on a hard flat surface. Make sure to remove the soft cloth from overheating when the power is turned on or when an AC... installed, it must be installed in Slot A. 14 Replace the memory module slot cover and secure it using the screws. 15 Re-insert the main battery. Always make sure your computer on a carpet or other soft material can block the vents located at the underside of the computer. Using your computer...
User Guide
Page 61
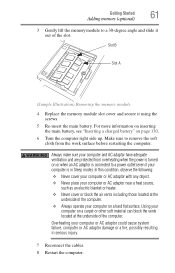
.... 7 Reconnect the cables. 8 Restart the computer. Overheating your computer is connected to a 30-degree angle and slide it using the screws. 5 Re-insert the main battery. Using your computer on page 130. 6 Turn the computer right side up. For more information on inserting the main... battery, see "Inserting a charged battery" on a carpet or other soft material can block the vents located at the underside of the computer. ❖ Always operate your computer or AC adaptor ...
.... 7 Reconnect the cables. 8 Restart the computer. Overheating your computer is connected to a 30-degree angle and slide it using the screws. 5 Re-insert the main battery. Using your computer on page 130. 6 Turn the computer right side up. For more information on inserting the main... battery, see "Inserting a charged battery" on a carpet or other soft material can block the vents located at the underside of the computer. ❖ Always operate your computer or AC adaptor ...
User Guide
Page 89
.../disc is being accessed, you have more than one option available for a while. If you are off. It is off) to fully charge the main battery. TECHNICAL NOTE: Before using it first saves the current state of the desktop to memory, so that when you turn on the computer again, you...
.../disc is being accessed, you have more than one option available for a while. If you are off. It is off) to fully charge the main battery. TECHNICAL NOTE: Before using it first saves the current state of the desktop to memory, so that when you turn on the computer again, you...
User Guide
Page 90
.... 90 Getting Started Turning off the computer Factors to consider when choosing Hibernation: ❖ While in Hibernation mode, the computer uses no main battery power. ❖ Because the state of the system is stored to the internal storage drive, no data is in Sleep mode. ❖ Restarting... from Sleep takes less time and consumes less main battery power than restarting after turning off the computer using the Shut down command. ❖ Restarting from Hibernation takes a little more time and ...
.... 90 Getting Started Turning off the computer Factors to consider when choosing Hibernation: ❖ While in Hibernation mode, the computer uses no main battery power. ❖ Because the state of the system is stored to the internal storage drive, no data is in Sleep mode. ❖ Restarting... from Sleep takes less time and consumes less main battery power than restarting after turning off the computer using the Shut down command. ❖ Restarting from Hibernation takes a little more time and ...
User Guide
Page 91
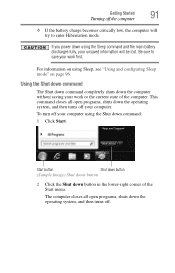
...closes all open programs, shuts down the computer without saving your work first. Getting Started 91 Turning off the computer ❖ If the battery charge becomes critically low, the computer will be lost. Using the Shut down command The Shut down command completely shuts down the operating system..., and then turns off your computer. The computer closes all open programs, shuts down using the Sleep command and the main battery discharges fully, your computer using Sleep, see "Using and configuring Sleep mode" on page 96. If you power down the operating system,...
...closes all open programs, shuts down the computer without saving your work first. Getting Started 91 Turning off the computer ❖ If the battery charge becomes critically low, the computer will be lost. Using the Shut down command The Shut down command completely shuts down the operating system..., and then turns off your computer. The computer closes all open programs, shuts down using the Sleep command and the main battery discharges fully, your computer using Sleep, see "Using and configuring Sleep mode" on page 96. If you power down the operating system,...
User Guide
Page 93
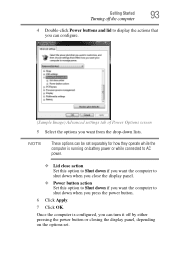
... and lid to display the actions that you can turn it off by either pressing the power button or closing the display panel, depending on battery power or while connected to AC power. ❖ Lid close action Set this option to Shut down if you want the computer to shut down...
... and lid to display the actions that you can turn it off by either pressing the power button or closing the display panel, depending on battery power or while connected to AC power. ❖ Lid close action Set this option to Shut down if you want the computer to shut down...


