User Guide
Page 1
GMAD00278010 03/11 Satellite®/Satellite Pro® C600 Series User's Guide If you need assistance: ❖ Toshiba's Support Web site pcsupport.toshiba.com ❖ Toshiba Customer Support Center Calling within the United States (800) 457-7777 Calling from outside the United States (949) 859-4273 For more information, see "If Something Goes Wrong" on page 162 in this guide.
GMAD00278010 03/11 Satellite®/Satellite Pro® C600 Series User's Guide If you need assistance: ❖ Toshiba's Support Web site pcsupport.toshiba.com ❖ Toshiba Customer Support Center Calling within the United States (800) 457-7777 Calling from outside the United States (949) 859-4273 For more information, see "If Something Goes Wrong" on page 162 in this guide.
User Guide
Page 2
... CONFIRM WHETHER THE DATA HAS BEEN SUCCESSFULLY COPIED OR TRANSFERRED. TOSHIBA DISCLAIMS ANY LIABILITY FOR THE FAILURE TO COPY OR TRANSFER THE DATA CORRECTLY. Model: Satellite®/Satellite Pro® C600 Series Recordable and/or ReWritable Drive(s) and Associated Software Warranty The computer... and/or ReWritable optical disc drive(s) and associated software, among the most advanced data storage technologies available. TOSHIBA AMERICA INFORMATION SYSTEMS, INC. ("TOSHIBA"), ITS AFFILIATES AND SUPPLIERS DO NOT WARRANT THAT OPERATION OF THE PRODUCT WILL BE UNINTERRUPTED OR ERROR FREE....
... CONFIRM WHETHER THE DATA HAS BEEN SUCCESSFULLY COPIED OR TRANSFERRED. TOSHIBA DISCLAIMS ANY LIABILITY FOR THE FAILURE TO COPY OR TRANSFER THE DATA CORRECTLY. Model: Satellite®/Satellite Pro® C600 Series Recordable and/or ReWritable Drive(s) and Associated Software Warranty The computer... and/or ReWritable optical disc drive(s) and associated software, among the most advanced data storage technologies available. TOSHIBA AMERICA INFORMATION SYSTEMS, INC. ("TOSHIBA"), ITS AFFILIATES AND SUPPLIERS DO NOT WARRANT THAT OPERATION OF THE PRODUCT WILL BE UNINTERRUPTED OR ERROR FREE....

User Guide
Page 14
... Netherlands New Caledonia New Zealand Nicaragua Norway Oman Pakistan Panama 14 Approved Countries/Regions for the Intel® Wireless Wi-Fi® Link 5100/5300 Series This equipment is approved to the radio standard by the countries/regions in the following table.
... Netherlands New Caledonia New Zealand Nicaragua Norway Oman Pakistan Panama 14 Approved Countries/Regions for the Intel® Wireless Wi-Fi® Link 5100/5300 Series This equipment is approved to the radio standard by the countries/regions in the following table.

User Guide
Page 15
...Australia Bahrain Bolivia Brunei Canada Canada USA Approved Countries/Regions for the Intel® Wireless Wi-Fi® Link 622ANHMW and 633ANHMW Series This equipment is approved to the radio standard by the countries/regions in the following table. 15 Paraguay Poland Qatar Russia San Marino...Spain Switzerland Turkey UAE (United Arab Emirates) USA Vietnam Approved Countries/Regions for the Atheros® Wireless Wi-Fi® Link AR5B95 Series This equipment is approved to the radio standard by the countries/regions in the following table. Do not use this equipment except in...
...Australia Bahrain Bolivia Brunei Canada Canada USA Approved Countries/Regions for the Intel® Wireless Wi-Fi® Link 622ANHMW and 633ANHMW Series This equipment is approved to the radio standard by the countries/regions in the following table. 15 Paraguay Poland Qatar Russia San Marino...Spain Switzerland Turkey UAE (United Arab Emirates) USA Vietnam Approved Countries/Regions for the Atheros® Wireless Wi-Fi® Link AR5B95 Series This equipment is approved to the radio standard by the countries/regions in the following table. Do not use this equipment except in...
User Guide
Page 39
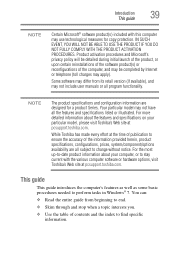
...PRODUCT IF YOU DO NOT FULLY COMPLY WITH THE PRODUCT ACTIVATION PROCEDURES. Your particular model may use technological measures for a product Series. This guide This guide introduces the computer's features as well as some basic procedures needed to stay current with this computer...This guide 39 NOTE Certain Microsoft® software product(s) included with the various computer software or hardware options, visit Toshiba's Web site at pcsupport.toshiba.com. Product activation procedures and Microsoft's privacy policy will be completed by Internet or telephone (toll charges may not ...
...PRODUCT IF YOU DO NOT FULLY COMPLY WITH THE PRODUCT ACTIVATION PROCEDURES. Your particular model may use technological measures for a product Series. This guide This guide introduces the computer's features as well as some basic procedures needed to stay current with this computer...This guide 39 NOTE Certain Microsoft® software product(s) included with the various computer software or hardware options, visit Toshiba's Web site at pcsupport.toshiba.com. Product activation procedures and Microsoft's privacy policy will be completed by Internet or telephone (toll charges may not ...
User Guide
Page 41
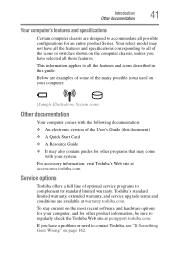
... 162. If you have a problem or need to complement its standard limited warranty. Below are designed to regularly check the Toshiba Web site at warranty.toshiba.com. Introduction Other documentation 41 Your computer's features and specifications Certain computer chassis are examples of some of the many possible ...described in this document) ❖ A Quick Start Card ❖ A Resource Guide ❖ It may also contain guides for an entire product Series. Toshiba's standard limited warranty, extended warranty, and service upgrade terms and conditions are available at pcsupport...
... 162. If you have a problem or need to complement its standard limited warranty. Below are designed to regularly check the Toshiba Web site at warranty.toshiba.com. Introduction Other documentation 41 Your computer's features and specifications Certain computer chassis are examples of some of the many possible ...described in this document) ❖ A Quick Start Card ❖ A Resource Guide ❖ It may also contain guides for an entire product Series. Toshiba's standard limited warranty, extended warranty, and service upgrade terms and conditions are available at pcsupport...
User Guide
Page 54
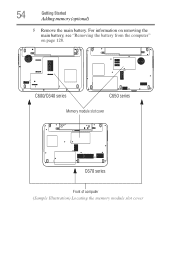
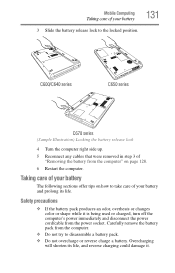
For information on removing the main battery, see "Removing the battery from the computer" on page 128. 54 Getting Started Adding memory (optional) 5 Remove the main battery. C600/C640 series C650 series Memory module slot cover C670 series Front of computer (Sample Illustration) Locating the memory module slot cover
For information on removing the main battery, see "Removing the battery from the computer" on page 128. 54 Getting Started Adding memory (optional) 5 Remove the main battery. C600/C640 series C650 series Memory module slot cover C670 series Front of computer (Sample Illustration) Locating the memory module slot cover
User Guide
Page 55
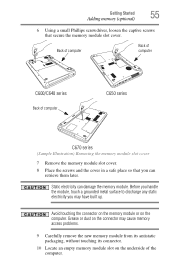
... remove the new memory module from its antistatic packaging, without touching its connector. 10 Locate an empty memory module slot on the underside of computer C650 series C670 series (Sample Illustration) Removing the memory module slot cover 7 Remove the memory module slot cover. 8 Place the screws and the cover in a safe place so...
... remove the new memory module from its antistatic packaging, without touching its connector. 10 Locate an empty memory module slot on the underside of computer C650 series C670 series (Sample Illustration) Removing the memory module slot cover 7 Remove the memory module slot cover. 8 Place the screws and the cover in a safe place so...
User Guide
Page 102
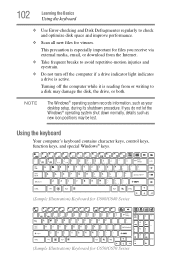
... active. Using the keyboard Your computer's keyboard contains character keys, control keys, function keys, and special Windows® keys. (Sample Illustration) Keyboard for C600/C640 Series (Sample Illustration) Keyboard for C650/C670 Series
... active. Using the keyboard Your computer's keyboard contains character keys, control keys, function keys, and special Windows® keys. (Sample Illustration) Keyboard for C600/C640 Series (Sample Illustration) Keyboard for C650/C670 Series
User Guide
Page 103
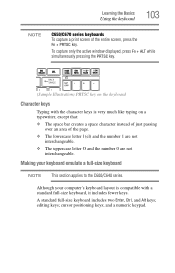
...Alt keys; editing keys; cursor positioning keys; Although your keyboard emulate a full-size keyboard NOTE This section applies to the C600/C640 series. Making your computer's keyboard layout is very much like typing on the keyboard Character keys Typing with the character keys is compatible with a... instead of just passing over an area of the entire screen, press the Fn + PRTSC key. Learning the Basics Using the keyboard 103 NOTE C650/C670 series keyboards To capture a print screen of the page. ❖ The lowercase letter l (el) and the number 1 are not interchangeable. ❖...
...Alt keys; editing keys; cursor positioning keys; Although your keyboard emulate a full-size keyboard NOTE This section applies to the C600/C640 series. Making your computer's keyboard layout is very much like typing on the keyboard Character keys Typing with the character keys is compatible with a... instead of just passing over an area of the entire screen, press the Fn + PRTSC key. Learning the Basics Using the keyboard 103 NOTE C650/C670 series keyboards To capture a print screen of the page. ❖ The lowercase letter l (el) and the number 1 are not interchangeable. ❖...
User Guide
Page 105
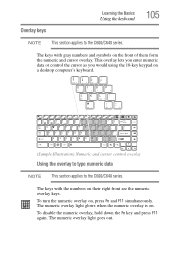
... again. The numeric overlay light goes out. Overlay keys Learning the Basics Using the keyboard 105 NOTE This section applies to the C600/C640 series. To turn the numeric overlay on a desktop computer's keyboard. (Sample Illustration) Numeric and cursor control overlay Using the overlay to type numeric... data NOTE This section applies to the C600/C640 series. This overlay lets you enter numeric data or control the cursor as you would using the 10-key keypad on , press Fn and F11...
... again. The numeric overlay light goes out. Overlay keys Learning the Basics Using the keyboard 105 NOTE This section applies to the C600/C640 series. To turn the numeric overlay on a desktop computer's keyboard. (Sample Illustration) Numeric and cursor control overlay Using the overlay to type numeric... data NOTE This section applies to the C600/C640 series. This overlay lets you enter numeric data or control the cursor as you would using the 10-key keypad on , press Fn and F11...
User Guide
Page 106
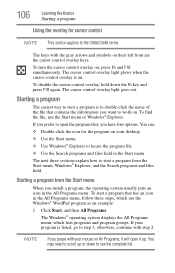
... menu When you want to work on. You can: ❖ Double-click the icon for cursor control NOTE This section applies to the C600/C640 series. NOTE If you have four options. You may need to scroll up . To disable the cursor control overlay, hold down to see the complete list...
... menu When you want to work on. You can: ❖ Double-click the icon for cursor control NOTE This section applies to the C600/C640 series. NOTE If you have four options. You may need to scroll up . To disable the cursor control overlay, hold down to see the complete list...

User Guide
Page 123
.... When the ON/OFF light flashes amber, it indicates that the system is suspended (using the Windows® operating system Sleep command). C600/C640 series C650/C670 series System indicator lights AC power light/Battery light ON/OFF light (Sample Illustration) Power and battery light locations Determining remaining battery power NOTE Wait a few...
.... When the ON/OFF light flashes amber, it indicates that the system is suspended (using the Windows® operating system Sleep command). C600/C640 series C650/C670 series System indicator lights AC power light/Battery light ON/OFF light (Sample Illustration) Power and battery light locations Determining remaining battery power NOTE Wait a few...

User Guide
Page 129
Mobile Computing Changing the main battery 129 5 Slide the battery release lock to release the battery. 7 Pull the discharged battery out of the computer. C600/C640 series C650 series C670 series (Sample Illustration) Removing the battery C600/C640 series C650 series C670 series (Sample Illustration) Unlocking the battery release lock 6 Slide the battery release latch to the unlocked position.
Mobile Computing Changing the main battery 129 5 Slide the battery release lock to release the battery. 7 Pull the discharged battery out of the computer. C600/C640 series C650 series C670 series (Sample Illustration) Removing the battery C600/C640 series C650 series C670 series (Sample Illustration) Unlocking the battery release lock 6 Slide the battery release latch to the unlocked position.

User Guide
Page 130
Put insulating tape, such as cellophane tape, on protective gloves to handle it, and discard it with reverse polarity. C600/C640 series C650 series C670 series (Sample Illustration) Inserting the battery Failure to do so could possibly result in compliance with a clean cloth to ensure a good connection. 2 Insert the charged battery ...
Put insulating tape, such as cellophane tape, on protective gloves to handle it, and discard it with reverse polarity. C600/C640 series C650 series C670 series (Sample Illustration) Inserting the battery Failure to do so could possibly result in compliance with a clean cloth to ensure a good connection. 2 Insert the charged battery ...
User Guide
Page 131
... overcharge or reverse charge a battery. Safety precautions ❖ If the battery pack produces an odor, overheats or changes color or shape while it . C600/C640 series C650 series C670 series (Sample Illustration) Locking the battery release lock 4 Turn the computer right side up. 5 Reconnect any cables that were removed in step 3 of your battery...
... overcharge or reverse charge a battery. Safety precautions ❖ If the battery pack produces an odor, overheats or changes color or shape while it . C600/C640 series C650 series C670 series (Sample Illustration) Locking the battery release lock 4 Turn the computer right side up. 5 Reconnect any cables that were removed in step 3 of your battery...

User Guide
Page 142
NOTE Do not use of Secure Digital™ (SD™), or MMC® (MultiMediaCard®) media. C600/C640 series C650 series C670 series (Sample Illustration) Inserting memory media When inserting memory media, do not touch the metal contacts. The Memory card reader may also support other types of ...
NOTE Do not use of Secure Digital™ (SD™), or MMC® (MultiMediaCard®) media. C600/C640 series C650 series C670 series (Sample Illustration) Inserting memory media When inserting memory media, do not touch the metal contacts. The Memory card reader may also support other types of ...

User Guide
Page 143
... card and pull it . otherwise, skip to step 3. 2 Gently press the card inward to Remove Hardware. If the media can be destroyed. C600/C640 series C650 series C670 series (Sample Illustration) Removing memory media Do not remove memory media while data is unable to prepare the media for safe removal, a message will tell you...
... card and pull it . otherwise, skip to step 3. 2 Gently press the card inward to Remove Hardware. If the media can be destroyed. C600/C640 series C650 series C670 series (Sample Illustration) Removing memory media Do not remove memory media while data is unable to prepare the media for safe removal, a message will tell you...
User Guide
Page 171
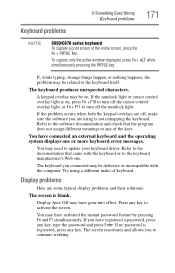
Keyboard problems If Something Goes Wrong Keyboard problems 171 NOTE C650/C670 series keyboard To capture a print screen of the keys. Refer to the software documentation and check that came with the computer. You have activated the instant ...
Keyboard problems If Something Goes Wrong Keyboard problems 171 NOTE C650/C670 series keyboard To capture a print screen of the keys. Refer to the software documentation and check that came with the computer. You have activated the instant ...
User Guide
Page 200
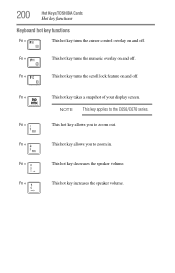
Fn + This hot key allows you to zoom in. Fn + This hot key increases the speaker volume. Fn + This hot key turns the scroll lock feature on and off . 200 Hot Keys/TOSHIBA Cards Hot key functions Keyboard hot key functions Fn + This hot key turns the cursor control overlay on and off . Fn + This hot key allows you to the C650/C670 series. NOTE This key applies to zoom out. Fn + This hot key decreases the speaker volume. Fn + This hot key takes a snapshot of your display screen. Fn + This hot key turns the numeric overlay on and off.
Fn + This hot key allows you to zoom in. Fn + This hot key increases the speaker volume. Fn + This hot key turns the scroll lock feature on and off . 200 Hot Keys/TOSHIBA Cards Hot key functions Keyboard hot key functions Fn + This hot key turns the cursor control overlay on and off . Fn + This hot key allows you to the C650/C670 series. NOTE This key applies to zoom out. Fn + This hot key decreases the speaker volume. Fn + This hot key takes a snapshot of your display screen. Fn + This hot key turns the numeric overlay on and off.


