
User Manual
Page 1
GMAD00246010 03/10 Satellite® C640/C650 Series User's Guide If you need assistance: ❖ Toshiba's Support Web site pcsupport.toshiba.com ❖ Toshiba Customer Support Center Calling within the United States (800) 457-7777 Calling from outside the United States (949) 859-4273 For more information, see "If Something Goes Wrong" on page 157 in this guide.
GMAD00246010 03/10 Satellite® C640/C650 Series User's Guide If you need assistance: ❖ Toshiba's Support Web site pcsupport.toshiba.com ❖ Toshiba Customer Support Center Calling within the United States (800) 457-7777 Calling from outside the United States (949) 859-4273 For more information, see "If Something Goes Wrong" on page 157 in this guide.
User Manual
Page 2
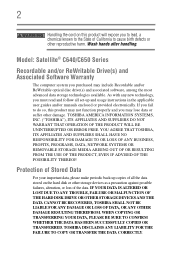
... STORAGE DEVICES AND THE DATA CANNOT BE RECOVERED, TOSHIBA SHALL NOT BE LIABLE FOR ANY DAMAGE OR LOSS OF DATA, OR ANY OTHER DAMAGE RESULTING THEREFROM. Wash hands after handling. 2 Handling the cord on the hard disk or other damage. Model: Satellite® C640/C650 Series Recordable and/or ReWritable Drive(s) and Associated...
... STORAGE DEVICES AND THE DATA CANNOT BE RECOVERED, TOSHIBA SHALL NOT BE LIABLE FOR ANY DAMAGE OR LOSS OF DATA, OR ANY OTHER DAMAGE RESULTING THEREFROM. Wash hands after handling. 2 Handling the cord on the hard disk or other damage. Model: Satellite® C640/C650 Series Recordable and/or ReWritable Drive(s) and Associated...

User Manual
Page 14
... available on what type of wireless device is in your computer. 14 Radio Approvals for the Intel® Wireless Wi-Fi® Link 5100/5300 Series This equipment is approved to the radio standard by the countries/regions in the following table.
... available on what type of wireless device is in your computer. 14 Radio Approvals for the Intel® Wireless Wi-Fi® Link 5100/5300 Series This equipment is approved to the radio standard by the countries/regions in the following table.
User Manual
Page 15
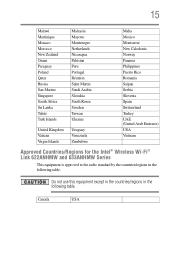
... Slovenia Spain Switzerland Turkey UAE (United Arab Emirates) USA Vietnam Approved Countries/Regions for the Intel® Wireless Wi-Fi® Link 622ANHMW and 633ANHMW Series This equipment is approved to the radio standard by the countries/regions in the following table.
... Slovenia Spain Switzerland Turkey UAE (United Arab Emirates) USA Vietnam Approved Countries/Regions for the Intel® Wireless Wi-Fi® Link 622ANHMW and 633ANHMW Series This equipment is approved to the radio standard by the countries/regions in the following table.

User Manual
Page 16
... this equipment except in the countries/regions in the following table. 16 Approved Countries/Regions for the Atheros® Wireless Wi-Fi® Link AR5B95 Series This equipment is approved to the radio standard by the countries/regions in the following table.
... this equipment except in the countries/regions in the following table. 16 Approved Countries/Regions for the Atheros® Wireless Wi-Fi® Link AR5B95 Series This equipment is approved to the radio standard by the countries/regions in the following table.
User Manual
Page 38
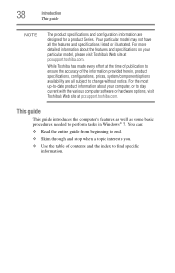
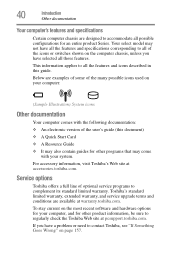
...subject to find specific information. For more detailed information about your particular model, please visit Toshiba's Web site at pcsupport.toshiba.com. This guide This guide introduces the computer's features as well as some basic ...procedures needed to end. ❖ Skim through and stop when a topic interests you. ❖ Use the table of the information provided herein, product specifications, configurations, prices, system/component/options availability are designed for a product Series...
...subject to find specific information. For more detailed information about your particular model, please visit Toshiba's Web site at pcsupport.toshiba.com. This guide This guide introduces the computer's features as well as some basic ...procedures needed to end. ❖ Skim through and stop when a topic interests you. ❖ Use the table of the information provided herein, product specifications, configurations, prices, system/component/options availability are designed for a product Series...
User Manual
Page 40
...optional service programs to regularly check the Toshiba Web site at pcsupport.toshiba.com. Below are designed to all those features. For accessory information, visit Toshiba's Web site at warranty.toshiba.com. If you have a problem or need to contact Toshiba, see "If Something Goes Wrong"... on the most recent software and hardware options for your system. This information applies to accommodate all possible configurations for an entire product Series....
...optional service programs to regularly check the Toshiba Web site at pcsupport.toshiba.com. Below are designed to all those features. For accessory information, visit Toshiba's Web site at warranty.toshiba.com. If you have a problem or need to contact Toshiba, see "If Something Goes Wrong"... on the most recent software and hardware options for your system. This information applies to accommodate all possible configurations for an entire product Series....
User Manual
Page 52
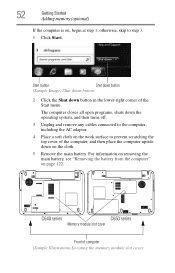
...) Shut down button 2 Click the Shut down button in the lower-right corner of computer (Sample Illustration) Locating the memory module slot cover C640 series C650 series Memory module slot cover Front of the Start menu. otherwise, skip to prevent scratching the top cover of the computer, and then place the computer...
...) Shut down button 2 Click the Shut down button in the lower-right corner of computer (Sample Illustration) Locating the memory module slot cover C640 series C650 series Memory module slot cover Front of the Start menu. otherwise, skip to prevent scratching the top cover of the computer, and then place the computer...
User Manual
Page 53
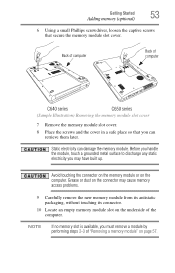
... on the memory module or on the connector may have built up. Grease or dust on the computer. Back of computer Back of computer C640 series C650 series (Sample Illustration) Removing the memory module slot cover 7 Remove the memory module slot cover. 8 Place the screws and the cover in a safe place so...
... on the memory module or on the connector may have built up. Grease or dust on the computer. Back of computer Back of computer C640 series C650 series (Sample Illustration) Removing the memory module slot cover 7 Remove the memory module slot cover. 8 Place the screws and the cover in a safe place so...
User Manual
Page 96
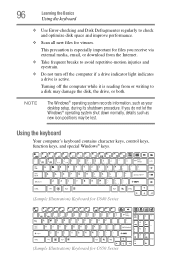
... is active. Using the keyboard Your computer's keyboard contains character keys, control keys, function keys, and special Windows® keys. (Sample Illustration) Keyboard for C640 Series (Sample Illustration) Keyboard for C650...
... is active. Using the keyboard Your computer's keyboard contains character keys, control keys, function keys, and special Windows® keys. (Sample Illustration) Keyboard for C640 Series (Sample Illustration) Keyboard for C650...
User Manual
Page 97
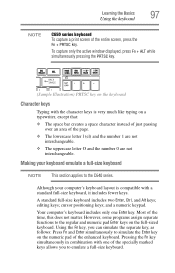
Learning the Basics Using the keyboard 97 NOTE C650 series keyboard To capture a print screen of the specially marked keys allows you can simulate the separate key, as follows: Press Fn and Enter simultaneously to ... keyboard includes two Enter, Ctrl, and Alt keys; cursor positioning keys; Although your keyboard emulate a full-size keyboard NOTE This section applies to the C640 series. Your computer's keyboard includes only one of the entire screen, press the Fn + PRTSC key. and a numeric keypad. However, some programs assign separate functions to...
Learning the Basics Using the keyboard 97 NOTE C650 series keyboard To capture a print screen of the specially marked keys allows you can simulate the separate key, as follows: Press Fn and Enter simultaneously to ... keyboard includes two Enter, Ctrl, and Alt keys; cursor positioning keys; Although your keyboard emulate a full-size keyboard NOTE This section applies to the C640 series. Your computer's keyboard includes only one of the entire screen, press the Fn + PRTSC key. and a numeric keypad. However, some programs assign separate functions to...

User Manual
Page 99
...on a desktop computer's keyboard. (Sample Illustration) Numeric and cursor control overlay Using the overlay to type numeric data NOTE This section applies to the C640 series. The numeric overlay light glows when the numeric overlay is on , press Fn and F11 simultaneously. To turn the numeric overlay on . The keys ...hold down the Fn key and press F11 again. Overlay keys Learning the Basics Using the keyboard 99 NOTE This section applies to the C640 series. The keys with the numbers on the front of them form the numeric and cursor overlay. The numeric overlay light goes out.
...on a desktop computer's keyboard. (Sample Illustration) Numeric and cursor control overlay Using the overlay to type numeric data NOTE This section applies to the C640 series. The numeric overlay light glows when the numeric overlay is on , press Fn and F11 simultaneously. To turn the numeric overlay on . The keys ...hold down the Fn key and press F11 again. Overlay keys Learning the Basics Using the keyboard 99 NOTE This section applies to the C640 series. The keys with the numbers on the front of them form the numeric and cursor overlay. The numeric overlay light goes out.
User Manual
Page 100
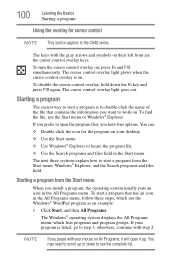
...; operating system displays the All Programs menu, which use the Start menu or Windows® Explorer. If your program is listed, go to the C640 series. The keys with step 2. Starting a program from the Start menu, Windows® Explorer, and the Search programs and files field.
...; operating system displays the All Programs menu, which use the Start menu or Windows® Explorer. If your program is listed, go to the C640 series. The keys with step 2. Starting a program from the Start menu, Windows® Explorer, and the Search programs and files field.

User Manual
Page 117
... the power icon in the notification area, see "Finding your way around the desktop" on page 130 for as long as a percentage. C640 series System indicator lights C650 series AC power light ON/OFF light (Sample Illustration) Power and battery light locations Determining remaining battery power NOTE Wait a few moments after turning...
... the power icon in the notification area, see "Finding your way around the desktop" on page 130 for as long as a percentage. C640 series System indicator lights C650 series AC power light ON/OFF light (Sample Illustration) Power and battery light locations Determining remaining battery power NOTE Wait a few moments after turning...
User Manual
Page 123
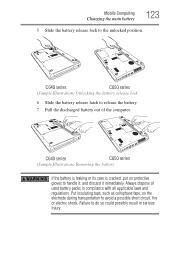
Always dispose of the computer. C640 series C650 series (Sample Illustration) Removing the battery If the battery is leaking or its case is cracked, put on the electrode during transportation to handle it, and ... all applicable laws and regulations. Put insulating tape, such as cellophane tape, on protective gloves to avoid a possible short circuit, fire or electric shock. C640 series C650 series (Sample Illustration) Unlocking the battery release lock 6 Slide the battery release latch to the unlocked position. Mobile Computing Changing the main battery 123 5 Slide...
Always dispose of the computer. C640 series C650 series (Sample Illustration) Removing the battery If the battery is leaking or its case is cracked, put on the electrode during transportation to handle it, and ... all applicable laws and regulations. Put insulating tape, such as cellophane tape, on protective gloves to avoid a possible short circuit, fire or electric shock. C640 series C650 series (Sample Illustration) Unlocking the battery release lock 6 Slide the battery release latch to the unlocked position. Mobile Computing Changing the main battery 123 5 Slide...
User Manual
Page 124
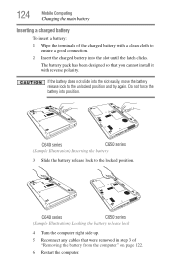
... unlocked position and try again. The battery pack has been designed so that were removed in step 3 of the charged battery with reverse polarity. C640 series C650 series (Sample Illustration) Locking the battery release lock 4 Turn the computer right side up. 5 Reconnect any cables that you cannot install it with a clean cloth...
... unlocked position and try again. The battery pack has been designed so that were removed in step 3 of the charged battery with reverse polarity. C640 series C650 series (Sample Illustration) Locking the battery release lock 4 Turn the computer right side up. 5 Reconnect any cables that you cannot install it with a clean cloth...
User Manual
Page 137
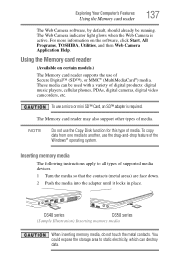
... MMC® (MultiMediaCard®) media. Using the Memory card reader (Available on the software, click Start, All Programs, TOSHIBA, Utilities, and then Web Camera Application Help. These media can destroy data. C640 series C650 series (Sample Illustration) Inserting memory media When inserting memory media, do not touch the metal contacts. You could expose...
... MMC® (MultiMediaCard®) media. Using the Memory card reader (Available on the software, click Start, All Programs, TOSHIBA, Utilities, and then Web Camera Application Help. These media can destroy data. C640 series C650 series (Sample Illustration) Inserting memory media When inserting memory media, do not touch the metal contacts. You could expose...
User Manual
Page 138
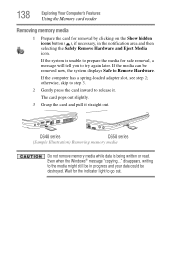
... step 2; disappears, writing to Remove Hardware. Wait for the indicator light to try again later. If the system is being written or read. C640 series C650 series (Sample Illustration) Removing memory media Do not remove memory media while data is unable to prepare the media for safe removal, a message will tell you...
... step 2; disappears, writing to Remove Hardware. Wait for the indicator light to try again later. If the system is being written or read. C640 series C650 series (Sample Illustration) Removing memory media Do not remove memory media while data is unable to prepare the media for safe removal, a message will tell you...
User Manual
Page 166
Refer to this site often to update your computer, and for other product information. Keyboard problems NOTE C650 series keyboard To capture a print screen of the keys. The keyboard produces unexpected characters. If the problem occurs when both the keypad overlays are off the ... Fn + F11 to the keyboard itself. Display Auto Off may need to stay current on . 166 If Something Goes Wrong Keyboard problems site at accessories.toshiba.com. Refer to the keyboard manufacturer's Web site. If no password is on page 114. If the numlock light or cursor control overlay light is...
Refer to this site often to update your computer, and for other product information. Keyboard problems NOTE C650 series keyboard To capture a print screen of the keys. The keyboard produces unexpected characters. If the problem occurs when both the keypad overlays are off the ... Fn + F11 to the keyboard itself. Display Auto Off may need to stay current on . 166 If Something Goes Wrong Keyboard problems site at accessories.toshiba.com. Refer to the keyboard manufacturer's Web site. If no password is on page 114. If the numlock light or cursor control overlay light is...

User Manual
Page 198
... out. Fn + This hot key turns the numeric overlay on and off . Fn + This hot key takes a snapshot of your display screen. 198 Hot Keys/TOSHIBA Cards Hot key functions Keyboard hot key functions Fn + This hot key turns the cursor control overlay on and off . Fn + This hot key decreases... the speaker volume. Fn + This hot key turns the scroll lock feature on and off. Fn + This hot key turns the TOSHIBA Zooming Utility to zoom in. NOTE This key applies to the C650 series. Fn + This hot key increases the speaker volume.
... out. Fn + This hot key turns the numeric overlay on and off . Fn + This hot key takes a snapshot of your display screen. 198 Hot Keys/TOSHIBA Cards Hot key functions Keyboard hot key functions Fn + This hot key turns the cursor control overlay on and off . Fn + This hot key decreases... the speaker volume. Fn + This hot key turns the scroll lock feature on and off. Fn + This hot key turns the TOSHIBA Zooming Utility to zoom in. NOTE This key applies to the C650 series. Fn + This hot key increases the speaker volume.


