User Guide
Page 46
In this condition, observe the following: ❖ Never cover your computer or AC adaptor with your computer. Overheating your computer or AC adaptor could cause system failure, computer or AC adaptor damage or a fire, ... is shipped with any object. ❖ Never place your computer or AC adaptor near a heat source, such as an electric blanket or heater. ❖ Never cover or block the air vents including those located at the base of the computer. ❖ Always operate your computer on page 47. Using your computer...
In this condition, observe the following: ❖ Never cover your computer or AC adaptor with your computer. Overheating your computer or AC adaptor could cause system failure, computer or AC adaptor damage or a fire, ... is shipped with any object. ❖ Never place your computer or AC adaptor near a heat source, such as an electric blanket or heater. ❖ Never cover or block the air vents including those located at the base of the computer. ❖ Always operate your computer on page 47. Using your computer...

User Guide
Page 54
... of the computer. You can be installed in minor bodily injury. If only one or two memory modules. Slot B is in Slot A. Avoid touching the cover, the module(s), and the surrounding area before replacing it must be hot. The computer has two memory slots-Slot A and Slot B. To avoid damaging the...
... of the computer. You can be installed in minor bodily injury. If only one or two memory modules. Slot B is in Slot A. Avoid touching the cover, the module(s), and the surrounding area before replacing it must be hot. The computer has two memory slots-Slot A and Slot B. To avoid damaging the...

User Guide
Page 55
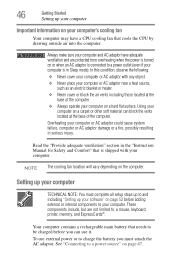
The Shut Down menu appears. Start (Sample Image) Shut Down menu Arrow Shut Down Menu 2 Click Shut Down. Memory module slot cover Front of the Start menu. The operating system turns off the computer. 3 Unplug and remove any cables connected to the lock button in the... lower-right corner of computer (Sample Illustration) Locating the memory module slot cover Getting Started Adding memory (optional) 55 If the computer is on page 125. For information on removing the main battery, see "Removing the battery ...
The Shut Down menu appears. Start (Sample Image) Shut Down menu Arrow Shut Down Menu 2 Click Shut Down. Memory module slot cover Front of the Start menu. The operating system turns off the computer. 3 Unplug and remove any cables connected to the lock button in the... lower-right corner of computer (Sample Illustration) Locating the memory module slot cover Getting Started Adding memory (optional) 55 If the computer is on page 125. For information on removing the main battery, see "Removing the battery ...

User Guide
Page 56
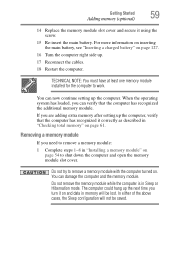
Front of computer (Sample Illustration) Removing the memory module slot cover 7 Remove the memory module slot cover. 8 Place the screw and the cover in a safe place so that secures the memory module slot cover. Before you handle the module, touch a grounded metal surface to discharge any static electricity you may cause memory access problems. 9 Carefully...
Front of computer (Sample Illustration) Removing the memory module slot cover 7 Remove the memory module slot cover. 8 Place the screw and the cover in a safe place so that secures the memory module slot cover. Before you handle the module, touch a grounded metal surface to discharge any static electricity you may cause memory access problems. 9 Carefully...
User Guide
Page 59
.... TECHNICAL NOTE: You must have at least one memory module installed for the computer to shut down the computer and open the memory module slot cover. The computer could hang up the next time you are adding extra memory after setting up the computer, verify that the computer has recognized the... 1-8 in "Installing a memory module" on and data in memory will not be lost. Getting Started Adding memory (optional) 59 14 Replace the memory module slot cover and secure it on page 54 to work. If you turn it using the screw. 15 Re-insert the main battery.
.... TECHNICAL NOTE: You must have at least one memory module installed for the computer to shut down the computer and open the memory module slot cover. The computer could hang up the next time you are adding extra memory after setting up the computer, verify that the computer has recognized the... 1-8 in "Installing a memory module" on and data in memory will not be lost. Getting Started Adding memory (optional) 59 14 Replace the memory module slot cover and secure it on page 54 to work. If you turn it using the screw. 15 Re-insert the main battery.
User Guide
Page 61
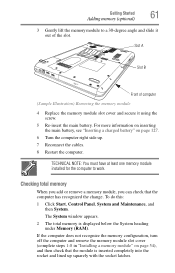
Slot A Slot B Front of computer (Sample Illustration) Removing the memory module 4 Replace the memory module slot cover and secure it out of the slot. To do this: 1 Click Start, Control Panel, System and Maintenance, and then System. The System window appears. 2 The ... lift the memory module to work. If the computer does not recognize the memory configuration, turn off the computer and remove the memory module slot cover (complete steps 1-8 in "Installing a memory module" on page 127. 6 Turn the computer right side up squarely with the socket latches. TECHNICAL NOTE: You must have...
Slot A Slot B Front of computer (Sample Illustration) Removing the memory module 4 Replace the memory module slot cover and secure it out of the slot. To do this: 1 Click Start, Control Panel, System and Maintenance, and then System. The System window appears. 2 The ... lift the memory module to work. If the computer does not recognize the memory configuration, turn off the computer and remove the memory module slot cover (complete steps 1-8 in "Installing a memory module" on page 127. 6 Turn the computer right side up squarely with the socket latches. TECHNICAL NOTE: You must have...

User Guide
Page 107
... disc in. (Sample Illustration) Positioning the disc in -use indicator light is dusty, clean it from the computer, then place the disc in its protective cover. NOTE The computer must be removed from the slot. 2 Grasp the disc and remove it as described in "Caring for optical discs" on to eject...
... disc in. (Sample Illustration) Positioning the disc in -use indicator light is dusty, clean it from the computer, then place the disc in its protective cover. NOTE The computer must be removed from the slot. 2 Grasp the disc and remove it as described in "Caring for optical discs" on to eject...
User Guide
Page 111
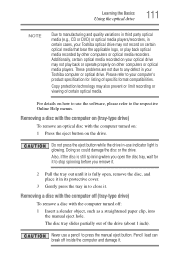
... remove an optical disc with the computer turned off inside the computer and damage it in its protective cover. 3 Gently press the tray in to any defect in your Toshiba optical drive may also prevent or limit recording or viewing of specific format compatibilities. Do not press the... eject button while the drive in certain cases, your Toshiba computer or optical drive. The disc tray slides partially out of the drive (about 1 inch). Removing a disc with the computer on the...
... remove an optical disc with the computer turned off inside the computer and damage it in its protective cover. 3 Gently press the tray in to any defect in your Toshiba optical drive may also prevent or limit recording or viewing of specific format compatibilities. Do not press the... eject button while the drive in certain cases, your Toshiba computer or optical drive. The disc tray slides partially out of the drive (about 1 inch). Removing a disc with the computer on the...
User Guide
Page 112
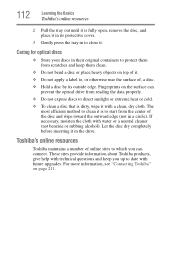
These sites provide information about Toshiba products, give help with technical questions and keep them clean. ❖ Do not ...clean, dry cloth. Fingerprints on page 211. Let the disc dry completely before inserting it in to close it. Toshiba's online resources Toshiba maintains a number of online sites to which you up to date with water or a neutral cleaner (not benzine... is fully open, remove the disc, and place it in its outside edge. 112 Learning the Basics Toshiba's online resources 2 Pull the tray out until it is to start from the center of , a disc. ❖...
These sites provide information about Toshiba products, give help with technical questions and keep them clean. ❖ Do not ...clean, dry cloth. Fingerprints on page 211. Let the disc dry completely before inserting it in to close it. Toshiba's online resources Toshiba maintains a number of online sites to which you up to date with water or a neutral cleaner (not benzine... is fully open, remove the disc, and place it in its outside edge. 112 Learning the Basics Toshiba's online resources 2 Pull the tray out until it is to start from the center of , a disc. ❖...
User Guide
Page 113
We recommend you leave these energy-saving features have been preset by Toshiba. Many of these features active, allowing your computer while traveling. Chapter 3 Mobile Computing This chapter covers all aspects of using your computer to operate at its energy efficiency. Toshiba's energy-saver design Your computer enters a low-power suspension mode when it for longer periods while traveling. 113 It has a number of other features that enhance its maximum energy efficiency, so that you can use it is not being used, thereby conserving energy and saving money in the process.
We recommend you leave these energy-saving features have been preset by Toshiba. Many of these features active, allowing your computer while traveling. Chapter 3 Mobile Computing This chapter covers all aspects of using your computer to operate at its energy efficiency. Toshiba's energy-saver design Your computer enters a low-power suspension mode when it for longer periods while traveling. 113 It has a number of other features that enhance its maximum energy efficiency, so that you can use it is not being used, thereby conserving energy and saving money in the process.

User Guide
Page 131
... while traveling. ❖ Never leave your computer on a sunny ledge or in a place where it could get wet or covered in dust. ❖ Always travel with the computer in a carrying case. Toshiba offers a choice of extra space for the computer. They all provide plenty of carrying cases for manuals, power cords, and... has wireless LAN capability. Mobile Computing Traveling tips 131 Traveling tips The environmental precautions listed in "Selecting a place to the OFF position if your authorized Toshiba representative for more information or visit...
... while traveling. ❖ Never leave your computer on a sunny ledge or in a place where it could get wet or covered in dust. ❖ Always travel with the computer in a carrying case. Toshiba offers a choice of extra space for the computer. They all provide plenty of carrying cases for manuals, power cords, and... has wireless LAN capability. Mobile Computing Traveling tips 131 Traveling tips The environmental precautions listed in "Selecting a place to the OFF position if your authorized Toshiba representative for more information or visit...
User Guide
Page 158
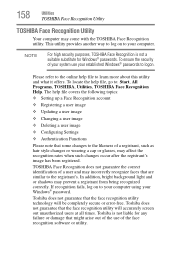
... Recognition utility. Toshiba does not guarantee that the face recognition utility will be completely secure or error-free. This utility provides another way to log on to your Windows® password. To locate the help file covers the following topics: ❖ Setting up a ... and may affect the recognition rates when such changes occur after the registrant's image has been registered. 158 Utilities TOSHIBA Face Recognition Utility TOSHIBA Face Recognition Utility Your computer may prevent a registrant from being recognized correctly. To ensure the security of a registrant...
... Recognition utility. Toshiba does not guarantee that the face recognition utility will be completely secure or error-free. This utility provides another way to log on to your Windows® password. To locate the help file covers the following topics: ❖ Setting up a ... and may affect the recognition rates when such changes occur after the registrant's image has been registered. 158 Utilities TOSHIBA Face Recognition Utility TOSHIBA Face Recognition Utility Your computer may prevent a registrant from being recognized correctly. To ensure the security of a registrant...

User Guide
Page 183
This chapter aims to help from your computer are relatively easy to identify and solve. You will find information on Toshiba's support services at the end of the software program. Others may encounter when using your network administrator or the manufacturer of this ...(once), then click Start Task Manager. If you solve many problems by yourself. It covers the problems you may require help you are working with a program that suddenly freezes all else fails, contact Toshiba. You can exit the failed program without shutting down the operating system or closing other ...
This chapter aims to help from your computer are relatively easy to identify and solve. You will find information on Toshiba's support services at the end of the software program. Others may encounter when using your network administrator or the manufacturer of this ...(once), then click Start Task Manager. If you solve many problems by yourself. It covers the problems you may require help you are working with a program that suddenly freezes all else fails, contact Toshiba. You can exit the failed program without shutting down the operating system or closing other ...

User Guide
Page 248
... 125 installing 125, 127 removing 125 safety precautions 128 manual eject hole optical drive 105 memory adding 53 problem solving 191 removing memory module slot cover 56 memory module installation 54 installing inserting into socket 57 removing 59, 61 memory module slot 56 microphone using 141 modem connecting to telephone line...
... 125 installing 125, 127 removing 125 safety precautions 128 manual eject hole optical drive 105 memory adding 53 problem solving 191 removing memory module slot cover 56 memory module installation 54 installing inserting into socket 57 removing 59, 61 memory module slot 56 microphone using 141 modem connecting to telephone line...

