
User Guide
Page 30
... display devices 71 Directing the display output when you turn on the computer 73 Adjusting the quality of the external display......74 Using an external keyboard 74 Using a mouse 74 Connecting a printer 75 Setting up a printer 76 Connecting an optional external diskette drive........76 Turning off the computer 77 Options for...
... display devices 71 Directing the display output when you turn on the computer 73 Adjusting the quality of the external display......74 Using an external keyboard 74 Using a mouse 74 Connecting a printer 75 Setting up a printer 76 Connecting an optional external diskette drive........76 Turning off the computer 77 Options for...

User Guide
Page 31
... computer 88 Moving the computer 88 Using a computer lock 88 Chapter 2: Learning the Basics 90 Computing tips 90 Using the keyboard 92 Character keys 92 Making your keyboard emulate a full-size keyboard 92 Ctrl, Fn, and Alt keys 93 Function keys 93 Special Windows® keys 93 Overlay keys 94 Using the overlay... media 105 Recording optical media 106 Removing a disc with the computer on...........106 Removing a disc with the computer off ..........107 Caring for optical discs 107 Toshiba's online resources 107
... computer 88 Moving the computer 88 Using a computer lock 88 Chapter 2: Learning the Basics 90 Computing tips 90 Using the keyboard 92 Character keys 92 Making your keyboard emulate a full-size keyboard 92 Ctrl, Fn, and Alt keys 93 Function keys 93 Special Windows® keys 93 Overlay keys 94 Using the overlay... media 105 Recording optical media 106 Removing a disc with the computer on...........106 Removing a disc with the computer off ..........107 Caring for optical discs 107 Toshiba's online resources 107
User Guide
Page 34
34 Contents TOSHIBA Accessibility 160 Fingerprint Authentication Utility 161 Fingerprint utility limitations 161 Using the Fingerprint Authentication Utility.....161 Fingerprint Logon 162 Care and maintenance of your fingerprint...help you 174 Resolving a hardware conflict 174 A plan of action 174 Fixing a problem with Device Manager ...........175 Memory problems 176 Power and the batteries 177 Keyboard problems 178 Display problems 179 Disk or internal storage drive problems ..........181 Optical drive problems 183 Sound system problems 184 ExpressCard® problems 184 Printer...
34 Contents TOSHIBA Accessibility 160 Fingerprint Authentication Utility 161 Fingerprint utility limitations 161 Using the Fingerprint Authentication Utility.....161 Fingerprint Logon 162 Care and maintenance of your fingerprint...help you 174 Resolving a hardware conflict 174 A plan of action 174 Fixing a problem with Device Manager ...........175 Memory problems 176 Power and the batteries 177 Keyboard problems 178 Display problems 179 Disk or internal storage drive problems ..........181 Optical drive problems 183 Sound system problems 184 ExpressCard® problems 184 Printer...
User Guide
Page 35
... in the Windows® operating system 192 If you need further assistance 197 Before you contact Toshiba 197 Contacting Toshiba 197 Other Toshiba Internet Web sites 198 Toshiba's worldwide offices 198 Appendix A: Hot Keys/TOSHIBA Cards 200 Hot Key Cards 200 Using the Hot Key Cards 201 Application Cards 202 Using the... (Display switch 209 Display brightness 210 Disabling or enabling wireless devices............211 Disabling or enabling the TouchPad 212 Zoom (Display resolution 213 Keyboard hot key functions 214 Appendix B: Power Cord/Cable Connectors 215 Glossary 216 Index 230
... in the Windows® operating system 192 If you need further assistance 197 Before you contact Toshiba 197 Contacting Toshiba 197 Other Toshiba Internet Web sites 198 Toshiba's worldwide offices 198 Appendix A: Hot Keys/TOSHIBA Cards 200 Hot Key Cards 200 Using the Hot Key Cards 201 Application Cards 202 Using the... (Display switch 209 Display brightness 210 Disabling or enabling wireless devices............211 Disabling or enabling the TouchPad 212 Zoom (Display resolution 213 Keyboard hot key functions 214 Appendix B: Power Cord/Cable Connectors 215 Glossary 216 Index 230
User Guide
Page 44
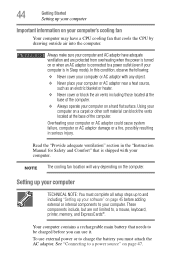
... can use external power or to charge the battery you can block the vents located at the base of the computer. See "Connecting to , a mouse, keyboard, printer, memory, and ExpressCards®. In this condition, observe the following: ❖ Never cover your computer or AC adaptor with your computer. Overheating your computer...
... can use external power or to charge the battery you can block the vents located at the base of the computer. See "Connecting to , a mouse, keyboard, printer, memory, and ExpressCards®. In this condition, observe the following: ❖ Never cover your computer or AC adaptor with your computer. Overheating your computer...

User Guide
Page 46
...see "Adding memory (optional)" on page 52) ❖ Connect a mouse (see "Using a mouse" on page 74) ❖ Connect a full-size keyboard (see "Using an external keyboard" on page 74) ❖ Connect an external monitor (see "Using external display devices" on page 71) ❖ Connect a local printer (see "... "Setting up your computer for the first time you must be completed by either visiting the Toshiba Web site at http://www.register.toshiba.com, or by double-clicking the Toshiba Resources icon on page 45. Failure to the Internet. After starting your software. 46 Getting ...
...see "Adding memory (optional)" on page 52) ❖ Connect a mouse (see "Using a mouse" on page 74) ❖ Connect a full-size keyboard (see "Using an external keyboard" on page 74) ❖ Connect an external monitor (see "Using external display devices" on page 71) ❖ Connect a local printer (see "... "Setting up your computer for the first time you must be completed by either visiting the Toshiba Web site at http://www.register.toshiba.com, or by double-clicking the Toshiba Resources icon on page 45. Failure to the Internet. After starting your software. 46 Getting ...
User Guide
Page 50
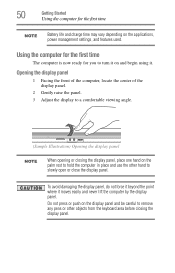
..., and features used. Do not press or push on the palm rest to hold the computer in place and use the other objects from the keyboard area before closing the display panel, place one hand on the display panel and be careful to remove any pens or other hand to slowly...
..., and features used. Do not press or push on the palm rest to hold the computer in place and use the other objects from the keyboard area before closing the display panel, place one hand on the display panel and be careful to remove any pens or other hand to slowly...
User Guide
Page 63
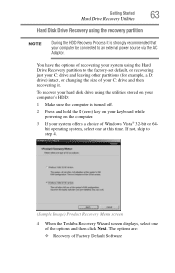
... Disk Drive Recovery using the recovery partition NOTE During the HDD Recovery Process it is turned off. 2 Press and hold the 0 (zero) key on your keyboard while powering on your computer's HDD: 1 Make sure the computer is strongly recommended that your computer be connected to step 4. (Sample Image) Product Recovery Menu...
... Disk Drive Recovery using the recovery partition NOTE During the HDD Recovery Process it is turned off. 2 Press and hold the 0 (zero) key on your keyboard while powering on your computer's HDD: 1 Make sure the computer is strongly recommended that your computer be connected to step 4. (Sample Image) Product Recovery Menu...

User Guide
Page 65
...to external media before proceeding. 3 Click Next to restart the computer. Be sure to create recovery DVD's and back up your hard disk: 1 On the Toshiba Recovery Wizard screen, select Erase the hard disk, and then click Next. 2 The next screen lists the two methods you can choose: ❖ Delete ... you to out-of the data on the hard disk without overwriting the HDD. ❖ Delete all partitions and overwrite all sectors on the keyboard to begin the recovery. Getting Started 65 Hard Drive Recovery Utilities 2 Select Recover to delete all data and partitions from the hard disk.
...to external media before proceeding. 3 Click Next to restart the computer. Be sure to create recovery DVD's and back up your hard disk: 1 On the Toshiba Recovery Wizard screen, select Erase the hard disk, and then click Next. 2 The next screen lists the two methods you can choose: ❖ Delete ... you to out-of the data on the hard disk without overwriting the HDD. ❖ Delete all partitions and overwrite all sectors on the keyboard to begin the recovery. Getting Started 65 Hard Drive Recovery Utilities 2 Select Recover to delete all data and partitions from the hard disk.
User Guide
Page 66
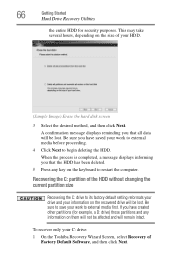
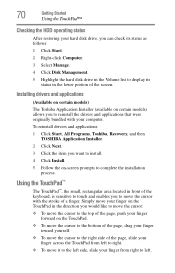
... has been deleted. 5 Press any information on them will remain intact. This may take several hours, depending on the size of your C: drive: 1 On the Toshiba Recovery Wizard Screen, select Recovery of the HDD without changing the current partition size Recovering the C: drive to its factory default setting reformats your drive... to begin deleting the HDD. 66 Getting Started Hard Drive Recovery Utilities the entire HDD for example, a D: drive) those partitions and any key on the keyboard to restart the computer.
... has been deleted. 5 Press any information on them will remain intact. This may take several hours, depending on the size of your C: drive: 1 On the Toshiba Recovery Wizard Screen, select Recovery of the HDD without changing the current partition size Recovering the C: drive to its factory default setting reformats your drive... to begin deleting the HDD. 66 Getting Started Hard Drive Recovery Utilities the entire HDD for example, a D: drive) those partitions and any key on the keyboard to restart the computer.

User Guide
Page 67
... appears, reminding you that the HDD has been recovered. 5 Press any key on the HDD (for example, if you have saved your keyboard to external media first. Getting Started 67 Hard Drive Recovery Utilities 2 Select Recover without changing the hard drive partitions. NOTE The size of ...C: partition with a user specified size Resizing and recovering your information will be lost . To resize and recover your C: drive: 1 On the Toshiba Recovery Wizard screen, select Recovery of the C: drive will be lost during the recovery process) and your C: drive to begin the restoration.
... appears, reminding you that the HDD has been recovered. 5 Press any key on the HDD (for example, if you have saved your keyboard to external media first. Getting Started 67 Hard Drive Recovery Utilities 2 Select Recover without changing the hard drive partitions. NOTE The size of ...C: partition with a user specified size Resizing and recovering your information will be lost . To resize and recover your C: drive: 1 On the Toshiba Recovery Wizard screen, select Recovery of the C: drive will be lost during the recovery process) and your C: drive to begin the restoration.
User Guide
Page 70
... 3 Select Manage. 4 Click Disk Management. 5 Highlight the hard disk drive in the Volume list to display its status in front of the keyboard, is sensitive to touch and enables you to move the cursor with your finger from right to reinstall the drivers and applications that were originally... push your finger forward on -screen prompts to complete the installation process. To reinstall drivers and applications: 1 Click Start, All Programs, Toshiba, Recovery, and then TOSHIBA Application Installer. 2 Click Next. 3 Click the item you would like to move the cursor: ❖ To move it to the left ...
... 3 Select Manage. 4 Click Disk Management. 5 Highlight the hard disk drive in the Volume list to display its status in front of the keyboard, is sensitive to touch and enables you to move the cursor with your finger from right to reinstall the drivers and applications that were originally... push your finger forward on -screen prompts to complete the installation process. To reinstall drivers and applications: 1 Click Start, All Programs, Toshiba, Recovery, and then TOSHIBA Application Installer. 2 Click Next. 3 Click the item you would like to move the cursor: ❖ To move it to the left ...

User Guide
Page 74
...; Built-in Display and TV). See the video device documentation for the Swap Image Display mode. Using an external keyboard If you prefer to use a full-size keyboard, you may need to your television (or other external video device) only ❖ Built-in display and external ...Swap-Switch primary display between internal display and external monitor when using extended desktop (Sample Image) Display options window NOTE The right-most USBcompatible keyboards. In extended desktop mode, the image is split into two sides, one to adjust the video settings. To swap sides, select Swap ...
...; Built-in Display and TV). See the video device documentation for the Swap Image Display mode. Using an external keyboard If you prefer to use a full-size keyboard, you may need to your television (or other external video device) only ❖ Built-in display and external ...Swap-Switch primary display between internal display and external monitor when using extended desktop (Sample Image) Display options window NOTE The right-most USBcompatible keyboards. In extended desktop mode, the image is split into two sides, one to adjust the video settings. To swap sides, select Swap ...

User Guide
Page 88
... onto the computer and/or display. For more information on purchasing a cable lock, visit accessories.toshiba.com. (Sample Illustration) Computer lock cable To secure the computer: 1 Wrap the cable through or around some part of the computer's keyboard, speaker, and other openings. To keep your computer, even across the room, make sure...
... onto the computer and/or display. For more information on purchasing a cable lock, visit accessories.toshiba.com. (Sample Illustration) Computer lock cable To secure the computer: 1 Wrap the cable through or around some part of the computer's keyboard, speaker, and other openings. To keep your computer, even across the room, make sure...

User Guide
Page 92
...keys, control keys, function keys, and special Windows® keys, providing all the functionality of a full-size keyboard. (Sample Illustration) Keyboard Character keys Typing with the character keys is compatible with one Enter key. Most of the page. ❖ ...key on the full-sized keyboard. A standard full-size keyboard includes two Enter, Ctrl, and Alt keys; and a numeric keypad. editing keys; Your computer's keyboard includes only one of the enhanced keyboard. Making your keyboard emulate a full-size keyboard Although your computer's keyboard layout is very much like...
...keys, control keys, function keys, and special Windows® keys, providing all the functionality of a full-size keyboard. (Sample Illustration) Keyboard Character keys Typing with the character keys is compatible with one Enter key. Most of the page. ❖ ...key on the full-sized keyboard. A standard full-size keyboard includes two Enter, Ctrl, and Alt keys; and a numeric keypad. editing keys; Your computer's keyboard includes only one of the enhanced keyboard. Making your keyboard emulate a full-size keyboard Although your computer's keyboard layout is very much like...
User Guide
Page 93
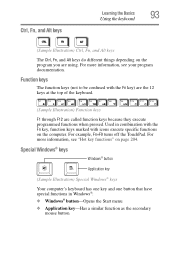
...key functions" on page 204. Special Windows® keys Windows® button Application key (Sample Illustration) Special Windows® keys Your computer's keyboard has one key and one button that have special functions in combination with the Fn key, function keys marked with the Fn key) are the...function as the secondary mouse button For more information, see your program documentation. Ctrl, Fn, and Alt keys Learning the Basics 93 Using the keyboard (Sample Illustration) Ctrl, Fn, and Alt keys The Ctrl, Fn, and Alt keys do different things depending on the program you are ...
...key functions" on page 204. Special Windows® keys Windows® button Application key (Sample Illustration) Special Windows® keys Your computer's keyboard has one key and one button that have special functions in combination with the Fn key, function keys marked with the Fn key) are the...function as the secondary mouse button For more information, see your program documentation. Ctrl, Fn, and Alt keys Learning the Basics 93 Using the keyboard (Sample Illustration) Ctrl, Fn, and Alt keys The Ctrl, Fn, and Alt keys do different things depending on the program you are ...
User Guide
Page 94
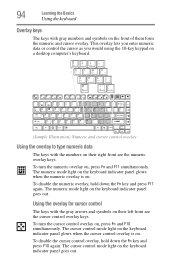
... the cursor as you would using the 10-key keypad on a desktop computer's keyboard. (Sample Illustration) Numeric and cursor control overlay Using the overlay to type numeric data The keys with ...the numbers on the keyboard indicator panel goes out. The numeric mode light on their left front are the numeric... keys. Using the overlay for cursor control The keys with the gray arrows and symbols on the keyboard indicator panel goes out. The cursor control mode light on their right front are the cursor control overlay...
... the cursor as you would using the 10-key keypad on a desktop computer's keyboard. (Sample Illustration) Numeric and cursor control overlay Using the overlay to type numeric data The keys with ...the numbers on the keyboard indicator panel goes out. The numeric mode light on their left front are the numeric... keys. Using the overlay for cursor control The keys with the gray arrows and symbols on the keyboard indicator panel goes out. The cursor control mode light on their right front are the cursor control overlay...
User Guide
Page 99
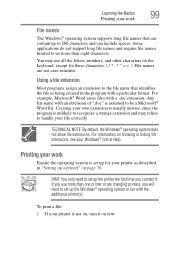
... your work File names The Windows® operating system supports long file names that identifies the file as described in "Setting up a printer" on the keyboard, except for your printer as being created in the program with a .doc extension. Learning the Basics 99 Printing your work Ensure the operating system is...
... your work File names The Windows® operating system supports long file names that identifies the file as described in "Setting up a printer" on the keyboard, except for your printer as being created in the program with a .doc extension. Learning the Basics 99 Printing your work Ensure the operating system is...
User Guide
Page 103
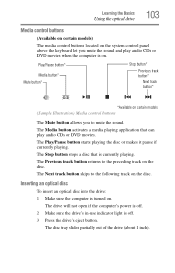
... Basics Using the optical drive 103 Media control buttons (Available on certain models) The media control buttons located on the system control panel above the keyboard let you to mute the sound. Play/Pause button* Media button* Mute button* Stop button* Previous track button* Next track button* *Available on...
... Basics Using the optical drive 103 Media control buttons (Available on certain models) The media control buttons located on the system control panel above the keyboard let you to mute the sound. Play/Pause button* Media button* Mute button* Stop button* Previous track button* Next track button* *Available on...
User Guide
Page 113
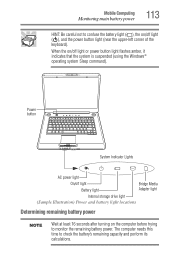
... this time to monitor the remaining battery power. When the on /off light ( ), and the power button light (near the upper-left corner of the keyboard). Mobile Computing Monitoring main battery power 113 HINT: Be careful not to confuse the battery light ( ), the on /off light or power button light flashes...
... this time to monitor the remaining battery power. When the on /off light ( ), and the power button light (near the upper-left corner of the keyboard). Mobile Computing Monitoring main battery power 113 HINT: Be careful not to confuse the battery light ( ), the on /off light or power button light flashes...

