
User Guide
Page 23
... data communication system radio station stipulated in serious injury. Optical Drive Safety Instructions The HD DVD-ROM and multi-function drives employ a laser system. TOSHIBA Direct PC Monday - Never attempt to disassemble, adjust or repair a HD DVD, CD/DVD drive, CD-RW drive, Multi-drive or any repair or adjustment is required. You could...
... data communication system radio station stipulated in serious injury. Optical Drive Safety Instructions The HD DVD-ROM and multi-function drives employ a laser system. TOSHIBA Direct PC Monday - Never attempt to disassemble, adjust or repair a HD DVD, CD/DVD drive, CD-RW drive, Multi-drive or any repair or adjustment is required. You could...

User Guide
Page 24
... the use this guide cannot be exposed to disassemble, adjust or repair a HD DVD, CD/DVD drive, CD-RW drive, Multi-drive or any form without the prior written permission of the information contained herein. ©2007 by Toshiba America Information Systems, Inc. You would also be reproduced in any other safety hazards...
... the use this guide cannot be exposed to disassemble, adjust or repair a HD DVD, CD/DVD drive, CD-RW drive, Multi-drive or any form without the prior written permission of the information contained herein. ©2007 by Toshiba America Information Systems, Inc. You would also be reproduced in any other safety hazards...
User Guide
Page 28
... 48 Adding memory (optional 49 Installing a memory module 49 Removing a memory module 55 Checking total memory 56 Hard Drive Recovery Utilities 57 Creating Recovery CDs/DVDs 58 Hard Disk Drive Recovery options 59 Hard Disk Drive Recovery using the Recovery media 64 Installing drivers and applications 65 Using the TouchPad 65...
... 48 Adding memory (optional 49 Installing a memory module 49 Removing a memory module 55 Checking total memory 56 Hard Drive Recovery Utilities 57 Creating Recovery CDs/DVDs 58 Hard Disk Drive Recovery options 59 Hard Disk Drive Recovery using the Recovery media 64 Installing drivers and applications 65 Using the TouchPad 65...
User Guide
Page 29
... drive 97 Optical drive components 97 Media control buttons 98 Inserting a compact disc 99 Playing an audio CD 100 Playing optical media 101 Creating a CD/DVD 102 Removing a disc with the computer on...........102 Removing a disc with the computer off ..........103 Caring for CD or...
... drive 97 Optical drive components 97 Media control buttons 98 Inserting a compact disc 99 Playing an audio CD 100 Playing optical media 101 Creating a CD/DVD 102 Removing a disc with the computer on...........102 Removing a disc with the computer off ..........103 Caring for CD or...
User Guide
Page 32
32 Contents TOSHIBA Button Support 156 CD/DVD Drive Acoustic Silencer 157 TOSHIBA Accessibility 158 Fingerprint Authentication Utility 159 Fingerprint utility limitations 159 Fingerprint Enrollment 159 Fingerprint Logon 161 Power-on Security 161 Control Center 161 Password Bank ...
32 Contents TOSHIBA Button Support 156 CD/DVD Drive Acoustic Silencer 157 TOSHIBA Accessibility 158 Fingerprint Authentication Utility 159 Fingerprint utility limitations 159 Fingerprint Enrollment 159 Fingerprint Logon 161 Power-on Security 161 Control Center 161 Password Bank ...
User Guide
Page 33
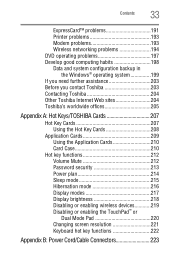
...problems 194 DVD operating problems 197 Develop good computing habits 198 Data and system configuration backup in the Windows® operating system 199 If you need further assistance 203 Before you contact Toshiba 203 Contacting Toshiba 204 Other Toshiba Internet Web sites 204 Toshiba's worldwide offices... 205 Appendix A: Hot Keys/TOSHIBA Cards 207 Hot Key Cards 207 Using the Hot Key Cards 208 Application...
...problems 194 DVD operating problems 197 Develop good computing habits 198 Data and system configuration backup in the Windows® operating system 199 If you need further assistance 203 Before you contact Toshiba 203 Contacting Toshiba 204 Other Toshiba Internet Web sites 204 Toshiba's worldwide offices... 205 Appendix A: Hot Keys/TOSHIBA Cards 207 Hot Key Cards 207 Using the Hot Key Cards 208 Application...
User Guide
Page 57
... recommended that says, "Windows® needs your permission to continue." For more information on creating Recovery media see "Creating Recovery CDs/DVDs" on certain models) to allow you to recover your hard disk drive or reinstall selected applications and software features or utilities. Hard Drive... Getting Started 57 Hard Drive Recovery Utilities NOTE From time to time, Windows® will display a pop-up that you create recovery CDs/DVDs before using a writable drive ❖ Recover your hard disk drive to the factory-set default ❖ Recover just your C: drive, leaving ...
... recommended that says, "Windows® needs your permission to continue." For more information on creating Recovery media see "Creating Recovery CDs/DVDs" on certain models) to allow you to recover your hard disk drive or reinstall selected applications and software features or utilities. Hard Drive... Getting Started 57 Hard Drive Recovery Utilities NOTE From time to time, Windows® will display a pop-up that you create recovery CDs/DVDs before using a writable drive ❖ Recover your hard disk drive to the factory-set default ❖ Recover just your C: drive, leaving ...
User Guide
Page 58
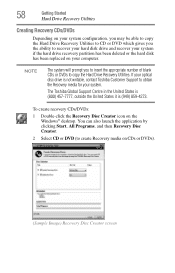
...(949) 859-4273. You can also launch the application by clicking Start, All Programs, and then Recovery Disc Creator. 2 Select CD or DVD (to recover your hard disk drive and recover your system if the hard drive recovery partition has been deleted or the hard disk has been... United States it is not writable, contact Toshiba Customer Support to copy the Hard Drive Recovery Utilities. NOTE The system will prompt you the ability to create Recovery media on CDs or DVDs). (Sample Image) Recovery Disc Creator screen To create recovery CDs/DVDs: 1 Double-click the Recovery Disc Creator...
...(949) 859-4273. You can also launch the application by clicking Start, All Programs, and then Recovery Disc Creator. 2 Select CD or DVD (to recover your hard disk drive and recover your system if the hard drive recovery partition has been deleted or the hard disk has been... United States it is not writable, contact Toshiba Customer Support to copy the Hard Drive Recovery Utilities. NOTE The system will prompt you the ability to create Recovery media on CDs or DVDs). (Sample Image) Recovery Disc Creator screen To create recovery CDs/DVDs: 1 Double-click the Recovery Disc Creator...
User Guide
Page 59
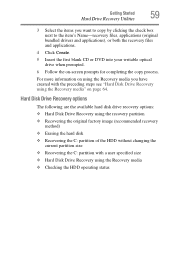
... item's Name-recovery files, applications (original bundled drivers and applications), or both the recovery files and applications. 4 Click Create. 5 Insert the first blank CD or DVD into your writable optical drive when prompted. 6 Follow the on page 64. Getting Started 59 Hard Drive Recovery Utilities 3 Select the items you have created...
... item's Name-recovery files, applications (original bundled drivers and applications), or both the recovery files and applications. 4 Click Create. 5 Insert the first blank CD or DVD into your writable optical drive when prompted. 6 Follow the on page 64. Getting Started 59 Hard Drive Recovery Utilities 3 Select the items you have created...

User Guide
Page 64
The system will boot up to the Toshiba Recovery Wizard screen. 4 Please refer to "Hard Disk Drive Recovery options" on page 59, to begin the restoration. The boot menu appears. 3 Using the arrow keys, select the CD/DVD option and press Enter. Once complete, a message displays that the HDD has been recovered. 5 ...Press any key on your optical drive and power on page 58): 1 Insert the first recovery CD or DVD into your keyboard to its default factory state, you can rebuild the system using the Recovery media If you need to recover your computer to...
The system will boot up to the Toshiba Recovery Wizard screen. 4 Please refer to "Hard Disk Drive Recovery options" on page 59, to begin the restoration. The boot menu appears. 3 Using the arrow keys, select the CD/DVD option and press Enter. Once complete, a message displays that the HDD has been recovered. 5 ...Press any key on your optical drive and power on page 58): 1 Insert the first recovery CD or DVD into your keyboard to its default factory state, you can rebuild the system using the Recovery media If you need to recover your computer to...

User Guide
Page 69
... port, as follows: ❖ An external monitor or projector via the RGB (monitor) port ❖ A TV, VCR, or DVD recorder via the S-video (TV-out) port* ❖ An HDMI-compatible television or VCR/DVD player via the HDMI Out port* *(Available on the bottom of these buttons if you wish. The virtual...
... port, as follows: ❖ An external monitor or projector via the RGB (monitor) port ❖ A TV, VCR, or DVD recorder via the S-video (TV-out) port* ❖ An HDMI-compatible television or VCR/DVD player via the HDMI Out port* *(Available on the bottom of these buttons if you wish. The virtual...

User Guide
Page 70
... the display output when you turn on the side of your television. Connecting an HDMI-compatible television or VCR/DVD player (Available on certain models) To connect an HDMI-compatible television or VCR/DVD player to the computer: 1 Connect one end of an HDMI cable (not included with display options. 70 Getting...
... the display output when you turn on the side of your television. Connecting an HDMI-compatible television or VCR/DVD player (Available on certain models) To connect an HDMI-compatible television or VCR/DVD player to the computer: 1 Connect one end of an HDMI cable (not included with display options. 70 Getting...
User Guide
Page 96
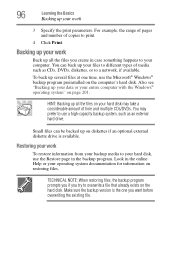
...documentation for information on restoring files. Look in the backup program. For example, the range of pages and number of time and multiple CDs/DVDs. Make sure the backup version is available. Also see "Backing up all the files you want before overwriting the existing file. 96 Learning the... Basics Backing up on diskettes if an optional external diskette drive is the one time, use a high-capacity backup system, such as CDs, DVDs, diskettes, or to print. 4 Click Print. Small files can back up several files at one you create in case something happens to your ...
...documentation for information on restoring files. Look in the backup program. For example, the range of pages and number of time and multiple CDs/DVDs. Make sure the backup version is available. Also see "Backing up all the files you want before overwriting the existing file. 96 Learning the... Basics Backing up on diskettes if an optional external diskette drive is the one time, use a high-capacity backup system, such as CDs, DVDs, diskettes, or to print. 4 Click Print. Small files can back up several files at one you create in case something happens to your ...
User Guide
Page 97
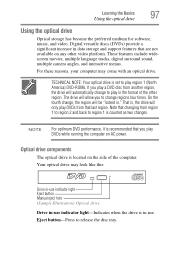
... digital surround sound, multiple camera angles, and interactive menus. On the fourth change regions four times. Note that changing from that you play a DVD disc from another region, the drive will be "locked in use. TECHNICAL NOTE: Your optical drive is set to change , the region will ...automatically change to play DVDs from region 1 to region 2 and back to release the disc tray. Learning the Basics 97 Using the optical drive Using the optical drive ...
... digital surround sound, multiple camera angles, and interactive menus. On the fourth change regions four times. Note that changing from that you play a DVD disc from another region, the drive will be "locked in use. TECHNICAL NOTE: Your optical drive is set to change , the region will ...automatically change to play DVDs from region 1 to region 2 and back to release the disc tray. Learning the Basics 97 Using the optical drive Using the optical drive ...
User Guide
Page 98
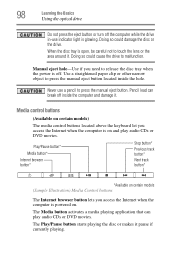
... Media Control buttons The Internet browser button lets you access the Internet when the computer is glowing. Pencil lead can play audio CDs or DVD movies. Play/Pause button* Media button* Internet browser button* Stop button* Previous track button* Next track button* *Available on and play audio ...CDs or DVD movies. Use a straightened paper clip or other narrow object to release the disc tray when the power is off the computer while the drive...
... Media Control buttons The Internet browser button lets you access the Internet when the computer is glowing. Pencil lead can play audio CDs or DVD movies. Play/Pause button* Media button* Internet browser button* Stop button* Previous track button* Next track button* *Available on and play audio ...CDs or DVD movies. Use a straightened paper clip or other narrow object to release the disc tray when the power is off the computer while the drive...
User Guide
Page 99
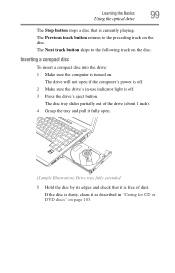
... Illustration) Drive tray fully extended 5 Hold the disc by its edges and check that is off . 2 Make sure the drive's in "Caring for CD or DVD discs" on the disc. If the disc is dusty, clean it is turned on the disc. Inserting a compact disc To insert a compact disc into the...
... Illustration) Drive tray fully extended 5 Hold the disc by its edges and check that is off . 2 Make sure the drive's in "Caring for CD or DVD discs" on the disc. If the disc is dusty, clean it is turned on the disc. Inserting a compact disc To insert a compact disc into the...
User Guide
Page 100
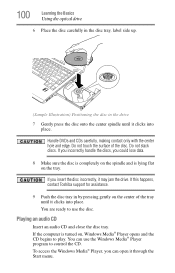
... Insert an audio CD and close the disc tray. To access the Windows Media® Player, you can use the disc. If this happens, contact Toshiba support for assistance. 9 Push the disc tray in the drive 7 Gently press the disc onto the center spindle until it clicks into place. You are... the CD begins to control the CD. You can open it through the Start menu. If the computer is lying flat on the tray. Handle DVDs and CDs carefully, making contact only with the center hole and edge.
... Insert an audio CD and close the disc tray. To access the Windows Media® Player, you can use the disc. If this happens, contact Toshiba support for assistance. 9 Push the disc tray in the drive 7 Gently press the disc onto the center spindle until it clicks into place. You are... the CD begins to control the CD. You can open it through the Start menu. If the computer is lying flat on the tray. Handle DVDs and CDs carefully, making contact only with the center hole and edge.

User Guide
Page 101
... from occurring, close Windows Media® Player before you insert a CD/DVD into the optical drive and the Auto-Run feature does not automatically start your disc, try launching the CD.../DVD manually. To prevent this , follow these steps: 1 Click Start, and then Computer. 2 Click... the CD or to listen, turn the volume down. The disc drive will run the CD/DVD. Learning the Basics Using the optical drive 101 NOTE When using headphones. Playing optical media If you select Sleep ...
... from occurring, close Windows Media® Player before you insert a CD/DVD into the optical drive and the Auto-Run feature does not automatically start your disc, try launching the CD.../DVD manually. To prevent this , follow these steps: 1 Click Start, and then Computer. 2 Click... the CD or to listen, turn the volume down. The disc drive will run the CD/DVD. Learning the Basics Using the optical drive 101 NOTE When using headphones. Playing optical media If you select Sleep ...
User Guide
Page 102
... or optical media recorders. NOTE Due to manufacturing and quality variations in third party optical media (e.g., CD or DVD) or optical media players/recorders, in certain cases, your Toshiba optical drive may not record on your computer's product specification for it to stop spinning before you remove it... the software, please refer to open Windows Media® Player and use it . 102 Learning the Basics Using the optical drive If your Toshiba computer or optical drive. For details on how to select and then play back or operate properly on the disc. Removing a disc with ...
... or optical media recorders. NOTE Due to manufacturing and quality variations in third party optical media (e.g., CD or DVD) or optical media players/recorders, in certain cases, your Toshiba optical drive may not record on your computer's product specification for it to stop spinning before you remove it... the software, please refer to open Windows Media® Player and use it . 102 Learning the Basics Using the optical drive If your Toshiba computer or optical drive. For details on how to select and then play back or operate properly on the disc. Removing a disc with ...

User Guide
Page 103
... resources Toshiba maintains a number of the disc and wipe toward the outward edge (not in the drive. If necessary, moisten the cloth with water or a neutral cleaner (not benzine or rubbing alcohol). Pencil lead can connect. Caring for CD or DVD discs ❖ Store your discs in to ...press the manual eject button. Learning the Basics Toshiba's online resources 103 2 Pull the tray out until it is to start from reading the data properly...
... resources Toshiba maintains a number of the disc and wipe toward the outward edge (not in the drive. If necessary, moisten the cloth with water or a neutral cleaner (not benzine or rubbing alcohol). Pencil lead can connect. Caring for CD or DVD discs ❖ Store your discs in to ...press the manual eject button. Learning the Basics Toshiba's online resources 103 2 Pull the tray out until it is to start from reading the data properly...


