User Guide
Page 48
... or closing the display panel. Opening the display panel 1 Facing the front of the computer, locate the center of the display panel. 2 Slide the display latch to the right. 3 Gently raise the panel. 4 Adjust the display to remove any pens or other objects from the keyboard area before closing the display...
... or closing the display panel. Opening the display panel 1 Facing the front of the computer, locate the center of the display panel. 2 Slide the display latch to the right. 3 Gently raise the panel. 4 Adjust the display to remove any pens or other objects from the keyboard area before closing the display...

User Guide
Page 54
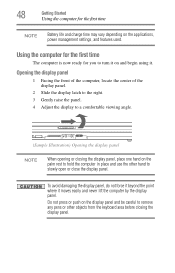
..., avoiding any contact with the socket 12 Firmly press the memory module into the socket NOTE For this model Slot A is the bottom slot. notch latch connector latch key (Sample Illustration) Aligning the memory module with its connector. Slot B is the top slot. 54 Getting Started Adding memory (optional) NOTE If your...
..., avoiding any contact with the socket 12 Firmly press the memory module into the socket NOTE For this model Slot A is the bottom slot. notch latch connector latch key (Sample Illustration) Aligning the memory module with its connector. Slot B is the top slot. 54 Getting Started Adding memory (optional) NOTE If your...
User Guide
Page 55
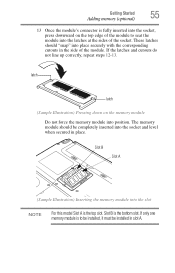
The memory module should "snap" into place securely with the corresponding cutouts in the side of the module. latch latch (Sample Illustration) Pressing down on the top edge of the module to be installed, it must be completely inserted into the socket and level when ...secured in place. If only one memory module is to seat the module into the latches at the sides of the socket. Getting Started 55 Adding memory (optional) 13 Once the module's connector is fully inserted into the socket, press downward...
The memory module should "snap" into place securely with the corresponding cutouts in the side of the module. latch latch (Sample Illustration) Pressing down on the top edge of the module to be installed, it must be completely inserted into the socket and level when ...secured in place. If only one memory module is to seat the module into the latches at the sides of the socket. Getting Started 55 Adding memory (optional) 13 Once the module's connector is fully inserted into the socket, press downward...
User Guide
Page 57
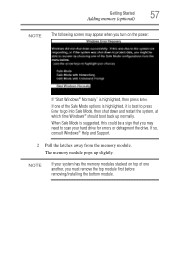
... best to press Enter to scan your hard drive for errors or defragment the drive. If so, consult Windows® Help and Support. 2 Pull the latches away from the memory module. The memory module pops up normally. Getting Started 57 Adding memory (optional) NOTE The following screen may need to go...
... best to press Enter to scan your hard drive for errors or defragment the drive. If so, consult Windows® Help and Support. 2 Pull the latches away from the memory module. The memory module pops up normally. Getting Started 57 Adding memory (optional) NOTE The following screen may need to go...
User Guide
Page 58
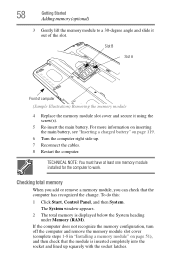
... remove the memory module slot cover (complete steps 1-8 in "Installing a memory module" on page 119. 6 Turn the computer right side up squarely with the socket latches. To do this: 1 Click Start, Control Panel, and then System. 58 Getting Started Adding memory (optional) 3 Gently lift the memory module to work. TECHNICAL NOTE...
... remove the memory module slot cover (complete steps 1-8 in "Installing a memory module" on page 119. 6 Turn the computer right side up squarely with the socket latches. To do this: 1 Click Start, Control Panel, and then System. 58 Getting Started Adding memory (optional) 3 Gently lift the memory module to work. TECHNICAL NOTE...
User Guide
Page 118
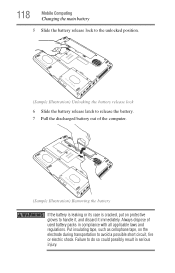
... Computing Changing the main battery 5 Slide the battery release lock to the unlocked position. (Sample Illustration) Unlocking the battery release lock 6 Slide the battery release latch to release the battery. 7 Pull the discharged battery out of used battery packs in serious injury.
... Computing Changing the main battery 5 Slide the battery release lock to the unlocked position. (Sample Illustration) Unlocking the battery release lock 6 Slide the battery release latch to release the battery. 7 Pull the discharged battery out of used battery packs in serious injury.
User Guide
Page 119
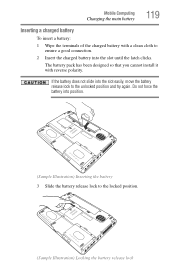
... into position. (Sample Illustration) Inserting the battery 3 Slide the battery release lock to ensure a good connection. 2 Insert the charged battery into the slot until the latch clicks. The battery pack has been designed so that you cannot install it with a clean cloth to the locked position. (Sample Illustration) Locking the battery...
... into position. (Sample Illustration) Inserting the battery 3 Slide the battery release lock to ensure a good connection. 2 Insert the charged battery into the slot until the latch clicks. The battery pack has been designed so that you cannot install it with a clean cloth to the locked position. (Sample Illustration) Locking the battery...
