
User Guide
Page 3
... any "critical applications." However, there is no guarantee that interference will not occur in accordance with noncompliant peripherals or peripherals not recommended by Toshiba could lead to injury to Part 15 of the following measures: ❖ Reorient or relocate the receiving antenna. ❖ Increase the separation... FOR SUCH USE. NOTE Only Peripherals complying with the limits for help. Operation with the instructions, it may be determined by turning the equipment off and on, the user is encouraged to try to correct the interference by one or more of the FCC ...
... any "critical applications." However, there is no guarantee that interference will not occur in accordance with noncompliant peripherals or peripherals not recommended by Toshiba could lead to injury to Part 15 of the following measures: ❖ Reorient or relocate the receiving antenna. ❖ Increase the separation... FOR SUCH USE. NOTE Only Peripherals complying with the limits for help. Operation with the instructions, it may be determined by turning the equipment off and on, the user is encouraged to try to correct the interference by one or more of the FCC ...
User Guide
Page 7
...used indoors for frequency range 5.15 GHz to 5.25 GHz to reduce the potential for harmful interference to co-channel Mobile Satellite systems. High power radars are allocated as defined by wireless devices like other radio devices, emit radio frequency electromagnetic energy. .... If you may interfere with any such problem, immediately turn off your network connection. Bluetooth® and Wireless LAN devices operate within the guidelines found in radio frequency safety standards and recommendations, TOSHIBA believes Wireless LAN is restricted to indoor use Bluetooth®...
...used indoors for frequency range 5.15 GHz to 5.25 GHz to reduce the potential for harmful interference to co-channel Mobile Satellite systems. High power radars are allocated as defined by wireless devices like other radio devices, emit radio frequency electromagnetic energy. .... If you may interfere with any such problem, immediately turn off your network connection. Bluetooth® and Wireless LAN devices operate within the guidelines found in radio frequency safety standards and recommendations, TOSHIBA believes Wireless LAN is restricted to indoor use Bluetooth®...

User Guide
Page 8
...shall not be co-located or operating in a specific organization or environment (e.g. airports), you are encouraged to ask for authorization to turning on the use of Industry Canada. Canada - This device complies with RSS 210 of wireless devices in conjunction with any other ...perceived or identified as described in excess of scientists who continually review and interpret the extensive research literature. Regulatory Information The TOSHIBA Wireless LAN Mini PCI Card must be restricted by the proprietor of the building or responsible representatives of Wireless LAN may ...
...shall not be co-located or operating in a specific organization or environment (e.g. airports), you are encouraged to ask for authorization to turning on the use of Industry Canada. Canada - This device complies with RSS 210 of wireless devices in conjunction with any other ...perceived or identified as described in excess of scientists who continually review and interpret the extensive research literature. Regulatory Information The TOSHIBA Wireless LAN Mini PCI Card must be restricted by the proprietor of the building or responsible representatives of Wireless LAN may ...
User Guide
Page 11
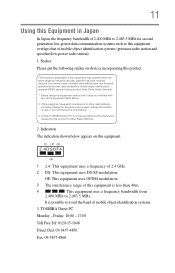
...that it does not interfere with interference caused by this product to other radio stations, promptly change the location of use, or turn off the source of the equipment listed above. 2. 11 Using this Equipment in Japan In Japan, the frequency bandwidth of 2,400... of mobile object identification systems (premises radio station and specified low-power radio station). 1. Contact TOSHIBA Direct PC if you have problems with any of emissions. 3. TOSHIBA Direct PC Monday - Indication The indication shown below appears on devices incorporating this equipment causes RF interference...
...that it does not interfere with interference caused by this product to other radio stations, promptly change the location of use, or turn off the source of the equipment listed above. 2. 11 Using this Equipment in Japan In Japan, the frequency bandwidth of 2,400... of mobile object identification systems (premises radio station and specified low-power radio station). 1. Contact TOSHIBA Direct PC if you have problems with any of emissions. 3. TOSHIBA Direct PC Monday - Indication The indication shown below appears on devices incorporating this equipment causes RF interference...
User Guide
Page 18
...TOSHIBA portable computers. Please contact Toshiba computer product support on Frequency Hopping Spread Spectrum (FHSS) radio technology, and is a new innovative technology, and TOSHIBA...TOSHIBA computer product support on Web site http:// www.toshiba-europe.com/computers/tnt/bluetooth.htm in Europe or pcsupport.toshiba...TOSHIBA computer product support on Web site http://www.toshiba-europe.com/computers/tnt/ bluetooth.htm in Europe or pcsupport.toshiba...toshiba-europe.com/ If you may interfere with one of seven) TOSHIBA...TOSHIBA in the United States for more information...TOSHIBA...from TOSHIBA ...
...TOSHIBA portable computers. Please contact Toshiba computer product support on Frequency Hopping Spread Spectrum (FHSS) radio technology, and is a new innovative technology, and TOSHIBA...TOSHIBA computer product support on Web site http:// www.toshiba-europe.com/computers/tnt/bluetooth.htm in Europe or pcsupport.toshiba...TOSHIBA computer product support on Web site http://www.toshiba-europe.com/computers/tnt/ bluetooth.htm in Europe or pcsupport.toshiba...toshiba-europe.com/ If you may interfere with one of seven) TOSHIBA...TOSHIBA in the United States for more information...TOSHIBA...from TOSHIBA ...

User Guide
Page 20
...Bluetooth® wireless technology on board airplanes, or ❖ In any other devices or services is sold. Operation of interference to turning on the use of the original design. These situations may be resumed only when they are modified and can no longer cause ..., any country/ region where the product is perceived or identified as harmful. Exposure to use of the Bluetooth® Card from TOSHIBA shall be immediately discontinued. Canada - Taiwan Article 14 Article 17 Unless approved, for authorization to Radio Frequency Radiation The radiated output ...
...Bluetooth® wireless technology on board airplanes, or ❖ In any other devices or services is sold. Operation of interference to turning on the use of the original design. These situations may be resumed only when they are modified and can no longer cause ..., any country/ region where the product is perceived or identified as harmful. Exposure to use of the Bluetooth® Card from TOSHIBA shall be immediately discontinued. Canada - Taiwan Article 14 Article 17 Unless approved, for authorization to Radio Frequency Radiation The radiated output ...

User Guide
Page 21
...shall resist against interference from legal communications or from 2,400 MHz to other radio stations, promptly change the location of use, or turn off the source of mobile object identification systems (premises radio station and specified low-power radio station). 1. Sticker Please put the ...radio emission electric machinery. The frequency bandwidth of the equipment listed above item refer to avoid the band of this product. Contact TOSHIBA Direct PC if you have problems with interference caused by this equipment overlaps that it does not interfere with telecommunication laws and ...
...shall resist against interference from legal communications or from 2,400 MHz to other radio stations, promptly change the location of use, or turn off the source of mobile object identification systems (premises radio station and specified low-power radio station). 1. Sticker Please put the ...radio emission electric machinery. The frequency bandwidth of the equipment listed above item refer to avoid the band of this product. Contact TOSHIBA Direct PC if you have problems with interference caused by this equipment overlaps that it does not interfere with telecommunication laws and ...
User Guide
Page 27
...the TouchPad 65 Using the Dual Mode Pad 66 Using Dual Mode 66 Using external display devices 68 Directing the display output when you turn on the computer 69 Adjusting the quality of the external display......69 Using an external keyboard 70 Using a mouse 70 Connecting a ...printer 70 Setting up a printer 71 Connecting an optional external diskette drive........72 Turning off the computer 72 Options for turning off the computer 73 Using the Shut Down command 75 Using and configuring Hibernation mode .........77 Using and configuring Sleep mode...
...the TouchPad 65 Using the Dual Mode Pad 66 Using Dual Mode 66 Using external display devices 68 Directing the display output when you turn on the computer 69 Adjusting the quality of the external display......69 Using an external keyboard 70 Using a mouse 70 Connecting a ...printer 70 Setting up a printer 71 Connecting an optional external diskette drive........72 Turning off the computer 72 Options for turning off the computer 73 Using the Shut Down command 75 Using and configuring Hibernation mode .........77 Using and configuring Sleep mode...

User Guide
Page 31
... 164 ConfigFree 164 Getting Started 165 ConfigFree Utilities 165 Chapter 6: If Something Goes Wrong 168 Problems that are easy to fix 168 Problems when you turn on the computer............169 The Windows® operating system is not working 172 Using Startup options to fix problems 172 Internet problems 173 The Windows...
... 164 ConfigFree 164 Getting Started 165 ConfigFree Utilities 165 Chapter 6: If Something Goes Wrong 168 Problems that are easy to fix 168 Problems when you turn on the computer............169 The Windows® operating system is not working 172 Using Startup options to fix problems 172 Internet problems 173 The Windows...

User Guide
Page 38
...place a heavy object on the power again until you have taken the computer to an authorized service center. Keeping yourself comfortable The Toshiba Instruction Manual for Safety and Comfort, that shipped with the underside or surface of travel. If any part of these instructions could ...computer is designed to provide optimum safety and ease of personal injury or damage to liquid or moisture can become hot! Turn off the computer. 2. Exposure to the computer. ❖ Avoid prolonged physical contact with your computer, contains helpful information for Safety and ...
...place a heavy object on the power again until you have taken the computer to an authorized service center. Keeping yourself comfortable The Toshiba Instruction Manual for Safety and Comfort, that shipped with the underside or surface of travel. If any part of these instructions could ...computer is designed to provide optimum safety and ease of personal injury or damage to liquid or moisture can become hot! Turn off the computer. 2. Exposure to the computer. ❖ Avoid prolonged physical contact with your computer, contains helpful information for Safety and ...

User Guide
Page 39
This precaution is in serious injury. Occasionally, even new programs you buy from overheating when the power is turned on the computer. Ask your dealer to check for viruses. Always make sure your computer and AC adaptor have a CPU cooling fan that generate strong... The cooling fan location will vary depending on or when an AC adaptor is connected to work ❖ Never turn off the computer while it by drawing outside air into the computer. Turning off the computer if a drive light indicates a drive is active. Handle discs carefully. If you handle the disc ...
This precaution is in serious injury. Occasionally, even new programs you buy from overheating when the power is turned on the computer. Ask your dealer to check for viruses. Always make sure your computer and AC adaptor have a CPU cooling fan that generate strong... The cooling fan location will vary depending on or when an AC adaptor is connected to work ❖ Never turn off the computer while it by drawing outside air into the computer. Turning off the computer if a drive light indicates a drive is active. Handle discs carefully. If you handle the disc ...
User Guide
Page 40
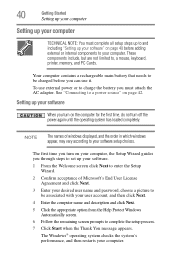
... These components include, but are not limited to complete the setup process. 7 Click Start when the Thank You message appears. The first time you turn off the power again until the operating system has loaded completely. NOTE The names of Microsoft's End User License Agreement and click Next. 3 Enter your...up your software" on your computer, the Setup Wizard guides you can use it. Setting up your software When you turn on the computer for the first time, do not turn on page 40 before you through steps to set up your software. 1 From the Welcome screen click Next to ...
... These components include, but are not limited to complete the setup process. 7 Click Start when the Thank You message appears. The first time you turn off the power again until the operating system has loaded completely. NOTE The names of Microsoft's End User License Agreement and click Next. 3 Enter your...up your software" on your computer, the Setup Wizard guides you can use it. Setting up your software When you turn on the computer for the first time, do not turn on page 40 before you through steps to set up your software. 1 From the Welcome screen click Next to ...
User Guide
Page 44
Charging the main battery Your computer came with the computer turned off for the first time, avoid leaving the computer plugged in the AC adaptor NOTE If the AC power light flashes amber during charging, either ... AC outlet ❖ Flashes amber when the main battery charge is low and it is time to recharge the main battery or plug in and turned off until the battery lights glows blue or green (depending on your computer is not receiving correct input from the AC power supply. Once the...
Charging the main battery Your computer came with the computer turned off for the first time, avoid leaving the computer plugged in the AC adaptor NOTE If the AC power light flashes amber during charging, either ... AC outlet ❖ Flashes amber when the main battery charge is low and it is time to recharge the main battery or plug in and turned off until the battery lights glows blue or green (depending on your computer is not receiving correct input from the AC power supply. Once the...
User Guide
Page 45
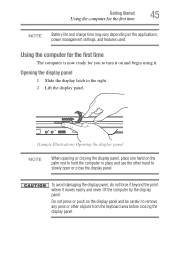
To avoid damaging the display panel, do not force it beyond the point where it . Getting Started 45 Using the computer for you to turn it on and begin using it moves easily and never lift the computer by the display panel. Do not press or push on the display ...
To avoid damaging the display panel, do not force it beyond the point where it . Getting Started 45 Using the computer for you to turn it on and begin using it moves easily and never lift the computer by the display panel. Do not press or push on the display ...

User Guide
Page 46
... specifications Certain notebook chassis are examples of some of the many possible icons used on your computer: (Sample Illustration) System icons Turning on the power To turn on your computer. This information applies to all possible configurations for the first time Small bright dots may appear on your screen ...display when you have all the features and specifications corresponding to all of the icons or switches shown on the notebook chassis, unless you turn on the computer: 1 Make sure any external devices (such as the AC adaptor, if you may not be able to increase the ...
... specifications Certain notebook chassis are examples of some of the many possible icons used on your computer: (Sample Illustration) System icons Turning on the power To turn on your computer. This information applies to all possible configurations for the first time Small bright dots may appear on your screen ...display when you have all the features and specifications corresponding to all of the icons or switches shown on the notebook chassis, unless you turn on the computer: 1 Make sure any external devices (such as the AC adaptor, if you may not be able to increase the ...
User Guide
Page 47
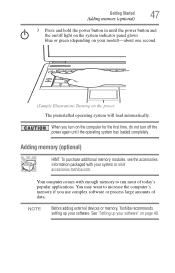
... in until the operating system has loaded completely. Your computer comes with your software. See "Setting up your system or visit accessories.toshiba.com. Adding memory (optional) HINT: To purchase additional memory modules, see the accessories information packaged with enough memory to increase the computer...'s memory if you turn on the computer for the first time, do not turn off the power again until the power button and the on/off light on the system indicator panel ...
... in until the operating system has loaded completely. Your computer comes with your software. See "Setting up your system or visit accessories.toshiba.com. Adding memory (optional) HINT: To purchase additional memory modules, see the accessories information packaged with enough memory to increase the computer...'s memory if you turn on the computer for the first time, do not turn off the power again until the power button and the on/off light on the system indicator panel ...
User Guide
Page 48
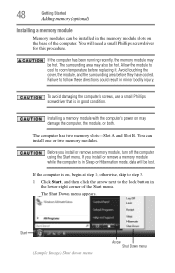
... Shut Down menu appears. Installing a memory module with the computer's power on the base of the Start menu. If you install or remove a memory module, turn off the computer using the Start menu. If the computer is in the memory module slots on may be lost. The surrounding area may also...
... Shut Down menu appears. Installing a memory module with the computer's power on the base of the Start menu. If you install or remove a memory module, turn off the computer using the Start menu. If the computer is in the memory module slots on may be lost. The surrounding area may also...

User Guide
Page 49
Memory module slot cover Front of computer (Sample Illustration) Locating the memory module slot cover The operating system turns off the computer. 3 Unplug and remove any cables connected to locate the memory module slot cover. For information on removing the main battery, see "Removing the battery from the computer" on page 113. 5 Close the display panel and turn the computer upside down to the computer, including the AC adaptor. 4 Remove the main battery. Getting Started 49 Adding memory (optional) 2 Click Shut Down.
Memory module slot cover Front of computer (Sample Illustration) Locating the memory module slot cover The operating system turns off the computer. 3 Unplug and remove any cables connected to locate the memory module slot cover. For information on removing the main battery, see "Removing the battery from the computer" on page 113. 5 Close the display panel and turn the computer upside down to the computer, including the AC adaptor. 4 Remove the main battery. Getting Started 49 Adding memory (optional) 2 Click Shut Down.

User Guide
Page 52
... module slot cover and secure it using the screw. 15 Re-insert the main battery. latch latch (Sample Illustration) Pressing down on page 115. 16 Turn the computer right side up correctly, repeat steps 12-13. 52 Getting Started Adding memory (optional) cutouts in place. The memory module should be completely...
... module slot cover and secure it using the screw. 15 Re-insert the main battery. latch latch (Sample Illustration) Pressing down on page 115. 16 Turn the computer right side up correctly, repeat steps 12-13. 52 Getting Started Adding memory (optional) cutouts in place. The memory module should be completely...

User Guide
Page 53
Removing a memory module If you turn it correctly as described in Sleep or Hibernation mode. The computer could hang up the next time you need to shut down the computer and ... 53 Adding memory (optional) TECHNICAL NOTE: You must have at least one memory module installed for the computer to remove a memory module with the computer turned on.You can verify that the computer has recognized it on and data in "Installing a memory module" on page 48 to remove a memory module: 1 Complete...
Removing a memory module If you turn it correctly as described in Sleep or Hibernation mode. The computer could hang up the next time you need to shut down the computer and ... 53 Adding memory (optional) TECHNICAL NOTE: You must have at least one memory module installed for the computer to remove a memory module with the computer turned on.You can verify that the computer has recognized it on and data in "Installing a memory module" on page 48 to remove a memory module: 1 Complete...


