User Guide
Page 27
... enabling the TouchPad 65 Using the Dual Mode Pad 66 Using Dual Mode 66 Using external display devices 68 Directing the display output when you turn on the computer 69 Adjusting the quality of the external display......69 Using an external keyboard 70 Using a mouse 70 Connecting a printer 70 Setting up a... the computer 73 Using the Shut Down command 75 Using and configuring Hibernation mode .........77 Using and configuring Sleep mode 79 Closing the display panel 82 Customizing your computer's settings 82 Caring for your computer 82 Cleaning the computer 82 Moving the computer 82
... enabling the TouchPad 65 Using the Dual Mode Pad 66 Using Dual Mode 66 Using external display devices 68 Directing the display output when you turn on the computer 69 Adjusting the quality of the external display......69 Using an external keyboard 70 Using a mouse 70 Connecting a printer 70 Setting up a... the computer 73 Using the Shut Down command 75 Using and configuring Hibernation mode .........77 Using and configuring Sleep mode 79 Closing the display panel 82 Customizing your computer's settings 82 Caring for your computer 82 Cleaning the computer 82 Moving the computer 82

User Guide
Page 31
... Resolving a hardware conflict 174 A plan of action 174 Fixing a problem with Device Manager ...........175 Memory problems 176 Power and the batteries 177 Keyboard problems 178 Display problems 179 Disk drive problems 181 Optical drive problems 182 Sound system problems 183 PC Card problems 184 Printer problems 186 Wireless networking problems 187...
... Resolving a hardware conflict 174 A plan of action 174 Fixing a problem with Device Manager ...........175 Memory problems 176 Power and the batteries 177 Keyboard problems 178 Display problems 179 Disk drive problems 181 Optical drive problems 182 Sound system problems 183 PC Card problems 184 Printer problems 186 Wireless networking problems 187...
User Guide
Page 32
...the Windows® operating system 191 If you need further assistance 195 Before you contact Toshiba 195 Contacting Toshiba 196 Other Toshiba Internet Web sites 197 Toshiba's worldwide offices 197 Appendix A: Hot Keys/TOSHIBA Cards 199 Hot Key Cards 199 Using the Hot Key Cards 200 Application Cards 201... Using the Application Cards 201 Card Case 202 Hot Key Functions 203 Volume Mute 203 Password security 204 Power plan 206 Sleep mode 207 Hibernation mode 208 Display modes 209 Display ...
...the Windows® operating system 191 If you need further assistance 195 Before you contact Toshiba 195 Contacting Toshiba 196 Other Toshiba Internet Web sites 197 Toshiba's worldwide offices 197 Appendix A: Hot Keys/TOSHIBA Cards 199 Hot Key Cards 199 Using the Hot Key Cards 200 Application Cards 201... Using the Application Cards 201 Card Case 202 Hot Key Functions 203 Volume Mute 203 Password security 204 Power plan 206 Sleep mode 207 Hibernation mode 208 Display modes 209 Display ...
User Guide
Page 40
... Wizard guides you through steps to set up your software. 1 From the Welcome screen click Next to enter the Setup Wizard. 2 Confirm acceptance of windows displayed, and the order in which windows appear, may vary according to , a mouse, keyboard, printer, memory, and PC Cards. The Windows® operating system checks the...
... Wizard guides you through steps to set up your software. 1 From the Welcome screen click Next to enter the Setup Wizard. 2 Confirm acceptance of windows displayed, and the order in which windows appear, may vary according to , a mouse, keyboard, printer, memory, and PC Cards. The Windows® operating system checks the...
User Guide
Page 41
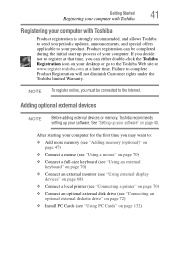
... allows Toshiba to send you can be connected to : ❖ Add more memory (see "Adding memory (optional)" on page 47) ❖ Connect a mouse (see "Using a mouse" on page 70) ❖ Connect a full-size keyboard (see "Using an external keyboard" on page 70) ❖ Connect an external monitor (see "Using external display devices...
... allows Toshiba to send you can be connected to : ❖ Add more memory (see "Adding memory (optional)" on page 47) ❖ Connect a mouse (see "Using a mouse" on page 70) ❖ Connect a full-size keyboard (see "Using an external keyboard" on page 70) ❖ Connect an external monitor (see "Using external display devices...
User Guide
Page 45
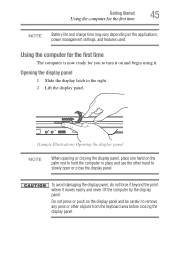
... hand on the applications, power management settings, and features used. Opening the display panel 1 Slide the display latch to the right. 2 Lift the display panel. (Sample Illustration) Opening the display panel NOTE When opening or closing the display panel. To avoid damaging the display panel, do not force it beyond the point where it moves easily...
... hand on the applications, power management settings, and features used. Opening the display panel 1 Slide the display latch to the right. 2 Lift the display panel. (Sample Illustration) Opening the display panel NOTE When opening or closing the display panel. To avoid damaging the display panel, do not force it beyond the point where it moves easily...

User Guide
Page 46
... you plan to use AC power rather than battery power) are properly connected and ready. 2 Check to accommodate all those features. Your display contains an extremely large number of thin-film transistors (TFT) and is also an intrinsic characteristic of the screen while on battery power. ...Your select model may not have selected all possible configurations for the first time Small bright dots may appear on your screen display when you may not be able to increase the brightness of the screen technology. Your computer's features and specifications Certain notebook chassis are...
... you plan to use AC power rather than battery power) are properly connected and ready. 2 Check to accommodate all those features. Your display contains an extremely large number of thin-film transistors (TFT) and is also an intrinsic characteristic of the screen while on battery power. ...Your select model may not have selected all possible configurations for the first time Small bright dots may appear on your screen display when you may not be able to increase the brightness of the screen technology. Your computer's features and specifications Certain notebook chassis are...

User Guide
Page 49
Memory module slot cover Front of computer (Sample Illustration) Locating the memory module slot cover For information on removing the main battery, see "Removing the battery from the computer" on page 113. 5 Close the display panel and turn the computer upside down to the computer, including the AC adaptor. 4 Remove the main battery. Getting Started 49 Adding memory (optional) 2 Click Shut Down. The operating system turns off the computer. 3 Unplug and remove any cables connected to locate the memory module slot cover.
Memory module slot cover Front of computer (Sample Illustration) Locating the memory module slot cover For information on removing the main battery, see "Removing the battery from the computer" on page 113. 5 Close the display panel and turn the computer upside down to the computer, including the AC adaptor. 4 Remove the main battery. Getting Started 49 Adding memory (optional) 2 Click Shut Down. The operating system turns off the computer. 3 Unplug and remove any cables connected to locate the memory module slot cover.
User Guide
Page 56
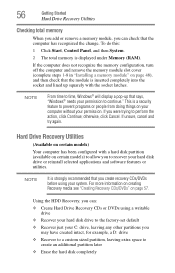
...) Your computer has been configured with the socket latches. Hard Drive Recovery Utilities (Available on your computer without your permission to continue." NOTE It is displayed under Memory (RAM). 56 Getting Started Hard Drive Recovery Utilities Checking total memory When you add or remove a memory module, you to perform the action... CDs or DVDs using your hard disk drive or reinstall selected applications and software features or utilities. NOTE From time to time, Windows® will display a pop-up squarely with a hard disk partition (available on page 57.
...) Your computer has been configured with the socket latches. Hard Drive Recovery Utilities (Available on your computer without your permission to continue." NOTE It is displayed under Memory (RAM). 56 Getting Started Hard Drive Recovery Utilities Checking total memory When you add or remove a memory module, you to perform the action... CDs or DVDs using your hard disk drive or reinstall selected applications and software features or utilities. NOTE From time to time, Windows® will display a pop-up squarely with a hard disk partition (available on page 57.
User Guide
Page 59
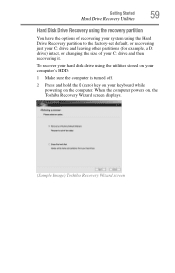
... default, or recovering just your C: drive and leaving other partitions (for example, a D: drive) intact, or changing the size of your keyboard while powering on , the Toshiba Recovery Wizard screen displays. (Sample Image) Toshiba Recovery Wizard screen
... default, or recovering just your C: drive and leaving other partitions (for example, a D: drive) intact, or changing the size of your keyboard while powering on , the Toshiba Recovery Wizard screen displays. (Sample Image) Toshiba Recovery Wizard screen
User Guide
Page 60
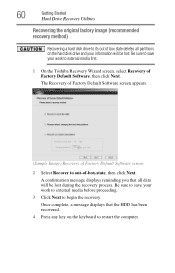
... (Sample Image) Recovery of Factory Default Software screen 2 Select Recover to out-of Factory Default Software, then click Next. A confirmation message displays reminding you that the HDD has been recovered. 4 Press any key on the hard disk drive and your information will be lost during the... recovery process. Be sure to save your work to external media first. 1 On the Toshiba Recovery Wizard screen, select Recovery of -box-state, then click Next. Once complete, a message displays that all partitions on the keyboard to restart the computer. Be sure to save your work ...
... (Sample Image) Recovery of Factory Default Software screen 2 Select Recover to out-of Factory Default Software, then click Next. A confirmation message displays reminding you that the HDD has been recovered. 4 Press any key on the hard disk drive and your information will be lost during the... recovery process. Be sure to save your work to external media first. 1 On the Toshiba Recovery Wizard screen, select Recovery of -box-state, then click Next. Once complete, a message displays that all partitions on the keyboard to restart the computer. Be sure to save your work ...
User Guide
Page 61
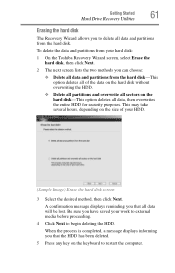
...hard disk-This option deletes all data, then overwrites the entire HDD for security purposes. Be sure you have saved your hard disk: 1 On the Toshiba Recovery Wizard screen, select Erase the hard disk, then click Next. 2 The next screen lists the two methods you can choose: ❖ Delete... disk. This may take several hours, depending on the keyboard to delete all data will be lost. When the process is completed, a message displays informing you that all data and partitions from your work to external media before proceeding. 4 Click Next to begin deleting the HDD. Getting Started ...
...hard disk-This option deletes all data, then overwrites the entire HDD for security purposes. Be sure you have saved your hard disk: 1 On the Toshiba Recovery Wizard screen, select Erase the hard disk, then click Next. 2 The next screen lists the two methods you can choose: ❖ Delete... disk. This may take several hours, depending on the keyboard to delete all data will be lost. When the process is completed, a message displays informing you that all data and partitions from your work to external media before proceeding. 4 Click Next to begin deleting the HDD. Getting Started ...
User Guide
Page 62
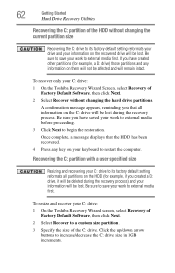
... begin the restoration. Click the up/down arrow buttons to external media first. To resize and recover your C: drive: 1 On the Toshiba Recovery Wizard Screen, select Recovery of Factory Default Software, then click Next. 2 Select Recover without changing the current partition size Recovering the... C: drive to its factory default setting reformats all information on your keyboard to restart the computer. Once complete, a message displays that all partitions on the HDD (for example, a D: drive) those partitions and any key on the C: drive will be lost during...
... begin the restoration. Click the up/down arrow buttons to external media first. To resize and recover your C: drive: 1 On the Toshiba Recovery Wizard Screen, select Recovery of Factory Default Software, then click Next. 2 Select Recover without changing the current partition size Recovering the... C: drive to its factory default setting reformats all information on your keyboard to restart the computer. Once complete, a message displays that all partitions on the HDD (for example, a D: drive) those partitions and any key on the C: drive will be lost during...
User Guide
Page 63
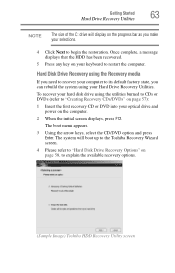
... Drive Recovery Utilities NOTE The size of the C: drive will boot up to the Toshiba Recovery Wizard screen. 4 Please refer to "Hard Disk Drive Recovery Options" on the computer. 2 When the initial screen displays, press F12. Hard Disk Drive Recovery using the utilities burned to CDs or DVDs ...drive using the Recovery media If you need to recover your computer to explain the available recovery options. (Sample Image) Toshiba HDD Recovery Utility screen Once complete, a message displays that the HDD has been recovered. 5 Press any key on your optical drive and power on page 58, to its...
... Drive Recovery Utilities NOTE The size of the C: drive will boot up to the Toshiba Recovery Wizard screen. 4 Please refer to "Hard Disk Drive Recovery Options" on the computer. 2 When the initial screen displays, press F12. Hard Disk Drive Recovery using the utilities burned to CDs or DVDs ...drive using the Recovery media If you need to recover your computer to explain the available recovery options. (Sample Image) Toshiba HDD Recovery Utility screen Once complete, a message displays that the HDD has been recovered. 5 Press any key on your optical drive and power on page 58, to its...

User Guide
Page 64
... TouchPad™, the small, smooth, square cutout located in the lower portion of the screen. Installing drivers and applications (Available on certain models) The Toshiba Application Installer (available on certain models) allows you can check its status as follows: 1 Click Start. 2 Right-click Computer. 3 Select Manage. ...4 Click Disk Management. 5 Highlight the hard disk drive in the Volume list to display its status in front of the keyboard, is sensitive to touch and enables you would like to move the cursor: ❖ To move the ...
... TouchPad™, the small, smooth, square cutout located in the lower portion of the screen. Installing drivers and applications (Available on certain models) The Toshiba Application Installer (available on certain models) allows you can check its status as follows: 1 Click Start. 2 Right-click Computer. 3 Select Manage. ...4 Click Disk Management. 5 Highlight the hard disk drive in the Volume list to display its status in front of the keyboard, is sensitive to touch and enables you would like to move the cursor: ❖ To move the ...
User Guide
Page 65
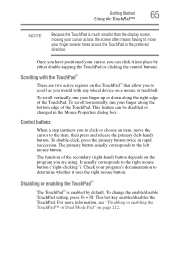
... scroll as you would with the TouchPad™ There are using. Disabling or enabling the TouchPad™ The TouchPad™ is much smaller than the display screen, moving your program's documentation to the right mouse button ("right-clicking").
... scroll as you would with the TouchPad™ There are using. Disabling or enabling the TouchPad™ The TouchPad™ is much smaller than the display screen, moving your program's documentation to the right mouse button ("right-clicking").
User Guide
Page 68
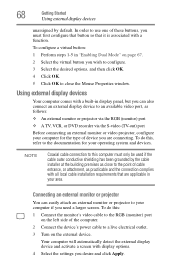
...use one of cable entrance, or attachment, as practicable and the connection complies with all local cable installation requirements that it is associated with display options. 4 Select the settings you are applicable in "Enabling Dual Mode" on the external device. To do this : 1 Connect the ...cable to the RGB (monitor) port on the left side of device you desire and click Apply. Your computer will automatically detect the external display device and activate a screen with a function. In order to the documentation for the type of the computer. 2 Connect the device's power ...
...use one of cable entrance, or attachment, as practicable and the connection complies with all local cable installation requirements that it is associated with display options. 4 Select the settings you are applicable in "Enabling Dual Mode" on the external device. To do this : 1 Connect the ...cable to the RGB (monitor) port on the left side of device you desire and click Apply. Your computer will automatically detect the external display device and activate a screen with a function. In order to the documentation for the type of the computer. 2 Connect the device's power ...
User Guide
Page 69
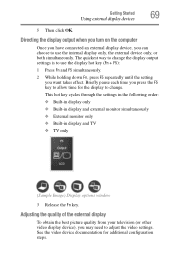
... F5 repeatedly until the setting you can choose to adjust the video settings. See the video device documentation for the display to use the internal display only, the external device only, or both simultaneously. This hot key cycles through the settings in the following order:... ❖ Built-in display only ❖ Built-in display and external monitor simultaneously ❖ External monitor only ❖ Built-in display and TV ❖ TV only (Sample Image) Display options window 3 Release the Fn key. Getting Started 69 Using ...
... F5 repeatedly until the setting you can choose to adjust the video settings. See the video device documentation for the display to use the internal display only, the external device only, or both simultaneously. This hot key cycles through the settings in the following order:... ❖ Built-in display only ❖ Built-in display and external monitor simultaneously ❖ External monitor only ❖ Built-in display and TV ❖ TV only (Sample Image) Display options window 3 Release the Fn key. Getting Started 69 Using ...
User Guide
Page 70
... Using an external keyboard TECHNICAL NOTE: To use one of the simultaneous modes, you must support a resolution of the external display device. Using an external keyboard If you prefer to your computer. Connecting a printer NOTE Your printer documentation may not function ... a USB cable was not included with your printer. Follow the manufacturer's instructions when connecting a printer. The external display device must set the resolution of the internal display panel to use . You can use a full-size keyboard, you to install the printer software before physically connecting ...
... Using an external keyboard TECHNICAL NOTE: To use one of the simultaneous modes, you must support a resolution of the external display device. Using an external keyboard If you prefer to your computer. Connecting a printer NOTE Your printer documentation may not function ... a USB cable was not included with your printer. Follow the manufacturer's instructions when connecting a printer. The external display device must set the resolution of the internal display panel to use . You can use a full-size keyboard, you to install the printer software before physically connecting ...
User Guide
Page 76
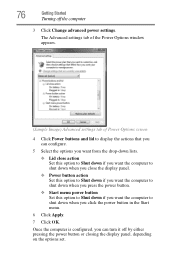
76 Getting Started Turning off by either pressing the power button or closing the display panel, depending on the options set. The Advanced settings tab of the Power Options window appears. (Sample Image) Advanced settings tab of Power Options screen 4 ... this option to Shut down if you want the computer to shut down when you close the display panel. ❖ Power button action Set this option to Shut down if you want the computer to display the actions that you click the power button in the Start menu. 6 Click Apply. 7 Click OK...
76 Getting Started Turning off by either pressing the power button or closing the display panel, depending on the options set. The Advanced settings tab of the Power Options window appears. (Sample Image) Advanced settings tab of Power Options screen 4 ... this option to Shut down if you want the computer to shut down when you close the display panel. ❖ Power button action Set this option to Shut down if you want the computer to display the actions that you click the power button in the Start menu. 6 Click Apply. 7 Click OK...


