
User Manual
Page 27
... enabling the TouchPad 56 Using the Dual Mode Pad 56 Using Dual Mode 56 Using external display devices 59 Directing the display output when you turn on the computer 59 Adjusting the quality of the external display......60 Using an external keyboard 60 Using a mouse 60 Connecting a printer 61 Setting up a printer ... off the computer 63 Using the Shut Down command 66 Using and configuring Hibernation mode .........68 Using and configuring Sleep mode 70 Closing the display panel 73 Caring for your computer 73 Cleaning the computer 73 Moving the computer 73 Using a computer lock 74
... enabling the TouchPad 56 Using the Dual Mode Pad 56 Using Dual Mode 56 Using external display devices 59 Directing the display output when you turn on the computer 59 Adjusting the quality of the external display......60 Using an external keyboard 60 Using a mouse 60 Connecting a printer 61 Setting up a printer ... off the computer 63 Using the Shut Down command 66 Using and configuring Hibernation mode .........68 Using and configuring Sleep mode 70 Closing the display panel 73 Caring for your computer 73 Cleaning the computer 73 Moving the computer 73 Using a computer lock 74
User Manual
Page 31
... Resolving a hardware conflict 164 A plan of action 164 Fixing a problem with Device Manager ...........165 Memory problems 166 Power and the batteries 167 Keyboard problems 168 Display problems 169 Disk drive problems 171 Optical drive problems 172 Sound system problems 173 PC Card problems 174 Printer problems 176 Wireless networking problems 177...
... Resolving a hardware conflict 164 A plan of action 164 Fixing a problem with Device Manager ...........165 Memory problems 166 Power and the batteries 167 Keyboard problems 168 Display problems 169 Disk drive problems 171 Optical drive problems 172 Sound system problems 173 PC Card problems 174 Printer problems 176 Wireless networking problems 177...

User Manual
Page 32
32 Contents If you need further assistance 186 Before you contact Toshiba 186 Contacting Toshiba 187 Other Toshiba Internet Web sites 188 Toshiba's worldwide offices 188 Appendix A: Hot Keys 190 Hot Key Cards 190 Using the Hot Key Cards 191 Application Cards 192 Using... the Application Cards 192 Card Case 193 Hot Key Functions 194 Volume Mute 194 Password security 195 Power plan 197 Sleep mode 198 Hibernation mode 199 Display modes 200 Display...
32 Contents If you need further assistance 186 Before you contact Toshiba 186 Contacting Toshiba 187 Other Toshiba Internet Web sites 188 Toshiba's worldwide offices 188 Appendix A: Hot Keys 190 Hot Key Cards 190 Using the Hot Key Cards 191 Application Cards 192 Using... the Application Cards 192 Card Case 193 Hot Key Functions 194 Volume Mute 194 Password security 195 Power plan 197 Sleep mode 198 Hibernation mode 199 Display modes 200 Display...
User Manual
Page 40
... software When you through steps to set up your software. 1 From the Welcome screen click Next to enter the Setup Wizard. 2 Confirm acceptance of windows displayed, and the order in which windows appear, may vary according to your computer. The first time you turn on your computer, the Setup Wizard guides...
... software When you through steps to set up your software. 1 From the Welcome screen click Next to enter the Setup Wizard. 2 Confirm acceptance of windows displayed, and the order in which windows appear, may vary according to your computer. The first time you turn on your computer, the Setup Wizard guides...
User Manual
Page 41
... on page 60) ❖ Connect a full-size keyboard (see "Using an external keyboard" on page 60) ❖ Connect an external monitor (see "Using external display devices" on page 59) ❖ Connect a local printer (see "Connecting a printer" on page 61) ❖ Connect an optional external disk drive (see "Connecting...during the initial start up your product. See "Setting up your computer for the first time you may want to the Toshiba Web site at www.register.toshiba.com at that time, you can be connected to complete Product Registration will not diminish Customer rights under the...
... on page 60) ❖ Connect a full-size keyboard (see "Using an external keyboard" on page 60) ❖ Connect an external monitor (see "Using external display devices" on page 59) ❖ Connect a local printer (see "Connecting a printer" on page 61) ❖ Connect an optional external disk drive (see "Connecting...during the initial start up your product. See "Setting up your computer for the first time you may want to the Toshiba Web site at www.register.toshiba.com at that time, you can be connected to complete Product Registration will not diminish Customer rights under the...
User Manual
Page 45
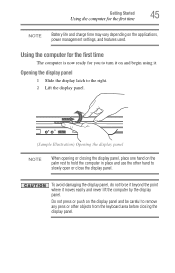
... the other objects from the keyboard area before closing the display panel. Opening the display panel 1 Slide the display latch to the right. 2 Lift the display panel. (Sample Illustration) Opening the display panel NOTE When opening or closing the display panel, place one hand on the display panel and be careful to remove any pens or other... hand to slowly open or close the display panel. Getting Started Using the computer for you to turn it on the applications, power management settings, and features used. Using the computer for the ...
... the other objects from the keyboard area before closing the display panel. Opening the display panel 1 Slide the display latch to the right. 2 Lift the display panel. (Sample Illustration) Opening the display panel NOTE When opening or closing the display panel, place one hand on the display panel and be careful to remove any pens or other... hand to slowly open or close the display panel. Getting Started Using the computer for you to turn it on the applications, power management settings, and features used. Using the computer for the ...
User Manual
Page 46
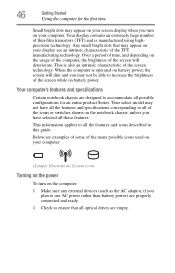
...of some of the many possible icons used on your computer: (Sample Illustration) System icons Turning on the power To turn on your display are an intrinsic characteristic of the TFT manufacturing technology. This is manufactured using highprecision technology. Your select model may not have all the ...battery power) are properly connected and ready. 2 Check to all those features. This information applies to ensure that may appear on your screen display when you turn on the notebook chassis, unless you have selected all the features and icons described in this guide. Over a period of ...
...of some of the many possible icons used on your computer: (Sample Illustration) System icons Turning on the power To turn on your display are an intrinsic characteristic of the TFT manufacturing technology. This is manufactured using highprecision technology. Your select model may not have all the ...battery power) are properly connected and ready. 2 Check to all those features. This information applies to ensure that may appear on your screen display when you turn on the notebook chassis, unless you have selected all the features and icons described in this guide. Over a period of ...
User Manual
Page 49
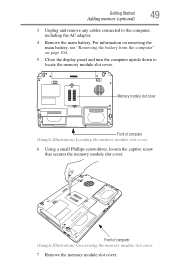
... secures the memory module slot cover. For information on removing the main battery, see "Removing the battery from the computer" on page 104. 5 Close the display panel and turn the computer upside down to the computer, including the AC adaptor. 4 Remove the main battery. Memory module slot cover Front of computer...
... secures the memory module slot cover. For information on removing the main battery, see "Removing the battery from the computer" on page 104. 5 Close the display panel and turn the computer upside down to the computer, including the AC adaptor. 4 Remove the main battery. Memory module slot cover Front of computer...
User Manual
Page 55
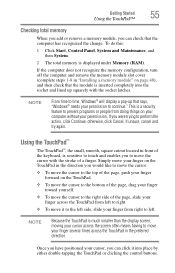
... the cursor to the top of the page, push your finger forward on your computer without your cursor, you can check that the module is displayed under Memory (RAM). Simply move the cursor with the socket latches. NOTE Because the TouchPad is a security feature to prevent programs or people from ... turn off the computer and remove the memory module slot cover (complete steps 1-8 in front of a finger. NOTE From time to time, Windows® will display a pop-up squarely with the stroke of the keyboard, is sensitive to touch and enables you to move your finger on page 48), and then...
... the cursor to the top of the page, push your finger forward on your computer without your cursor, you can check that the module is displayed under Memory (RAM). Simply move the cursor with the socket latches. NOTE Because the TouchPad is a security feature to prevent programs or people from ... turn off the computer and remove the memory module slot cover (complete steps 1-8 in front of a finger. NOTE From time to time, Windows® will display a pop-up squarely with the stroke of the keyboard, is sensitive to touch and enables you to move your finger on page 48), and then...
User Manual
Page 59
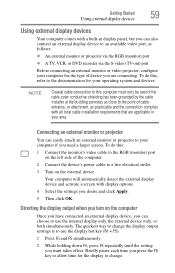
... for the type of the computer. 2 Connect the device's power cable to a live electrical outlet. 3 Turn on the computer Once you have connected an external display device, you turn on the external device. Connecting an external monitor or projector You can easily attach an external monitor or projector to your computer...
... for the type of the computer. 2 Connect the device's power cable to a live electrical outlet. 3 Turn on the computer Once you have connected an external display device, you turn on the external device. Connecting an external monitor or projector You can easily attach an external monitor or projector to your computer...
User Manual
Page 60
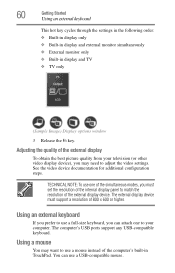
... obtain the best picture quality from your computer. Using an external keyboard If you prefer to your television (or other video display device), you must support a resolution of the simultaneous modes, you may want to use one to use a full-size keyboard, you can use a ...attach one of 800 x 600 or higher. Using a mouse You may need to match the resolution of the computer's built-in display and TV ❖ TV only (Sample Image) Display options window 3 Release the Fn key. The computer's USB ports support any USB-compatible keyboard. See the video device documentation for...
... obtain the best picture quality from your computer. Using an external keyboard If you prefer to your television (or other video display device), you must support a resolution of the simultaneous modes, you may want to use one to use a full-size keyboard, you can use a ...attach one of 800 x 600 or higher. Using a mouse You may need to match the resolution of the computer's built-in display and TV ❖ TV only (Sample Image) Display options window 3 Release the Fn key. The computer's USB ports support any USB-compatible keyboard. See the video device documentation for...

User Manual
Page 67
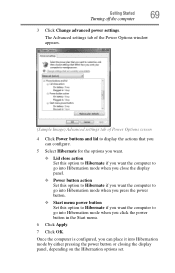
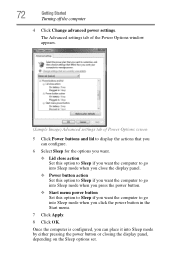
... appears. (Sample Image) Advanced settings tab of Power Options screen 4 Click Power buttons and lid to display the actions that you can configure. 5 Select the options you want from the drop-down lists. ...this option to Shut down if you want the computer to shut down when you close the display panel. ❖ Power button action Set this option to Shut down if you want the ...Change advanced power settings. Getting Started Turning off by either pressing the power button or closing the display panel, depending on the options set. Once the computer is configured, you click the power button in...
... appears. (Sample Image) Advanced settings tab of Power Options screen 4 Click Power buttons and lid to display the actions that you can configure. 5 Select the options you want from the drop-down lists. ...this option to Shut down if you want the computer to shut down when you close the display panel. ❖ Power button action Set this option to Shut down if you want the ...Change advanced power settings. Getting Started Turning off by either pressing the power button or closing the display panel, depending on the options set. Once the computer is configured, you click the power button in...
User Manual
Page 68
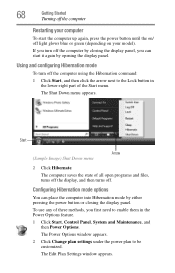
... command: 1 Click Start, and then click the arrow next to be customized. Using and configuring Hibernation mode To turn off the computer by closing the display panel. The Power Options window appears. 2 Click Change plan settings under the power plan to the Lock button in the Power Options feature. 1 Click ...again, press the power button until the on/ off light glows blue or green (depending on your computer To start it again by opening the display panel. To use any of these methods, you can place the computer into Hibernation mode by either pressing the power button or closing the...
... command: 1 Click Start, and then click the arrow next to be customized. Using and configuring Hibernation mode To turn off the computer by closing the display panel. The Power Options window appears. 2 Click Change plan settings under the power plan to the Lock button in the Power Options feature. 1 Click ...again, press the power button until the on/ off light glows blue or green (depending on your computer To start it again by opening the display panel. To use any of these methods, you can place the computer into Hibernation mode by either pressing the power button or closing the...
User Manual
Page 69
... button Set this option to Hibernate if you want the computer to go into Hibernation mode by either pressing the power button or closing the display panel, depending on the Hibernation options set. Getting Started Turning off the computer 69 3 Click Change advanced power settings. Once the computer is ...this option to Hibernate if you want the computer to go into Hibernation mode when you close the display panel. ❖ Power button action Set this option to Hibernate if you want the computer to display the actions that you click the power button in the Start menu. 6 Click Apply. 7 ...
... button Set this option to Hibernate if you want the computer to go into Hibernation mode by either pressing the power button or closing the display panel, depending on the Hibernation options set. Getting Started Turning off the computer 69 3 Click Change advanced power settings. Once the computer is ...this option to Hibernate if you want the computer to go into Hibernation mode when you close the display panel. ❖ Power button action Set this option to Hibernate if you want the computer to display the actions that you click the power button in the Start menu. 6 Click Apply. 7 ...
User Manual
Page 70
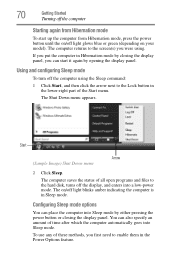
... blinks amber indicating the computer is in Sleep mode. To use any of the Start menu. Using and configuring Sleep mode To turn off the display, and enters into a low-power mode. Configuring Sleep mode options You can place the computer into Sleep mode. You can start up the computer from... Hibernation mode To start it again by either pressing the power button or closing the display panel, you can also specify an amount of all open programs and files to the hard disk, turns off the computer using the Sleep command...
... blinks amber indicating the computer is in Sleep mode. To use any of the Start menu. Using and configuring Sleep mode To turn off the display, and enters into a low-power mode. Configuring Sleep mode options You can place the computer into Sleep mode. You can start up the computer from... Hibernation mode To start it again by either pressing the power button or closing the display panel, you can also specify an amount of all open programs and files to the hard disk, turns off the computer using the Sleep command...
User Manual
Page 72
... action Set this option to Sleep if you want the computer to go into Sleep mode by either pressing the power button or closing the display panel, depending on the Sleep options set. The Advanced settings tab of the Power Options window appears. (Sample Image) Advanced settings tab of Power Options... screen 5 Click Power buttons and lid to display the actions that you can place it into Sleep mode when you want the computer to go into Sleep mode when you press the power...
... action Set this option to Sleep if you want the computer to go into Sleep mode by either pressing the power button or closing the display panel, depending on the Sleep options set. The Advanced settings tab of the Power Options window appears. (Sample Image) Advanced settings tab of Power Options... screen 5 Click Power buttons and lid to display the actions that you can place it into Sleep mode when you want the computer to go into Sleep mode when you press the power...
User Manual
Page 73
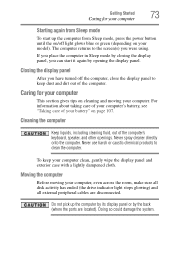
...openings. Do not pick up the computer from Sleep mode To start it again by the back (where the ports are disconnected. Closing the display panel After you were using. Caring for your computer 73 Starting again from Sleep mode, press the power button until the on/off the ... cleaning fluid, out of your battery" on page 107. Never use harsh or caustic chemical products to keep your computer clean, gently wipe the display panel and exterior case with a lightly dampened cloth. Doing so could damage the system. Getting Started Caring for your computer This section gives tips on...
...openings. Do not pick up the computer from Sleep mode To start it again by the back (where the ports are disconnected. Closing the display panel After you were using. Caring for your computer 73 Starting again from Sleep mode, press the power button until the on/off the ... cleaning fluid, out of your battery" on page 107. Never use harsh or caustic chemical products to keep your computer clean, gently wipe the display panel and exterior case with a lightly dampened cloth. Doing so could damage the system. Getting Started Caring for your computer This section gives tips on...
User Manual
Page 80
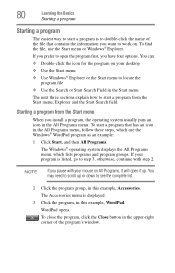
Starting a program from the Start menu, Explorer and the Start Search field. If your program is displayed. 3 Click the program, in this example, Accessories. NOTE If you have four options. You may need to scroll up . WordPad opens. You can: ❖ Double...menu. To find the file, use the Windows® WordPad program as an example: 1 Click Start, and then All Programs. The Windows® operating system displays the All Programs menu, which use the Start menu or Windows® Explorer. 80 Learning the Basics Starting a program Starting a program The easiest way to...
Starting a program from the Start menu, Explorer and the Start Search field. If your program is displayed. 3 Click the program, in this example, Accessories. NOTE If you have four options. You may need to scroll up . WordPad opens. You can: ❖ Double...menu. To find the file, use the Windows® WordPad program as an example: 1 Click Start, and then All Programs. The Windows® operating system displays the All Programs menu, which use the Start menu or Windows® Explorer. 80 Learning the Basics Starting a program Starting a program The easiest way to...
User Manual
Page 82
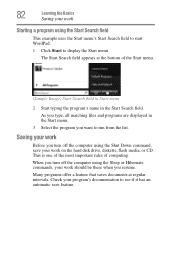
.... Check your work Starting a program using the Start Search field This example uses the Start menu's Start Search field to start WordPad: 1 Click Start to display the Start menu. Many programs offer a feature that saves documents at the bottom of computing. The Start Search field appears at regular intervals. When you... an automatic save your work should be there when you want to run from the list. As you type, all matching files and programs are displayed in the Start Search field.
.... Check your work Starting a program using the Start Search field This example uses the Start menu's Start Search field to start WordPad: 1 Click Start to display the Start menu. Many programs offer a feature that saves documents at the bottom of computing. The Start Search field appears at regular intervals. When you... an automatic save your work should be there when you want to run from the list. As you type, all matching files and programs are displayed in the Start Search field.
User Manual
Page 83
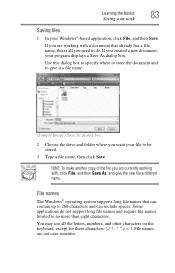
... created a new document, your Windows®-based application, click File, and then Save. Learning the Basics Saving your work 83 Saving files 1 In your program displays a Save As dialog box. If you are working with a document that can include spaces. File names The Windows® operating system supports long file names...
... created a new document, your Windows®-based application, click File, and then Save. Learning the Basics Saving your work 83 Saving files 1 In your program displays a Save As dialog box. If you are working with a document that can include spaces. File names The Windows® operating system supports long file names...


