

User Guide
Page 16
... 41 Selecting a place to work 41 Creating a computer-friendly environment 41 Keeping yourself comfortable 42 Precautions 46 Setting up your computer 47 Installing additional memory (optional 48 Removing a memory module 50 Connecting a mouse 52 Connecting a keyboard 53 Connecting a printer 53 Connecting the AC adapter 54 Charging the battery 56 Using the computer...
... 41 Selecting a place to work 41 Creating a computer-friendly environment 41 Keeping yourself comfortable 42 Precautions 46 Setting up your computer 47 Installing additional memory (optional 48 Removing a memory module 50 Connecting a mouse 52 Connecting a keyboard 53 Connecting a printer 53 Connecting the AC adapter 54 Charging the battery 56 Using the computer...
User Guide
Page 21
... can help you 202 Resolving a hardware conflict 203 A plan of action 204 Resolving hardware conflicts on your own 204 Fixing a problem with Device Manager 206 Memory card problems 207 Power problems 208 Keyboard problems 209 Display problems 210 Disk drive problems 212 CD-ROM/DVD-ROM drive problems 214 Sound system... Printer problems 218 Modem problems 219 Develop good computing habits 220 Using VirtualTech 222 If you need further assistance 223 Before you call 223 Contacting Toshiba 224
... can help you 202 Resolving a hardware conflict 203 A plan of action 204 Resolving hardware conflicts on your own 204 Fixing a problem with Device Manager 206 Memory card problems 207 Power problems 208 Keyboard problems 209 Display problems 210 Disk drive problems 212 CD-ROM/DVD-ROM drive problems 214 Sound system... Printer problems 218 Modem problems 219 Develop good computing habits 220 Using VirtualTech 222 If you need further assistance 223 Before you call 223 Contacting Toshiba 224
User Guide
Page 39
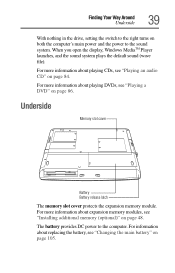
...to the computer. For more information about playing DVDs, see "Playing an audio CD" on page 86. Underside Memory slot cover Battery Battery release latch The memory slot cover protects the expansion memory module. For more information about playing CDs, see "Playing a DVD" on page 84. For information about expansion... memory modules, see "Changing the main battery" on page 48. When you open the display, Windows MediaTM Player launches, and the sound system...
...to the computer. For more information about playing DVDs, see "Playing an audio CD" on page 86. Underside Memory slot cover Battery Battery release latch The memory slot cover protects the expansion memory module. For more information about playing CDs, see "Playing a DVD" on page 84. For information about expansion... memory modules, see "Changing the main battery" on page 48. When you open the display, Windows MediaTM Player launches, and the sound system...

User Guide
Page 47
... to charge the battery, you may contain a computer virus. Placing a magnet too close to a disk can use external power or to : ❖ Add more memory (see "Installing additional memory (optional)" on page 48) ❖ Connect a mouse (see "Connecting a mouse" on page 52) ❖ Connect a full-size keyboard (see "Connecting a monitor, keyboard and...
... to charge the battery, you may contain a computer virus. Placing a magnet too close to a disk can use external power or to : ❖ Add more memory (see "Installing additional memory (optional)" on page 48) ❖ Connect a mouse (see "Connecting a mouse" on page 52) ❖ Connect a full-size keyboard (see "Connecting a monitor, keyboard and...
User Guide
Page 48
...Turn Off Computer dialog box, select Turn Off. If you have started to use complex software or process large amounts of data. With additional memory, the computer: ❖ Can run more programs and open more documents at step 1. 48 Getting Started Setting up your Windows® operating... system and Windows® applications faster Installing a memory module If you are adding memory after you have not yet used the computer, skip to step 3. 1 If the computer is on page 161) Installing additional...
...Turn Off Computer dialog box, select Turn Off. If you have started to use complex software or process large amounts of data. With additional memory, the computer: ❖ Can run more programs and open more documents at step 1. 48 Getting Started Setting up your Windows® operating... system and Windows® applications faster Installing a memory module If you are adding memory after you have not yet used the computer, skip to step 3. 1 If the computer is on page 161) Installing additional...

User Guide
Page 49
... Standard #1 Phillips screwdriver that is in good condition. Avoid touching the connectors on the memory module or on the connectors can damage the memory module. Removing the memory slot cover CAUTION: Static electricity can cause memory access problems. 6 Remove the memory module from its antistatic packaging, holding it by its edges. 7 Gently slide the module...
... Standard #1 Phillips screwdriver that is in good condition. Avoid touching the connectors on the memory module or on the connectors can damage the memory module. Removing the memory slot cover CAUTION: Static electricity can cause memory access problems. 6 Remove the memory module from its antistatic packaging, holding it by its edges. 7 Gently slide the module...

User Guide
Page 50
... you disconnected. 12 Turn on either side of the socket engage, securing the module in "Installing a memory module" on page 48, to access the computer's memory socket. 2 Release the memory module by gently pressing outward on the latches on the computer. 13 Click Start, then click Control Panel...that the amount of RAM listed matches the amount of the module pops up. One edge of memory currently installed. Removing a memory module 1 Perform steps 1 through 5 in the socket. 9 Position the memory module cover on the computer and secure it with the screw. 10 Turn your computer Inserting the...
... you disconnected. 12 Turn on either side of the socket engage, securing the module in "Installing a memory module" on page 48, to access the computer's memory socket. 2 Release the memory module by gently pressing outward on the latches on the computer. 13 Click Start, then click Control Panel...that the amount of RAM listed matches the amount of the module pops up. One edge of memory currently installed. Removing a memory module 1 Perform steps 1 through 5 in the socket. 9 Position the memory module cover on the computer and secure it with the screw. 10 Turn your computer Inserting the...

User Guide
Page 51
... from the computer and store it with the screw. 5 Turn the computer right side up . Avoid touching the connectors on the memory module or on the computer and secure it in antistatic packaging. Before you handle the module, touch a grounded metal surface to discharge any cables you ...may have built up . 6 Reconnect any static electricity you removed. Oil or dust on the connectors can damage the memory module. CAUTION: Static electricity can cause memory access problems. 4 Position the memory module cover on the computer.
... from the computer and store it with the screw. 5 Turn the computer right side up . Avoid touching the connectors on the memory module or on the computer and secure it in antistatic packaging. Before you handle the module, touch a grounded metal surface to discharge any cables you ...may have built up . 6 Reconnect any static electricity you removed. Oil or dust on the connectors can damage the memory module. CAUTION: Static electricity can cause memory access problems. 4 Position the memory module cover on the computer.
User Guide
Page 66
... for turning off the computer: ❖ If you have work in progress and aren't connected to a network, use Hibernation to save your system settings to memory so that, when you turn on page 94 for a while. 66 Getting Started Turning off the computer Turning off the computer It's a good idea to...
... for turning off the computer: ❖ If you have work in progress and aren't connected to a network, use Hibernation to save your system settings to memory so that, when you turn on page 94 for a while. 66 Getting Started Turning off the computer Turning off the computer It's a good idea to...
User Guide
Page 69
... notebook computer, and provides important information about the computer's basic features. You will lose all the work frequently. Your work stays in the computer's temporary memory until you save feature which you should follow when using your file to the disk. Chapter 3 Learning the Basics This chapter lists computing tips that...
... notebook computer, and provides important information about the computer's basic features. You will lose all the work frequently. Your work stays in the computer's temporary memory until you save feature which you should follow when using your file to the disk. Chapter 3 Learning the Basics This chapter lists computing tips that...
User Guide
Page 93
... computer When you power down uses the most efficient mode if you will be away from your computer for an extended time. ❖ Restarting from memory. Factors to maintain the saved information, the system settings are retained indefinitely. When you start up again, the computer runs a self-test and loads the...
... computer When you power down uses the most efficient mode if you will be away from your computer for an extended time. ❖ Restarting from memory. Factors to maintain the saved information, the system settings are retained indefinitely. When you start up again, the computer runs a self-test and loads the...
User Guide
Page 94
Standby holds the current state of memory. ❖ When starting up again, the computer returns to consider when choosing Standby: ❖ While in Standby mode. ❖ Restarting from Standby mode uses less ... the state of the system is held on the hard disk, no data is being retrieved from the hard disk instead of the computer in memory so that, when you restart the computer, you can continue working from where you were using. Factors to the state in which you left it...
Standby holds the current state of memory. ❖ When starting up again, the computer returns to consider when choosing Standby: ❖ While in Standby mode. ❖ Restarting from Standby mode uses less ... the state of the system is held on the hard disk, no data is being retrieved from the hard disk instead of the computer in memory so that, when you restart the computer, you can continue working from where you were using. Factors to the state in which you left it...

User Guide
Page 98
... the feature in the Power Saver utility. 1 Open the Start menu, then click Control Panel. 2 In the Control Panel window, double-click the Toshiba Power Saver icon. If you put the computer into Standby by closing the display panel. The computer saves the status of these methods, you can... put the computer in Standby mode. The computer returns to indicate the machine is in Standby by either of all open programs and files to memory, turns off light blinks amber to the screen you want from the drop-down the computer using . The Power Saver Properties dialog box appears....
... the feature in the Power Saver utility. 1 Open the Start menu, then click Control Panel. 2 In the Control Panel window, double-click the Toshiba Power Saver icon. If you put the computer into Standby by closing the display panel. The computer saves the status of these methods, you can... put the computer in Standby mode. The computer returns to indicate the machine is in Standby by either of all open programs and files to memory, turns off light blinks amber to the screen you want from the drop-down the computer using . The Power Saver Properties dialog box appears....

User Guide
Page 100
For more information, see "Toshiba Power Saver" on battery power Click the Details button, then the Power Save Mode tab. The RTC battery powers the RTC memory, which stores your system configuration settings and the current time and date for your computer. Battery safety precautions ❖ Never try to the removable main ...
For more information, see "Toshiba Power Saver" on battery power Click the Details button, then the Power Save Mode tab. The RTC battery powers the RTC memory, which stores your system configuration settings and the current time and date for your computer. Battery safety precautions ❖ Never try to the removable main ...
User Guide
Page 161
...usefulness. Most PC Cards conform to two of these cards, one of these cards. You can install up to the PCMCIA (Personal Computer Memory Card International Association) standard. Check the documentation that require a larger card. You can install just one in each slot. ❖ Type ...III cards are typically used for memory storage, network cards, etc. You can purchase additional PC Cards from the headphones or external speakers into the headphone jack. Using PC Cards...
...usefulness. Most PC Cards conform to two of these cards, one of these cards. You can install up to the PCMCIA (Personal Computer Memory Card International Association) standard. Check the documentation that require a larger card. You can install just one in each slot. ❖ Type ...III cards are typically used for memory storage, network cards, etc. You can purchase additional PC Cards from the headphones or external speakers into the headphone jack. Using PC Cards...

User Guide
Page 172
... They are: ❖ General-Allows you to use both the TouchPad and external pointing devices together or to view current BIOS, hard disk drive and memory settings ❖ Password - Sample Toshiba HWSetup window The tabs represent various dialog boxes. To access it, open the Start menu, click Control Panel, then double-click...
... They are: ❖ General-Allows you to use both the TouchPad and external pointing devices together or to view current BIOS, hard disk drive and memory settings ❖ Password - Sample Toshiba HWSetup window The tabs represent various dialog boxes. To access it, open the Start menu, click Control Panel, then double-click...

User Guide
Page 204
...commonly referred to as system resources. These channels of all previously connected devices work together is stored in a specific place or address in memory called an Interrupt Request (IRQ) because it works. If two or more devices use the same DMA, the data required by the ...to add and set up one The DMA provides a dedicated channel for attention. The device most likely to bypass the microprocessor and access memory directly. If the system or one most recently connected to the system is asking for adapter cards to be timeconsuming and frustrating. This ...
...commonly referred to as system resources. These channels of all previously connected devices work together is stored in a specific place or address in memory called an Interrupt Request (IRQ) because it works. If two or more devices use the same DMA, the data required by the ...to add and set up one The DMA provides a dedicated channel for attention. The device most likely to bypass the microprocessor and access memory directly. If the system or one most recently connected to the system is asking for adapter cards to be timeconsuming and frustrating. This ...
User Guide
Page 207
... more information about the device. ❖ The Driver tab, which to the Windows® XP online help. Memory card problems Incorrectly connected or faulty memory cards may be device-related. If the error recurs without the 207 If Something Goes Wrong Resolving a hardware conflict..., refer to choose. The operating system shuts down and turns off the computer automatically. 3 Remove the memory card. 4 Reinstall the memory card, following the instructions in "Installing additional memory (optional)" on page 48, and making sure it is seated properly. 5 Check for the error again...
... more information about the device. ❖ The Driver tab, which to the Windows® XP online help. Memory card problems Incorrectly connected or faulty memory cards may be device-related. If the error recurs without the 207 If Something Goes Wrong Resolving a hardware conflict..., refer to choose. The operating system shuts down and turns off the computer automatically. 3 Remove the memory card. 4 Reinstall the memory card, following the instructions in "Installing additional memory (optional)" on page 48, and making sure it is seated properly. 5 Check for the error again...

User Guide
Page 208
...them: The AC power light does not come on when you think this is consuming full power. 208 If Something Goes Wrong Resolving a hardware conflict memory card installed, the error is not caused by plugging in a lamp or other appliance. The AC adapter and power cable work correctly, but the battery... computer nor recharge the batteries. If the AC power light still does not come on , check that the wall outlet is working properly by the memory card. The battery may not be in the computer. Try turning off the computer, remove the battery, clean the contacts with a soft dry cloth ...
...them: The AC power light does not come on when you think this is consuming full power. 208 If Something Goes Wrong Resolving a hardware conflict memory card installed, the error is not caused by plugging in a lamp or other appliance. The AC adapter and power cable work correctly, but the battery... computer nor recharge the batteries. If the AC power light still does not come on , check that the wall outlet is working properly by the memory card. The battery may not be in the computer. Try turning off the computer, remove the battery, clean the contacts with a soft dry cloth ...
User Guide
Page 209
... lasts. If the battery light does not glow after 20 minutes, let the computer continue charging the battery for as long as a PC Card or memory module, that the program does not assign different meanings to turn off automatically? Check the Power Saver using the hard disk more information on the.... For more ? Have you are off the cursor control light or press Fn and F11 simultaneously to begin charging immediately. Is your software using the Toshiba Power Saver utility. The keyboard produces unexpected characters.
... lasts. If the battery light does not glow after 20 minutes, let the computer continue charging the battery for as long as a PC Card or memory module, that the program does not assign different meanings to turn off automatically? Check the Power Saver using the hard disk more information on the.... For more ? Have you are off the cursor control light or press Fn and F11 simultaneously to begin charging immediately. Is your software using the Toshiba Power Saver utility. The keyboard produces unexpected characters.


