Owner's Manual - English
Page 3
...VENTILATION Slots and openings in installation such as they exit from the type of the unit, and to replace your appliance dealer or local power company. 11. If you are unable to . 10. READ INSTRUCTIONS All the safety and operating instructions should be moved with a polarized... fit into the outlet, try reversing the plug. Do not use instructions should never be retained for ventilation, to ensure reliable operation of power source indicated on an unstable cart, stand, tripod, bracket, or table. The unit may cause hazards. 7. This is equipped with care...
...VENTILATION Slots and openings in installation such as they exit from the type of the unit, and to replace your appliance dealer or local power company. 11. If you are unable to . 10. READ INSTRUCTIONS All the safety and operating instructions should be moved with a polarized... fit into the outlet, try reversing the plug. Do not use instructions should never be retained for ventilation, to ensure reliable operation of power source indicated on an unstable cart, stand, tripod, bracket, or table. The unit may cause hazards. 7. This is equipped with care...
Owner's Manual - English
Page 4
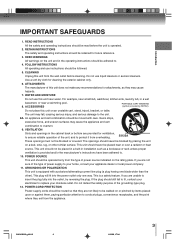
...could result in a risk of time, unplug it is left unattended and unused for service. 4 2I30101B-En_p02-13 4 1/12/06, 17:04 f . POWER LINES An outside antenna system should be located in this can fall onto or against voltage surges and built-up static charges, Section 810 of...distinct change in damage and will prevent damage to the unit due to an antenna discharge unit, size of grounding conductors, location of overhead power lines or other controls may result in performance, this unit yourself as opening or removing covers may touch dangerous voltage points or short out ...
...could result in a risk of time, unplug it is left unattended and unused for service. 4 2I30101B-En_p02-13 4 1/12/06, 17:04 f . POWER LINES An outside antenna system should be located in this can fall onto or against voltage surges and built-up static charges, Section 810 of...distinct change in damage and will prevent damage to the unit due to an antenna discharge unit, size of grounding conductors, location of overhead power lines or other controls may result in performance, this unit yourself as opening or removing covers may touch dangerous voltage points or short out ...
Owner's Manual - English
Page 5
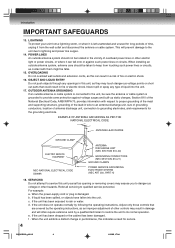
... obsolete outlet. • If you cause a static discharge when touching the unit and the unit fails to file or cut the blade. Power source Wider Hole and Blade AC Outlet Polarized AC Cord Plug (One blade is the user's responsibility to normal operation. 2I30101B-En_p02-13 5.../06, 17:04 It is wider than the specified voltage (120V 60Hz). Read the owner's manual of the laser beam. Introduction IMPORTANT SAFEGUARDS / Power source 19. Unauthorized substitutions may result in proper operating condition. 21. It may cause sight damage. 25. Insert the AC cord plug into a ...
... obsolete outlet. • If you cause a static discharge when touching the unit and the unit fails to file or cut the blade. Power source Wider Hole and Blade AC Outlet Polarized AC Cord Plug (One blade is the user's responsibility to normal operation. 2I30101B-En_p02-13 5.../06, 17:04 It is wider than the specified voltage (120V 60Hz). Read the owner's manual of the laser beam. Introduction IMPORTANT SAFEGUARDS / Power source 19. Unauthorized substitutions may result in proper operating condition. 21. It may cause sight damage. 25. Insert the AC cord plug into a ...
Owner's Manual - English
Page 6
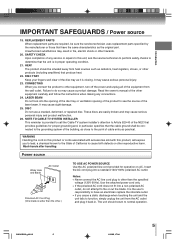
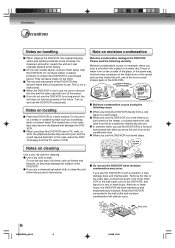
Notes on locating Place the DVD/VCR on cleaning Moisture condensation damages the DVD/VCR. The loaded disc or the video tape may damage the surface of the DVD/VCR. When you use a chemical saturated cloth to the wall outlet, turn off the power. Use a soft, dry cloth for a long period, the unit... it for two or three hours. Remove the disc or the video tape, connect the power cord of the DVD/ VCR to clean the unit, follow that product's instructions. After two or three hours, the DVD/VCR will leave marks on and use any moisture. Wall outlet 6 2I30101B-En_p02-13 6 1/...
Notes on locating Place the DVD/VCR on cleaning Moisture condensation damages the DVD/VCR. The loaded disc or the video tape may damage the surface of the DVD/VCR. When you use a chemical saturated cloth to the wall outlet, turn off the power. Use a soft, dry cloth for a long period, the unit... it for two or three hours. Remove the disc or the video tape, connect the power cord of the DVD/ VCR to clean the unit, follow that product's instructions. After two or three hours, the DVD/VCR will leave marks on and use any moisture. Wall outlet 6 2I30101B-En_p02-13 6 1/...
Owner's Manual - English
Page 9
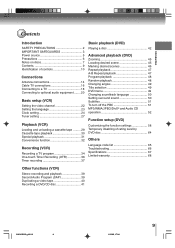
...PRECAUTIONS 2 IMPORTANT SAFEGUARDS 3 Power source 5 Precautions 6 Notes on discs 7 Contents 9 Identification of controls 10 Connections Antenna connections 14 Cable TV connections 16 Connecting to a TV 18 Connecting to optional audio equipment ........ 20 Basic setup (VCR) Setting the video channel...tape playback 30 Special playback 31 Convenience function 32 Recording (VCR) Recording a TV program 34 One-touch Timer Recording (OTR 36 Timer recording 37 Basic playback (DVD) Playing a disc 42 Advanced playback (DVD) Zooming 45 Locating desired scene 45 Marking desired scenes ...
...PRECAUTIONS 2 IMPORTANT SAFEGUARDS 3 Power source 5 Precautions 6 Notes on discs 7 Contents 9 Identification of controls 10 Connections Antenna connections 14 Cable TV connections 16 Connecting to a TV 18 Connecting to optional audio equipment ........ 20 Basic setup (VCR) Setting the video channel...tape playback 30 Special playback 31 Convenience function 32 Recording (VCR) Recording a TV program 34 One-touch Timer Recording (OTR 36 Timer recording 37 Basic playback (DVD) Playing a disc 42 Advanced playback (DVD) Zooming 45 Locating desired scene 45 Marking desired scenes ...

Owner's Manual - English
Page 10
Introduction Identification of controls See the page in for details. Front panel ON/STANDBY button 22 REC button 34 VCR/DVD mode selector button 22 OPEN/CLOSE button 42 DVD mode indicator 42 FWD button 30 Cassette loading slot 29 Remote sensor 13 Disc tray 42 EJECT button 29 CHANNEL / ...window 11 PLAY button 30 REV button 30 STOP button 30 Rear panel DVD COAXIAL DIGITAL AUDIO OUT jack 20 DVD S-VIDEO OUT jack 19 DVD/VCR common AUDIO (L/R)/VIDEO OUT jacks 18 ANT IN jack 14 AC power cord 5 DVD COMPONENT DVD AUDIO (L/R) AUDIO (L/R)/VIDEO OUT jacks 19 OUT jacks 19 IN (LINE ...
Introduction Identification of controls See the page in for details. Front panel ON/STANDBY button 22 REC button 34 VCR/DVD mode selector button 22 OPEN/CLOSE button 42 DVD mode indicator 42 FWD button 30 Cassette loading slot 29 Remote sensor 13 Disc tray 42 EJECT button 29 CHANNEL / ...window 11 PLAY button 30 REV button 30 STOP button 30 Rear panel DVD COAXIAL DIGITAL AUDIO OUT jack 20 DVD S-VIDEO OUT jack 19 DVD/VCR common AUDIO (L/R)/VIDEO OUT jacks 18 ANT IN jack 14 AC power cord 5 DVD COMPONENT DVD AUDIO (L/R) AUDIO (L/R)/VIDEO OUT jacks 19 OUT jacks 19 IN (LINE ...
Owner's Manual - English
Page 12
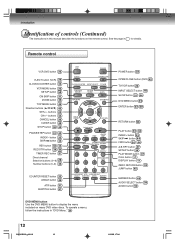
... button to display the menu included on the remote control. buttons 23 CH+/- Remote control VCR DVD button 22 EJECT button (VCR) 29 CLOCK/COUNTER button 33 VCR MENU button 23 SETUP button 58 CM SKIP button 31 ZOOM button 45 TOP MENU button 49 Direction buttons ( / / / ) 45 SET+/- To...manual describe the functions on many DVD video discs. Introduction Identification of controls (Continued) The instructions in "DVD Menu." 49 12 2I30101B-En_p02-13 12 POWER button 22 OPEN/CLOSE button (DVD) 42 TV/VCR button 22 INPUT SELECT button 40 SLOW button 31 44 DVD MENU button 49 ENTER button ...
... button to display the menu included on the remote control. buttons 23 CH+/- Remote control VCR DVD button 22 EJECT button (VCR) 29 CLOCK/COUNTER button 33 VCR MENU button 23 SETUP button 58 CM SKIP button 31 ZOOM button 45 TOP MENU button 49 Direction buttons ( / / / ) 45 SET+/- To...manual describe the functions on many DVD video discs. Introduction Identification of controls (Continued) The instructions in "DVD Menu." 49 12 2I30101B-En_p02-13 12 POWER button 22 OPEN/CLOSE button (DVD) 42 TV/VCR button 22 INPUT SELECT button 40 SLOW button 31 44 DVD MENU button 49 ENTER button ...
Owner's Manual - English
Page 13
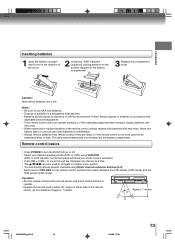
... batteries (supplied), paying attention to turn the DVD/VCR on or off. • Select your desired operating mode (DVD or VCR) using Direct channel selection buttons (0-9). • Each press of approx. 7 meters. Remote control basics • Press POWER to the polarity diagram in the battery compartment... menu system. • You can directly access specific channels using VCR DVD. (DVD or VCR indicator on the remote control, switches the screen between the VCR screen (VCR mode) and the DVD screen (DVD mode). Introduction Inserting batteries 1 Open the battery compartment cover in the...
... batteries (supplied), paying attention to turn the DVD/VCR on or off. • Select your desired operating mode (DVD or VCR) using Direct channel selection buttons (0-9). • Each press of approx. 7 meters. Remote control basics • Press POWER to the polarity diagram in the battery compartment... menu system. • You can directly access specific channels using VCR DVD. (DVD or VCR indicator on the remote control, switches the screen between the VCR screen (VCR mode) and the DVD screen (DVD mode). Introduction Inserting batteries 1 Open the battery compartment cover in the...
Owner's Manual - English
Page 18
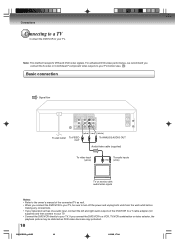
... TV. Note: This method transports VHS and DVD-video signals. Connections Connecting to a TV Connect the DVD/VCR to your TV, be distorted as well. • When you connect the DVD/VCR to a VCR, TV/VCR combination or video selector, the playback picture may be sure to turn off the power and unplug both units from the wall...
... TV. Note: This method transports VHS and DVD-video signals. Connections Connecting to a TV Connect the DVD/VCR to your TV, be distorted as well. • When you connect the DVD/VCR to a VCR, TV/VCR combination or video selector, the playback picture may be sure to turn off the power and unplug both units from the wall...
Owner's Manual - English
Page 19
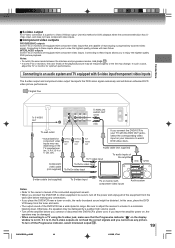
... broadcast sound might be damaged by a sudden high volume sound. • Turn off the power and unplug all of reproducing a progressively scanned video signal. If you connect the DVD/VCR to watch DVD video discs. INTERLACED outputs Some TVs or monitors are capable of the equipment from the tuner and... the corresponding video input on the display window is lit, the S-video outputs do not feed the correct signals and you connect or disconnect the DVD/VCR's power cord. Y, R-Y, B-Y or Y, CB, CR). Component video cable (not supplied) To PR/CR VIDEO OUT To PB/CB VIDEO OUT To Y VIDEO...
... broadcast sound might be damaged by a sudden high volume sound. • Turn off the power and unplug all of reproducing a progressively scanned video signal. If you connect the DVD/VCR to watch DVD video discs. INTERLACED outputs Some TVs or monitors are capable of the equipment from the tuner and... the corresponding video input on the display window is lit, the S-video outputs do not feed the correct signals and you connect or disconnect the DVD/VCR's power cord. Y, R-Y, B-Y or Y, CB, CR). Component video cable (not supplied) To PR/CR VIDEO OUT To PB/CB VIDEO OUT To Y VIDEO...
Owner's Manual - English
Page 21
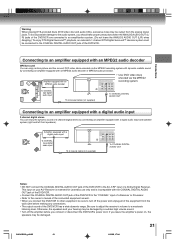
... Warning When playing DTS-encoded discs (DVD video disc and audio CDs), excessive noise may be output from the wall outlet before you connect or disconnect the DVD/VCR's power cord. To avoid possible damage to the audio system, you connect the DVD/VCR to the COAXIAL DIGITAL AUDIO OUT jack... of the DVD/VCR. Amplifier equipped with an MPEG2 audio decoder MPEG2 sound You can enjoy...
... Warning When playing DTS-encoded discs (DVD video disc and audio CDs), excessive noise may be output from the wall outlet before you connect or disconnect the DVD/VCR's power cord. To avoid possible damage to the audio system, you connect the DVD/VCR to the COAXIAL DIGITAL AUDIO OUT jack... of the DVD/VCR. Amplifier equipped with an MPEG2 audio decoder MPEG2 sound You can enjoy...
Owner's Manual - English
Page 22
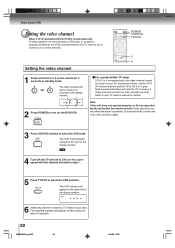
...once, then connect it again. 3 Press VCR DVD selector to turn on the remote for details. POWER VCR DVD TV/VCR 3 4 Setting the video channel 1 Press and hold 3 or 4 on the DVD/VCR. Note: If the unit does not operate properly, or No key operation (by the VCR's channel selector, the TV must be ... with the 75 ohm coaxial cable only. The VCR mode indicator will appear at the right of a recorded tape or DVD disc, or to your TV owner's manual for 3 seconds in the display window. 2 Press POWER to select the VCR mode. Basic setup (VCR) Setting the video channel When a TV is...
...once, then connect it again. 3 Press VCR DVD selector to turn on the remote for details. POWER VCR DVD TV/VCR 3 4 Setting the video channel 1 Press and hold 3 or 4 on the DVD/VCR. Note: If the unit does not operate properly, or No key operation (by the VCR's channel selector, the TV must be ... with the 75 ohm coaxial cable only. The VCR mode indicator will appear at the right of a recorded tape or DVD disc, or to your TV owner's manual for 3 seconds in the display window. 2 Press POWER to select the VCR mode. Basic setup (VCR) Setting the video channel When a TV is...
Owner's Manual - English
Page 24
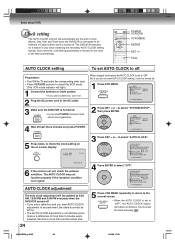
...from factory the AUTO CLOCK is not good. AUTO CLOCK adjustment The auto clock adjustment will be updated at least three minutes and press POWER. POWER VCR DVD VCR MENU ENTER SET +/- The AUTO CLOCK may not function properly if the reception condition is set to "ON". to select "OFF". SYSTEM...CLOCK setting, it on. 2 Plug the AC power cord to the AC outlet. 3 Make sure the DVD/VCR is turned off Preparation: • Turn ON the TV and select the corresponding video input. • Press VCR DVD selector to select the VCR mode. (The VCR mode indicator will light.) 1 Connect the Antenna ...
...from factory the AUTO CLOCK is not good. AUTO CLOCK adjustment The auto clock adjustment will be updated at least three minutes and press POWER. POWER VCR DVD VCR MENU ENTER SET +/- The AUTO CLOCK may not function properly if the reception condition is set to "ON". to select "OFF". SYSTEM...CLOCK setting, it on. 2 Plug the AC power cord to the AC outlet. 3 Make sure the DVD/VCR is turned off Preparation: • Turn ON the TV and select the corresponding video input. • Press VCR DVD selector to select the VCR mode. (The VCR mode indicator will light.) 1 Connect the Antenna ...

Owner's Manual - English
Page 26
... MONTH 3 DAY 25 (SAT) YEAR 2006 TIME 8 : 30AM 〈+/-/ENTER/CANCEL/MENU 〉 26 2I30101B-En_p26-31 26 1/12/06, 17:05 Basic setup (VCR) Clock setting (Continued) If the AUTO CLOCK process did not set the date and time correctly, you want to set them manually for timer recording... and DAYLIGHT SAVING TIME. to select "CLOCK SET", then press ENTER. Note: After a power failure or disconnection of the power, the timer settings will be lost. SYSTEM SETUP CLOCK SET LANGUAGE/IDIOMA/LANGUE NO NOISE BACKGROUND ON OFF AUTO CLOCK ON OFF STANDARD...
... MONTH 3 DAY 25 (SAT) YEAR 2006 TIME 8 : 30AM 〈+/-/ENTER/CANCEL/MENU 〉 26 2I30101B-En_p26-31 26 1/12/06, 17:05 Basic setup (VCR) Clock setting (Continued) If the AUTO CLOCK process did not set the date and time correctly, you want to set them manually for timer recording... and DAYLIGHT SAVING TIME. to select "CLOCK SET", then press ENTER. Note: After a power failure or disconnection of the power, the timer settings will be lost. SYSTEM SETUP CLOCK SET LANGUAGE/IDIOMA/LANGUE NO NOISE BACKGROUND ON OFF AUTO CLOCK ON OFF STANDARD...

Owner's Manual - English
Page 29
... When you insert a cassette tape, the DVD/VCR power will start automatically. Erase prevention tab Tape speed and maximum recording time Adhesive tape Tape Speed SP (Standard Play) SLP (Super Long Play) T-160 2-2/3 hours 8 .... 2 Remove the cassette tape. Automatic playback When loading a cassette tape without an erase prevention tab, playback will turn ON automatically. or Automatic tape eject This DVD/VCR will be inserted. Once the tape is automatically inserted. Insert the cassette tape with its beginning, the cassette tape will automatically rewind the tape when...
... When you insert a cassette tape, the DVD/VCR power will start automatically. Erase prevention tab Tape speed and maximum recording time Adhesive tape Tape Speed SP (Standard Play) SLP (Super Long Play) T-160 2-2/3 hours 8 .... 2 Remove the cassette tape. Automatic playback When loading a cassette tape without an erase prevention tab, playback will turn ON automatically. or Automatic tape eject This DVD/VCR will be inserted. Once the tape is automatically inserted. Insert the cassette tape with its beginning, the cassette tape will automatically rewind the tape when...
Owner's Manual - English
Page 36
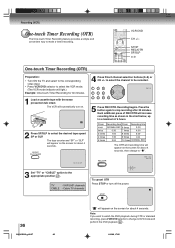
.../OTR SP/SLP 0-9 One-touch Timer Recording (OTR) Preparation: • Turn ON the TV and select to the corresponding video input. • Press VCR DVD selector to make a timed recording. VHF/UHF channels CABLE - to select the channel to " ". Press Recording time Press Recording time once NORMAL REC 6... TV channels 4 Press Direct channel selection buttons (0-9) or CH +/- Each additional press of REC/OTR will automatically turn off the power. 36 2I30101B-En_p32-37 36 " " will appear on the screen for about 4 seconds, then change to the appropriate position 27 .
.../OTR SP/SLP 0-9 One-touch Timer Recording (OTR) Preparation: • Turn ON the TV and select to the corresponding video input. • Press VCR DVD selector to make a timed recording. VHF/UHF channels CABLE - to select the channel to " ". Press Recording time Press Recording time once NORMAL REC 6... TV channels 4 Press Direct channel selection buttons (0-9) or CH +/- Each additional press of REC/OTR will automatically turn off the power. 36 2I30101B-En_p32-37 36 " " will appear on the screen for about 4 seconds, then change to the appropriate position 27 .
Owner's Manual - English
Page 37
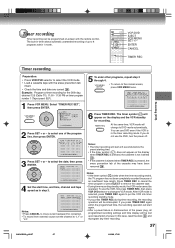
...6 Press TIMER REC. To use the VCR, first press TIMER REC, then press VCR DVD selector to change to DVD mode automatically. After VCR mode is selected, press TIMER REC again to put the VCR into timer recording standby mode. • If you do not use the DVD, turn the power off. In this case, reset the ...clock 24 and reprogram any timer recording. 37 2I30101B-En_p32-37 37 1/12/06, 17:05 The timer symbol ( ) will change to VCR mode. At the same time, VCR mode will appear on timer program number 1 ...
...6 Press TIMER REC. To use the VCR, first press TIMER REC, then press VCR DVD selector to change to DVD mode automatically. After VCR mode is selected, press TIMER REC again to put the VCR into timer recording standby mode. • If you do not use the DVD, turn the power off. In this case, reset the ...clock 24 and reprogram any timer recording. 37 2I30101B-En_p32-37 37 1/12/06, 17:05 The timer symbol ( ) will change to VCR mode. At the same time, VCR mode will appear on timer program number 1 ...
Owner's Manual - English
Page 40
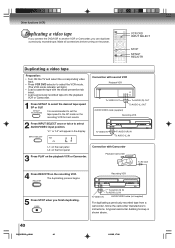
... is shown above. 40 2I30101B-En_p38-41 40 1/12/06, 17:06 Other functions (VCR) Duplicating a video tape If you connect the DVD/VCR to the SP mode on the power. Connection with second VCR Playback VCR To VIDEO OUT To AUDIO (R) OUT To AUDIO (L) OUT AUDIO/VIDEO cable (supplied) ...Recording VCR To VIDEO IN To AUDIO (R) IN To AUDIO (L) IN L1: on the rear panel L2:...
... is shown above. 40 2I30101B-En_p38-41 40 1/12/06, 17:06 Other functions (VCR) Duplicating a video tape If you connect the DVD/VCR to the SP mode on the power. Connection with second VCR Playback VCR To VIDEO OUT To AUDIO (R) OUT To AUDIO (L) OUT AUDIO/VIDEO cable (supplied) ...Recording VCR To VIDEO IN To AUDIO (R) IN To AUDIO (L) IN L1: on the rear panel L2:...
Owner's Manual - English
Page 43
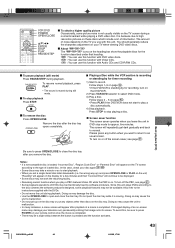
..., be sure to press POWER on the heading bar show the playable discs for the function described under that image onto its screen. To resume normal playback, press PLAY. • The sound is standing by for recording, turn on the DVD/VCR. 2) Press VCR DVD selector to select DVD mode. 3) Play a...34 . • If the DVD/VCR is muted during a normal broadcast while playing a DVD video disc. Basic playback (DVD) Be sure to press OPEN/CLOSE to close the disc tray. To turn on the TV screen during still mode. Prolonged display of loaded disc. VCR DVD POWER OPEN/CLOSE C/D/B/A ENTER STOP ...
..., be sure to press POWER on the heading bar show the playable discs for the function described under that image onto its screen. To resume normal playback, press PLAY. • The sound is standing by for recording, turn on the DVD/VCR. 2) Press VCR DVD selector to select DVD mode. 3) Play a...34 . • If the DVD/VCR is muted during a normal broadcast while playing a DVD video disc. Basic playback (DVD) Be sure to press OPEN/CLOSE to close the disc tray. To turn on the TV screen during still mode. Prolonged display of loaded disc. VCR DVD POWER OPEN/CLOSE C/D/B/A ENTER STOP ...
Owner's Manual - English
Page 46
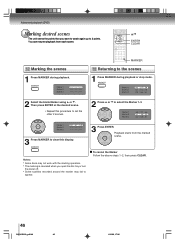
.... Then press ENTER at the desired scene. • Repeat this display. 2 Press C or D to select the Marker 1-3. Marker1 MMaarrkkeerr23 MARKER DVD VCD Returning to the scenes 1 Press MARKER during playback. To cancel the Marker Follow the above steps 1~2, then press CLEAR. 46 2I30101B-En_p46-49... Select the blank Marker using C or D. Playback starts from each scene. Advanced playback (DVD) Marking desired scenes The unit stores the points that you open the disc tray or turn the power off. • Some subtitles recorded around the marker may fail to appear. You can ...
.... Then press ENTER at the desired scene. • Repeat this display. 2 Press C or D to select the Marker 1-3. Marker1 MMaarrkkeerr23 MARKER DVD VCD Returning to the scenes 1 Press MARKER during playback. To cancel the Marker Follow the above steps 1~2, then press CLEAR. 46 2I30101B-En_p46-49... Select the blank Marker using C or D. Playback starts from each scene. Advanced playback (DVD) Marking desired scenes The unit stores the points that you open the disc tray or turn the power off. • Some subtitles recorded around the marker may fail to appear. You can ...
