

Owners Manual
Page 4
...change in a risk of the National Electrical Code, ANSI/NFPA 70, provides information with them might be sure the antenna or cable system is damaged. When installing an outside antenna system, extreme care should not be taken to keep from touching such power lines or circuits, as an improper adjustment of antenna discharge unit, connection...often require extensive work by following the operating instructions. SERVICING Do not attempt to service this indicates a need for long periods of time, unplug it can fall onto or against voltage surges and built-up static charges, Section 810...
...change in a risk of the National Electrical Code, ANSI/NFPA 70, provides information with them might be sure the antenna or cable system is damaged. When installing an outside antenna system, extreme care should not be taken to keep from touching such power lines or circuits, as an improper adjustment of antenna discharge unit, connection...often require extensive work by following the operating instructions. SERVICING Do not attempt to service this indicates a need for long periods of time, unplug it can fall onto or against voltage surges and built-up static charges, Section 810...

Owners Manual
Page 5
... to other equipment, turn off the power and unplug all of the disc tray as practical. It may cause serious personal injury. 23. These discs are required, be sure the service technician uses replacement parts specified by the manufacturer or those that the cable ground shall be situated away from the wall outlet. NOTE TO CABLE TV SYSTEM INSTALLER This reminder is closing.
... to other equipment, turn off the power and unplug all of the disc tray as practical. It may cause serious personal injury. 23. These discs are required, be sure the service technician uses replacement parts specified by the manufacturer or those that the cable ground shall be situated away from the wall outlet. NOTE TO CABLE TV SYSTEM INSTALLER This reminder is closing.

Owners Manual
Page 8
... search function by the player. (In this case, the DVD/VCR will play DVD video discs recorded in this DVD/VCR, please feel free to Obtain Warranty Services" (page 65). 2H20101A (E)p02-13 8 2/10/05, 7:31 PM Because of problems and errors that can occur during the creation of DVD and Video CD software and/or the manufacture of DVD and Video CD discs, Toshiba cannot guarantee that allows specific or limited operation during operation...
... search function by the player. (In this case, the DVD/VCR will play DVD video discs recorded in this DVD/VCR, please feel free to Obtain Warranty Services" (page 65). 2H20101A (E)p02-13 8 2/10/05, 7:31 PM Because of problems and errors that can occur during the creation of DVD and Video CD software and/or the manufacture of DVD and Video CD discs, Toshiba cannot guarantee that allows specific or limited operation during operation...

Owners Manual
Page 9
... 46 Repeat playback 47 A-B Repeat playback 47 Program playback 48 Random playback 48 Changing angles 49 Title selection 49 DVD menu 49 Changing soundtrack language 50 Setting surround sound 50 Subtitles 51 To turn off the PBC 51 MP3/WMA/JPEG operation 52 Function setup (DVD) Customizing the function settings 55 Temporary disabling of rating level by DVD disc 60 Others Language code list 61 Troubleshooting 62 Specifications 63 Limited warranty 64 Other functions (VCR) Stereo recording and playback 39 Second Audio Program (SAP 39 Duplicating a video tape 40 Recording a DVD...
... 46 Repeat playback 47 A-B Repeat playback 47 Program playback 48 Random playback 48 Changing angles 49 Title selection 49 DVD menu 49 Changing soundtrack language 50 Setting surround sound 50 Subtitles 51 To turn off the PBC 51 MP3/WMA/JPEG operation 52 Function setup (DVD) Customizing the function settings 55 Temporary disabling of rating level by DVD disc 60 Others Language code list 61 Troubleshooting 62 Specifications 63 Limited warranty 64 Other functions (VCR) Stereo recording and playback 39 Second Audio Program (SAP 39 Duplicating a video tape 40 Recording a DVD...

Owners Manual
Page 12
...Controls (continued) The instructions in "DVD Menu." 49 12 2H20101A (E)p02-13 12 POWER button OPEN/CLOSE button (DVD) " TV/VCR button INPUT SELECT button " SLOW button ! "" MENU button "' ENTER button ! ## RETURN button ## PLAY button ! " INDEX+ button !! VCR MENU button ! SKIP button "" REW button ! "" REC/OTR button !" !$ TIMER REC button !% Direct channel selection buttons (0Ð9) & Number buttons (0Ð9) "# COUNTER RESET button ! ANGLE button "' ATR button ! SUBTITLE button # MENU button Use the MENU button to display the menu included on the remote control. SKIP button...
...Controls (continued) The instructions in "DVD Menu." 49 12 2H20101A (E)p02-13 12 POWER button OPEN/CLOSE button (DVD) " TV/VCR button INPUT SELECT button " SLOW button ! "" MENU button "' ENTER button ! ## RETURN button ## PLAY button ! " INDEX+ button !! VCR MENU button ! SKIP button "" REW button ! "" REC/OTR button !" !$ TIMER REC button !% Direct channel selection buttons (0Ð9) & Number buttons (0Ð9) "# COUNTER RESET button ! ANGLE button "' ATR button ! SUBTITLE button # MENU button Use the MENU button to display the menu included on the remote control. SKIP button...
Owners Manual
Page 17
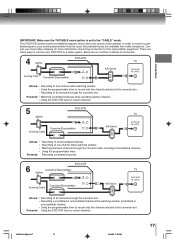
... record only the channel selected at the converter box. * Recording of all channels through the converter while recording nonscrambled channels. * Using the programmable timer. Prevents: Using the DVD/VCR tuner to the "CABLE" mode. Consult your local cable company for more information concerning connection to receive scrambled programs, your DVD/VCR to record only the channel selected at the converter box. Below are six common methods of connection. 4 Splitter DVD/VCR TV IN (ANT) Incoming Cable Converter/Descrambler OUT (TV) A/B Switch...
... record only the channel selected at the converter box. * Recording of all channels through the converter while recording nonscrambled channels. * Using the programmable timer. Prevents: Using the DVD/VCR tuner to the "CABLE" mode. Consult your local cable company for more information concerning connection to receive scrambled programs, your DVD/VCR to record only the channel selected at the converter box. Below are six common methods of connection. 4 Splitter DVD/VCR TV IN (ANT) Incoming Cable Converter/Descrambler OUT (TV) A/B Switch...

Owners Manual
Page 20
... with a Dolby Digital decoder To COAXIAL type digital audio input 75 Ω coaxial cable (not supplied) To COAXIAL DIGITAL AUDIO OUT Connecting to an amplifier equipped with Dolby Surround Pro Logic * Connect one or two rear speakers). The output sound from Dolby Laboratories. With an amplifier equipped with Dolby Digital Connect the equipment the same way as follows. • This connection is only suitable for home use, on DVD video discs or audio CDs. To COAXIAL type digital audio input 75...
... with a Dolby Digital decoder To COAXIAL type digital audio input 75 Ω coaxial cable (not supplied) To COAXIAL DIGITAL AUDIO OUT Connecting to an amplifier equipped with Dolby Surround Pro Logic * Connect one or two rear speakers). The output sound from Dolby Laboratories. With an amplifier equipped with Dolby Digital Connect the equipment the same way as follows. • This connection is only suitable for home use, on DVD video discs or audio CDs. To COAXIAL type digital audio input 75...

Owners Manual
Page 21
... DTS Digital Surround™ playback, an external 5.1 channel DTS Digital Surround™ decoder system must be damaged by a sudden high volume sound. • Turn off the power and unplug all of the DVD/VCR are connected to an amplifier equipped with a digital audio input 2 channel digital stereo You can enjoy motion picture and live concert DVD video discs encorded via the MPEG2 recording system. Otherwise, the speakers and your A/V Receiver is reserved for Laserdisc use...
... DTS Digital Surround™ playback, an external 5.1 channel DTS Digital Surround™ decoder system must be damaged by a sudden high volume sound. • Turn off the power and unplug all of the DVD/VCR are connected to an amplifier equipped with a digital audio input 2 channel digital stereo You can enjoy motion picture and live concert DVD video discs encorded via the MPEG2 recording system. Otherwise, the speakers and your A/V Receiver is reserved for Laserdisc use...

Owners Manual
Page 22
...-button TV tuner If CH 3 or 4 corresponding to the video channel cannot be set the VCR 3/4 channel selector and the TV to CH 3 or 4, play back a prerecorded tape and tune the TV to receive a sharp color picture from the video cassette recorder. To view playback of a recorded tape or DVD disc, or to watch a program selected by the unit and/or the remote control): Static electricity, etc., may affect the player's operation. The video channel will light. 4 Turn...
...-button TV tuner If CH 3 or 4 corresponding to the video channel cannot be set the VCR 3/4 channel selector and the TV to CH 3 or 4, play back a prerecorded tape and tune the TV to receive a sharp color picture from the video cassette recorder. To view playback of a recorded tape or DVD disc, or to watch a program selected by the unit and/or the remote control): Static electricity, etc., may affect the player's operation. The video channel will light. 4 Turn...

Owners Manual
Page 24
.... The DVD/VCR searches for the clock to set itself automatically. CALL AUTO CLOCK setting Preparation: • Turn ON the TV and select the corresponding video input. • Press VCR DVD selector to select the VCR mode. (The VCR indicator will light.) 1 Connect the Antenna or Cable system. • If you use a cable box and you want AUTO CLOCK setting: 1 Press VCR MENU. TSCSAIAYUHMMPSTESTOEREENRTMRUUEESPPCEETASUTEPT OONN OOFFFF +/Ð/ENTER/MENU 2 Press SET + or - POWER VCR DVD VCR MENU ENTER SET +/- But if you press POWER, the Auto Clock set is not programmed...
.... The DVD/VCR searches for the clock to set itself automatically. CALL AUTO CLOCK setting Preparation: • Turn ON the TV and select the corresponding video input. • Press VCR DVD selector to select the VCR mode. (The VCR indicator will light.) 1 Connect the Antenna or Cable system. • If you use a cable box and you want AUTO CLOCK setting: 1 Press VCR MENU. TSCSAIAYUHMMPSTESTOEREENRTMRUUEESPPCEETASUTEPT OONN OOFFFF +/Ð/ENTER/MENU 2 Press SET + or - POWER VCR DVD VCR MENU ENTER SET +/- But if you press POWER, the Auto Clock set is not programmed...

Owners Manual
Page 26
... power, the timer settings will be lost. ENTER CANCEL Manual clock setting EXAMPLE: Setting the clock to "8:30 AM" March, 26 (SAT), 2005. 1 Press VCR MENU. 6 After setting the clock, date and time starts functioning automatically. 8 : 30AM SAT 2 Press SET + or - SYSTEM SETUP CLOCK SET LANGUAGE/IDIOMA/LANGUE NO NOISE BACKGROUND ON OFF AUTO CLOCK ON OFF STANDARD TIME DAYLIGHT SAVING TIME 〈+/-/ENTER/MENU 〉 To make corrections any time during the process Press CANCEL repeatedly...
... power, the timer settings will be lost. ENTER CANCEL Manual clock setting EXAMPLE: Setting the clock to "8:30 AM" March, 26 (SAT), 2005. 1 Press VCR MENU. 6 After setting the clock, date and time starts functioning automatically. 8 : 30AM SAT 2 Press SET + or - SYSTEM SETUP CLOCK SET LANGUAGE/IDIOMA/LANGUE NO NOISE BACKGROUND ON OFF AUTO CLOCK ON OFF STANDARD TIME DAYLIGHT SAVING TIME 〈+/-/ENTER/MENU 〉 To make corrections any time during the process Press CANCEL repeatedly...

Owners Manual
Page 27
... PM 27 Auto tuning will light.) 1 Press VCR MENU. The arrow indicates the selected mode. Note: You can receive up to select "CH SETUP", then press ENTER. 1 Repeat left step 1 and press SET + or - When shipped from the factory, this menu option is cleared. TV/CABLE selection Setting channels automatically Preparation: • Turn ON the TV and select to the corresponding video input. • Press VCR DVD selector to select the VCR mode. (The VCR indicator will...
... PM 27 Auto tuning will light.) 1 Press VCR MENU. The arrow indicates the selected mode. Note: You can receive up to select "CH SETUP", then press ENTER. 1 Repeat left step 1 and press SET + or - When shipped from the factory, this menu option is cleared. TV/CABLE selection Setting channels automatically Preparation: • Turn ON the TV and select to the corresponding video input. • Press VCR DVD selector to select the VCR mode. (The VCR indicator will...
Owners Manual
Page 38
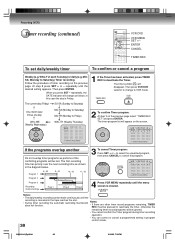
.... • During timer recording the automatic rewinding mechanism does not function. Recording (VCR) Timer recording (continued) VCR DVD VCR MENU SET +/- The timer program list will disappear. Then press VCR DVD selector to change to Saturday) Timer recording Follow the procedure of the conflicting programs will change as shown in the diagram below. Notes: • If there are other timer record programs remaining, TIMER REC must be pressed to reactivate the timer, otherwise the remaining timer record programs will be made...
.... • During timer recording the automatic rewinding mechanism does not function. Recording (VCR) Timer recording (continued) VCR DVD VCR MENU SET +/- The timer program list will disappear. Then press VCR DVD selector to change to Saturday) Timer recording Follow the procedure of the conflicting programs will change as shown in the diagram below. Notes: • If there are other timer record programs remaining, TIMER REC must be pressed to reactivate the timer, otherwise the remaining timer record programs will be made...

Owners Manual
Page 39
.... 1 Press VCR MENU. Then press SET + or - to the chart below. This button has no effect when viewing a MONO videotape or TV program. Each time when you to switch to a second audio program when viewing a selected channel. TSCSAIAYUHMMPSTESTOEREENRTMRUUEESPPCEETASUTEPT OONN OOFFFF +/Ð/ENTER/MENU Listening to a VHS Hi-Fi video tape or MTS broadcast through the VHF/UHF jack (Audio/Video cable not connected), the sound will appear on the screen for several...
.... 1 Press VCR MENU. Then press SET + or - to the chart below. This button has no effect when viewing a MONO videotape or TV program. Each time when you to switch to a second audio program when viewing a selected channel. TSCSAIAYUHMMPSTESTOEREENRTMRUUEESPPCEETASUTEPT OONN OOFFFF +/Ð/ENTER/MENU Listening to a VHS Hi-Fi video tape or MTS broadcast through the VHF/UHF jack (Audio/Video cable not connected), the sound will appear on the screen for several...
Owners Manual
Page 41
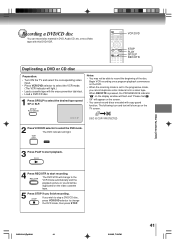
... the screen. • You cannot record discs encoded with copy guard function. If you wish to stop a DVD/CD disc, press VCR DVD selector to change to the VCR mode automatically and the playback picture or sound will light. 3 Press PLAY to start playback. 4 Press REC/OTR to the progressive mode, you finish recording. When REC/OTR is set to start recording. Begin VCR recording once program playback commences on the DVD. • When the scanning mode is pressed, the PROGRESSIVE indicator...
... the screen. • You cannot record discs encoded with copy guard function. If you wish to stop a DVD/CD disc, press VCR DVD selector to change to the VCR mode automatically and the playback picture or sound will light. 3 Press PLAY to start playback. 4 Press REC/OTR to the progressive mode, you finish recording. When REC/OTR is set to start recording. Begin VCR recording once program playback commences on the DVD. • When the scanning mode is pressed, the PROGRESSIVE indicator...
Owners Manual
Page 58
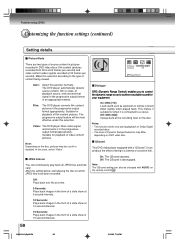
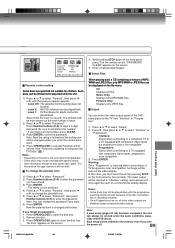
... sound for playback of being viewed. JPEG Interval You can produce the effect of video content pictures. The progressive output feature will be changed with a "QSound". On: The QSound operates. This makes it in the progressive output format appropriately. It can continuously play back all JPEG files automatically. Note: Depending on the remote control # . 58 2H20101A (E)p56-59 58 2/10/05, 7:34 PM Make this selection. Video: The DVD player filters video signal, and...
... sound for playback of being viewed. JPEG Interval You can produce the effect of video content pictures. The progressive output feature will be changed with a "QSound". On: The QSound operates. This makes it in the progressive output format appropriately. It can continuously play back all JPEG files automatically. Note: Depending on the remote control # . 58 2H20101A (E)p56-59 58 2/10/05, 7:34 PM Make this selection. Video: The DVD player filters video signal, and...
Owners Manual
Page 59
... or recording condition. • Once Progressive scan on the remote control. Select Files Parental control setting Some discs are disabled except component video outputs. Press OPEN/CLOSE to close the disc tray. Pictures Only: Displays only JPEG files. Warning: Once "Progressive" is locked and the setting cannot be limited not to a composite TV or a TV equipped with component video inputs, progressive scan compatible. 3) Press ENTER. Press Number buttons (0-9) to select "Interlace" or "Progressive". Interlace: Select when connecting to play back with specific rating...
... or recording condition. • Once Progressive scan on the remote control. Select Files Parental control setting Some discs are disabled except component video outputs. Press OPEN/CLOSE to close the disc tray. Pictures Only: Displays only JPEG files. Warning: Once "Progressive" is locked and the setting cannot be limited not to a composite TV or a TV equipped with component video inputs, progressive scan compatible. 3) Press ENTER. Press Number buttons (0-9) to select "Interlace" or "Progressive". Interlace: Select when connecting to play back with specific rating...

Owners Manual
Page 62
... Parental setup. • Multilingual language is not recorded on -screen display. • Select Display "On". The unit or remote operation key is connected to a TV into two parts. No on the DVD disc. Press SUBTITLE. cannot be • Some discs may be changed when you play back a DVD. • Turn off . • The unit is inserted. • The disc may not do some solutions. Replace the batteries. • Check the batteries are weak. No picture...
... Parental setup. • Multilingual language is not recorded on -screen display. • Select Display "On". The unit or remote operation key is connected to a TV into two parts. No on the DVD disc. Press SUBTITLE. cannot be • Some discs may be changed when you play back a DVD. • Turn off . • The unit is inserted. • The disc may not do some solutions. Replace the batteries. • Check the batteries are weak. No picture...

Owners Manual
Page 63
... 2/10/05, 7:34 PM 63 Specifications General Power supply Power consumption Weight Dimensions Tuner Antenna input/output RF channel output Color system Video head Audio track Hi-Fi frequency response Hi-Fi dynamic range FF/REW time at 25˚C (77˚F) Applicable disc Frequency range S/N ratio Harmonic distortion Wow and flutter Operating conditions Input/Output DVD/VCR Video input Video output Audio input Audio output DVD S-video output Component video output Audio output (BITSTREAM/PCM COAXIAL) Audio output (ANALOG) AC 120 V 60 Hz Operation: 18 W, Stand by: 2 W 7.7 lbs...
... 2/10/05, 7:34 PM 63 Specifications General Power supply Power consumption Weight Dimensions Tuner Antenna input/output RF channel output Color system Video head Audio track Hi-Fi frequency response Hi-Fi dynamic range FF/REW time at 25˚C (77˚F) Applicable disc Frequency range S/N ratio Harmonic distortion Wow and flutter Operating conditions Input/Output DVD/VCR Video input Video output Audio input Audio output DVD S-video output Component video output Audio output (BITSTREAM/PCM COAXIAL) Audio output (ANALOG) AC 120 V 60 Hz Operation: 18 W, Stand by: 2 W 7.7 lbs...
Owners Manual
Page 64
... warranty for set installation, setup, TION AND INSURANCE CHARGES FOR THE DVD/ adjustment of shipment to the rental firm, whichever comes first. (5) Warranties extend only to defects in the unlikely CHARGE TO YOU. or Puerto Rico. RESPONSIBLE FOR ALL INBOUND TRANSPORTA- (4) Labor service charges for all parts and labor. repair of this warranty. NOMINAL FEE. YOU MUST CONTACT TACP'S CONSUMER SOLUTIONS CENTER FOR INSTRUCTIONS ON...
... warranty for set installation, setup, TION AND INSURANCE CHARGES FOR THE DVD/ adjustment of shipment to the rental firm, whichever comes first. (5) Warranties extend only to defects in the unlikely CHARGE TO YOU. or Puerto Rico. RESPONSIBLE FOR ALL INBOUND TRANSPORTA- (4) Labor service charges for all parts and labor. repair of this warranty. NOMINAL FEE. YOU MUST CONTACT TACP'S CONSUMER SOLUTIONS CENTER FOR INSTRUCTIONS ON...


