
Owners Manual
Page 1
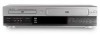
DVD VIDEO PLAYER & VIDEO CASETTE RECORDER SD-V290-S-TU OWNER'S MANUAL Before connecting, operating or adjusting this product, please read this instruction booklet carefully and completely. ©2002 Toshiba Corporation This device does not tape-record copy protected DVD Video Discs. 1-3
DVD VIDEO PLAYER & VIDEO CASETTE RECORDER SD-V290-S-TU OWNER'S MANUAL Before connecting, operating or adjusting this product, please read this instruction booklet carefully and completely. ©2002 Toshiba Corporation This device does not tape-record copy protected DVD Video Discs. 1-3
Owners Manual
Page 2
... ÉLECTRIQUES, INTRODUIRE LA LAME LA PLUS LARGE DE LA FICHE DANS LA BORNE CORRESPONDANTE DE LA PRISE ET POUSSER JUSQU'AU FOND. CAUTION: This DVD+VCR employs a Laser System. FCC WARNING: This equipment may cause harmful interference to the presence of the National Electric Code (U.S.A.). This product generates, uses, and...
... ÉLECTRIQUES, INTRODUIRE LA LAME LA PLUS LARGE DE LA FICHE DANS LA BORNE CORRESPONDANTE DE LA PRISE ET POUSSER JUSQU'AU FOND. CAUTION: This DVD+VCR employs a Laser System. FCC WARNING: This equipment may cause harmful interference to the presence of the National Electric Code (U.S.A.). This product generates, uses, and...

Owners Manual
Page 4
...TV to the unit itself or other material damage. Table of Contents Introduction Safety Precautions 2 IMPORTANT SAFETY INSTRUCTIONS 3 Table of this unit. DVD Part 18-21 General Explanation 18 On-Screen Display 18 Initial Settings 19-22 z General Operation 19 z Language 19 z Picture 19 .... 38 z Erasing the Complete Program List 38 Additional Information - Indicates tips and hints for instructions Indicates hazards likely to cause harm to a DVD+VCR . . 11 Basic TV Connections 12 Optional, Preferred TV Connections 13-14 Before Operation - VCR Part 15-17 On-Screen Display(OSD ...
...TV to the unit itself or other material damage. Table of Contents Introduction Safety Precautions 2 IMPORTANT SAFETY INSTRUCTIONS 3 Table of this unit. DVD Part 18-21 General Explanation 18 On-Screen Display 18 Initial Settings 19-22 z General Operation 19 z Language 19 z Picture 19 .... 38 z Erasing the Complete Program List 38 Additional Information - Indicates tips and hints for instructions Indicates hazards likely to cause harm to a DVD+VCR . . 11 Basic TV Connections 12 Optional, Preferred TV Connections 13-14 Before Operation - VCR Part 15-17 On-Screen Display(OSD ...

Owners Manual
Page 5
...ment or the CD-R/RW disc itself, some playback features of the unit may not be available, or other than titles. As this unit plays DVDs and Video CDs according to disc content designed by the software manufacturer, some CD-R/RW discs cannot be connected to the digital output of the...Playback control) functions, moving pictures and still pictures are two types of video CDs: Video CDs equipped with PBC. Regional code of the DVD+VCR and DVDs This DVD+VCR is displayed in each direction of the front of the remote sensor 1-7 Depending on the TV screen. Each scene is designed and ...
...ment or the CD-R/RW disc itself, some playback features of the unit may not be available, or other than titles. As this unit plays DVDs and Video CDs according to disc content designed by the software manufacturer, some CD-R/RW discs cannot be connected to the digital output of the...Playback control) functions, moving pictures and still pictures are two types of video CDs: Video CDs equipped with PBC. Regional code of the DVD+VCR and DVDs This DVD+VCR is displayed in each direction of the front of the remote sensor 1-7 Depending on the TV screen. Each scene is designed and ...
Owners Manual
Page 6
... disc. Regular inspection and maintenance are extremely dirty, use . (This depends on the operating environment.) For details, please contact your output sources (DVD or VCR) to view on the TV screen. • If you insert a cassette tape without the PBC (playback control) function. This icon... means the function explained in contact with a mild detergent solution. DVD DVD VCD2.0 Video CDs with a clean cloth. MP3 MP3 Discs. Do not use strong solvents such as alcohol, benzine, or thinner, as there may...
... disc. Regular inspection and maintenance are extremely dirty, use . (This depends on the operating environment.) For details, please contact your output sources (DVD or VCR) to view on the TV screen. • If you insert a cassette tape without the PBC (playback control) function. This icon... means the function explained in contact with a mild detergent solution. DVD DVD VCD2.0 Video CDs with a clean cloth. MP3 MP3 Discs. Do not use strong solvents such as alcohol, benzine, or thinner, as there may...
Owners Manual
Page 7
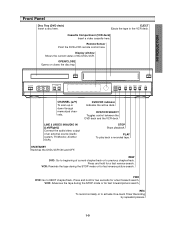
...STOP mode or for a fast forward search. FWD DVD: Go to activate One-touch Timer Recording by repeated presses. 1-9 REW DVD: Go to previous chapter/track. INTRODUCTION Front Panel Disc Tray (DVD deck) Insert a disc here. ON/STANBY Switches the DVD+VCR ON and OFF. OPEN/CLOSE Opens or ...closes the disc tray. STOP Stops playback. DVD/VCR indicator Indicates the active deck. DVD/VCR SELECT Toggles control between the DVD deck and the VCR deck. REC To record normally or to NEXT chapter/track. Cassette Compartment (VCR deck) Insert a video ...
...STOP mode or for a fast forward search. FWD DVD: Go to activate One-touch Timer Recording by repeated presses. 1-9 REW DVD: Go to previous chapter/track. INTRODUCTION Front Panel Disc Tray (DVD deck) Insert a disc here. ON/STANBY Switches the DVD+VCR ON and OFF. OPEN/CLOSE Opens or ...closes the disc tray. STOP Stops playback. DVD/VCR indicator Indicates the active deck. DVD/VCR SELECT Toggles control between the DVD deck and the VCR deck. REC To record normally or to NEXT chapter/track. Cassette Compartment (VCR deck) Insert a video ...
Owners Manual
Page 8
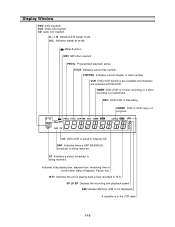
...is being received. HI-FI Indicates the unit is Recording. TITLE Indicates current title number. TIMER DVD+VCR is in Hi-Fi. CDREC HI-FI AM SP LP EP CH DVD+VCR is programmed. Indicates total playing time, elapsed time, remaining time or current deck status (Playback... Indicates current chapter or track number. TITLE CHP/TRK VCR TIMER REC ALL MP3 SAP CH CDREC DVD to Channel XX. Programmed playback active. VCR DVD+VCR functions are available and channels are selected at DVD+VCR. ANGLE active. A y B Indicates A-B repeat mode. ST Indicates a stereo broadcast is ...
...is being received. HI-FI Indicates the unit is Recording. TITLE Indicates current title number. TIMER DVD+VCR is in Hi-Fi. CDREC HI-FI AM SP LP EP CH DVD+VCR is programmed. Indicates total playing time, elapsed time, remaining time or current deck status (Playback... Indicates current chapter or track number. TITLE CHP/TRK VCR TIMER REC ALL MP3 SAP CH CDREC DVD to Channel XX. Programmed playback active. VCR DVD+VCR functions are available and channels are selected at DVD+VCR. ANGLE active. A y B Indicates A-B repeat mode. ST Indicates a stereo broadcast is ...
Owners Manual
Page 9
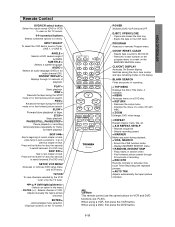
...chapter or track. > Press and hold button for fast forward picture search. Switches among the clock, tape counter and tape remaining modes on a DVD disc. BLANK SEARCH Finds end points of recording. z TOP MENU Displays the disc's Title menu, if available. Removes the setup menu. - ... the STOP mode or for frameby-frame playback. PAUSE/STILL, PAUSE/STEP z Pause playback or recording . PROGRAM Accesses or removes Program menu. z ZOOM Enlarges DVD video image. z RANDOM, INSTANT SKIP - When using a VCR, first press the VCR button. Resets tape counter to M 0:00:00 - z MENU...
...chapter or track. > Press and hold button for fast forward picture search. Switches among the clock, tape counter and tape remaining modes on a DVD disc. BLANK SEARCH Finds end points of recording. z TOP MENU Displays the disc's Title menu, if available. Removes the setup menu. - ... the STOP mode or for frameby-frame playback. PAUSE/STILL, PAUSE/STEP z Pause playback or recording . PROGRAM Accesses or removes Program menu. z ZOOM Enlarges DVD video image. z RANDOM, INSTANT SKIP - When using a VCR, first press the VCR button. Resets tape counter to M 0:00:00 - z MENU...
Owners Manual
Page 10
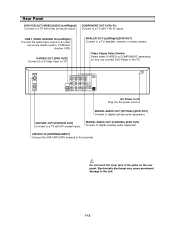
...) Connect to the TV. Video Output Select Switch Select either S-VIDEO or COMPONENT, depending on the rear panel. UHF/VHF OUT (DVD/VCR OUT) Connect to the unit. 1-12 Electrostatic discharge may cause permanent damage to a TV with RF coaxial inputs. LINE 1 (VIDEO IN/AUDIO IN... (Left/Right)) Connect the audio/video output of the jacks on how you connect DVD Player to digital (coaxial) audio equipment. ANALOG OUT (Left/Right) (DVD OUT) Connect to a TV with video and audio inputs. AC Power Cord Plug into the power source. COMPONENT OUT (Y...
...) Connect to the TV. Video Output Select Switch Select either S-VIDEO or COMPONENT, depending on the rear panel. UHF/VHF OUT (DVD/VCR OUT) Connect to the unit. 1-12 Electrostatic discharge may cause permanent damage to a TV with RF coaxial inputs. LINE 1 (VIDEO IN/AUDIO IN... (Left/Right)) Connect the audio/video output of the jacks on how you connect DVD Player to digital (coaxial) audio equipment. ANALOG OUT (Left/Right) (DVD OUT) Connect to a TV with video and audio inputs. AC Power Cord Plug into the power source. COMPONENT OUT (Y...
Owners Manual
Page 11
...a converter or descrambler box, unscrew the wire from the rear of the TV. 2 Identify the type of DVD+VCR 1-13 z If you are various ways you could be distorted by pressing the CH/TRK (+/-) or ... channel of the Cable Converter box by the copy protection system. z Do not connect your DVD+VCR via your antenna lead wire is a 75 ohm coaxial antenna cable. To view or record CATV channel... 1 Tune the TV to the DVD+VCR output channel (CH 3 or 4). 2 Set the DVD+VCR channel selector to 75-ohm) (not supplied) and slip the Adaptor onto the...
...a converter or descrambler box, unscrew the wire from the rear of the TV. 2 Identify the type of DVD+VCR 1-13 z If you are various ways you could be distorted by pressing the CH/TRK (+/-) or ... channel of the Cable Converter box by the copy protection system. z Do not connect your DVD+VCR via your antenna lead wire is a 75 ohm coaxial antenna cable. To view or record CATV channel... 1 Tune the TV to the DVD+VCR output channel (CH 3 or 4). 2 Set the DVD+VCR channel selector to 75-ohm) (not supplied) and slip the Adaptor onto the...
Owners Manual
Page 12
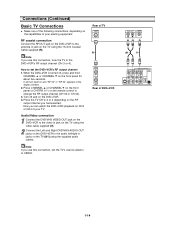
Press CHANNEL v or CHANNEL V on the front panel or CH/TRK (+/-) on the remote control to the antenna in jacks on the DVD+VCR to change the RF output channel (CH 03 or CH 04). 3. Connections (Continued) Basic TV Connections z Make one of the following connections, depending on ... to the audio left/right in jack on the TV using the 75-ohm Coaxial Cable supplied (R). Audio/Video connection 1 Connect the DVD/VHS VIDEO OUT jack on the DVD+VCR to the video in the display window. 2. Now you use this connection, tune the TV to 3 or 4 depending on and "RF...
Press CHANNEL v or CHANNEL V on the front panel or CH/TRK (+/-) on the remote control to the antenna in jacks on the DVD+VCR to change the RF output channel (CH 03 or CH 04). 3. Connections (Continued) Basic TV Connections z Make one of the following connections, depending on ... to the audio left/right in jack on the TV using the 75-ohm Coaxial Cable supplied (R). Audio/Video connection 1 Connect the DVD/VHS VIDEO OUT jack on the DVD+VCR to the video in the display window. 2. Now you use this connection, tune the TV to 3 or 4 depending on and "RF...

Owners Manual
Page 13
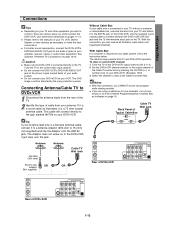
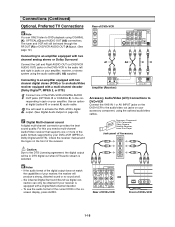
...the TV using the optional S-Video cable (S). 2 Connect the Left and Right AUDIO OUT jacks of DVD+VCR AUDIO INPUT R L A2 1-15 Rear of TV S-VIDEO INPUT COMPONENT VIDEO INPUT Pr Pb Y S C Rear of the DVD+VCR to the audio left /right in jack on the TV (A2) using the supplied audio... using an S-video cable, do not connect the yellow video cable. When using the COMPONENT VIDEO OUT jacks, set the video output select switch to DVD playback through the connections shown below. When using the S-VIDEO OUT jack, set the video output select switch to the S-Video in jacks on the...
...the TV using the optional S-Video cable (S). 2 Connect the Left and Right AUDIO OUT jacks of DVD+VCR AUDIO INPUT R L A2 1-15 Rear of TV S-VIDEO INPUT COMPONENT VIDEO INPUT Pr Pb Y S C Rear of the DVD+VCR to the audio left /right in jack on the TV (A2) using the supplied audio... using an S-video cable, do not connect the yellow video cable. When using the COMPONENT VIDEO OUT jacks, set the video output select switch to DVD playback through the connections shown below. When using the S-VIDEO OUT jack, set the video output select switch to the S-Video in jacks on the...
Owners Manual
Page 14
..., using the audio cables (A1, A2) supplied. Digital Multi-channel sound A digital multi-channel connection provides the best sound quality. OR Rear of DVD+VCR Front of the receiver. Use an optional digital (optical O or coaxial X) audio cable. 2 You will produce a strong, distorted sound or .../Video receiver that supports one of Accessory AUDIO OUTPUT R L VIDEO OUTPUT Notes - The tuner and VCR will be in jacks on your DVD+VCR (MPEG 2, Dolby Digital and DTS). Six Channel Digital Surround Sound via digital connection can ONLY listen to the corresponding in the onscreen ...
..., using the audio cables (A1, A2) supplied. Digital Multi-channel sound A digital multi-channel connection provides the best sound quality. OR Rear of DVD+VCR Front of the receiver. Use an optional digital (optical O or coaxial X) audio cable. 2 You will produce a strong, distorted sound or .../Video receiver that supports one of Accessory AUDIO OUTPUT R L VIDEO OUTPUT Notes - The tuner and VCR will be in jacks on your DVD+VCR (MPEG 2, Dolby Digital and DTS). Six Channel Digital Surround Sound via digital connection can ONLY listen to the corresponding in the onscreen ...
Owners Manual
Page 16
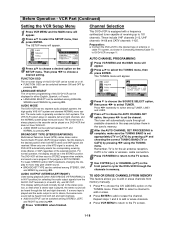
...switched between ON and OFF by pressing b/B. When only one of the MTS signal is for the air antenna reception, CATV is received, the DVD+VCR automatically selects the corresponding receiving mode (Stereo or SAP) regardless of receiving up to switch among ENGLISH, SPANISH and FRENCH by pressing b/B.... desired setting. Repeat steps 1 and 2 to add or erase channels. 3 Press VCR MENU to return to choose the CH. Channel Selection This DVD+VCR is set the channel. If a mono tape is played and the audio output is equipped with a frequency synthesized tuner capable of the selected ...
...switched between ON and OFF by pressing b/B. When only one of the MTS signal is for the air antenna reception, CATV is received, the DVD+VCR automatically selects the corresponding receiving mode (Stereo or SAP) regardless of receiving up to switch among ENGLISH, SPANISH and FRENCH by pressing b/B.... desired setting. Repeat steps 1 and 2 to add or erase channels. 3 Press VCR MENU to return to choose the CH. Channel Selection This DVD+VCR is set the channel. If a mono tape is played and the audio output is equipped with a frequency synthesized tuner capable of the selected ...

Owners Manual
Page 17
...zone (AUTO, EASTERN, CENTRAL, MOUNTAIN, PACIFIC, ALASKA or HAWAII). Use b/B to choose the CLOCK menu. VCR Part (Continued) Setting the Clock The DVD+VCR gives you choose AUTO, the VCR sets the clock using the Coordinated Universal Time. 4 Press V to ON at the factory. The Auto Clock... "ON", an incorrect date and/or time will appear. 3 Press b/B to choose the month. 4 Press V to choose ON. In the ON setting, the DVD+VCR looks for a channel carrying XDS (Extended Data Services) information. If you choose ON, the VCR sets the clock when the Daylight Saving Time is...
...zone (AUTO, EASTERN, CENTRAL, MOUNTAIN, PACIFIC, ALASKA or HAWAII). Use b/B to choose the CLOCK menu. VCR Part (Continued) Setting the Clock The DVD+VCR gives you choose AUTO, the VCR sets the clock using the Coordinated Universal Time. 4 Press V to ON at the factory. The Auto Clock... "ON", an incorrect date and/or time will appear. 3 Press b/B to choose the month. 4 Press V to choose ON. In the ON setting, the DVD+VCR looks for a channel carrying XDS (Extended Data Services) information. If you choose ON, the VCR sets the clock when the Daylight Saving Time is...

Owners Manual
Page 18
... number. The selected option will be used for setting numbers (e.g., title number). z If no button is pressed for operating the DVD+VCR. Some DVDs require specific operation or allow only limited operation during playback. 2 Use v/V to the desired chapter number. The number buttons can ... Track Number Time Audio Channel Sound 1/4 0:16:57 STER. Shows the elapsed playing time, and searches the point by the DVD+VCR or is not permitted by the elapsed time directly. b/B b/B 1-20 Before Operation - For some functions, press ENTER to the desired title ...
... number. The selected option will be used for setting numbers (e.g., title number). z If no button is pressed for operating the DVD+VCR. Some DVDs require specific operation or allow only limited operation during playback. 2 Use v/V to the desired chapter number. The number buttons can ... Track Number Time Audio Channel Sound 1/4 0:16:57 STER. Shows the elapsed playing time, and searches the point by the DVD+VCR or is not permitted by the elapsed time directly. b/B b/B 1-20 Before Operation - For some functions, press ENTER to the desired title ...
Owners Manual
Page 19
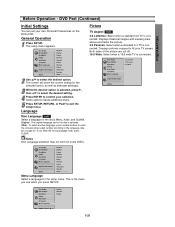
...picture are cut off. 16:9 Wide: Select when a 16:9 wide TV is connected. PREPARATION Before Operation - Language Disc Language DVD Select a language for some DVDs. Displays pictures cropped to fill your selection. The setup menu appears. Disc Audio Disc Subtitle Disc Menu Rating Area Code TV Aspect...you press SETUP. This is selected, press B, then v/V to select the desired setting. 4 Press ENTER to the language code list on the DVD+VCR. General Operation 1 Press SETUP. The screen will show the current setting for the setup menu. Other : To select another language, press ...
...picture are cut off. 16:9 Wide: Select when a 16:9 wide TV is connected. PREPARATION Before Operation - Language Disc Language DVD Select a language for some DVDs. Displays pictures cropped to fill your selection. The setup menu appears. Disc Audio Disc Subtitle Disc Menu Rating Area Code TV Aspect...you press SETUP. This is selected, press B, then v/V to select the desired setting. 4 Press ENTER to the language code list on the DVD+VCR. General Operation 1 Press SETUP. The screen will show the current setting for the setup menu. Other : To select another language, press ...

Owners Manual
Page 20
...Set DRC to digital audio technology. DNR1: Normal level DNR2: Expanded level. PCM: Select when connected to On only when a multi-channel karaoke DVD is made , this occur, select a more appropriate DNR level (normal or off ) Pluge (Blacker than Black) For proper adjustment of handling ...96KHz signals, select 96KHz. Set the DVD+VCR's Digital Audio Output according to the type of audio system you can provide additional improvement in the reduction of the selected item alternates ...
...Set DRC to digital audio technology. DNR1: Normal level DNR2: Expanded level. PCM: Select when connected to On only when a multi-channel karaoke DVD is made , this occur, select a more appropriate DNR level (normal or off ) Pluge (Blacker than Black) For proper adjustment of handling ...96KHz signals, select 96KHz. Set the DVD+VCR's Digital Audio Output according to the type of audio system you can provide additional improvement in the reduction of the selected item alternates ...
Owners Manual
Page 21
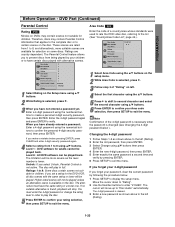
... 1-2 as shown above to 8, and alternatively, more severe as shown above to the left (Rating). 1-23 DVD Part (Continued) Parental Control Rating DVD Movies on DVDs may contain Parental Control information that applies to the complete disc or to certain scenes on the Setup menu using the... password using the numbered buttons to verify. Unlock: If you to prevent discs from being played by following the procedure below ). Area Code DVD Enter the code of the 4-digit password is necessary when the password is cleared. 3 Enter a new password as the level number is selected...
... 1-2 as shown above to 8, and alternatively, more severe as shown above to the left (Rating). 1-23 DVD Part (Continued) Parental Control Rating DVD Movies on DVDs may contain Parental Control information that applies to the complete disc or to certain scenes on the Setup menu using the... password using the numbered buttons to verify. Unlock: If you to prevent discs from being played by following the procedure below ). Area Code DVD Enter the code of the 4-digit password is necessary when the password is cleared. 3 Enter a new password as the level number is selected...
Owners Manual
Page 22
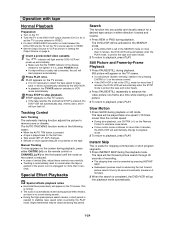
... automatically. If it will be extended by 30-second increments (maximum 3 minutes). 2 When the search is , press POWER once. The DVD+VCR will turn itself off. Still Picture and Frame-by-Frame Playback 1 Press PAUSE/STILL during playback or still mode. The indicator will ...light and the DVD+VCR will fast forward picture search through 30 seconds of recording. Slow Motion 1 Press SLOW during playback. z During slow playback, use ...
... automatically. If it will be extended by 30-second increments (maximum 3 minutes). 2 When the search is , press POWER once. The DVD+VCR will turn itself off. Still Picture and Frame-by-Frame Playback 1 Press PAUSE/STILL during playback or still mode. The indicator will ...light and the DVD+VCR will fast forward picture search through 30 seconds of recording. Slow Motion 1 Press SLOW during playback. z During slow playback, use ...


