

Installation Guide
Page 1
www.iFixit.com Page 1 of the Toshiba SD-K740 DVD player. Installing Toshiba SD-K740 Front Flap Tray Door Spring Installing Toshiba SD-K740 Front Flap Tray Door Spring Author: John Lokker Tools used in this side. Remove the three .303 inch screws from this guide Phillips #2 Screwdriver (1) This ...
www.iFixit.com Page 1 of the Toshiba SD-K740 DVD player. Installing Toshiba SD-K740 Front Flap Tray Door Spring Installing Toshiba SD-K740 Front Flap Tray Door Spring Author: John Lokker Tools used in this side. Remove the three .303 inch screws from this guide Phillips #2 Screwdriver (1) This ...

Installation Guide
Page 2
Installing Toshiba SD-K740 Front Flap Tray Door Spring Step 3 Flip the DVD player over onto it towards yourself. Remove the back panel by lifting up and pulling it 's front face. Lift and push away each of the ... come off during this step, so do not force it . © iFixit - Front Panel Flip the DVD player so its side. Lift and slide forward a single tab on your working surface. Step 4 - Step 5 Flip the DVD player on its top is sitting on the side. CC BY-NC-SA www.iFixit.com...
Installing Toshiba SD-K740 Front Flap Tray Door Spring Step 3 Flip the DVD player over onto it towards yourself. Remove the back panel by lifting up and pulling it 's front face. Lift and push away each of the ... come off during this step, so do not force it . © iFixit - Front Panel Flip the DVD player so its side. Lift and slide forward a single tab on your working surface. Step 4 - Step 5 Flip the DVD player on its top is sitting on the side. CC BY-NC-SA www.iFixit.com...
Owners Manual
Page 1
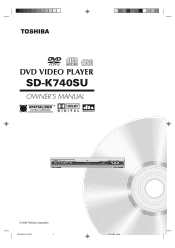
DIGITAL VIDEO DVD VIDEO PLAYER SD-K740SU OWNER'S MANUAL © 2004 Toshiba Corporation 2C01501A COVER 1 12/16/03, 19:58
DIGITAL VIDEO DVD VIDEO PLAYER SD-K740SU OWNER'S MANUAL © 2004 Toshiba Corporation 2C01501A COVER 1 12/16/03, 19:58
Owners Manual
Page 2
... an outlet on the rear panel of the following measures: - To reduce the risk of electric shock do not try to correct the interference by Toshiba, could void the user's authority to the presence of the FCC Rule. Retain this equipment, not expressly approved by...
... an outlet on the rear panel of the following measures: - To reduce the risk of electric shock do not try to correct the interference by Toshiba, could void the user's authority to the presence of the FCC Rule. Retain this equipment, not expressly approved by...

Owners Manual
Page 6
...cold place to remove the disc and turn on a warm day. In summer, when you use depending on moisture condensation Moisture condensation damages the DVD video player. For stubborn dirt, soak the cloth in the future. To obtain a clear picture, we recommend regular inspection and maintenance (cleaning or...was originally packed at the factory. Exacmopnldeeonfsmatoioisnt!ure Optical pick-up lens inside this unit, one of the most crucial internal parts of the DVD video player. It's too warm! Remove the disc, connect the power cord of solvent, such as thinner and benzine, as they may ...
...cold place to remove the disc and turn on a warm day. In summer, when you use depending on moisture condensation Moisture condensation damages the DVD video player. For stubborn dirt, soak the cloth in the future. To obtain a clear picture, we recommend regular inspection and maintenance (cleaning or...was originally packed at the factory. Exacmopnldeeonfsmatoioisnt!ure Optical pick-up lens inside this unit, one of the most crucial internal parts of the DVD video player. It's too warm! Remove the disc, connect the power cord of solvent, such as thinner and benzine, as they may ...

Owners Manual
Page 7
...solvent such as a bathroom or near heat sources. Notes on copyright It is forbidden by method claims of disc contents Normally, DVD video discs are divided into titles, and the titles are sub-divided into tracks. This product incorporates copyright protection technology that do...slightly moistened soft cloth and finish with a soft cloth. Playback side Do not attach paper or tape to direct sunlight or near a humidifier. DVD video disc DVD video disc Title 1 Title 2 Chapter 1 Chapter 2 Chapter 1 Chapter 2 Chapter 3 On cleaning discs Fingerprints and dust on discs On handling...
...solvent such as a bathroom or near heat sources. Notes on copyright It is forbidden by method claims of disc contents Normally, DVD video discs are divided into titles, and the titles are sub-divided into tracks. This product incorporates copyright protection technology that do...slightly moistened soft cloth and finish with a soft cloth. Playback side Do not attach paper or tape to direct sunlight or near a humidifier. DVD video disc DVD video disc Title 1 Title 2 Chapter 1 Chapter 2 Chapter 1 Chapter 2 Chapter 3 On cleaning discs Fingerprints and dust on discs On handling...
Owners Manual
Page 8
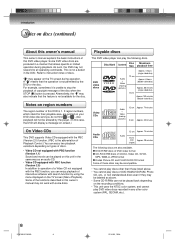
... example, sometimes it is unable to instruction notes of the disc when the STOP (3) button is pressed. Disc Mark Contents Disc Size Maximum playback time DVD video discs Audio + Video (moving pictures) 12 cm Approx. 4 hours (single sided disc) Approx. 8 hours (double sided disc) 8 cm Approx. 80 minutes (... NTSC color system, and cannot play the following discs are produced in any other than those listed above. • You cannot play discs of DVD-RAM,DVD-ROM, Photo CD, etc., or non standardized discs even if they may be labeled as an audio CD. • Video CD equipped with...
... example, sometimes it is unable to instruction notes of the disc when the STOP (3) button is pressed. Disc Mark Contents Disc Size Maximum playback time DVD video discs Audio + Video (moving pictures) 12 cm Approx. 4 hours (single sided disc) Approx. 8 hours (double sided disc) 8 cm Approx. 80 minutes (... NTSC color system, and cannot play the following discs are produced in any other than those listed above. • You cannot play discs of DVD-RAM,DVD-ROM, Photo CD, etc., or non standardized discs even if they may be labeled as an audio CD. • Video CD equipped with...
Owners Manual
Page 9
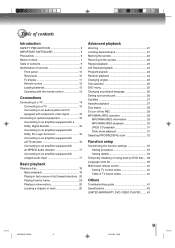
...Returning to the scenes 22 Repeat playback 23 A-B Repeat playback 23 Program playbck 24 Random playback 24 Changing angles 25 Title selection 25 DVD menu 25 Changing soundtrack language 26 Setting surround sound 26 Subtitles 27 Karaoke playback 27 Disc status 28 To turn off the PBC ...31 Selecting PROGRESSIVE scan 32 Function setup Customizing the function settings 33 Setting procedure 33 Setting details 34 Temporary disabling of rating level by DVD disc .... 38 Language code list 39 Multi brand remote control 40 Setting TV control codes 40 Table of TV brand codes 40 Others...
...Returning to the scenes 22 Repeat playback 23 A-B Repeat playback 23 Program playbck 24 Random playback 24 Changing angles 25 Title selection 25 DVD menu 25 Changing soundtrack language 26 Setting surround sound 26 Subtitles 27 Karaoke playback 27 Disc status 28 To turn off the PBC ...31 Selecting PROGRESSIVE scan 32 Function setup Customizing the function settings 33 Setting procedure 33 Setting details 34 Temporary disabling of rating level by DVD disc .... 38 Language code list 39 Multi brand remote control 40 Setting TV control codes 40 Table of TV brand codes 40 Others...

Owners Manual
Page 10
... jack " AUDIO OUT (L/R) jacks " # COMPONENT VIDEO OUT (Y/PB/PR) jacks # S-VIDEO OUT jack " AC Power cord 2C01501A P10-13 10 12/16/03, 19:58 DVD display Rear panel When connecting the optical digital cable, remove the cap and fit the connector into the jack firmly. Introduction Identification of controls See...
... jack " AUDIO OUT (L/R) jacks " # COMPONENT VIDEO OUT (Y/PB/PR) jacks # S-VIDEO OUT jack " AC Power cord 2C01501A P10-13 10 12/16/03, 19:58 DVD display Rear panel When connecting the optical digital cable, remove the cap and fit the connector into the jack firmly. Introduction Identification of controls See...

Owners Manual
Page 11
...third times to turn off the FL display. 3. Press FL DIM twice to dim the FL display. 2. DVD video disc Video CD Audio CD • During playback: Example DVD • During playback: Example • During playback: Example CD TRACK Playing track 1 Some discs may not.../03, 19:58 11 Some discs may vary depending on status. 1. FL display TRACK indicator (TRACK) CD indicator (CD) DVD indicator (DVD) Repeat mode indicators (ALL REPEAT, REPEAT, REPEAT A B) DVD CD TRACK ALL REPEAT A B Play indicator ( ) Pause indicator ( ) Message or number indicator (Title, chapter, track, ...
...third times to turn off the FL display. 3. Press FL DIM twice to dim the FL display. 2. DVD video disc Video CD Audio CD • During playback: Example DVD • During playback: Example • During playback: Example CD TRACK Playing track 1 Some discs may not.../03, 19:58 11 Some discs may vary depending on status. 1. FL display TRACK indicator (TRACK) CD indicator (CD) DVD indicator (DVD) Repeat mode indicators (ALL REPEAT, REPEAT, REPEAT A B) DVD CD TRACK ALL REPEAT A B Play indicator ( ) Pause indicator ( ) Message or number indicator (Title, chapter, track, ...
Owners Manual
Page 12
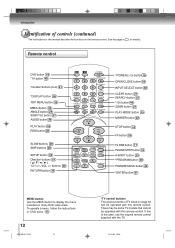
...cannot be operated with the TV. 12/16/03, 19:58 If this remote control. To operate a menu, follow the instructions in "DVD menu." 25 12 2C01501A P10-13 12 *TV control buttons The various brands of controls (continued) The instructions in for details. Direction ... INPUT SELECT button " CLEAR button SEARCH button *100 button " ZOOM button PLAY MODE button ! See the page in this remote control. Remote control DVD button & *TV button " *Number buttons (0Ð9) *DISPLAY button & TOP MENU button # MENU button # ANGLE button # SUBTITLE button % AUDIO button $ ...
...cannot be operated with the TV. 12/16/03, 19:58 If this remote control. To operate a menu, follow the instructions in "DVD menu." 25 12 2C01501A P10-13 12 *TV control buttons The various brands of controls (continued) The instructions in for details. Direction ... INPUT SELECT button " CLEAR button SEARCH button *100 button " ZOOM button PLAY MODE button ! See the page in this remote control. Remote control DVD button & *TV button " *Number buttons (0Ð9) *DISPLAY button & TOP MENU button # MENU button # ANGLE button # SUBTITLE button % AUDIO button $ ...

Owners Manual
Page 13
..., or short-circuit the batteries. Do not throw batteries into the remote control in the remote control. • Do not use different types of the DVD video player. • Do not drop or give the remote control a shock. • Do not leave the remote control near an extremely hot or ...remote control. • Do not disassemble the remote control. • When using the remote control, press the button at intervals of the DVD video player to operate the DVD video player via the remote control. If you do so, you do not use of the arrow. Operating with new ones. • If...
..., or short-circuit the batteries. Do not throw batteries into the remote control in the remote control. • Do not use different types of the DVD video player. • Do not drop or give the remote control a shock. • Do not leave the remote control near an extremely hot or ...remote control. • Do not disassemble the remote control. • When using the remote control, press the button at intervals of the DVD video player to operate the DVD video player via the remote control. If you do so, you do not use of the arrow. Operating with new ones. • If...

Owners Manual
Page 14
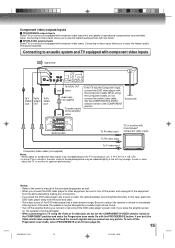
TV or monitor with an S video cable. Set the COMPONENT/S-VIDEO selector switch to your TV. If you connect the DVD video player to a TV Signal flow S-VIDEO OUT PUT COMPONENT Y DIGITAL PB L OPTICAL AUDIO PR R COAXIAL VEDIO To S VIDEO OUT (red) To AUDIO OUT (white) (...; If your television set has one audio input, connect the left and right audio outputs of the DVD video player to a Y cable adapter (not supplied) and then connect to your TV. • Connect the DVD video player directly to your TV. When using an S video cable, do not connect the yellow video...
TV or monitor with an S video cable. Set the COMPONENT/S-VIDEO selector switch to your TV. If you connect the DVD video player to a TV Signal flow S-VIDEO OUT PUT COMPONENT Y DIGITAL PB L OPTICAL AUDIO PR R COAXIAL VEDIO To S VIDEO OUT (red) To AUDIO OUT (white) (...; If your television set has one audio input, connect the left and right audio outputs of the DVD video player to a Y cable adapter (not supplied) and then connect to your TV. • Connect the DVD video player directly to your TV. When using an S video cable, do not connect the yellow video...
Owners Manual
Page 15
... unplug all of the equipment from the tuner and radio. • The output sound of the connected equipment as well. • When you place the DVD video player near a tuner or radio, the radio broadcast sound might be damaged by a sudden high volume sound. • Turn off the Progressive scan mode... and you cannot see page 32). 15 2C01501A P14-17 15 12/16/03, 19:58 Notes: • Refer to the owner's manual of the DVD video player has a wide dynamic range. Connecting to turn off the amplifier before making any picture. In such a case, adjust the TV or monitor for...
... unplug all of the equipment from the tuner and radio. • The output sound of the connected equipment as well. • When you place the DVD video player near a tuner or radio, the radio broadcast sound might be damaged by a sudden high volume sound. • Turn off the Progressive scan mode... and you cannot see page 32). 15 2C01501A P14-17 15 12/16/03, 19:58 Notes: • Refer to the owner's manual of the DVD video player has a wide dynamic range. Connecting to turn off the amplifier before making any picture. In such a case, adjust the TV or monitor for...

Owners Manual
Page 16
...VEDIO Connect either . Manufactured under license from the rear speakers will obtain the full benefit of 5.1 channel DTS encoded sound tracks on DVD video discs or audio CDs. Amplifier equipped with a Dolby Digital decoder." "DTS" and "DTS Digital Surround" are trademarks of ...PR R COAXIAL VEDIO * Connect one or two rear speakers). Connections Connecting to optional equipment You can enjoy high quality dynamic sounds by connecting the DVD video player to optional audio equipment. : Front speaker For connection to your TV, see "Connecting to a TV" " # . : Rear speaker...
...VEDIO Connect either . Manufactured under license from the rear speakers will obtain the full benefit of 5.1 channel DTS encoded sound tracks on DVD video discs or audio CDs. Amplifier equipped with a Dolby Digital decoder." "DTS" and "DTS Digital Surround" are trademarks of ...PR R COAXIAL VEDIO * Connect one or two rear speakers). Connections Connecting to optional equipment You can enjoy high quality dynamic sounds by connecting the DVD video player to optional audio equipment. : Front speaker For connection to your TV, see "Connecting to a TV" " # . : Rear speaker...

Owners Manual
Page 17
... equipped with an MPEG2 audio decoder or MPEG2 audio processor. If you should take proper precautions when the AUDIO OUT (L/R) jacks of the DVD video player are connected to an amplification system. (Do not leave the ANALOG AUDIO OUT (L/R) cables dongling.) To enjoy DTS Digital Surround&#..., be connected to an amplifier equipped with a digital audio input 2 channel digital stereo You can enjoy motion picture and live concert DVD video discs with dynamic realistic sound by connecting an amplifier equipped with an MPEG2 audio decoder To COAXIAL type digital audio input To OPTICAL...
... equipped with an MPEG2 audio decoder or MPEG2 audio processor. If you should take proper precautions when the AUDIO OUT (L/R) jacks of the DVD video player are connected to an amplification system. (Do not leave the ANALOG AUDIO OUT (L/R) cables dongling.) To enjoy DTS Digital Surround&#..., be connected to an amplifier equipped with a digital audio input 2 channel digital stereo You can enjoy motion picture and live concert DVD video discs with dynamic realistic sound by connecting an amplifier equipped with an MPEG2 audio decoder To COAXIAL type digital audio input To OPTICAL...

Owners Manual
Page 18
...want to enjoy the sound of the disc tray as it may damage the disc and cause the DVD to malfunction. • Do not place a disc which are two different disc sizes. " "... closing. Press PLAY to resume playback (from the audio system, turn on how to "No Disc". (If DVD disc has already loaded, playback will appear on the TV screen, if the disc has a menu feature. Press... the disc tray. "Reading" display will change to play commences. 3 Press OPEN/CLOSE. Neglecting to the DVD. Resuming facility • The unit records the stopped point, depending on the disc tray. CAUTION Keep your ...
...want to enjoy the sound of the disc tray as it may damage the disc and cause the DVD to malfunction. • Do not place a disc which are two different disc sizes. " "... closing. Press PLAY to resume playback (from the audio system, turn on how to "No Disc". (If DVD disc has already loaded, playback will appear on the TV screen, if the disc has a menu feature. Press... the disc tray. "Reading" display will change to play commences. 3 Press OPEN/CLOSE. Neglecting to the DVD. Resuming facility • The unit records the stopped point, depending on the disc tray. CAUTION Keep your ...
Owners Manual
Page 19
.... • In many instances, a menu screen will appear on . Doing so may cause the unit to start playback. • When you leave the unit in DVD stop playback Press STOP. To pause playback (still mode) Press PAUSE/STEP during playback. Be sure to press OPEN/CLOSE to open and close the.... • Use the OPEN/CLOSE button to close the disc tray. VCD : You can use this unit, you use this function with this function with DVD video discs. Doing so may cause the unit to malfunction. • Do not push up ) and press the OPEN/CLOSE button or the PLAY button...
.... • In many instances, a menu screen will appear on . Doing so may cause the unit to start playback. • When you leave the unit in DVD stop playback Press STOP. To pause playback (still mode) Press PAUSE/STEP during playback. Be sure to press OPEN/CLOSE to open and close the.... • Use the OPEN/CLOSE button to close the disc tray. VCD : You can use this unit, you use this function with this function with DVD video discs. Doing so may cause the unit to malfunction. • Do not push up ) and press the OPEN/CLOSE button or the PLAY button...

Owners Manual
Page 20
...slow-motion speed changes. Playback starts from the beginning of holding a still video image or On screen display image on the disc, or the DVD can not access the feature at this unit plays sound during fast forward or fast reverse play of audio CDs. • The playback speed may... appear at various speeds. Notes: • A "Prohibition" symbol may differ depending on your television screen. This does not indicate a problem with the DVD. • The unit is muted during reverse and forward scan of time, you risk permanent damage to display the chapter or track number you want...
...slow-motion speed changes. Playback starts from the beginning of holding a still video image or On screen display image on the disc, or the DVD can not access the feature at this unit plays sound during fast forward or fast reverse play of audio CDs. • The playback speed may... appear at various speeds. Notes: • A "Prohibition" symbol may differ depending on your television screen. This does not indicate a problem with the DVD. • The unit is muted during reverse and forward scan of time, you risk permanent damage to display the chapter or track number you want...

Owners Manual
Page 21
Advanced playback Zooming/Locating desired scene 0-9 CLEAR SEARCH ZOOM DISPLAY ENTER C/D/B/A DVD VCD Zooming This unit will allow you to zoom in the zoom mode. • Some discs may not respond to zoom feature. You can select ... Title Chapter /Enter/0 9/Clear/Search • If you change the number. Notes: • You can then make selections by switching the position of the frame. DVD VCD Locating desired scene CD Use the title, chapter and time recorded on the frame image. Note: In case of the Video-CD playback with...
Advanced playback Zooming/Locating desired scene 0-9 CLEAR SEARCH ZOOM DISPLAY ENTER C/D/B/A DVD VCD Zooming This unit will allow you to zoom in the zoom mode. • Some discs may not respond to zoom feature. You can select ... Title Chapter /Enter/0 9/Clear/Search • If you change the number. Notes: • You can then make selections by switching the position of the frame. DVD VCD Locating desired scene CD Use the title, chapter and time recorded on the frame image. Note: In case of the Video-CD playback with...


