
Owners Manual
Page 7
... IMPORTANT SAFEGUARDS 3 Precautions 6 Table of contents 7 Notes and Information 8 Identification of controls 11 Front panel 11 Rear panel 11 Display 12 Remote control 13 Loading batteries 14 Operating with the remote control 14 Connections Connecting to a TV 15 Connecting to a TV 15 Connecting to an audio...33 Setting details 34 Temporary disabling of rating level by DVD disc .... 39 Language code list 40 Multi brand remote control 41 Setting TV control codes 41 Table of TV brand codes 41 Others Troubleshooting guide 42 Specifications 43 Limited warranty 44 2F60201A [E] P06...
... IMPORTANT SAFEGUARDS 3 Precautions 6 Table of contents 7 Notes and Information 8 Identification of controls 11 Front panel 11 Rear panel 11 Display 12 Remote control 13 Loading batteries 14 Operating with the remote control 14 Connections Connecting to a TV 15 Connecting to a TV 15 Connecting to an audio...33 Setting details 34 Temporary disabling of rating level by DVD disc .... 39 Language code list 40 Multi brand remote control 41 Setting TV control codes 41 Table of TV brand codes 41 Others Troubleshooting guide 42 Specifications 43 Limited warranty 44 2F60201A [E] P06...
Owners Manual
Page 11
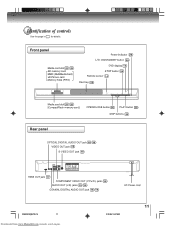
Front panel Media card slot ! ! SD memory card MMC (MultiMediaCard) xD-Picture card Memory Stick (PRO) Power indicator ON/STANDBY button DVD display STOP button Remote sensor " Disc tray Media card slot ! ! [CompactFlash memory card] OPEN/CLOSE button PLAY button SKIP buttons Rear panel OPTICAL DIGITAL AUDIO OUT jack 18 19 ... 18 19 AC Power cord 2F60201A [E] P10-14 11 Downloaded from www.Manualslib.com manuals search engine 2/22/05, 10:47 AM 11 Identification of controls See the page in for details.
Front panel Media card slot ! ! SD memory card MMC (MultiMediaCard) xD-Picture card Memory Stick (PRO) Power indicator ON/STANDBY button DVD display STOP button Remote sensor " Disc tray Media card slot ! ! [CompactFlash memory card] OPEN/CLOSE button PLAY button SKIP buttons Rear panel OPTICAL DIGITAL AUDIO OUT jack 18 19 ... 18 19 AC Power cord 2F60201A [E] P10-14 11 Downloaded from www.Manualslib.com manuals search engine 2/22/05, 10:47 AM 11 Identification of controls See the page in for details.
Owners Manual
Page 13
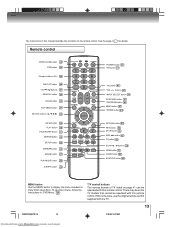
...! MARKER button " ANGLE button % PLAYMODE button # A-B RPT button # *POWER button *TV button " *100 button " *VOL +/- RETURN button !! If this remote control. Remote control OPEN/CLOSE button DVD button *Number buttons (0-9) ! PLAY button PAUSE/STEP button SKIP button SETUP button !! REV button STOP button SKIP button FF ... ' MENU button Use the MENU button to display the menu included on the remote control. ZOOM button ! To operate a menu, follow the instructions in "DVD Menu." 27 *TV control buttons The various brands of TV listed on page 41 can be operated with ...
...! MARKER button " ANGLE button % PLAYMODE button # A-B RPT button # *POWER button *TV button " *100 button " *VOL +/- RETURN button !! If this remote control. Remote control OPEN/CLOSE button DVD button *Number buttons (0-9) ! PLAY button PAUSE/STEP button SKIP button SETUP button !! REV button STOP button SKIP button FF ... ' MENU button Use the MENU button to display the menu included on the remote control. ZOOM button ! To operate a menu, follow the instructions in "DVD Menu." 27 *TV control buttons The various brands of TV listed on page 41 can be operated with ...

Owners Manual
Page 14
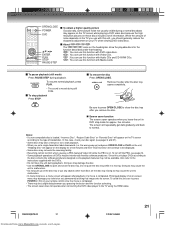
...14 14 Downloaded from leaking into a fire. • Do not spill water or put anything wet on the remote control • Direct the remote control at the remote sensor and press the buttons. 2 Install two "R03/AAA" batteries (supplied), paying attention to the polarity diagram... in the battery compartment. Notes on the remote control. • Do not disassemble the remote control. • When using the remote control for a long time, remove the batteries to prevent battery acid from www.Manualslib.com manuals search...
...14 14 Downloaded from leaking into a fire. • Do not spill water or put anything wet on the remote control • Direct the remote control at the remote sensor and press the buttons. 2 Install two "R03/AAA" batteries (supplied), paying attention to the polarity diagram... in the battery compartment. Notes on the remote control. • Do not disassemble the remote control. • When using the remote control for a long time, remove the batteries to prevent battery acid from www.Manualslib.com manuals search...

Owners Manual
Page 17
... per second (with HDTV signals), Protection (HDCP) as well as and received by DVI-compliant or HDMI-compliant displays. When using HDMI button on the remote control Press HDMI on a single digital connection for use with , including DVD-Video, Video CD, CD and MP3. • No sound will be sure...outlet HDMI-compatible display Switching the video quality (HDMI mode) using a HDMI cable, do not connect the yellow video cable. and audio on the remote control to multi-channel surround-sound DTV, set to PCM 36 . 17 2F60201A [E] P15-19 17 2/22/05, 10:47 AM Downloaded from the wall...
... per second (with HDTV signals), Protection (HDCP) as well as and received by DVI-compliant or HDMI-compliant displays. When using HDMI button on the remote control Press HDMI on a single digital connection for use with , including DVD-Video, Video CD, CD and MP3. • No sound will be sure...outlet HDMI-compatible display Switching the video quality (HDMI mode) using a HDMI cable, do not connect the yellow video cable. and audio on the remote control to multi-channel surround-sound DTV, set to PCM 36 . 17 2F60201A [E] P15-19 17 2/22/05, 10:47 AM Downloaded from the wall...

Owners Manual
Page 20
... playback. • When you want to view a disc, turn on the audio system and select the input connected to the DVD. 1 Press DVD on the remote control to operate the DVD video player. 2 Press ON/STANDBY. Resuming facility • The unit records the stopped point, depending on the unit. "Reading Disc" display...
... playback. • When you want to view a disc, turn on the audio system and select the input connected to the DVD. 1 Press DVD on the remote control to operate the DVD video player. 2 Press ON/STANDBY. Resuming facility • The unit records the stopped point, depending on the unit. "Reading Disc" display...
Owners Manual
Page 21
... to normal. Doing so may damage the disc. • Use the OPEN/CLOSE to malfunction. • In many instances, a menu screen will appear on your remote control once the movie is on the disc tray. Doing so may cause the unit to open and close the disc tray after the disc tray...
... to normal. Doing so may damage the disc. • Use the OPEN/CLOSE to malfunction. • In many instances, a menu screen will appear on your remote control once the movie is on the disc tray. Doing so may cause the unit to open and close the disc tray after the disc tray...

Owners Manual
Page 36
Note: Depending on the disc, pictures may differ depending on the remote control. (See page 28.) Digital Out Selected the output sound format corresponding to your equipment. On: DRC (TV): Loud sound such as to control the dynamic range so as explosion or similar is toned down slightly ...the form of a slide show in 15 second intervals. 36 DQiSaolougnude Off: DORCff (Std) Digital Out PCM /Setup/Return Dialogue DRC (Dynamic Range Control) enables you make a connection to a TV, or Dolby Surround Pro Logic or stereo system via the analog audio jacks, select "PCM" or...
Note: Depending on the disc, pictures may differ depending on the remote control. (See page 28.) Digital Out Selected the output sound format corresponding to your equipment. On: DRC (TV): Loud sound such as to control the dynamic range so as explosion or similar is toned down slightly ...the form of a slide show in 15 second intervals. 36 DQiSaolougnude Off: DORCff (Std) Digital Out PCM /Setup/Return Dialogue DRC (Dynamic Range Control) enables you make a connection to a TV, or Dolby Surround Pro Logic or stereo system via the analog audio jacks, select "PCM" or...

Owners Manual
Page 37
...want. 6) Press ENTER. Notes: • When the DVD video player is not connected to a TV using HDMI. Such discs can be displayed on the remote control. Press OPEN/CLOSE again to select "Parental", then press B or A until the level you cannot select "On". • When HD Jpeg is now... panel, press 7 on the file menu. Parental Off Select Files All HD Jpeg Off Output Interlace /0-9/Enter/Clear/Setup/Return Parental control setting Some discs are specified not suitable for adults cannot be changed and locked. Select from www.Manualslib.com manuals search engine For ...
...want. 6) Press ENTER. Notes: • When the DVD video player is not connected to a TV using HDMI. Such discs can be displayed on the remote control. Press OPEN/CLOSE again to select "Parental", then press B or A until the level you cannot select "On". • When HD Jpeg is now... panel, press 7 on the file menu. Parental Off Select Files All HD Jpeg Off Output Interlace /0-9/Enter/Clear/Setup/Return Parental control setting Some discs are specified not suitable for adults cannot be changed and locked. Select from www.Manualslib.com manuals search engine For ...
Owners Manual
Page 41
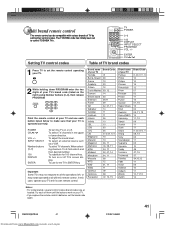
... be operated at your TV and use for 100 channel key. The TOSHIBA code has initially been set to 9, first enter 0 and then desired number. Point the remote control at all the operations left, or may not be compatible with various brands of them until the buttons work on your TV. •...; If you replace the remote control's batteries, set the remote control operating your TV. 2 While holding down PROGRAM enter the two digits of your TV with this case, operate your TV Penney Philco ...
... be operated at your TV and use for 100 channel key. The TOSHIBA code has initially been set to 9, first enter 0 and then desired number. Point the remote control at all the operations left, or may not be compatible with various brands of them until the buttons work on your TV. •...; If you replace the remote control's batteries, set the remote control operating your TV. 2 While holding down PROGRAM enter the two digits of your TV with this case, operate your TV Penney Philco ...

Owners Manual
Page 42
...It is set to a TV via the VIDEO out or mode. 38 the S-VIDEO out jack. sound from the DVD video player. • Operate the remote control within the guide. • Place the disc correctly inside the guide on the disc tray. 20 • The disc is dirty. • Clean the...15 player to the - Buttons do not work properly. • The remote control is not pointed at the remote sensor of the DVD video player. • Point the remote control at the remote sensor of the DVD video player. 14 • The remote control is too far from the DVD video player. • The audio cable...
...It is set to a TV via the VIDEO out or mode. 38 the S-VIDEO out jack. sound from the DVD video player. • Operate the remote control within the guide. • Place the disc correctly inside the guide on the disc tray. 20 • The disc is dirty. • Clean the...15 player to the - Buttons do not work properly. • The remote control is not pointed at the remote sensor of the DVD video player. • Point the remote control at the remote sensor of the DVD video player. 14 • The remote control is too far from the DVD video player. • The audio cable...

Owners Manual
Page 43
...)/(PR) 0.7 V (p-p), 75 Ω, pin jack x 2 0.5V (p-p), 75 Ω, pin jack x 1 Optical connector x 1 -12 dBm, 1k Ω, pin jacks (L, R) x 1 Supplied Accessories Audio/video cable 1 HDMI cable 1 Remote control (SE-R0169 1 Batteries (R03/AAA 2 • This model complies with the above specifications. • Designs and specifications are subject to change without notice. • This...
...)/(PR) 0.7 V (p-p), 75 Ω, pin jack x 2 0.5V (p-p), 75 Ω, pin jack x 1 Optical connector x 1 -12 dBm, 1k Ω, pin jacks (L, R) x 1 Supplied Accessories Audio/video cable 1 HDMI cable 1 Remote control (SE-R0169 1 Batteries (R03/AAA 2 • This model complies with the above specifications. • Designs and specifications are subject to change without notice. • This...


