

Owners Manual
Page 2
...: This Digital Video Disc Player employs a Laser System. To prevent direct exposure to laser beam, do not try to correct the interference by Toshiba, could void the user's authority to operate the equipment. 2 Should the unit require maintenance, contact an authorized service location see service procedure. Changes or modifications made to this owner's manual carefully and retain for a Class B digital device, pursuant to part 15 of...
...: This Digital Video Disc Player employs a Laser System. To prevent direct exposure to laser beam, do not try to correct the interference by Toshiba, could void the user's authority to operate the equipment. 2 Should the unit require maintenance, contact an authorized service location see service procedure. Changes or modifications made to this owner's manual carefully and retain for a Class B digital device, pursuant to part 15 of...

Owners Manual
Page 3
... the operating instructions unless you are for future reference. To reduce the risk of the required label Be aware that contained in the electrical installation of your DVD video player. Location of electric shock do not perform any servicing other than that this equipment is still powered even after the ON/STANDBY indicator turns off (standby mode) by qualified service personnel only. Model No...
... the operating instructions unless you are for future reference. To reduce the risk of the required label Be aware that contained in the electrical installation of your DVD video player. Location of electric shock do not perform any servicing other than that this equipment is still powered even after the ON/STANDBY indicator turns off (standby mode) by qualified service personnel only. Model No...
Owners Manual
Page 8
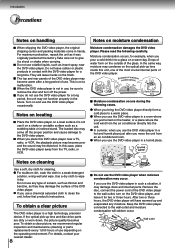
... function properly in use it a shock or shake when carrying. The loaded disc may damage discs and internal parts. Please read the following cases. When you just turned on the heater, or a place where the cold wind from a cold place to a warm place. Use a dry cloth to remove the disc and turn on the DVD video player, and leave it was originally packed at the factory...
... function properly in use it a shock or shake when carrying. The loaded disc may damage discs and internal parts. Please read the following cases. When you just turned on the heater, or a place where the cold wind from a cold place to a warm place. Use a dry cloth to remove the disc and turn on the DVD video player, and leave it was originally packed at the factory...

Owners Manual
Page 10
... to experience and difficulty playing a DVD on a Toshiba DVD player, please feel free to call our Contact listed in "How to all operating commands. Notes on region numbers The region number of this owner's manual may not work with the PBC (Version 2.0) function. (PBC is prohibited by the DVD video player or the disc. Because of problems and errors that can play every feature of every DVD bearing the DVD logo. Audio CDs Audio 12 cm Approx...
... to experience and difficulty playing a DVD on a Toshiba DVD player, please feel free to call our Contact listed in "How to all operating commands. Notes on region numbers The region number of this owner's manual may not work with the PBC (Version 2.0) function. (PBC is prohibited by the DVD video player or the disc. Because of problems and errors that can play every feature of every DVD bearing the DVD logo. Audio CDs Audio 12 cm Approx...
Owners Manual
Page 11
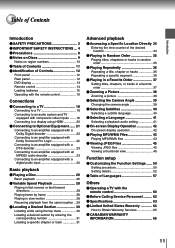
... SAFETY INSTRUCTIONS ... 4 Precautions 8 Notes on Discs 9 Notes on region numbers 10 Table of Contents 11 Identification of Controls 12 Front panel 12 Rear panel 12 DVD display 13 Remote control 14 Loading batteries 15 Operating with the remote control 15 Connections Connecting to a TV 18 Connecting to a TV 18 Connecting to an audio system and TV equipped with component video inputs ....... 19 Connecting to a display using HDMI 20 Connecting to Optional Equipment ...... 21 Connecting to an amplifier equipped with a Dolby Digital decoder 22 Connecting...
... SAFETY INSTRUCTIONS ... 4 Precautions 8 Notes on Discs 9 Notes on region numbers 10 Table of Contents 11 Identification of Controls 12 Front panel 12 Rear panel 12 DVD display 13 Remote control 14 Loading batteries 15 Operating with the remote control 15 Connections Connecting to a TV 18 Connecting to a TV 18 Connecting to an audio system and TV equipped with component video inputs ....... 19 Connecting to a display using HDMI 20 Connecting to Optional Equipment ...... 21 Connecting to an amplifier equipped with a Dolby Digital decoder 22 Connecting...

Owners Manual
Page 14
....SELECT POWER button 26 OPEN/CLOSE button 26 INPUT SELECT button 60 CLEAR button 31 SEARCH button 31 100 button 60 ZOOM button 38 REPEAT button 36 HDMI button 20 AUDIO button 41 FF button 28 SLOW button 29 STOP button 27 PAUSE/STEP button 27 28 FL.DIM button 13 A-B REPEAT button 36 PROGRAM button 37 60 RANDOM button 35 PROGRESSIVE button 19 FL.SELECT button 13 14 * MENU button Use the MENU button to display the menu included on the remote control. Introduction Identification of Controls (continued) The instructions in this manual describe the functions...
....SELECT POWER button 26 OPEN/CLOSE button 26 INPUT SELECT button 60 CLEAR button 31 SEARCH button 31 100 button 60 ZOOM button 38 REPEAT button 36 HDMI button 20 AUDIO button 41 FF button 28 SLOW button 29 STOP button 27 PAUSE/STEP button 27 28 FL.DIM button 13 A-B REPEAT button 36 PROGRAM button 37 60 RANDOM button 35 PROGRESSIVE button 19 FL.SELECT button 13 14 * MENU button Use the MENU button to display the menu included on the remote control. Introduction Identification of Controls (continued) The instructions in this manual describe the functions...
Owners Manual
Page 17
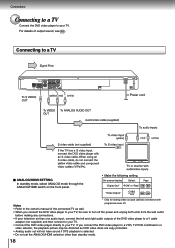
.../HDMI SETTING In standby mode, select ANALOG mode through the ANALOG/HDMI switch on the front panel. • Make the following setting. On-screen display Select: Page "Digital Out" "PCM" or "Raw" 50 55 "Video Output" CVBS * YUV 50 54 * Only for analog video out jack (yellow) connection with Notes progressive scan off. • Refer to the owner's manual of the connected TV as well. • When you connect the DVD video player to a VCR, TV/VCR combination or video selector, the playback picture...
.../HDMI SETTING In standby mode, select ANALOG mode through the ANALOG/HDMI switch on the front panel. • Make the following setting. On-screen display Select: Page "Digital Out" "PCM" or "Raw" 50 55 "Video Output" CVBS * YUV 50 54 * Only for analog video out jack (yellow) connection with Notes progressive scan off. • Refer to the owner's manual of the connected TV as well. • When you connect the DVD video player to a VCR, TV/VCR combination or video selector, the playback picture...

Owners Manual
Page 18
... be displayed in color when the video output is set compatibility with this product and may damage your hearing as well as well. • When you connect or disconnect the DVD video player's power cord. In such a case, adjust the TV or monitor for better picture quality. Switching the output signal (interlaced/ progressive) using component video cables, do not connect the S video cable. 19 In case of 525 progressive scan picture problems, it is on the remote control during stop mode. Otherwise, high volume sound...
... be displayed in color when the video output is set compatibility with this product and may damage your hearing as well as well. • When you connect or disconnect the DVD video player's power cord. In such a case, adjust the TV or monitor for better picture quality. Switching the output signal (interlaced/ progressive) using component video cables, do not connect the S video cable. 19 In case of 525 progressive scan picture problems, it is on the remote control during stop mode. Otherwise, high volume sound...

Owners Manual
Page 19
... output from the wall outlet before making any connections. • Select HDMI mode through the ANALOG/HDMI switch on the front panel to multi-channel surround-sound audio. HDMI-compatible display • Make the following setting. On-screen display Select: Page "Digital Out" "PCM" 50 55 Notes • Refer to the owner's manual of the connected TV as Digital Visual Interface (DVI) in one connector (instead of up to 2.2 gigabytes per second (with HDTV signals), one specification. Press HDMI button on the remote control...
... output from the wall outlet before making any connections. • Select HDMI mode through the ANALOG/HDMI switch on the front panel to multi-channel surround-sound audio. HDMI-compatible display • Make the following setting. On-screen display Select: Page "Digital Out" "PCM" 50 55 Notes • Refer to the owner's manual of the connected TV as Digital Visual Interface (DVI) in one connector (instead of up to 2.2 gigabytes per second (with HDTV signals), one specification. Press HDMI button on the remote control...

Owners Manual
Page 20
... the DVD video player to the "DIGITAL (OPTICAL)" input of a Receiver or Processor. • Refer to the owner's manual of the connected equipment as the speakers. • When playing DTS-encoded discs (audio CDs), excessive noise may damage your TV, see "Connecting to a TV" 18 19 20 . • For details of output sound, see 41 . • This section uses the following reference marks. : Front speaker : Rear speaker...
... the DVD video player to the "DIGITAL (OPTICAL)" input of a Receiver or Processor. • Refer to the owner's manual of the connected equipment as the speakers. • When playing DTS-encoded discs (audio CDs), excessive noise may damage your TV, see "Connecting to a TV" 18 19 20 . • For details of output sound, see 41 . • This section uses the following reference marks. : Front speaker : Rear speaker...

Owners Manual
Page 21
...'s owner's manual and set the amplifier so you connect two rear speakers. 22 If you have a Dolby Surround Pro Logic decoder, you will be monaural even if you can enjoy the dynamic realistic sound of Dolby Surround Pro Logic by connecting the DVD video player to a 6 channel amplifier equipped with a Dolby Digital decoder or Dolby Digital processor. Amplifier equipped with Dolby Surround Pro Logic To audio input To ANALOG AUDIO OUT Audio cable • Make the following setting...
...'s owner's manual and set the amplifier so you connect two rear speakers. 22 If you have a Dolby Surround Pro Logic decoder, you will be monaural even if you can enjoy the dynamic realistic sound of Dolby Surround Pro Logic by connecting the DVD video player to a 6 channel amplifier equipped with a Dolby Digital decoder or Dolby Digital processor. Amplifier equipped with Dolby Surround Pro Logic To audio input To ANALOG AUDIO OUT Audio cable • Make the following setting...

Owners Manual
Page 22
... audio decoder or MPEG2 audio processor. On-screen display "Digital Out" Recording system Select: "Raw" or "PCM" MPEG2 Page 50 55 41 23 Amplifier equipped with a DTS decoder To COAXIAL type digital audio input To OPTICAL type digital audio input Optical digital cable Connect either . 75 Ω coaxial cable • Use DVD video discs encoded via the DTS recording system. • Make the following setting. "DTS" and "DTS Digital Out" are trademarks of 5.1 channel DTS encoded sound tracks on DVD video discs or audio...
... audio decoder or MPEG2 audio processor. On-screen display "Digital Out" Recording system Select: "Raw" or "PCM" MPEG2 Page 50 55 41 23 Amplifier equipped with a DTS decoder To COAXIAL type digital audio input To OPTICAL type digital audio input Optical digital cable Connect either . 75 Ω coaxial cable • Use DVD video discs encoded via the DTS recording system. • Make the following setting. "DTS" and "DTS Digital Out" are trademarks of 5.1 channel DTS encoded sound tracks on DVD video discs or audio...

Owners Manual
Page 36
... when you turn . Follow steps 2 and 3. To change the programmed selections 1 While the display appears on the TV screen, press / / / to move the highlighted bar to resume normal playback. The following the instructions in step 2. To program during playback If you press the PROGRAM button during stop. Notes • Some discs may not permit program playback operation. • If you press the REPEAT button during program playback, the DVD video player repeats the current program playback. •...
... when you turn . Follow steps 2 and 3. To change the programmed selections 1 While the display appears on the TV screen, press / / / to move the highlighted bar to resume normal playback. The following the instructions in step 2. To program during playback If you press the PROGRAM button during stop. Notes • Some discs may not permit program playback operation. • If you press the REPEAT button during program playback, the DVD video player repeats the current program playback. •...
Owners Manual
Page 44
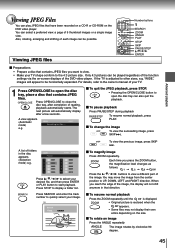
... DVD video player. A view appears. (Automatic mode) e.g. To change the image To view the succeeding image, press SKIP . For details, refer to the owner's manual of the image. To quit the JPEG playback, press STOP. • Pressing the OPEN/CLOSE button to open the disc tray, place a disc that direction. You may not display their own entire depending on -screen displays of the function settings via the on the size. Advanced playback Viewing JPEG Files You can play...
... DVD video player. A view appears. (Automatic mode) e.g. To change the image To view the succeeding image, press SKIP . For details, refer to the owner's manual of the image. To quit the JPEG playback, press STOP. • Pressing the OPEN/CLOSE button to open the disc tray, place a disc that direction. You may not display their own entire depending on -screen displays of the function settings via the on the size. Advanced playback Viewing JPEG Files You can play...

Owners Manual
Page 45
... playback, press STOP. • Pressing the OPEN/CLOSE button to review other thumbnail screen. Press the / / / to select an image, press PLAY to view one image in full-screen and automatically images will be displayed one by one again in full-screen review, the DVD video player will display a menu of 9 thumbnail images. 46 Turn the page if necessary Press / / / to highlight the PREV or NEXT and ENTER to open the disc tray...
... playback, press STOP. • Pressing the OPEN/CLOSE button to review other thumbnail screen. Press the / / / to select an image, press PLAY to view one image in full-screen and automatically images will be displayed one by one again in full-screen review, the DVD video player will display a menu of 9 thumbnail images. 46 Turn the page if necessary Press / / / to highlight the PREV or NEXT and ENTER to open the disc tray...
Owners Manual
Page 52
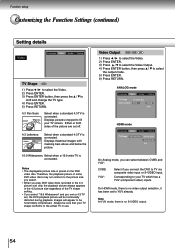
... TV screen. Note At YUV mode, there is connected. Function setup Customizing the Function Settings (continued) Setting details Video TV Shape DVD 1) Press / to select the Video. 2) Press ENTER. 3) Press ENTER button, then press the / to select the output mode. 5) Press ENTER. 6) Press RETURN. Video Output 1) Press / to select the Video. 2) Press ENTER. 3) Press / to select the Video Output. 4) Press ENTER button, then press / to shift and change the TV type 4) Press ENTER. 5) Press RETURN. 4:3 Pan Scan: Select...
... TV screen. Note At YUV mode, there is connected. Function setup Customizing the Function Settings (continued) Setting details Video TV Shape DVD 1) Press / to select the Video. 2) Press ENTER. 3) Press ENTER button, then press the / to select the output mode. 5) Press ENTER. 6) Press RETURN. Video Output 1) Press / to select the Video. 2) Press ENTER. 3) Press / to select the Video Output. 4) Press ENTER button, then press / to shift and change the TV type 4) Press ENTER. 5) Press RETURN. 4:3 Pan Scan: Select...

Owners Manual
Page 53
... PCM 2 channel format when you cancel the parental lock function. (continued) 55 Audio Rating Function setup Digital Out Selected the output sound format corresponding to your system connection. 1) Press / to the parental lock settings. The DVD video player outputs sounds in the DVD video player. Make sure this function works with the password function are rated according to disc. For example, if the disc allowed, you could lock out playback of the disc altogether. • DVD video discs may or may vary from disc to their content. Adult No Password Rating Load factory...
... PCM 2 channel format when you cancel the parental lock function. (continued) 55 Audio Rating Function setup Digital Out Selected the output sound format corresponding to your system connection. 1) Press / to the parental lock settings. The DVD video player outputs sounds in the DVD video player. Make sure this function works with the password function are rated according to disc. For example, if the disc allowed, you could lock out playback of the disc altogether. • DVD video discs may or may vary from disc to their content. Adult No Password Rating Load factory...

Owners Manual
Page 59
... is not set to turn it into the appropriate jacks. 18-20 • Select correct video mode, ANALOG or HDMI. 20 • Select the correct Video Output setting. • Check the connection. 54 18-20 • Select HDMI mode through the ANALOG/ HDMI switch on the front panel. 20 • Press HDMI button to select another picture resolution. 20 • Select the correct input mode of the DVD video player. • The remote control is not set to use. • Insert a disc. 18...
... is not set to turn it into the appropriate jacks. 18-20 • Select correct video mode, ANALOG or HDMI. 20 • Select the correct Video Output setting. • Check the connection. 54 18-20 • Select HDMI mode through the ANALOG/ HDMI switch on the front panel. 20 • Press HDMI button to select another picture resolution. 20 • Select the correct input mode of the DVD video player. • The remote control is not set to use. • Insert a disc. 18...

Owners Manual
Page 61
... INBOUND TRANSPORTATION AND INSURANCE CHARGES FOR THE DVD PLAYER TO THE EXCHANGE CENTER. You should read this owner's manual thoroughly before operating this DVD PLAYER. Others Limited United States Warranty DVD Players - AND USED IN CANADA ARE NOT COVERED BY THESE WARRANTIES. ARE NOT COVERED BY THESE WARRANTIES. YOU MUST CONTACT TOSHIBA'S CONSUMER SOLUTIONS CENTER FOR INSTRUCTIONS ON HOW TO PROCESS YOUR IN WARRANTY EXCHANGE REQUEST. PRODUCTS PURCHASED...
... INBOUND TRANSPORTATION AND INSURANCE CHARGES FOR THE DVD PLAYER TO THE EXCHANGE CENTER. You should read this owner's manual thoroughly before operating this DVD PLAYER. Others Limited United States Warranty DVD Players - AND USED IN CANADA ARE NOT COVERED BY THESE WARRANTIES. ARE NOT COVERED BY THESE WARRANTIES. YOU MUST CONTACT TOSHIBA'S CONSUMER SOLUTIONS CENTER FOR INSTRUCTIONS ON HOW TO PROCESS YOUR IN WARRANTY EXCHANGE REQUEST. PRODUCTS PURCHASED...

Owners Manual
Page 62
... any state thereof is needed: (1) For instructions on how to obtain warranty service for the DVD Product to change, modify or extend the terms of these limited warranties in this warranty or under the law of any manner whatsoever. How to Obtain Warranty Services If, after following all transportation and insurance charges for exchange program DVD Players contact TACP's toll free Call Center at 1-866...
... any state thereof is needed: (1) For instructions on how to obtain warranty service for the DVD Product to change, modify or extend the terms of these limited warranties in this warranty or under the law of any manner whatsoever. How to Obtain Warranty Services If, after following all transportation and insurance charges for exchange program DVD Players contact TACP's toll free Call Center at 1-866...


