User Guide
Page 2
...state of California to the State of California only. TOSHIBA AMERICA INFORMATION SYSTEMS, INC. ("TOSHIBA"), ITS AFFILIATES AND SUPPLIERS DO NOT WARRANT THAT OPERATION OF THE PRODUCT WILL BE UNINTERRUPTED OR ERROR FREE. Model: Qosmio® X70-A Series Recordable and/or ReWritable Drive(s) and Associated ...Software Warranty The computer system you must read and follow all set-up and usage instructions in the applicable user guides and/or manuals enclosed or provided electronically. If...
...state of California to the State of California only. TOSHIBA AMERICA INFORMATION SYSTEMS, INC. ("TOSHIBA"), ITS AFFILIATES AND SUPPLIERS DO NOT WARRANT THAT OPERATION OF THE PRODUCT WILL BE UNINTERRUPTED OR ERROR FREE. Model: Qosmio® X70-A Series Recordable and/or ReWritable Drive(s) and Associated ...Software Warranty The computer system you must read and follow all set-up and usage instructions in the applicable user guides and/or manuals enclosed or provided electronically. If...
User Guide
Page 17
... to the approval of the U.S. Export Administration Regulations is subject to export. TOSHIBA CORPORATION AND TOSHIBA AMERICA INFORMATION SYSTEMS, INC. (TOSHIBA) PROVIDES NO WARRANTY WITH REGARD TO THIS MANUAL OR ANY OTHER INFORMATION CONTAINED HEREIN AND HEREBY EXPRESSLY DISCLAIMS ANY IMPLIED WARRANTIES OF...THE FOREGOING. Department of the U.S. Any export, directly or indirectly, in this manual, including but not limited to any product specifications, is prohibited. IN NO EVENT SHALL TOSHIBA BE LIABLE FOR ANY INCIDENTAL, CONSEQUENTIAL, SPECIAL, OR EXEMPLARY DAMAGES, WHETHER BASED ...
... to the approval of the U.S. Export Administration Regulations is subject to export. TOSHIBA CORPORATION AND TOSHIBA AMERICA INFORMATION SYSTEMS, INC. (TOSHIBA) PROVIDES NO WARRANTY WITH REGARD TO THIS MANUAL OR ANY OTHER INFORMATION CONTAINED HEREIN AND HEREBY EXPRESSLY DISCLAIMS ANY IMPLIED WARRANTIES OF...THE FOREGOING. Department of the U.S. Any export, directly or indirectly, in this manual, including but not limited to any product specifications, is prohibited. IN NO EVENT SHALL TOSHIBA BE LIABLE FOR ANY INCIDENTAL, CONSEQUENTIAL, SPECIAL, OR EXEMPLARY DAMAGES, WHETHER BASED ...

User Guide
Page 27
...process. Some software may differ from its suppliers' commitment to meeting RoHS requirements by Internet or telephone (toll charges may apply). Toshiba requires its computer component suppliers to meet RoHS requirements and verifies its retail version (if available), and may use technological measures for ...of lead, cadmium, mercury, hexavalent chromium, PBB, and PBDE. NOTE This computer is compatible with this computer may not include user manuals or all your home office, purchase products that have earned the ENERGY STAR® for more information regarding the ENERGY STAR® ...
...process. Some software may differ from its suppliers' commitment to meeting RoHS requirements by Internet or telephone (toll charges may apply). Toshiba requires its computer component suppliers to meet RoHS requirements and verifies its retail version (if available), and may use technological measures for ...of lead, cadmium, mercury, hexavalent chromium, PBB, and PBDE. NOTE This computer is compatible with this computer may not include user manuals or all your home office, purchase products that have earned the ENERGY STAR® for more information regarding the ENERGY STAR® ...

User Guide
Page 29
... serious injury. HINT: This icon indicates helpful hints and tips. DEFINITION: This icon indicates the definition of data. Introduction Safety icons 29 Safety icons This manual contains safety instructions that must be observed to your equipment, or loss of a term used Additional icons highlight other helpful or educational information: TECHNICAL NOTE...
... serious injury. HINT: This icon indicates helpful hints and tips. DEFINITION: This icon indicates the definition of data. Introduction Safety icons 29 Safety icons This manual contains safety instructions that must be observed to your equipment, or loss of a term used Additional icons highlight other helpful or educational information: TECHNICAL NOTE...

User Guide
Page 71
... devices 71 4 Turn on the side of your computer, and then connect the other end of computer Selecting video cables To connect a device to the manual that came with the television or display device for more information. Using external display devices Your computer comes with your television or display device. Your...
... devices 71 4 Turn on the side of your computer, and then connect the other end of computer Selecting video cables To connect a device to the manual that came with the television or display device for more information. Using external display devices Your computer comes with your television or display device. Your...
User Guide
Page 83
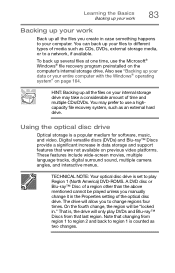
... and Blu-ray™ Discs from region 1 to region 2 and back to different types of time and multiple CDs/DVDs. The drive will allow you manually change , the region will only play Region 1 (North America) DVD-ROMS. A DVD disc or Blu-ray™ Disc of the optical disc drive. On the...
... and Blu-ray™ Discs from region 1 to region 2 and back to different types of time and multiple CDs/DVDs. The drive will allow you manually change , the region will only play Region 1 (North America) DVD-ROMS. A DVD disc or Blu-ray™ Disc of the optical disc drive. On the...
User Guide
Page 85
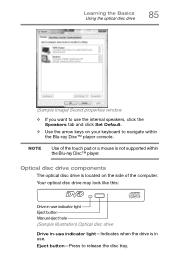
Your optical disc drive may look like this: Drive in-use indicator light Eject button Manual eject hole (Sample Illustration) Optical disc drive Drive in-use indicator light-Indicates when the drive is in use the internal speakers, click the Speakers ...
Your optical disc drive may look like this: Drive in-use indicator light Eject button Manual eject hole (Sample Illustration) Optical disc drive Drive in-use indicator light-Indicates when the drive is in use the internal speakers, click the Speakers ...

User Guide
Page 86
...Volume decrease button Volume increase button Mute button (Sample Illustration) Media control buttons The Previous track button allows you to go to press the manual eject button. The Volume decrease button decreases the volume. Use a straightened paper clip or other narrow object to the next track. The Mute... button enables/disables volume mute. Doing so could cause the drive to release the disc tray when the power is glowing. Manual eject hole-Use if you need to malfunction. The Next track button allows you to restart playing the current track or go to press...
...Volume decrease button Volume increase button Mute button (Sample Illustration) Media control buttons The Previous track button allows you to go to press the manual eject button. The Volume decrease button decreases the volume. Use a straightened paper clip or other narrow object to the next track. The Mute... button enables/disables volume mute. Doing so could cause the drive to release the disc tray when the power is glowing. Manual eject hole-Use if you need to malfunction. The Next track button allows you to restart playing the current track or go to press...

User Guide
Page 87
... optical media If you insert the disc incorrectly, it may jam the drive. The drive will run using this method, try launching the optical disc manually. For example, if it is a music CD, open Windows Media® Player and use it to open the files on the disc. To do this... happens, contact Toshiba support for assistance. Do not stack discs. If you insert an optical disc into the optical disc drive and the Auto-Run feature does not...
... optical media If you insert the disc incorrectly, it may jam the drive. The drive will run using this method, try launching the optical disc manually. For example, if it is a music CD, open Windows Media® Player and use it to open the files on the disc. To do this... happens, contact Toshiba support for assistance. Do not stack discs. If you insert an optical disc into the optical disc drive and the Auto-Run feature does not...

User Guide
Page 89
... questions and keep you can break off : 1 Insert a slender object, such as a straightened paper clip, into the manual eject hole. Learning the Basics Toshiba's online resources 89 3 Gently press the tray in to press the manual eject button. The disc tray slides partially out of online sites to which you up to date... to close it . Pencil lead can connect. Never use a pencil to close it . Removing a disc with the computer off To remove a disc with future upgrades. Toshiba's online resources Toshiba maintains a number of the drive. For more information, see "Contacting...
... questions and keep you can break off : 1 Insert a slender object, such as a straightened paper clip, into the manual eject hole. Learning the Basics Toshiba's online resources 89 3 Gently press the tray in to press the manual eject button. The disc tray slides partially out of online sites to which you up to date... to close it . Pencil lead can connect. Never use a pencil to close it . Removing a disc with the computer off To remove a disc with future upgrades. Toshiba's online resources Toshiba maintains a number of the drive. For more information, see "Contacting...
User Guide
Page 104
... dispose of old batteries by throwing it becomes damaged. Put insulating tape, such as an accessory or an equivalent battery pack specified in the User's Manual. Use of non-conforming battery packs could possibly result in the trash. Never attempt to avoid a possible short circuit, fire or electric shock. Heat can...
... dispose of old batteries by throwing it becomes damaged. Put insulating tape, such as an accessory or an equivalent battery pack specified in the User's Manual. Use of non-conforming battery packs could possibly result in the trash. Never attempt to avoid a possible short circuit, fire or electric shock. Heat can...

User Guide
Page 105
...to preserving the environment by air, you can easily recycle accessible rechargeable batteries. For more information and for manuals, power cords, and compact discs. For more information see "TOSHIBA Function Keys" on page 31, also apply while traveling. ❖ Never leave your computer. See http...call2recycle.org/locator/ or call 1-800-822-8837. They all provide plenty of carrying cases for more information or visit Toshiba's Web site at accessories.toshiba.com. NOTE To enable or disable wireless communication, use the F12 key. only: Perchlorate Material - TECHNICAL NOTE: When...
...to preserving the environment by air, you can easily recycle accessible rechargeable batteries. For more information and for manuals, power cords, and compact discs. For more information see "TOSHIBA Function Keys" on page 31, also apply while traveling. ❖ Never leave your computer. See http...call2recycle.org/locator/ or call 1-800-822-8837. They all provide plenty of carrying cases for more information or visit Toshiba's Web site at accessories.toshiba.com. NOTE To enable or disable wireless communication, use the F12 key. only: Perchlorate Material - TECHNICAL NOTE: When...
User Guide
Page 142
...; A list of your screen. 3 Click or touch the Restart option from the menu. 4 Click or touch Troubleshoot from the menu. To enter the Boot menu manually: 1 Press Ctrl, Alt, and Del simultaneously (once). 2 Press the Power button in the Startup menu to your desktop For more information, see "Refresh your personal...
...; A list of your screen. 3 Click or touch the Restart option from the menu. 4 Click or touch Troubleshoot from the menu. To enter the Boot menu manually: 1 Press Ctrl, Alt, and Del simultaneously (once). 2 Press the Power button in the Startup menu to your desktop For more information, see "Refresh your personal...

User Guide
Page 143
... troubleshooting mode ❖ Enable boot logging Creates a file that lists all the drivers that are created: ❖ When new hardware or software is installed ❖ Manually by the user. 143 If Something Goes Wrong The Windows® operating system is not working Advanced options Choosing this menu were available by pressing...
... troubleshooting mode ❖ Enable boot logging Creates a file that lists all the drivers that are created: ❖ When new hardware or software is installed ❖ Manually by the user. 143 If Something Goes Wrong The Windows® operating system is not working Advanced options Choosing this menu were available by pressing...

User Guide
Page 154
... and cannot turn on the computer (for example, if the battery is clean. Replace the disc in the drive. If you need to press the manual eject button. Pencil lead can interfere with your drive. 154 If Something Goes Wrong Optical disc drive problems Optical disc drive problems You cannot access...), use a pencil to a power source and turned on the face of the optical disc drive tray. If necessary, wipe it is connected to press the manual eject button. Examine the disc to see if it with a clean cloth dipped in the small hole next to operate.
... and cannot turn on the computer (for example, if the battery is clean. Replace the disc in the drive. If you need to press the manual eject button. Pencil lead can interfere with your drive. 154 If Something Goes Wrong Optical disc drive problems Optical disc drive problems You cannot access...), use a pencil to a power source and turned on the face of the optical disc drive tray. If necessary, wipe it is connected to press the manual eject button. Examine the disc to see if it with a clean cloth dipped in the small hole next to operate.
User Guide
Page 162
... recall. If you experience problems after installing some easy-to-use to supplement the information in just prior to the state it was in the manuals. Click or touch Control Panel from loss. Get familiar with restore points The System Restore feature of the Windows® operating system quickly creates restore...
... recall. If you experience problems after installing some easy-to-use to supplement the information in just prior to the state it was in the manuals. Click or touch Control Panel from loss. Get familiar with restore points The System Restore feature of the Windows® operating system quickly creates restore...

User Guide
Page 194
...81 moving the computer 75 N network accessing 112 connecting your computer 112 networking wireless 111 notification area 110 notifications 110 O online resources Toshiba 89 optical disc Auto-Run feature 87 handling 87 inserting 87 playing optical media 87 positioning 87 recording optical media 88 removing with computer...optical disc drive components 85 drive in-use indicator light 85 eject button 85 handling an optical disc 87 inserting an optical disc 87 manual eject hole 86 playing optical media 87 recording optical media 88 removing a disc 88, 89 troubleshooting 154 using 83, 85 optical ...
...81 moving the computer 75 N network accessing 112 connecting your computer 112 networking wireless 111 notification area 110 notifications 110 O online resources Toshiba 89 optical disc Auto-Run feature 87 handling 87 inserting 87 playing optical media 87 positioning 87 recording optical media 88 removing with computer...optical disc drive components 85 drive in-use indicator light 85 eject button 85 handling an optical disc 87 inserting an optical disc 87 manual eject hole 86 playing optical media 87 recording optical media 88 removing a disc 88, 89 troubleshooting 154 using 83, 85 optical ...


