
User Guide
Page 30
... 76 Connecting a printer 76 Connecting the modem 78 Connecting other external devices 79 Using the TouchPad 80 Disabling or enabling the TouchPad 81 Using the Toshiba Assist button 82 Customizing your computer's settings 83 Powering off the computer 83 Closing the display panel 84 Different ways to turn the computer on... your computer 85 Cleaning the computer 85 Moving the computer 86 Using a computer lock 86 Chapter 2: Learning the Basics 87 Computing tips 87 Using the keyboard 89
... 76 Connecting a printer 76 Connecting the modem 78 Connecting other external devices 79 Using the TouchPad 80 Disabling or enabling the TouchPad 81 Using the Toshiba Assist button 82 Customizing your computer's settings 83 Powering off the computer 83 Closing the display panel 84 Different ways to turn the computer on... your computer 85 Cleaning the computer 85 Moving the computer 86 Using a computer lock 86 Chapter 2: Learning the Basics 87 Computing tips 87 Using the keyboard 89

User Guide
Page 31
31 Contents Character keys 89 Making your keyboard emulate a full-size keyboard 90 Ctrl, Fn and Alt keys 90 Function keys 91 Windows ® special keys 91 Overlay keys 92 Saving your work 93 Using a file extension ...
31 Contents Character keys 89 Making your keyboard emulate a full-size keyboard 90 Ctrl, Fn and Alt keys 90 Function keys 91 Windows ® special keys 91 Overlay keys 92 Saving your work 93 Using a file extension ...
User Guide
Page 33
33 Contents Connecting the optional external USB diskette drive 135 Using an external keyboard 136 Connecting a keyboard 137 Using an external monitor 137 Connecting the monitor 137 Connecting a mouse or a printer 138 Using PC Cards 138 Hot swapping PC Cards 139 Inserting a ...
33 Contents Connecting the optional external USB diskette drive 135 Using an external keyboard 136 Connecting a keyboard 137 Using an external monitor 137 Connecting the monitor 137 Connecting a mouse or a printer 138 Using PC Cards 138 Hot swapping PC Cards 139 Inserting a ...

User Guide
Page 35
... A plan of action 213 Resolving hardware conflicts on your own .... 214 Fixing a problem with Device Manager .......... 215 Memory problems 217 Power and the batteries 218 Keyboard problems 220 Display problems 221 Disk drive problems 223 DVD-ROM or multi-function drive problems.. 226 Sound system problems 227 PC Card problems 227
... A plan of action 213 Resolving hardware conflicts on your own .... 214 Fixing a problem with Device Manager .......... 215 Memory problems 217 Power and the batteries 218 Keyboard problems 220 Display problems 221 Disk drive problems 223 DVD-ROM or multi-function drive problems.. 226 Sound system problems 227 PC Card problems 227

User Guide
Page 36
...habits 239 Data and system configuration backup in Windows XP 240 If you need further assistance 246 Before you contact Toshiba 246 Contacting Toshiba 247 Other Toshiba Internet Web sites 248 Toshiba's worldwide offices 248 Appendix A: Hot Keys 250 Volume Mute 250 Password security 251 Without a password 251 With a... 254 Display modes 255 Display brightness 255 Disabling or enabling wireless devices 256 Disabling or enabling the TouchPad 256 Keyboard hot keys 257 Zooming applications in/out 257 Appendix B: Power Cord/Cable Connectors 258 USA and Canada 258 United Kingdom 258
...habits 239 Data and system configuration backup in Windows XP 240 If you need further assistance 246 Before you contact Toshiba 246 Contacting Toshiba 247 Other Toshiba Internet Web sites 248 Toshiba's worldwide offices 248 Appendix A: Hot Keys 250 Volume Mute 250 Password security 251 Without a password 251 With a... 254 Display modes 255 Display brightness 255 Disabling or enabling wireless devices 256 Disabling or enabling the TouchPad 256 Keyboard hot keys 257 Zooming applications in/out 257 Appendix B: Power Cord/Cable Connectors 258 USA and Canada 258 United Kingdom 258

User Guide
Page 47
... to and including "Setting up your computer 47 Important information on your computer. The cooling fan may have a CPU cooling fan that needs to , a mouse, keyboard, printer, memory, and PC cards. To prevent possible overheating of the computer. Loose items such as notebook and tissue paper, plastic wrappers, or other similar...
... to and including "Setting up your computer 47 Important information on your computer. The cooling fan may have a CPU cooling fan that needs to , a mouse, keyboard, printer, memory, and PC cards. To prevent possible overheating of the computer. Loose items such as notebook and tissue paper, plastic wrappers, or other similar...

User Guide
Page 50
...: ❖ Add more memory (see "Adding memory (optional)" on page 58) ❖ Connect a mouse (see "Connecting a mouse" on page 76) ❖ Connect a full-size keyboard (see "Connecting a keyboard" on page 137) ❖ Connect an external monitor (see "Using an external monitor" on page 137) ❖ Connect a local printer (see "Connecting a printer" on... PC Cards (see "Using PC Cards" on page 48. 50 Getting Started Adding external devices Adding external devices NOTE Before adding external devices or memory, Toshiba recommends setting up your software" on page 138)
...: ❖ Add more memory (see "Adding memory (optional)" on page 58) ❖ Connect a mouse (see "Connecting a mouse" on page 76) ❖ Connect a full-size keyboard (see "Connecting a keyboard" on page 137) ❖ Connect an external monitor (see "Using an external monitor" on page 137) ❖ Connect a local printer (see "Connecting a printer" on... PC Cards (see "Using PC Cards" on page 48. 50 Getting Started Adding external devices Adding external devices NOTE Before adding external devices or memory, Toshiba recommends setting up your software" on page 138)
User Guide
Page 69
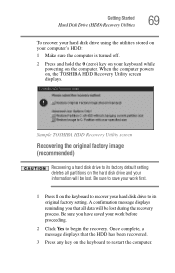
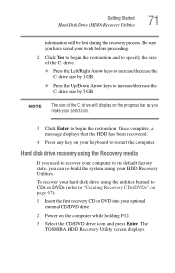
...save your work before proceeding. 2 Click Yes to begin the recovery. A confirmation message displays reminding you have saved your keyboard while powering on , the TOSHIBA HDD Recovery Utility screen displays. Getting Started Hard Disk Drive (HDD) Recovery Utilities 69 To recover your hard disk drive ...data will be lost . Sample TOSHIBA HDD Recovery Utility screen Recovering the original factory image (recommended) Recovering a hard disk drive to restart the computer. Be sure you that the HDD has been recovered. 3 Press any key on the keyboard to its original factory setting. ...
...save your work before proceeding. 2 Click Yes to begin the recovery. A confirmation message displays reminding you have saved your keyboard while powering on , the TOSHIBA HDD Recovery Utility screen displays. Getting Started Hard Disk Drive (HDD) Recovery Utilities 69 To recover your hard disk drive ...data will be lost . Sample TOSHIBA HDD Recovery Utility screen Recovering the original factory image (recommended) Recovering a hard disk drive to restart the computer. Be sure you that the HDD has been recovered. 3 Press any key on the keyboard to its original factory setting. ...
User Guide
Page 70
... information on the HDD (for example, a D: drive) those partitions and any key on your C: drive: 1 Press 3 on the keyboard when the TOSHIBA HDD Recovery Utility screen displays. A confirmation message appears, reminding you created a D: drive, it will be affected and will not be deleted...and recovering your C: drive to its factory default setting reformats your drive and your C: drive: 1 Press 2 on the keyboard when the TOSHIBA HDD Recovery Utility screen displays. A confirmation message appears, reminding you have saved your information will be lost. If you that all
... information on the HDD (for example, a D: drive) those partitions and any key on your C: drive: 1 Press 3 on the keyboard when the TOSHIBA HDD Recovery Utility screen displays. A confirmation message appears, reminding you created a D: drive, it will be affected and will not be deleted...and recovering your C: drive to its factory default setting reformats your drive and your C: drive: 1 Press 2 on the keyboard when the TOSHIBA HDD Recovery Utility screen displays. A confirmation message appears, reminding you have saved your information will be lost. If you that all
User Guide
Page 71
... If you need to recover your computer to restart the computer. NOTE The size of the C: drive will be lost during the recovery process. The TOSHIBA HDD Recovery Utility screen displays. Once complete, a message displays that the HDD has been recovered. 4 Press any key on the computer while holding F12. ..."Creating Recovery CDs/DVDs" on page 67): 1 Insert the first recovery CD or DVD into your optional external CD/DVD drive. 2 Power on your keyboard to its default factory state, you can re-build the system using the utilities burned to CDs or DVDs (refer to begin the restoration.
... If you need to recover your computer to restart the computer. NOTE The size of the C: drive will be lost during the recovery process. The TOSHIBA HDD Recovery Utility screen displays. Once complete, a message displays that the HDD has been recovered. 4 Press any key on the computer while holding F12. ..."Creating Recovery CDs/DVDs" on page 67): 1 Insert the first recovery CD or DVD into your optional external CD/DVD drive. 2 Power on your keyboard to its default factory state, you can re-build the system using the utilities burned to CDs or DVDs (refer to begin the restoration.
User Guide
Page 72
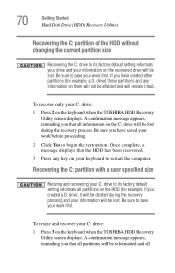
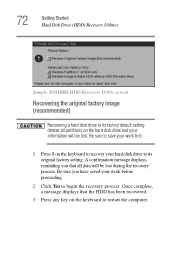
...your information will be lost during the recovery process. Be sure you that the HDD has been recovered. 3 Press any key on the keyboard to recover your work before proceeding. 2 Click Yes to its factory default setting deletes all data will be lost . 72 Getting Started ...Hard Disk Drive (HDD) Recovery Utilities Sample TOSHIBA HDD Recovery Utility screen Recovering the original factory image (recommended) Recovering a hard disk drive to its original factory setting. Be sure to save...
...your information will be lost during the recovery process. Be sure you that the HDD has been recovered. 3 Press any key on the keyboard to recover your work before proceeding. 2 Click Yes to its factory default setting deletes all data will be lost . 72 Getting Started ...Hard Disk Drive (HDD) Recovery Utilities Sample TOSHIBA HDD Recovery Utility screen Recovering the original factory image (recommended) Recovering a hard disk drive to its original factory setting. Be sure to save...
User Guide
Page 73
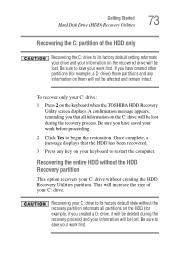
...the HDD only Recovering the C: drive to its factory default state without creating the HDD Recovery Utilities partition. Be sure to save your keyboard to begin the restoration. Be sure you have created other partitions (for example, if you have saved your C: drive: 1 Press ...Once complete, a message displays that all partitions on the HDD (for example, a D: drive) those partitions and any key on the keyboard when the TOSHIBA HDD Recovery Utility screen displays. Getting Started Hard Disk Drive (HDD) Recovery Utilities 73 Recovering the C: partition of your work first. If...
...the HDD only Recovering the C: drive to its factory default state without creating the HDD Recovery Utilities partition. Be sure to save your keyboard to begin the restoration. Be sure you have created other partitions (for example, if you have saved your C: drive: 1 Press ...Once complete, a message displays that all partitions on the HDD (for example, a D: drive) those partitions and any key on the keyboard when the TOSHIBA HDD Recovery Utility screen displays. Getting Started Hard Disk Drive (HDD) Recovery Utilities 73 Recovering the C: partition of your work first. If...

User Guide
Page 74
... be lost during the recovery process. A confirmation message appears, reminding you that the HDD has been recovered. 3 Press any key on your keyboard to display its status as follows: 1 Click Start, and then click Control Panel. 2 Double-click the Performance and Maintenance icon. 3 Double...hard disk drive, you have saved your work before proceeding. 2 Click Yes to begin the restoration. When the computer powers on the keyboard when the TOSHIBA HDD Recovery Utility screen displays. Be sure you can delete the HDD recovery partition without the recovery partition: 1 Press 3 on ,...
... be lost during the recovery process. A confirmation message appears, reminding you that the HDD has been recovered. 3 Press any key on your keyboard to display its status as follows: 1 Click Start, and then click Control Panel. 2 Double-click the Performance and Maintenance icon. 3 Double...hard disk drive, you have saved your work before proceeding. 2 Click Yes to begin the restoration. When the computer powers on the keyboard when the TOSHIBA HDD Recovery Utility screen displays. Be sure you can delete the HDD recovery partition without the recovery partition: 1 Press 3 on ,...

User Guide
Page 79
For more information on attaching the optional Slim Port Replicator, an external monitor and other external USBcompatible devices, such as a keyboard and diskette drive, see "Setting up for use with a standard analog telephone line. Getting Started Connecting other external devices 79 3 Connect the other external devices ...
For more information on attaching the optional Slim Port Replicator, an external monitor and other external USBcompatible devices, such as a keyboard and diskette drive, see "Setting up for use with a standard analog telephone line. Getting Started Connecting other external devices 79 3 Connect the other external devices ...

User Guide
Page 80
80 Getting Started Using the TouchPad Using the TouchPad The TouchPad, the small, smooth square cutout located in front of the keyboard, is sensitive to touch and enables you to move the cursor with the stroke of the page, slide your finger across the TouchPad in the ...
80 Getting Started Using the TouchPad Using the TouchPad The TouchPad, the small, smooth square cutout located in front of the keyboard, is sensitive to touch and enables you to move the cursor with the stroke of the page, slide your finger across the TouchPad in the ...

User Guide
Page 82
... options. You can change the function of the keyboard, activates the Toshiba Assist. Sample TOSHIBA Assist screen To reprogram the TOSHIBA Assist button: 1 Click Start, then Control Panel, then Printers and Other Hardware. 2 Select Toshiba Controls. 82 Getting Started Using the Toshiba Assist button Using the Toshiba Assist button The Toshiba Assist button, located to the left of...
... options. You can change the function of the keyboard, activates the Toshiba Assist. Sample TOSHIBA Assist screen To reprogram the TOSHIBA Assist button: 1 Click Start, then Control Panel, then Printers and Other Hardware. 2 Select Toshiba Controls. 82 Getting Started Using the Toshiba Assist button Using the Toshiba Assist button The Toshiba Assist button, located to the left of...
User Guide
Page 85
... the computer. Alternatives include: ❖ Using Hot Key combinations ❖ Opening and closing the display panel For more information, see "Taking care of the computer's keyboard, speaker grille and other openings. Getting Started Caring for your computer clean, gently wipe the display panel and exterior case with a lightly dampened cloth. Caring...
... the computer. Alternatives include: ❖ Using Hot Key combinations ❖ Opening and closing the display panel For more information, see "Taking care of the computer's keyboard, speaker grille and other openings. Getting Started Caring for your computer clean, gently wipe the display panel and exterior case with a lightly dampened cloth. Caring...

User Guide
Page 89
... on a typewriter, except that: ❖ The spacebar creates a space character instead of just passing over an area of a full-size keyboard. Learning the Basics Using the keyboard 89 Using the keyboard Your computer's keyboard contains character keys, control keys, function keys, and special Windows® keys, providing all the functionality of the page. ❖...
... on a typewriter, except that: ❖ The spacebar creates a space character instead of just passing over an area of a full-size keyboard. Learning the Basics Using the keyboard 89 Using the keyboard Your computer's keyboard contains character keys, control keys, function keys, and special Windows® keys, providing all the functionality of the page. ❖...

User Guide
Page 90
... Ctrl and Alt keys, or to the regular and numeric pad Enter keys on the program you are using. For more information, see your computer's keyboard layout is compatible with one Ctrl key. and a numeric keypad. Ctrl, Fn and Alt keys Ctrl Fn Alt Sample Ctrl, Fn and Alt keys The... Ctrl, Fn and Alt keys do different things depending on the full-sized keyboard. Your computer's keyboard has only one Enter and one of the specially marked keys allows you can simulate these separate keys, as follows: ❖ Press Fn and...
... Ctrl and Alt keys, or to the regular and numeric pad Enter keys on the program you are using. For more information, see your computer's keyboard layout is compatible with one Ctrl key. and a numeric keypad. Ctrl, Fn and Alt keys Ctrl Fn Alt Sample Ctrl, Fn and Alt keys The... Ctrl, Fn and Alt keys do different things depending on the full-sized keyboard. Your computer's keyboard has only one Enter and one of the specially marked keys allows you can simulate these separate keys, as follows: ❖ Press Fn and...
User Guide
Page 91
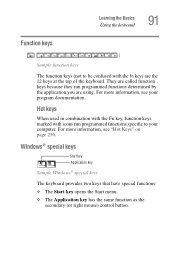
...key, function keys marked with the Fn key) are the 12 keys at the top of the keyboard. Windows® special keys Start key Application key Sample Windows® special keys The keyboard provides two keys that have special functions: ❖ The Start key opens the Start menu. &#...secondary (or right mouse) control button. For more information, see "Hot Keys" on page 250. Function keys Learning the Basics Using the keyboard 91 Sample function keys The function keys (not to your program documentation. They are called function keys because they run programmed functions specific to ...
...key, function keys marked with the Fn key) are the 12 keys at the top of the keyboard. Windows® special keys Start key Application key Sample Windows® special keys The keyboard provides two keys that have special functions: ❖ The Start key opens the Start menu. &#...secondary (or right mouse) control button. For more information, see "Hot Keys" on page 250. Function keys Learning the Basics Using the keyboard 91 Sample function keys The function keys (not to your program documentation. They are called function keys because they run programmed functions specific to ...

