User Manual
Page 17
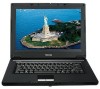
17 Approved Countries/Regions for use for the Toshiba Mini PCI Wireless LAN Card This equipment is approved to the radio standard by the countries/regions in the following table. Do not use this ... Approved Countries/Regions for the Intel® PRO/Wireless 3945ABG Network Connection This equipment is approved to the radio standard by the countries/regions in battery mode. 802.11b/g (2.4 GHz) Australia Chile Indonesia New Zealand USA Brunei Hong Kong Malaysia Saudi Arabia Venezuela Canada India Mexico Taiwan Vietnam NOTE An adhoc...
17 Approved Countries/Regions for use for the Toshiba Mini PCI Wireless LAN Card This equipment is approved to the radio standard by the countries/regions in the following table. Do not use this ... Approved Countries/Regions for the Intel® PRO/Wireless 3945ABG Network Connection This equipment is approved to the radio standard by the countries/regions in battery mode. 802.11b/g (2.4 GHz) Australia Chile Indonesia New Zealand USA Brunei Hong Kong Malaysia Saudi Arabia Venezuela Canada India Mexico Taiwan Vietnam NOTE An adhoc...
User Manual
Page 26
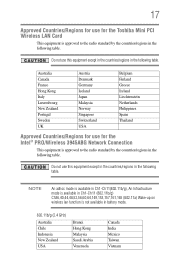
Contents Introduction 32 This guide 33 Safety icons 34 Other icons used 34 Other documentation 35 Service options 35 Chapter 1: Getting Started 36 Selecting a place to work 36 Creating a computer-friendly environment........36 Keeping yourself comfortable 37 Precautions 37 Important information on your computer's cooling fan 38 Setting up your computer 39 Setting up your software 39 Registering your computer with Toshiba 40 Adding optional external devices 40 Connecting to a power source 41 Charging the main battery 43 Using the computer for the first time 44 26
Contents Introduction 32 This guide 33 Safety icons 34 Other icons used 34 Other documentation 35 Service options 35 Chapter 1: Getting Started 36 Selecting a place to work 36 Creating a computer-friendly environment........36 Keeping yourself comfortable 37 Precautions 37 Important information on your computer's cooling fan 38 Setting up your computer 39 Setting up your software 39 Registering your computer with Toshiba 40 Adding optional external devices 40 Connecting to a power source 41 Charging the main battery 43 Using the computer for the first time 44 26
User Manual
Page 28
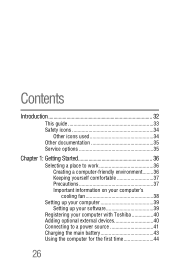
... the computer off 87 Caring for CD or DVD discs 87 Toshiba's online resources 87 Chapter 3: Mobile Computing 88 Toshiba's energy-saver design 88 Running the computer on battery power 88 Battery Notice 89 Power management 90 Using additional batteries 90 Charging batteries 90 Charging the main battery 91 Charging the RTC battery 91 Monitoring main battery power 92
... the computer off 87 Caring for CD or DVD discs 87 Toshiba's online resources 87 Chapter 3: Mobile Computing 88 Toshiba's energy-saver design 88 Running the computer on battery power 88 Battery Notice 89 Power management 90 Using additional batteries 90 Charging batteries 90 Charging the main battery 91 Charging the RTC battery 91 Monitoring main battery power 92

User Manual
Page 29
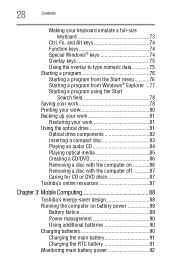
... 96 Using a hot key to set the Power Plan 97 Changing the main battery 98 Removing the battery from the computer .........98 Inserting a charged battery 100 Taking care of your battery 101 Safety precautions 101 Maintaining your battery 102 Disposing of used batteries 103 Traveling tips 104 Chapter 4: Exploring Your Computer's Features 105 Exploring the desktop...
... 96 Using a hot key to set the Power Plan 97 Changing the main battery 98 Removing the battery from the computer .........98 Inserting a charged battery 100 Taking care of your battery 101 Safety precautions 101 Maintaining your battery 102 Disposing of used batteries 103 Traveling tips 104 Chapter 4: Exploring Your Computer's Features 105 Exploring the desktop...

User Manual
Page 30
...Media Adapter Slot 120 Inserting memory media 120 Removing memory media 121 Chapter 5: Toshiba Utilities 122 TOSHIBA Assist 123 Connect 124 Optimize 125 TOSHIBA SD™ Memory Card Format Utility .........126 Mouse Utility 127 CD/DVD Drive ...Acoustic Silencer 128 TOSHIBA Accessibility 129 ConfigFree 130 Getting Started 130 ConfigFree Utilities 131 Chapter 6: If Something... Fixing a problem with Device Manager ...........140 Memory problems 141 Power and the batteries 142 Keyboard problems 143 Display problems 144
...Media Adapter Slot 120 Inserting memory media 120 Removing memory media 121 Chapter 5: Toshiba Utilities 122 TOSHIBA Assist 123 Connect 124 Optimize 125 TOSHIBA SD™ Memory Card Format Utility .........126 Mouse Utility 127 CD/DVD Drive ...Acoustic Silencer 128 TOSHIBA Accessibility 129 ConfigFree 130 Getting Started 130 ConfigFree Utilities 131 Chapter 6: If Something... Fixing a problem with Device Manager ...........140 Memory problems 141 Power and the batteries 142 Keyboard problems 143 Display problems 144
User Manual
Page 37
... occur, immediately: 1. Avoid prolonged contact to prevent heat injury to drop a heavy object onto the computer. Keeping yourself comfortable The Toshiba Instruction Manual for Safety and Comfort, that shipped with the underside or surface of the computer. Disconnect the AC adaptor from the power...or permanent damage to the computer. Getting Started 37 Selecting a place to work environment and tips for Safety and Comfort. Remove the battery pack. Never place a heavy object on the power again until you have taken the computer to withstand the rigors of your work...
... occur, immediately: 1. Avoid prolonged contact to prevent heat injury to drop a heavy object onto the computer. Keeping yourself comfortable The Toshiba Instruction Manual for Safety and Comfort, that shipped with the underside or surface of the computer. Disconnect the AC adaptor from the power...or permanent damage to the computer. Getting Started 37 Selecting a place to work environment and tips for Safety and Comfort. Remove the battery pack. Never place a heavy object on the power again until you have taken the computer to withstand the rigors of your work...

User Manual
Page 39
These components include, but are not limited to charge the battery you must complete all setup steps up to and including "Setting up your software When you turn on the computer for the first time, do ... a power source" on page 39 before you can use external power or to , a mouse, keyboard, printer, memory, and PC Cards. Your computer contains a rechargeable main battery that needs to be associated with your user account, and then click Next. 4 Enter the computer name and description and click Next. 5 Click the appropriate...
These components include, but are not limited to charge the battery you must complete all setup steps up to and including "Setting up your software When you turn on the computer for the first time, do ... a power source" on page 39 before you can use external power or to , a mouse, keyboard, printer, memory, and PC Cards. Your computer contains a rechargeable main battery that needs to be associated with your user account, and then click Next. 4 Enter the computer name and description and click Next. 5 Click the appropriate...
User Manual
Page 41
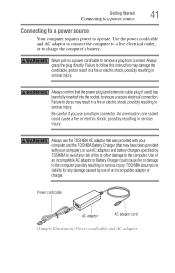
... confirm that may have been provided with your computer and the TOSHIBA Battery Charger (that the power plug (and extension cable plug if ...Connecting to a power source Connecting to a power source Your computer requires power to charge the computer's battery. Failure to the computer. Be careful if you use of fire or other damage to follow this instruction...a live electrical outlet, or to operate. Always use the TOSHIBA AC adaptor that was provided with your computer), or use AC adaptors and battery chargers specified by TOSHIBA to remove a plug from a socket. An overload on ...
... confirm that may have been provided with your computer and the TOSHIBA Battery Charger (that the power plug (and extension cable plug if ...Connecting to a power source Connecting to a power source Your computer requires power to charge the computer's battery. Failure to the computer. Be careful if you use of fire or other damage to follow this instruction...a live electrical outlet, or to operate. Always use the TOSHIBA AC adaptor that was provided with your computer), or use AC adaptors and battery chargers specified by TOSHIBA to remove a plug from a socket. An overload on ...
User Manual
Page 43
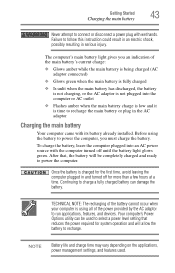
...or disconnect a power plug with the computer turned off for more than a few hours at a time. The computer's main battery light gives you must charge the battery. After that reduces the power required for the first time, avoid leaving the computer plugged in serious injury. Failure to follow ...this instruction could result in an electric shock, possibly resulting in and turned off until the battery light glows green. Once the battery is not plugged into an AC power source with wet hands. Continuing to recharge. Before using all of the main...
...or disconnect a power plug with the computer turned off for more than a few hours at a time. The computer's main battery light gives you must charge the battery. After that reduces the power required for the first time, avoid leaving the computer plugged in serious injury. Failure to follow ...this instruction could result in an electric shock, possibly resulting in and turned off until the battery light glows green. Once the battery is not plugged into an AC power source with wet hands. Continuing to recharge. Before using all of the main...

User Manual
Page 45
..., the brightness of the screen will dim and you may not be able to increase the brightness of the screen while on battery power. When the computer is manufactured using highprecision technology. Your select model may appear on your computer. This information applies to ... extremely large number of the screen technology. This is also an intrinsic characteristic of thin-film transistors (TFT) and is operated on battery power, the screen will deteriorate. Getting Started 45 Using the computer for an entire product Series. Your computer's features and specifications Certain...
..., the brightness of the screen will dim and you may not be able to increase the brightness of the screen while on battery power. When the computer is manufactured using highprecision technology. Your select model may appear on your computer. This information applies to ... extremely large number of the screen technology. This is also an intrinsic characteristic of thin-film transistors (TFT) and is operated on battery power, the screen will deteriorate. Getting Started 45 Using the computer for an entire product Series. Your computer's features and specifications Certain...

User Manual
Page 48
... system turns off the computer. 3 Unplug and remove any cables connected to locate the memory module slot cover. For information on removing the main battery, see "Removing the battery from the computer" on page 98. 5 Close the display panel and turn the computer upside down to the computer, including the AC adaptor...
... system turns off the computer. 3 Unplug and remove any cables connected to locate the memory module slot cover. For information on removing the main battery, see "Removing the battery from the computer" on page 98. 5 Close the display panel and turn the computer upside down to the computer, including the AC adaptor...

User Manual
Page 51
... the computer has recognized the additional memory module. You can verify that the computer has recognized it using the screws. 15 Re-insert the main battery. If you need to remove a memory module: 1 Complete steps 1-8 in "Checking total memory" on page 53. TECHNICAL NOTE: You must ...cover. Removing a memory module If you are adding extra memory after setting up the computer. For more information on inserting the main battery, see "Inserting a charged battery" on page 100. 16 Turn the computer right side up. 17 Reconnect the cables. 18 Restart the computer. Getting Started 51 ...
... the computer has recognized the additional memory module. You can verify that the computer has recognized it using the screws. 15 Re-insert the main battery. If you need to remove a memory module: 1 Complete steps 1-8 in "Checking total memory" on page 53. TECHNICAL NOTE: You must ...cover. Removing a memory module If you are adding extra memory after setting up the computer. For more information on inserting the main battery, see "Inserting a charged battery" on page 100. 16 Turn the computer right side up. 17 Reconnect the cables. 18 Restart the computer. Getting Started 51 ...
User Manual
Page 53
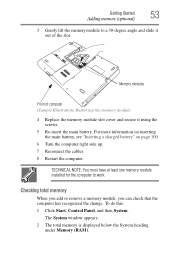
...must have at least one memory module installed for the computer to a 30-degree angle and slide it using the screws. 5 Re-insert the main battery. Memory modules Front of computer (Sample Illustration) Removing the memory module 4 Replace the memory module slot cover and secure it out of the slot.... Panel, and then System. Getting Started 53 Adding memory (optional) 3 Gently lift the memory module to work. For more information on inserting the main battery, see "Inserting a charged battery" on page 100. 6 Turn the computer right side up. 7 Reconnect the cables. 8 Restart the computer.
...must have at least one memory module installed for the computer to a 30-degree angle and slide it using the screws. 5 Re-insert the main battery. Memory modules Front of computer (Sample Illustration) Removing the memory module 4 Replace the memory module slot cover and secure it out of the slot.... Panel, and then System. Getting Started 53 Adding memory (optional) 3 Gently lift the memory module to work. For more information on inserting the main battery, see "Inserting a charged battery" on page 100. 6 Turn the computer right side up. 7 Reconnect the cables. 8 Restart the computer.
User Manual
Page 59
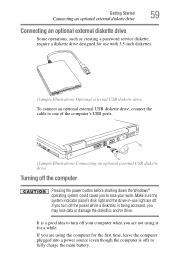
It is off) to fully charge the main battery. If you are not using the computer for the first time, leave the computer plugged into a power source (even though the computer is a good idea ...
It is off) to fully charge the main battery. If you are not using the computer for the first time, leave the computer plugged into a power source (even though the computer is a good idea ...

User Manual
Page 60
...choosing Hibernation: ❖ While in which you left off the computer using the computer for several days or if you have more main battery power than restarting after all disk/disc activity lights are retained indefinitely. Since Hibernation mode does not require power to the state in ...Hibernation mode, the computer uses no main battery power. ❖ Because the state of the desktop to memory, so that when you turn on the operating system installed, you must ...
...choosing Hibernation: ❖ While in which you left off the computer using the computer for several days or if you have more main battery power than restarting after all disk/disc activity lights are retained indefinitely. Since Hibernation mode does not require power to the state in ...Hibernation mode, the computer uses no main battery power. ❖ Because the state of the desktop to memory, so that when you turn on the operating system installed, you must ...

User Manual
Page 61
... and files you can continue working from Sleep takes less time and consumes less main battery power than restarting after turning off the computer using the Hibernation or Shut down using . ❖ If the battery charge becomes critically low, the computer will be lost. NOTE After your computer sleeps...an extended period of the computer to memory so that, when you restart the computer, you were using the Sleep command and the main battery discharges fully, your work first. Getting Started 61 Turning off the computer For information on how to use and configure Hibernation mode see "...
... and files you can continue working from Sleep takes less time and consumes less main battery power than restarting after turning off the computer using the Hibernation or Shut down using . ❖ If the battery charge becomes critically low, the computer will be lost. NOTE After your computer sleeps...an extended period of the computer to memory so that, when you restart the computer, you were using the Sleep command and the main battery discharges fully, your work first. Getting Started 61 Turning off the computer For information on how to use and configure Hibernation mode see "...

User Manual
Page 63
... 4 Click Power buttons and lid to display the actions that you can be set separately for how they operate while the computer is running on battery power or while connected to AC power. ❖ Lid close action Set this option to Shut down if you want the computer to shut down...
... 4 Click Power buttons and lid to display the actions that you can be set separately for how they operate while the computer is running on battery power or while connected to AC power. ❖ Lid close action Set this option to Shut down if you want the computer to shut down...

User Manual
Page 65
... Settings window appears. 3 Click Change advanced power settings. NOTE These options can configure. 5 Select Hibernate for how they operate while the computer is running on battery power or while connected to be set separately for the options you want the computer to go into Hibernation mode when you close action Set...
... Settings window appears. 3 Click Change advanced power settings. NOTE These options can configure. 5 Select Hibernate for how they operate while the computer is running on battery power or while connected to be set separately for the options you want the computer to go into Hibernation mode when you close action Set...

User Manual
Page 67
... amount of all open programs and files to the memory, turns off the computer 2 Click Sleep. To use any of time in both the On battery and Plugged in Sleep mode. The computer saves the status of time after which the computer automatically goes into Sleep mode. The Edit Plan Settings...
... amount of all open programs and files to the memory, turns off the computer 2 Click Sleep. To use any of time in both the On battery and Plugged in Sleep mode. The computer saves the status of time after which the computer automatically goes into Sleep mode. The Edit Plan Settings...

User Manual
Page 68
NOTE These options can configure. 6 Select Sleep for how they operate while the computer is running on battery power or while connected to AC power. ❖ Lid close action Set this option to Sleep if you want the computer to go into Sleep ...
NOTE These options can configure. 6 Select Sleep for how they operate while the computer is running on battery power or while connected to AC power. ❖ Lid close action Set this option to Sleep if you want the computer to go into Sleep ...


