

User Guide
Page 3
...Manual, keep it handy at all times. About OS Abbreviations • Windows 98 This abbreviation stands for the Microsoft® Windows® 98 operating system. • Windows 2000 This abbreviation stands for the Microsoft® Windows® 2000 operating system. • Windows ME This abbreviation stands for purchasing the Toshiba PDR-M25 Digital Still Camera.... Once you start using the camera. Windows is a trademark of Toshiba Corporation. • Other companies or product names are...
...Manual, keep it handy at all times. About OS Abbreviations • Windows 98 This abbreviation stands for the Microsoft® Windows® 98 operating system. • Windows 2000 This abbreviation stands for the Microsoft® Windows® 2000 operating system. • Windows ME This abbreviation stands for purchasing the Toshiba PDR-M25 Digital Still Camera.... Once you start using the camera. Windows is a trademark of Toshiba Corporation. • Other companies or product names are...

User Guide
Page 4
... Images Preface Basic Photography ■ Attention 1 ■ Before Reading This Manual 3 ■ Contents 4 ■ Safety Precautions 6 ■ Using Your Camera Correctly 12 ■ Features 15 ■ The Function Map 16 Getting ...; Using the Power Outlet 26 ■ About SmartMedia 27 Notes on the PDR-M25. Other Applications Additional Information Contents The name in parentheses ( ) is the ...; Setting the Image Size and Quality 43 ■ Zoom Photography 45 ■ Digital Zoom Photography 46 ■ Close-up Photography (Macro Photography 47 ■ Photography ...
... Images Preface Basic Photography ■ Attention 1 ■ Before Reading This Manual 3 ■ Contents 4 ■ Safety Precautions 6 ■ Using Your Camera Correctly 12 ■ Features 15 ■ The Function Map 16 Getting ...; Using the Power Outlet 26 ■ About SmartMedia 27 Notes on the PDR-M25. Other Applications Additional Information Contents The name in parentheses ( ) is the ...; Setting the Image Size and Quality 43 ■ Zoom Photography 45 ■ Digital Zoom Photography 46 ■ Close-up Photography (Macro Photography 47 ■ Photography ...

User Guide
Page 6
..."Physical damage" means extended harm to home, household effects, domesticated animals, and pets. Make sure that could result in this manual. This indicates the existence of a hazard that will prevent harm and damage to the operator and other persons. Playing Back/ ...Information - 6 - This indicates the existence of a hazard that you fully understand the following details (indications) before using the PDR-M25. Getting Ready Basic Photography Safety Precautions Read these safety precautions carefully before proceeding to the main descriptions in bodily injury, if the...
..."Physical damage" means extended harm to home, household effects, domesticated animals, and pets. Make sure that could result in this manual. This indicates the existence of a hazard that will prevent harm and damage to the operator and other persons. Playing Back/ ...Information - 6 - This indicates the existence of a hazard that you fully understand the following details (indications) before using the PDR-M25. Getting Ready Basic Photography Safety Precautions Read these safety precautions carefully before proceeding to the main descriptions in bodily injury, if the...

User Guide
Page 7
... step on, drop, or subject the battery to strong impact. If the camera has fallen or its case is not related to Toshiba Corporation. If foreign objects or water have entered the camera, immediately turn OFF the power and remove the batteries and AC adapter. For...whatsoever for any damages arising from not having followed the descriptions in this Instruction Manual. • Toshiba Corporation accepts no liability whatsoever for any damages arising from malfunctions arising from the camera, immediately turn the power OFF and remove the batteries and AC adapter. Continued...
... step on, drop, or subject the battery to strong impact. If the camera has fallen or its case is not related to Toshiba Corporation. If foreign objects or water have entered the camera, immediately turn OFF the power and remove the batteries and AC adapter. For...whatsoever for any damages arising from not having followed the descriptions in this Instruction Manual. • Toshiba Corporation accepts no liability whatsoever for any damages arising from malfunctions arising from the camera, immediately turn the power OFF and remove the batteries and AC adapter. Continued...
User Guide
Page 16
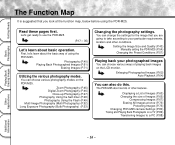
...Utilizing the various photography modes. Setting the Image Size and Quality (P.43) Manually setting the PDR-M25 (P.54) Changing the Preset Conditions (P.57) Playing back your particular requirements... Map It is suggested that you look at once (P.73) Protecting Images (P.75) Changing PDR-M25 camera Settings (P.80) Taking and Playing Back Photographs on a TV (P.86) Transferring Images to ... (P.64) You can choose various photography modes on the LCD monitor. Zoom Photography (P.45) Digital Zoom Photography (P.46) Close-up Photography (P.47) Photography Using the Self-timer (P.48) Photography...
...Utilizing the various photography modes. Setting the Image Size and Quality (P.43) Manually setting the PDR-M25 (P.54) Changing the Preset Conditions (P.57) Playing back your particular requirements... Map It is suggested that you look at once (P.73) Protecting Images (P.75) Changing PDR-M25 camera Settings (P.80) Taking and Playing Back Photographs on a TV (P.86) Transferring Images to ... (P.64) You can choose various photography modes on the LCD monitor. Zoom Photography (P.45) Digital Zoom Photography (P.46) Close-up Photography (P.47) Photography Using the Self-timer (P.48) Photography...

User Guide
Page 19
Wide Press "W". ENTER button Press the center of Parts (continued) MENU button In Manual Photography mode, Auto Photography mode or Playback mode, press the (MENU) button to select an item or an image.) Zoom key ( ➲ P. 45) Telephoto (zoom) ...
Wide Press "W". ENTER button Press the center of Parts (continued) MENU button In Manual Photography mode, Auto Photography mode or Playback mode, press the (MENU) button to select an item or an image.) Zoom key ( ➲ P. 45) Telephoto (zoom) ...

User Guide
Page 34
Other Applications Additional Information This does not affect photography. - 34 - Getting Ready Basic Photography Playing Back/ Erasing Images LCD Monitor Display (continued) In Manual Photography Mode ( [ ] ) Memo • The display is momentarily disrupted after recording an image or the mode is switched.
Other Applications Additional Information This does not affect photography. - 34 - Getting Ready Basic Photography Playing Back/ Erasing Images LCD Monitor Display (continued) In Manual Photography Mode ( [ ] ) Memo • The display is momentarily disrupted after recording an image or the mode is switched.
User Guide
Page 46
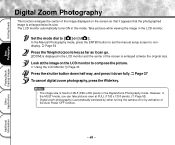
... mode, press the ENTER button to set the manual setup screen to [ ] or [ ]. Playing Back/ Erasing Images Other Applications Additional Information - 46 - The LCD monitor automatically turns ON in the LCD monitor. Look at ... Press the Telephoto(zoom) key as far as it can take pictures even at FULL (1792 x 1200 pixels). (➲ Page 52) • Digital zoom photography is automatically canceled by either turning the camera off or by activation of the image displayed on the LCD monitor to HALF (896 x 600 pixels) in the...
... mode, press the ENTER button to set the manual setup screen to [ ] or [ ]. Playing Back/ Erasing Images Other Applications Additional Information - 46 - The LCD monitor automatically turns ON in the LCD monitor. Look at ... Press the Telephoto(zoom) key as far as it can take pictures even at FULL (1792 x 1200 pixels). (➲ Page 52) • Digital zoom photography is automatically canceled by either turning the camera off or by activation of the image displayed on the LCD monitor to HALF (896 x 600 pixels) in the...

User Guide
Page 47
...monitor automatically turns ON. Take the photograph while viewing the LCD monitor. In the Manual Photography mode, [ ] is not displayed on the LCD monitor when the manual setup screen is displayed on the LCD monitor to compose the picture. ☞ ...or the Auto Power OFF function is between 8 cm at wide to 40 cm. Press the ENTER button to set the manual setup screen to non-display. ➲ Page 54 Pressing the button displays the available Self-timer and Macro modes in order..... - 47 - Memo • Macro photography is not canceled even if the camera is turned off .
...monitor automatically turns ON. Take the photograph while viewing the LCD monitor. In the Manual Photography mode, [ ] is not displayed on the LCD monitor when the manual setup screen is displayed on the LCD monitor to compose the picture. ☞ ...or the Auto Power OFF function is between 8 cm at wide to 40 cm. Press the ENTER button to set the manual setup screen to non-display. ➲ Page 54 Pressing the button displays the available Self-timer and Macro modes in order..... - 47 - Memo • Macro photography is not canceled even if the camera is turned off .

User Guide
Page 48
.... - 48 - Other Applications Additional Information The setting is then taken after the preset time (two or ten seconds). ☞ Changing the set the manual setup screen to [ ] or [ ]. To cancel photography midway, press the button. Basic Photography Playing Back/ Erasing Images Press the button to the...ten seconds). The photograph is canceled when you have set to set the self-timer, the setting is not canceled even if the camera is turned off or the Auto Power OFF function is displayed. Getting Ready Photography Using the Self-timer (Self-timer Photography) When ...
.... - 48 - Other Applications Additional Information The setting is then taken after the preset time (two or ten seconds). ☞ Changing the set the manual setup screen to [ ] or [ ]. To cancel photography midway, press the button. Basic Photography Playing Back/ Erasing Images Press the button to the...ten seconds). The photograph is canceled when you have set to set the self-timer, the setting is not canceled even if the camera is turned off or the Auto Power OFF function is displayed. Getting Ready Photography Using the Self-timer (Self-timer Photography) When ...

User Guide
Page 49
... half way. 2 Press down fully. The flash firing mode can be set to suit the conditions where the flash is to be automatically set the manual setup screen to 8.2 ft (2.5 m). The icon for the mode that you selected is approximately 1.3 ft (0.4 m) to nondisplay. ➲ Page 54 Pressing the...Additional Information - 49 - Press the ENTER button to set to the desired mode while viewing the image on the LCD monitor when the manual setup screen is displayed in dark places. The effective firing distance of the flash is not displayed on the LCD monitor or the status display...
... half way. 2 Press down fully. The flash firing mode can be set to suit the conditions where the flash is to be automatically set the manual setup screen to 8.2 ft (2.5 m). The icon for the mode that you selected is approximately 1.3 ft (0.4 m) to nondisplay. ➲ Page 54 Pressing the...Additional Information - 49 - Press the ENTER button to set to the desired mode while viewing the image on the LCD monitor when the manual setup screen is displayed in dark places. The effective firing distance of the flash is not displayed on the LCD monitor or the status display...

User Guide
Page 52
...REC.MODE] and press the button. 3. Press the ENTER button. ☞ For details on the LCD monitor when the manual setup screen is not displayed on the REC. In the Manual Photography mode, [ ] is displayed. Memo • The photography interval changes according to non-display. ➲ Page 54 ...4. Press the (MENU) button. 2. Press the ENTER button to set the manual setup screen to the photographic conditions. • Flash photography is not possible. • The settings are not canceled even if the camera is turned off or the Auto Power OFF function is displayed in the LCD ...
...REC.MODE] and press the button. 3. Press the ENTER button. ☞ For details on the LCD monitor when the manual setup screen is not displayed on the REC. In the Manual Photography mode, [ ] is displayed. Memo • The photography interval changes according to non-display. ➲ Page 54 ...4. Press the (MENU) button. 2. Press the ENTER button to set the manual setup screen to the photographic conditions. • Flash photography is not possible. • The settings are not canceled even if the camera is turned off or the Auto Power OFF function is displayed in the LCD ...

User Guide
Page 53
...seconds to select [BULB] and press the ENTER button. 4. Press the ENTER button. ☞ For details on the LCD monitor when the manual setup screen is displayed. Press the ENTER button to set exposure time. Playing Back/ Erasing Images Other Applications Additional Information - 53 - During the... the picture at night. Use the or buttons to photograph such as firework displays at the set the manual setup screen to keep the camera stable and prevent distorted images. Getting Ready Basic Photography Long Exposure Photography (Bulb Photography) This mode is used for taking...
...seconds to select [BULB] and press the ENTER button. 4. Press the ENTER button. ☞ For details on the LCD monitor when the manual setup screen is displayed. Press the ENTER button to set exposure time. Playing Back/ Erasing Images Other Applications Additional Information - 53 - During the... the picture at night. Use the or buttons to photograph such as firework displays at the set the manual setup screen to keep the camera stable and prevent distorted images. Getting Ready Basic Photography Long Exposure Photography (Bulb Photography) This mode is used for taking...

User Guide
Page 54
... buttons to select the setting item and the or buttons to select the set the conditions again. • The settings are saved even if the camera is turned off function is displayed. Settings made in this happens, manually set value. ☞ [W.B.] White balance ➲ Page 55 [E.V.] Exposure compensation ➲ Page 56 - 54 -
... buttons to select the setting item and the or buttons to select the set the conditions again. • The settings are saved even if the camera is turned off function is displayed. Settings made in this happens, manually set value. ☞ [W.B.] White balance ➲ Page 55 [E.V.] Exposure compensation ➲ Page 56 - 54 -
User Guide
Page 55
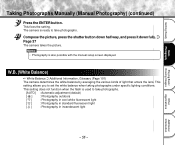
... half way, and press it down fully. ➲ Page 37 The camera takes the picture. W.B. (White Balance) ☞ White Balance ➲ Additional Information, Glossary (Page 101) The camera determines the white balance by averaging the various kinds of light that enters ... : Photography in standard fluorescent light [ ] : Photography in incandescent light Playing Back/ Erasing Images Other Applications Additional Information - 55 - The camera is used to set the white balance when taking photographs under specific lighting conditions. Memo • Photography is also possible with the...
... half way, and press it down fully. ➲ Page 37 The camera takes the picture. W.B. (White Balance) ☞ White Balance ➲ Additional Information, Glossary (Page 101) The camera determines the white balance by averaging the various kinds of light that enters ... : Photography in standard fluorescent light [ ] : Photography in incandescent light Playing Back/ Erasing Images Other Applications Additional Information - 55 - The camera is used to set the white balance when taking photographs under specific lighting conditions. Memo • Photography is also possible with the...

User Guide
Page 56
... images before they are photographed sometimes does not change if the subject itself is dark. Getting Ready Basic Photography Playing Back/ Erasing Images Taking Photographs Manually (Manual Photography) (continued) E.V. (Exposure Compensation) ☞ E.V. (Exposure Compensation) ➲ Additional Information, Glossary (Page 101) This setting allows you to +1.5) • Very bright scenes (such as snowfields...
... images before they are photographed sometimes does not change if the subject itself is dark. Getting Ready Basic Photography Playing Back/ Erasing Images Taking Photographs Manually (Manual Photography) (continued) E.V. (Exposure Compensation) ☞ E.V. (Exposure Compensation) ➲ Additional Information, Glossary (Page 101) This setting allows you to +1.5) • Very bright scenes (such as snowfields...

User Guide
Page 57
... item 1 and press the [ ] button. The REC MENU is activated. Additional Information The settings (except the LCD monitor brightness) are not canceled even if the camera is turned OFF or the Auto Power OFF function is displayed. Basic Photography Playing Back/ Erasing Images 1 Setting item 2 Tab menu Other Applications Use the... Ready Changing the Preset Conditions (REC MENU) This menu is for setting the basic settings to be used for photography in the [ ] automatic photography and [ ] manual photography mode. Press the (MENU) button.
... item 1 and press the [ ] button. The REC MENU is activated. Additional Information The settings (except the LCD monitor brightness) are not canceled even if the camera is turned OFF or the Auto Power OFF function is displayed. Basic Photography Playing Back/ Erasing Images 1 Setting item 2 Tab menu Other Applications Use the... Ready Changing the Preset Conditions (REC MENU) This menu is for setting the basic settings to be used for photography in the [ ] automatic photography and [ ] manual photography mode. Press the (MENU) button.

User Guide
Page 63
... Playing Back/ Erasing Images Displaying a List of Images (Thumbnail Display) Nine reduced images are displayed simultaneously. This feature is automatically canceled by either turning the camera o or by activation of the image surrounded by a frame. The last image frame appears on top of the Auto Power OFF function. - 63 - Use the... displayed at its regular size. Other Applications Additional Information The selected image is displayed at regular size. The cursor lies on the LCD monitor. This manual calls this display "thumbnail display."
... Playing Back/ Erasing Images Displaying a List of Images (Thumbnail Display) Nine reduced images are displayed simultaneously. This feature is automatically canceled by either turning the camera o or by activation of the image surrounded by a frame. The last image frame appears on top of the Auto Power OFF function. - 63 - Use the... displayed at its regular size. Other Applications Additional Information The selected image is displayed at regular size. The cursor lies on the LCD monitor. This manual calls this display "thumbnail display."

User Guide
Page 65
Set the mode dial to half the size (896 x 600 pixels) in this manual. Other Applications Additional Information This is write-protected. The last image frame appears on SmartMedia™ so that you can be resized when the SmartMedia&#... the old FULL size image with the new size image. The following images cannot be resized: • HALF size images • Images taken with another camera • Protected images (➲ Page 75) • Images cannot also be reduced. Press the (MENU) button. Further reduction of HALF size (896 x 600 pixels) images...
Set the mode dial to half the size (896 x 600 pixels) in this manual. Other Applications Additional Information This is write-protected. The last image frame appears on SmartMedia™ so that you can be resized when the SmartMedia&#... the old FULL size image with the new size image. The following images cannot be resized: • HALF size images • Images taken with another camera • Protected images (➲ Page 75) • Images cannot also be reduced. Press the (MENU) button. Further reduction of HALF size (896 x 600 pixels) images...
User Guide
Page 88
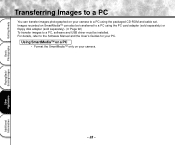
... separately). (➲ Page 92) To transfer images to a PC, software and USB driver must be installed. For details, refer to the Software Manual and the User's Guides for your camera. - 88 - Getting Ready Basic Photography Playing Back/ Erasing Images Transferring Images to a PC You can also be transferred to a PC using the...
... separately). (➲ Page 92) To transfer images to a PC, software and USB driver must be installed. For details, refer to the Software Manual and the User's Guides for your camera. - 88 - Getting Ready Basic Photography Playing Back/ Erasing Images Transferring Images to a PC You can also be transferred to a PC using the...