User Manual
Page 3
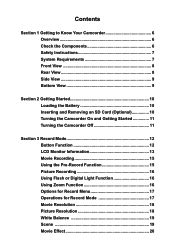
... View 9 Bottom View 9 Section 2 Getting Started 10 Loading the Battery 10 Inserting and Removing an SD Card (Optional 10 Turning the Camcorder On and Getting Started 11 Turning the Camcorder Off 11 Section 3 Record Mode 12 Button Function 12 LCD Monitor Information 13 Movie Recording 15 Using the Pre-Record Function 15...
... View 9 Bottom View 9 Section 2 Getting Started 10 Loading the Battery 10 Inserting and Removing an SD Card (Optional 10 Turning the Camcorder On and Getting Started 11 Turning the Camcorder Off 11 Section 3 Record Mode 12 Button Function 12 LCD Monitor Information 13 Movie Recording 15 Using the Pre-Record Function 15...
User Manual
Page 4
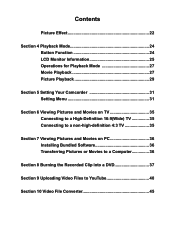
... Section 4 Playback Mode 24 Button Function 24 LCD Monitor Information 25 Operations for Playback Mode 27 Movie Playback 27 Picture Playback 29 Section 5 Setting Your Camcorder 31 Setting Menu 31 Section 6 Viewing Pictures and Movies on TV 35 Connecting to a High-Definition 16:9(Wide) TV 35 Connecting to a non-high-definition...
... Section 4 Playback Mode 24 Button Function 24 LCD Monitor Information 25 Operations for Playback Mode 27 Movie Playback 27 Picture Playback 29 Section 5 Setting Your Camcorder 31 Setting Menu 31 Section 6 Viewing Pictures and Movies on TV 35 Connecting to a High-Definition 16:9(Wide) TV 35 Connecting to a non-high-definition...

User Manual
Page 6
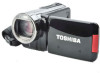
...to increase the storage capacity. Check the Components Unpack the package and make recording more fun. Section 1 Getting to Know Your Camcorder Overview The camcorder with 10 Mega Pixel sensor can take pictures and to record movies without a memory card. You can also connect it to control...Cloth Lens Cover Set Warranty Leaflet (Lens cover & strap) *preinstalled in YouTube Direct application, you can upload the videos captured by the camcorder to 16 megapixels can compose images and examine them easily. The varied effect options, such as Time Lapse and Slow Motion, make sure ...
...to increase the storage capacity. Check the Components Unpack the package and make recording more fun. Section 1 Getting to Know Your Camcorder Overview The camcorder with 10 Mega Pixel sensor can take pictures and to record movies without a memory card. You can also connect it to control...Cloth Lens Cover Set Warranty Leaflet (Lens cover & strap) *preinstalled in YouTube Direct application, you can upload the videos captured by the camcorder to 16 megapixels can compose images and examine them easily. The varied effect options, such as Time Lapse and Slow Motion, make sure ...
User Manual
Page 7
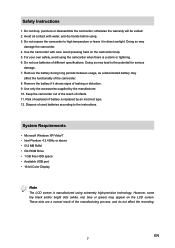
... before using extremely high-precision technology. Remove the battery during long periods between usage, as a deteriorated battery may appear on the camcorder body. 5. Keep the camcorder out of the reach of leaking or distortion. 9. However, some tiny black and/or bright dots (white, red, blue or... green) may affect the functionality of the camcorder. 8. EN 7 otherwise the warranty will be voided. 2. Doing so may damage the camcorder. 4. Remove the battery if it in direct sunlight. Dispose of explosion if battery is replaced by the...
... before using extremely high-precision technology. Remove the battery during long periods between usage, as a deteriorated battery may appear on the camcorder body. 5. Keep the camcorder out of the reach of leaking or distortion. 9. However, some tiny black and/or bright dots (white, red, blue or... green) may affect the functionality of the camcorder. 8. EN 7 otherwise the warranty will be voided. 2. Doing so may damage the camcorder. 4. Remove the battery if it in direct sunlight. Dispose of explosion if battery is replaced by the...
User Manual
Page 10
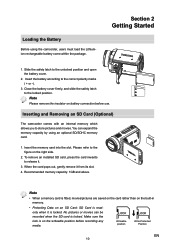
... is locked. Please refer to the correct polarity marks ( + or -). 3. No pictures or movies can expand the memory capacity by using the camcorder, users must load the Lithiumion rechargeable battery come within the package. When the card pops out, gently remove it . 3. To remove an installed ... card is locked. Note Please remove the insulator on the writeable position before use. Inserting and Removing an SD Card (Optional) The camcorder comes with an internal memory which allows you to the unlocked position and open the battery cover. 2. Loading the Battery Before using an...
... is locked. Please refer to the correct polarity marks ( + or -). 3. No pictures or movies can expand the memory capacity by using the camcorder, users must load the Lithiumion rechargeable battery come within the package. When the card pops out, gently remove it . 3. To remove an installed ... card is locked. Note Please remove the insulator on the writeable position before use. Inserting and Removing an SD Card (Optional) The camcorder comes with an internal memory which allows you to the unlocked position and open the battery cover. 2. Loading the Battery Before using an...
User Manual
Page 11
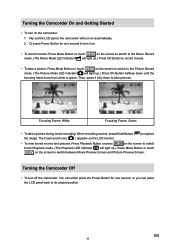
Flip out the LCD panel; Or press Power Button for one second to turn off the camcorder: You can either press the Power Button for one second, or you can place the LCD panel back to its original position. The Dual record ... .) Press Mode Button or touch on the screen to the Playback mode. (The Playback LED Indicator will turn on the camcorder: 1. Focusing Frame: White Focusing Frame: Green • To take pictures. the camcorder will light up .) Press OK Button halfway down to take a picture during movie recording: When recording movies, press Mode...
Flip out the LCD panel; Or press Power Button for one second to turn off the camcorder: You can either press the Power Button for one second, or you can place the LCD panel back to its original position. The Dual record ... .) Press Mode Button or touch on the screen to the Playback mode. (The Playback LED Indicator will turn on the camcorder: 1. Focusing Frame: White Focusing Frame: Green • To take pictures. the camcorder will light up .) Press OK Button halfway down to take a picture during movie recording: When recording movies, press Mode...

User Manual
Page 12
..., press to switch to exit. In Record menu, press to the submenu. In Record menu, press to return to turn on or turn off the camcorder. Tele Button : Zoom In Wide Button : Zoom out Playback Button: 1. Power Button: Press down for one second to the main menu. Switch between the option...
..., press to switch to exit. In Record menu, press to the submenu. In Record menu, press to return to turn on or turn off the camcorder. Tele Button : Zoom In Wide Button : Zoom out Playback Button: 1. Power Button: Press down for one second to the main menu. Switch between the option...

User Manual
Page 15
... To use the Pre-Record function: 1. When a movie is activated. The Pre-Record icon( LCD monitor. ) appears on the LCD monitor. Aim the camcorder at the subject and position it again. Press the OK Button to start recording. EN 15 Movie Recording • In Movie Record Mode (The Movie... Mode LED Indicator lights up), press OK Button to start recording. (The camcorder records 3 seconds before the OK Button is the same as the video resolution. • The flash can not be used when the Pre-Record...
... To use the Pre-Record function: 1. When a movie is activated. The Pre-Record icon( LCD monitor. ) appears on the LCD monitor. Aim the camcorder at the subject and position it again. Press the OK Button to start recording. EN 15 Movie Recording • In Movie Record Mode (The Movie... Mode LED Indicator lights up), press OK Button to start recording. (The camcorder records 3 seconds before the OK Button is the same as the video resolution. • The flash can not be used when the Pre-Record...

User Manual
Page 16
... available: Image Quality High Quality:16 Mega Pixels Standard Quality:10 Mega Pixels Low Quality:3 Mega Pixels Using Flash or Digital Light Function • This camcorder has three flash settings and one setting to allow you to extend the brightness of the flash). (Picture Recording Only) Note The flash will be...
... available: Image Quality High Quality:16 Mega Pixels Standard Quality:10 Mega Pixels Low Quality:3 Mega Pixels Using Flash or Digital Light Function • This camcorder has three flash settings and one setting to allow you to extend the brightness of the flash). (Picture Recording Only) Note The flash will be...

User Manual
Page 19
... show the wheel menu. 2. EN 19 The submenu of the normal Operation Display Screen 1. Touch the desired option. 4. White Balance The camcorder adjusts the color balance of White Balance pops up . 3. Touch [OK] to a sepia look. • Negative: The image is ... steady surface, or use a tripod when taking shots in the Night Mode. Three manual white balance settings are available: • Auto: The camcorder automatically adjusts white balance. • Daylight: Under outdoor condition. • Fluorescent: Under fluorescent light condition. • Tungsten: Under tungsten light ...
... show the wheel menu. 2. EN 19 The submenu of the normal Operation Display Screen 1. Touch the desired option. 4. White Balance The camcorder adjusts the color balance of White Balance pops up . 3. Touch [OK] to a sepia look. • Negative: The image is ... steady surface, or use a tripod when taking shots in the Night Mode. Three manual white balance settings are available: • Auto: The camcorder automatically adjusts white balance. • Daylight: Under outdoor condition. • Fluorescent: Under fluorescent light condition. • Tungsten: Under tungsten light ...
User Manual
Page 20
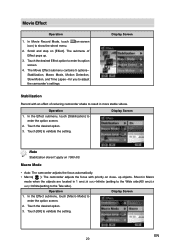
...and Time Lapse --for you to validate the setting. Display Screen Stabilization Record with priority on [Effect]. Operation 1. Touch [OK] to adjust the camcorder's settings. Scroll and stop on close- In the Effect submenu, touch [Stabilization] to enter the option screen. 2. up . 3. In the ...Effect submenu, touch [Macro Mode] to enter the option screen. 2. Touch the desired option. 3. The submenu of reducing camcorder shake to result in 1 cm(0.39 inch)~Infinite (setting to the Wide side)/60 cm(23.4 inch)~Infinite(setting to validate the setting. ...
...and Time Lapse --for you to validate the setting. Display Screen Stabilization Record with priority on [Effect]. Operation 1. Touch [OK] to adjust the camcorder's settings. Scroll and stop on close- In the Effect submenu, touch [Stabilization] to enter the option screen. 2. up . 3. In the ...Effect submenu, touch [Macro Mode] to enter the option screen. 2. Touch the desired option. 3. The submenu of reducing camcorder shake to result in 1 cm(0.39 inch)~Infinite (setting to the Wide side)/60 cm(23.4 inch)~Infinite(setting to validate the setting. ...
User Manual
Page 21
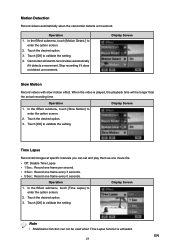
...at specific intervals you can not be longer than the actual recording time. Touch [OK] to enter the option screen. 2. Camcorder will be used when Time Lapse function is played, the playback time will start to record video automatically if it does not ....] to enter the option screen. 2. Touch the desired option. 3. When the video is activated. EN 21 Motion Detection Record videos automatically when the camcorder detects a movement. Operation 1. In the Effect submenu, touch [Slow Motion] to enter the option screen. 2. Touch the desired option. 3. Operation ...
...at specific intervals you can not be longer than the actual recording time. Touch [OK] to enter the option screen. 2. Camcorder will be used when Time Lapse function is played, the playback time will start to record video automatically if it does not ....] to enter the option screen. 2. Touch the desired option. 3. When the video is activated. EN 21 Motion Detection Record videos automatically when the camcorder detects a movement. Operation 1. In the Effect submenu, touch [Slow Motion] to enter the option screen. 2. Touch the desired option. 3. Operation ...

User Manual
Page 22
... the objects are located in 1 cm(0.39 inch)~Infinite (setting to the Wide side)/60 cm(23.4 inch)~Infinite(setting to adjust the camcorder's setting. Touch [OK] to enter its option screen. 4. The submenu of blinking will also blink. Touch the desired Effect option to validate...to show the wheel menu. (on [Effect]. Scroll and stop on -screen 2. Touch [OK] to take pictures with priority on the front of the camcorder will increase just before the picture is taken. up . 3. Touch the desired option. 3. Operation Display Screen 1. EN 22 Touch the desired option. 3....
... the objects are located in 1 cm(0.39 inch)~Infinite (setting to the Wide side)/60 cm(23.4 inch)~Infinite(setting to adjust the camcorder's setting. Touch [OK] to enter its option screen. 4. The submenu of blinking will also blink. Touch the desired Effect option to validate...to show the wheel menu. (on [Effect]. Scroll and stop on -screen 2. Touch [OK] to take pictures with priority on the front of the camcorder will increase just before the picture is taken. up . 3. Touch the desired option. 3. Operation Display Screen 1. EN 22 Touch the desired option. 3....

User Manual
Page 23
... Note The image may become noisy when the ISO number is set to. In the Effect submenu, touch [ISO] to shoot a smoother image. ISO The camcorder adjusts the ISO sensitivity of its images automatically. EN 23 Three manual ISO sensitivity settings are available. (800/1600/3200) The larger the number is...
... Note The image may become noisy when the ISO number is set to. In the Effect submenu, touch [ISO] to shoot a smoother image. ISO The camcorder adjusts the ISO sensitivity of its images automatically. EN 23 Three manual ISO sensitivity settings are available. (800/1600/3200) The larger the number is...

User Manual
Page 31
.... 3. In the Setting submenu, touch [Sound] to validate the setting. Operation 1. Scroll and stop on the screen. 2. The Setting submenu contains 6 options for configuring your camcorder setup. Touch the desired option. 3. Section 5 Setting Your...
.... 3. In the Setting submenu, touch [Sound] to validate the setting. Operation 1. Scroll and stop on the screen. 2. The Setting submenu contains 6 options for configuring your camcorder setup. Touch the desired option. 3. Section 5 Setting Your...
User Manual
Page 33
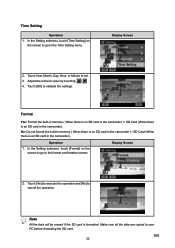
... Minute to cancel the operation. Format Yes: Format the built-in memory ( When there is no SD card in the camcorder ) / SD Card (When there is an SD card in the camcorder ) / SD Card (When there is formatted. EN 33 Touch [OK] to your PC before formatting the SD card. No: Do... not format the built-in memory ( When there is no SD card in the camcorder). Time Setting Operation 1. In the Setting submenu, touch [Time Setting] on the screen to go to the format confirmation screen Display Screen 2. Make sure all...
... Minute to cancel the operation. Format Yes: Format the built-in memory ( When there is no SD card in the camcorder ) / SD Card (When there is an SD card in the camcorder ) / SD Card (When there is formatted. EN 33 Touch [OK] to your PC before formatting the SD card. No: Do... not format the built-in memory ( When there is no SD card in the camcorder). Time Setting Operation 1. In the Setting submenu, touch [Time Setting] on the screen to go to the format confirmation screen Display Screen 2. Make sure all...

User Manual
Page 34
... [No] to the Default Setting confirmation screen. In the Setting submenu, touch [Default Setting] on shipping area Level 6 EN 34 The following table indicates the camcorder's default settings Resolution Setting Scene Stabilization Macro Mode Motion Detection Slow Motion Time Lapse White Balance Self Timer ISO Sound TV Language Volume Default Factory...
... [No] to the Default Setting confirmation screen. In the Setting submenu, touch [Default Setting] on shipping area Level 6 EN 34 The following table indicates the camcorder's default settings Resolution Setting Scene Stabilization Macro Mode Motion Detection Slow Motion Time Lapse White Balance Self Timer ISO Sound TV Language Volume Default Factory...
User Manual
Page 35
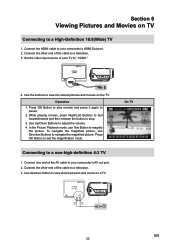
... pause. 2. While playing movies, press Right/Left Buttons to fast forward/rewind and then release the button to " HDMI." (16:9) 4. Press OK Button to your camcorder's HDMI Out port. 2. Connect one end of the cable to adjust the volume. 4. Section 6 Viewing Pictures and Movies on TV Connecting to magnify the picture... and press it again to a television. 3. Connect the other end of the AV cable to exit the magnification mode. Connect the HDMI cable to your camcorder's AV out port. 2.
... pause. 2. While playing movies, press Right/Left Buttons to fast forward/rewind and then release the button to " HDMI." (16:9) 4. Press OK Button to your camcorder's HDMI Out port. 2. Connect one end of the cable to adjust the volume. 4. Section 6 Viewing Pictures and Movies on TV Connecting to magnify the picture... and press it again to a television. 3. Connect the other end of the AV cable to exit the magnification mode. Connect the HDMI cable to your camcorder's AV out port. 2.

User Manual
Page 36
... 2.0 cable. Many computer users will light up and blink. 2. Under this folder, you can transfer pictures or movies stored on your camcorder to a computer and send them in online help of software. • ArcSoft MediaImpression is a user-friendly application that helps you managing ... video into DVD, and uploading your videos to YouTube easily. • ArcSoft MediaConverter is a popular program that converts multiple video formats into your camcorder. • Adobe Reader is a powerful application that you need to a Computer You can view, delete, move, or copy any movie/picture ...
... 2.0 cable. Many computer users will light up and blink. 2. Under this folder, you can transfer pictures or movies stored on your camcorder to a computer and send them in online help of software. • ArcSoft MediaImpression is a user-friendly application that helps you managing ... video into DVD, and uploading your videos to YouTube easily. • ArcSoft MediaConverter is a popular program that converts multiple video formats into your camcorder. • Adobe Reader is a powerful application that you need to a Computer You can view, delete, move, or copy any movie/picture ...
User Manual
Page 40
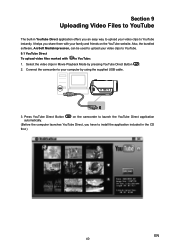
... MediaImpression, can be used to upload your video clips to YouTube. 9.1 YouTube Direct To upload video files marked with your family and friends on the camcorder to launch the YouTube Direct application (Before the computer launches YouTube Direct, you have to install the application included in YouTube Direct application offers you...
... MediaImpression, can be used to upload your video clips to YouTube. 9.1 YouTube Direct To upload video files marked with your family and friends on the camcorder to launch the YouTube Direct application (Before the computer launches YouTube Direct, you have to install the application included in YouTube Direct application offers you...


