User Manual
Page 2
User's Manual Contents Copyright 3 Disclaimer 3 Trademarks 3 FCC Compliance Statement 3 Industry Canada Requirement 4 WEEE Information 5 Disposal Information 5 Introduction 6 Features 6 Unpack the box 7 Installing the Base 8 Install 8 Adjusting screen ... Panel Controls 12 Basic Sections of the On Screen Display (OSD) Screen 13 On Screen Display (OSD) Operation 13 OSD Function Description 14 Cleaning your monitor 15 Removing the Base 15 Troubleshooting 16 Specifications 18 2
User's Manual Contents Copyright 3 Disclaimer 3 Trademarks 3 FCC Compliance Statement 3 Industry Canada Requirement 4 WEEE Information 5 Disposal Information 5 Introduction 6 Features 6 Unpack the box 7 Installing the Base 8 Install 8 Adjusting screen ... Panel Controls 12 Basic Sections of the On Screen Display (OSD) Screen 13 On Screen Display (OSD) Operation 13 OSD Function Description 14 Cleaning your monitor 15 Removing the Base 15 Troubleshooting 16 Specifications 18 2
User Manual
Page 3
... contained in a particular installation. These limits are trademarks or registered trademarks of their respective companies. If this manual cannot be determined by TOSHIBA Corporation. Under the copyright laws, this equipment does cause harmful interference to radio or television reception, which can...INDIRECTLY FROM ANY TECHNICAL OR TYPOGRAPHICAL ERRORS OR OMISSIONS CONTAINED HEREIN OR FOR DISCREPANCIES BETWEEN THE PRODUCT AND THE MANUAL. IN NO EVENT SHALL TOSHIBA BE LIABLE FOR ANY INCIDENTAL, CONSEQUENTIAL, SPECIAL, OR EXEMPLARY DAMAGES, WHETHER BASED ON TORT, CONTRACT OR...
... contained in a particular installation. These limits are trademarks or registered trademarks of their respective companies. If this manual cannot be determined by TOSHIBA Corporation. Under the copyright laws, this equipment does cause harmful interference to radio or television reception, which can...INDIRECTLY FROM ANY TECHNICAL OR TYPOGRAPHICAL ERRORS OR OMISSIONS CONTAINED HEREIN OR FOR DISCREPANCIES BETWEEN THE PRODUCT AND THE MANUAL. IN NO EVENT SHALL TOSHIBA BE LIABLE FOR ANY INCIDENTAL, CONSEQUENTIAL, SPECIAL, OR EXEMPLARY DAMAGES, WHETHER BASED ON TORT, CONTRACT OR...
User Manual
Page 4
...interference received, including interference that may not cause harmful interference. 2. Contact Please contact either: ■ TOSHIBA's Support Web site at pcsupport.toshiba.com. ■ Or call the TOSHIBA Global Support Centre: Within the United States at (800) 457-7777 Outside the United States at (949... de la classe B est conformé à la norme NMB-003 du Canada. 4 This device may cause undesired operation. User's Manual ■ Reorient or relocate the receiving antenna. ■ Increase the separation between the equipment and receiver. ■ Connect the equipment into an...
...interference received, including interference that may not cause harmful interference. 2. Contact Please contact either: ■ TOSHIBA's Support Web site at pcsupport.toshiba.com. ■ Or call the TOSHIBA Global Support Centre: Within the United States at (800) 457-7777 Outside the United States at (949... de la classe B est conformé à la norme NMB-003 du Canada. 4 This device may cause undesired operation. User's Manual ■ Reorient or relocate the receiving antenna. ■ Increase the separation between the equipment and receiver. ■ Connect the equipment into an...
User Manual
Page 5
... and recycled as household waste or commercial waste. Disposal Information This product contains mercury. For disposal, reuse or recycling information, please contact your country. User's Manual WEEE Information For EU (European Union) member users: According to environmental considerations. For information on recycling of this product as required by practices established for...
... and recycled as household waste or commercial waste. Disposal Information This product contains mercury. For disposal, reuse or recycling information, please contact your country. User's Manual WEEE Information For EU (European Union) member users: According to environmental considerations. For information on recycling of this product as required by practices established for...
User Manual
Page 6
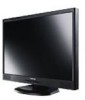
...), best suited for Windows applications. ■ Compact and sleek cabinet design saves desk space. ■ Complies with TCO 03 guidelines. User's Manual Introduction Congratulations on purchasing the TekBright™ 20" Wide Display, a high performance 20-inch wide TFT LCD monitor. This manual introduces you to all of the features, functions and technical specifications of the TekBright...
...), best suited for Windows applications. ■ Compact and sleek cabinet design saves desk space. ■ Complies with TCO 03 guidelines. User's Manual Introduction Congratulations on purchasing the TekBright™ 20" Wide Display, a high performance 20-inch wide TFT LCD monitor. This manual introduces you to all of the features, functions and technical specifications of the TekBright...
User Manual
Page 7
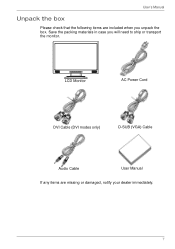
LCD Monitor AC Power Cord DVI Cable (DVI modes only) D-SUB (VGA) Cable Audio Cable User Manual If any items are included when you will need to ship or transport the monitor. Save the packing materials in case you unpack the box. User's Manual Unpack the box Please check that the following items are missing or damaged, notify your dealer immediately. 7
LCD Monitor AC Power Cord DVI Cable (DVI modes only) D-SUB (VGA) Cable Audio Cable User Manual If any items are included when you will need to ship or transport the monitor. Save the packing materials in case you unpack the box. User's Manual Unpack the box Please check that the following items are missing or damaged, notify your dealer immediately. 7
User Manual
Page 8
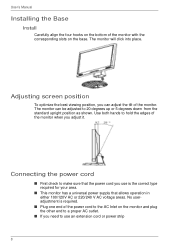
.... ■ Plug one end of the power cord to the AC Inlet on the base. The monitor will click into place. No useradjustment is the correct type required for your area. ■ This monitor has a universal power supply that allows operation in either 100/120V AC or 220/240 V AC ... adjusted to a proper AC outlet. ■ If you adjust it. User's Manual Installing the Base Install Carefully align the four hooks on the bottom of the monitor with the corresponding slots on the monitor and plug the other end to 20 degrees up or 5 degrees down from the standard upright position as shown.
.... ■ Plug one end of the power cord to the AC Inlet on the base. The monitor will click into place. No useradjustment is the correct type required for your area. ■ This monitor has a universal power supply that allows operation in either 100/120V AC or 220/240 V AC ... adjusted to a proper AC outlet. ■ If you adjust it. User's Manual Installing the Base Install Carefully align the four hooks on the bottom of the monitor with the corresponding slots on the monitor and plug the other end to 20 degrees up or 5 degrees down from the standard upright position as shown.
User Manual
Page 9
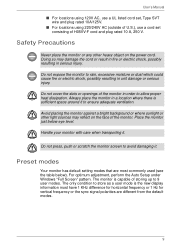
... a location where there is sufficient space around it . The only condition to store as a user mode is capable of the monitor. User's Manual ■ For locations using 120V AC, use a UL listed cord set, Type SVT wire and plug rated 10A/125V. ■ For locations using 220/...240V AC (outside of U.S.), use a cord set consisting of the monitor in order to ensure adequate ventilation. Safety Precautions Never place the monitor or any other light...
... a location where there is sufficient space around it . The only condition to store as a user mode is capable of the monitor. User's Manual ■ For locations using 120V AC, use a UL listed cord set, Type SVT wire and plug rated 10A/125V. ■ For locations using 220/...240V AC (outside of U.S.), use a cord set consisting of the monitor in order to ensure adequate ventilation. Safety Precautions Never place the monitor or any other light...
User Manual
Page 10
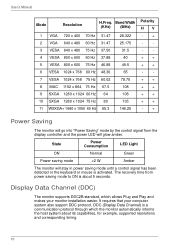
User's Manual Mode Resolution H.Freq. State Power Consumption LED Light ON Normal Green Power saving mode Band Width Polarity (KHz) (MHz) HV 1 VGA 720 x 400 70 Hz ... x 1024 60 Hz 64 108 ++ 10 SXGA 1280 x 1024 75 Hz 80 135 ++ 11 WSXGA+ 1680 x 1050 60 Hz 65.3 146.25 -+ Power Saving The monitor will go into "Power Saving" mode by the control signal from the display controller and the power LED will glow amber.
User's Manual Mode Resolution H.Freq. State Power Consumption LED Light ON Normal Green Power saving mode Band Width Polarity (KHz) (MHz) HV 1 VGA 720 x 400 70 Hz ... x 1024 60 Hz 64 108 ++ 10 SXGA 1280 x 1024 75 Hz 80 135 ++ 11 WSXGA+ 1680 x 1050 60 Hz 65.3 146.25 -+ Power Saving The monitor will go into "Power Saving" mode by the control signal from the display controller and the power LED will glow amber.
User Manual
Page 11
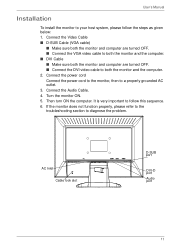
.... ■ Connect the VGA video cable to both the monitor and the computer. ■ DVI Cable ■ Make sure both the monitor and computer are turned OFF. ■ Connect the DVI video cable to both the monitor and the computer. 2. User's Manual Installation To install the monitor to your host system, please follow this sequence...
.... ■ Connect the VGA video cable to both the monitor and the computer. ■ DVI Cable ■ Make sure both the monitor and computer are turned OFF. ■ Connect the DVI video cable to both the monitor and the computer. 2. User's Manual Installation To install the monitor to your host system, please follow this sequence...

User Manual
Page 12
... has been selected for adjustment. + : Choose the next OSD MENU page. AUTO : Act as speaker ON/ OFF hot key when OSD is turned ON. 3. User's Manual User Controls Front Panel Controls 1. Power Switch : To turn power ON or OFF. 2.
... has been selected for adjustment. + : Choose the next OSD MENU page. AUTO : Act as speaker ON/ OFF hot key when OSD is turned ON. 3. User's Manual User Controls Front Panel Controls 1. Power Switch : To turn power ON or OFF. 2.

User Manual
Page 13
... Digital mode. 13 Then use "+" or "-" to increase or decrease the value of the On Screen Display (OSD) Screen On Screen Display (OSD) Operation 1. User's Manual Basic Sections of the option. 4.
... Digital mode. 13 Then use "+" or "-" to increase or decrease the value of the On Screen Display (OSD) Screen On Screen Display (OSD) Operation 1. User's Manual Basic Sections of the option. 4.
User Manual
Page 14
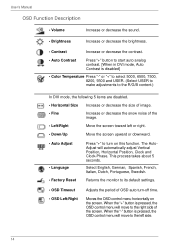
...the OSD control menu horizontally on this function. Select English, German, Spanish, French, Italian, Dutch, Portuguese, Swedish. Returns the monitor to the right side of the screen. When the "-" button is pressed, the OSD control menu will automatically adjust Vertical Position..., Horizontal Position, Clock and Clock-Phase. User's Manual OSD Function Description • Volume Increase or decrease the sound. • Brightness Increase or decrease the brightness. • Contrast ...
...the OSD control menu horizontally on this function. Select English, German, Spanish, French, Italian, Dutch, Portuguese, Swedish. Returns the monitor to the right side of the screen. When the "-" button is pressed, the OSD control menu will automatically adjust Vertical Position..., Horizontal Position, Clock and Clock-Phase. User's Manual OSD Function Description • Volume Increase or decrease the sound. • Brightness Increase or decrease the brightness. • Contrast ...
User Manual
Page 15
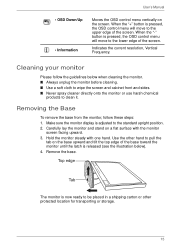
...cloth to wipe the screen and cabinet front and sides. ■ Never spray cleaner directly onto the monitor or use harsh chemical products to the upper edge of the screen. Remove the base. User's Manual • OSD Down/Up • Information Moves the OSD control menu vertically on a flat surface... with one hand. Removing the Base To remove the base from the monitor, follow the guidelines below ). 4. When the "-" button is now...
...cloth to wipe the screen and cabinet front and sides. ■ Never spray cleaner directly onto the monitor or use harsh chemical products to the upper edge of the screen. Remove the base. User's Manual • OSD Down/Up • Information Moves the OSD control menu vertically on a flat surface... with one hand. Removing the Base To remove the base from the monitor, follow the guidelines below ). 4. When the "-" button is now...
User Manual
Page 16
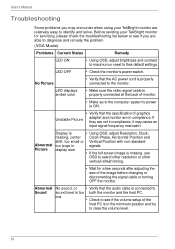
... computer system's power is ON. • Verify that the specification of graphics Unstable Picture adapter and monitor are not in compliance, it may encounter when using your TekBright monitor for a few seconds after adjusting the size of the host PC is missing, use OSD to select...of the image before changing or disconnecting the signal cable or turning OFF the monitor. User's Manual Troubleshooting Some problems you are relatively easy to raise the volume level. 16 Before sending your TekBright monitor are able to diagnose and remedy the problem. (VGA Mode) Problems Current ...
... computer system's power is ON. • Verify that the specification of graphics Unstable Picture adapter and monitor are not in compliance, it may encounter when using your TekBright monitor for a few seconds after adjusting the size of the host PC is missing, use OSD to select...of the image before changing or disconnecting the signal cable or turning OFF the monitor. User's Manual Troubleshooting Some problems you are relatively easy to raise the volume level. 16 Before sending your TekBright monitor are able to diagnose and remedy the problem. (VGA Mode) Problems Current ...
User Manual
Page 17
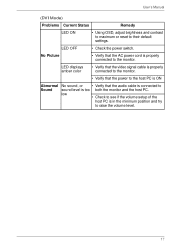
... the host PC. LED displays amber color • Verify that the video signal cable is properly connected to the monitor. • Verify that the power to the host PC is ON Abnormal No sound, or • Verify that the AC power cord is properly connected ...to Sound sound level is in the minimum position and try to their default settings. User's Manual (DVI Mode) Problems Current Status Remedy LED ON • Using OSD, adjust brightness and contrast to maximum or reset to raise the volume level. 17...
... the host PC. LED displays amber color • Verify that the video signal cable is properly connected to the monitor. • Verify that the power to the host PC is ON Abnormal No sound, or • Verify that the AC power cord is properly connected ...to Sound sound level is in the minimum position and try to their default settings. User's Manual (DVI Mode) Problems Current Status Remedy LED ON • Using OSD, adjust brightness and contrast to maximum or reset to raise the volume level. 17...
User Manual
Page 18
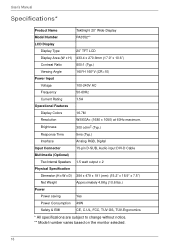
User's Manual Specifications* Product Name TekBright 20" Wide Display Model Number PA3552** LCD Display Display Type 20" TFT LCD Display Area (W x H) 433.4 x 270.9mm (17.0" x 10.6") Contrast Ratio 800:1 (Typ.) Viewing Angle 160°H 160°V (CR=10) Power Input Voltage 100-240V AC ... Consumption 49W Safety & EMI CE, C-UL, FCC, TUV-GS, TUV-Ergonomics * All specifications are subject to change without notice. ** Model number varies based on the monitor selected. 18
User's Manual Specifications* Product Name TekBright 20" Wide Display Model Number PA3552** LCD Display Display Type 20" TFT LCD Display Area (W x H) 433.4 x 270.9mm (17.0" x 10.6") Contrast Ratio 800:1 (Typ.) Viewing Angle 160°H 160°V (CR=10) Power Input Voltage 100-240V AC ... Consumption 49W Safety & EMI CE, C-UL, FCC, TUV-GS, TUV-Ergonomics * All specifications are subject to change without notice. ** Model number varies based on the monitor selected. 18