

Owners Manual
Page 10
Introduction Identification of MW20F11 Cassette loading slot 33 TIMER REC indicator 40 Remote sensor 12 Disc tray 44 PHONES jack 24 AUDIO (L/R)/VIDEO IN (LINE IN 2) jacks 42 REW (Rewind) button 34 STOP/EJECT button 33 PLAY button ...
Introduction Identification of MW20F11 Cassette loading slot 33 TIMER REC indicator 40 Remote sensor 12 Disc tray 44 PHONES jack 24 AUDIO (L/R)/VIDEO IN (LINE IN 2) jacks 42 REW (Rewind) button 34 STOP/EJECT button 33 PLAY button ...

Owners Manual
Page 11
... button 35 TOP MENU button 50 OPEN/CLOSE button 44 POWER button 18 SLEEP button 24 CM SKIP button 35 JUMP button 47 VOL +/- Introduction Remote control The instructions in this manual describe the function on many DVD video discs. To operate a menu, follow the instructions in for details. buttons 23... 48 SPEED button 38 RETURN button 53 EJECT button 33 *DVD MENU button Use the DVD MENU button to display the menu included on the remote control. See the page in "DVD menu." # 5T40301A [E]p06-12 11 3/1/05, 10:15 11
... button 35 TOP MENU button 50 OPEN/CLOSE button 44 POWER button 18 SLEEP button 24 CM SKIP button 35 JUMP button 47 VOL +/- Introduction Remote control The instructions in this manual describe the function on many DVD video discs. To operate a menu, follow the instructions in for details. buttons 23... 48 SPEED button 38 RETURN button 53 EJECT button 33 *DVD MENU button Use the DVD MENU button to display the menu included on the remote control. See the page in "DVD menu." # 5T40301A [E]p06-12 11 3/1/05, 10:15 11

Owners Manual
Page 12
...; Be sure to use AAA size batteries. • Dispose of batteries in the battery compartment. 3 Replace the compartment cover. Illustration of MW20F11 Operation: • Aim the remote control at a time. • The Direction buttons ( / / / ) are also used batteries with new ones. • If the... environmental aspects of the arrow. 2 Install two "R03/AAA" batteries (supplied), paying attention to prevent battery acid from leaking into a fire. Remote control basics • Press POWER to turn the unit on or off. • Select your desired operating mode (TV/VCR or DVD) using...
...; Be sure to use AAA size batteries. • Dispose of batteries in the battery compartment. 3 Replace the compartment cover. Illustration of MW20F11 Operation: • Aim the remote control at a time. • The Direction buttons ( / / / ) are also used batteries with new ones. • If the... environmental aspects of the arrow. 2 Install two "R03/AAA" batteries (supplied), paying attention to prevent battery acid from leaking into a fire. Remote control basics • Press POWER to turn the unit on or off. • Select your desired operating mode (TV/VCR or DVD) using...

Owners Manual
Page 19
... reception condition, it may take approx. Notes: • If the unit does not operate properly, or No key operation (by the unit and/or the remote control): Static electricity, etc., may not function properly if the reception condition is not effective. 2 Wait at 12:00 PM everyday if you turn off...
... reception condition, it may take approx. Notes: • If the unit does not operate properly, or No key operation (by the unit and/or the remote control): Static electricity, etc., may not function properly if the reception condition is not effective. 2 Wait at 12:00 PM everyday if you turn off...
Owners Manual
Page 24
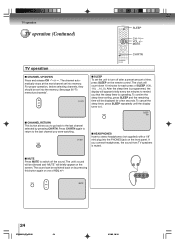
... the sleep timer, press SLEEP repeatedly until the display turns to remind you were watching. ■ SLEEP To set into the PHONES jack on the remote control. The channel automatically stops at the next channel set the unit to switch off after a preset amount of time, press SLEEP on the front...
... the sleep timer, press SLEEP repeatedly until the display turns to remind you were watching. ■ SLEEP To set into the PHONES jack on the remote control. The channel automatically stops at the next channel set the unit to switch off after a preset amount of time, press SLEEP on the front...

Owners Manual
Page 33
Playback (VCR) Loading and unloading a cassette tape Use only video cassette tapes marked . Unloading 1 Press STOP/EJECT on the front panel or remote control. 2 Remove the cassette tape. or Automatic tape eject This unit will start automatically. And when the tape is rewinded to its labeled side facing ...
Playback (VCR) Loading and unloading a cassette tape Use only video cassette tapes marked . Unloading 1 Press STOP/EJECT on the front panel or remote control. 2 Remove the cassette tape. or Automatic tape eject This unit will start automatically. And when the tape is rewinded to its labeled side facing ...
Owners Manual
Page 34
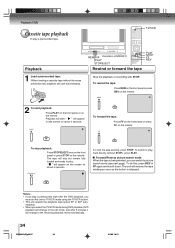
... SP or SLP auto- To stop the tape-winding, press STOP. The tape will start playback: Press PLAY on the front panel or on the remote. Playback (VCR) Cassette tape playback To play a prerecorded tape. TV/VCR Playback 1 Load a prerecorded tape: (When loading a cassette tape without STOP),... press PLAY. REW FF Illustration of MW20F11 PLAY STOP/EJECT Rewind or forward the tape PLAY STOP FF REV Stop the playback or recording with STOP. To rewind the tape: Press REW...
... SP or SLP auto- To stop the tape-winding, press STOP. The tape will start playback: Press PLAY on the front panel or on the remote. Playback (VCR) Cassette tape playback To play a prerecorded tape. TV/VCR Playback 1 Load a prerecorded tape: (When loading a cassette tape without STOP),... press PLAY. REW FF Illustration of MW20F11 PLAY STOP/EJECT Rewind or forward the tape PLAY STOP FF REV Stop the playback or recording with STOP. To rewind the tape: Press REW...

Owners Manual
Page 40
... cursor backward for another program. If a tape without an erase prevention tab, the Timer Recording is performed without a tape in the unit, or with the remote control. If you want to use the VCR operation, press TIMER REC to select the date, then press . Then press ENTER.
... cursor backward for another program. If a tape without an erase prevention tab, the Timer Recording is performed without a tape in the unit, or with the remote control. If you want to use the VCR operation, press TIMER REC to select the date, then press . Then press ENTER.

Owners Manual
Page 44
... or B/A to select DVD mode. The disc tray opens. 6 Press STOP to turn power off. 1 Press POWER on the unit or on the remote control to end playback. 3 Resuming facility • The unit records the stopped point, depending on the disc tray. Place the disc in the correct guide... unit will appear on how to malfunction. • Do not place a disc which is unplayable on the unit. CAUTION Keep your fingers well clear of MW20F11 3,5 6 5 1 4 DVD VCD Basic playback CD Preparations: • Insert the AC cord plug into a standard 120V 60Hz polarized AC outlet. Note: If ...
... or B/A to select DVD mode. The disc tray opens. 6 Press STOP to turn power off. 1 Press POWER on the unit or on the remote control to end playback. 3 Resuming facility • The unit records the stopped point, depending on the disc tray. Place the disc in the correct guide... unit will appear on how to malfunction. • Do not place a disc which is unplayable on the unit. CAUTION Keep your fingers well clear of MW20F11 3,5 6 5 1 4 DVD VCD Basic playback CD Preparations: • Insert the AC cord plug into a standard 120V 60Hz polarized AC outlet. Note: If ...

Owners Manual
Page 45
... unit to malfunction. • In many instances, a menu screen will appear after you should generally reduce the sharpness adjustment on -screen menu may damage your remote control once the movie is completed. • There may be a slight delay between you set , permanently etching that heading. DVD : You can use this unit...
... unit to malfunction. • In many instances, a menu screen will appear after you should generally reduce the sharpness adjustment on -screen menu may damage your remote control once the movie is completed. • There may be a slight delay between you set , permanently etching that heading. DVD : You can use this unit...
Owners Manual
Page 57
... you enter the correct pass word. 4) Press OPEN/CLOSE to activate Parental control setting. (See "Temporary disabling of rating level by DVD disc" on the remote control. Each setup will be more severe as the level number is now unlocked. 4) Press C or D to select "Parental", then press B or A to change the...
... you enter the correct pass word. 4) Press OPEN/CLOSE to activate Parental control setting. (See "Temporary disabling of rating level by DVD disc" on the remote control. Each setup will be more severe as the level number is now unlocked. 4) Press C or D to select "Parental", then press B or A to change the...
Owners Manual
Page 61
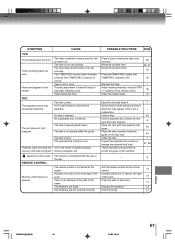
... (the TIMER REC indicator is inserted. No disc is not lit). The parental lock function is set correctly. appears on the disc tray. REMOTE CONTROL Remote control does not operate. POSSIBLE SOLUTIONS PAGE Place a piece of picture distortion may prevent a proper progress of the disc's program. Some times ...heads. 37 35 Eject the disc and clean it. Insert a playable disc (Check the disc type and color system). Noise bars appear on the remote control. Tape is lit). 33 20, 21 40 40 Replace the tape. - The disc is not a malfunction. Adjust tracking manually using the ...
... (the TIMER REC indicator is inserted. No disc is not lit). The parental lock function is set correctly. appears on the disc tray. REMOTE CONTROL Remote control does not operate. POSSIBLE SOLUTIONS PAGE Place a piece of picture distortion may prevent a proper progress of the disc's program. Some times ...heads. 37 35 Eject the disc and clean it. Insert a playable disc (Check the disc type and color system). Noise bars appear on the remote control. Tape is lit). 33 20, 21 40 40 Replace the tape. - The disc is not a malfunction. Adjust tracking manually using the ...

Owners Manual
Page 63
Specifications MW20F11 MW24F11 General Power supply AC 120 V 60 Hz Power consumption Operation: 110 W 135 W Stand by: 4 W Picture tube 20 in. (508 mm) diagonal* 24 in the...-8 dBm, 50 kΩ, negative sync., pin jack (L/R) x 2 Audio output -8 dBm, 1 kΩ, negative sync., pin jack (L/R) x 1 Audio output 0.5 V (p-p), 75 Ω, pin jack x 1 (DIGITAL COAXIAL) Supplied accessories Remote control (WC-SB1 1 Batteries (R03/AAA 2 300-75 Ω matching transformer 1 * Screen size is approximate. • This model complies with the above specifications. • Designs...
Specifications MW20F11 MW24F11 General Power supply AC 120 V 60 Hz Power consumption Operation: 110 W 135 W Stand by: 4 W Picture tube 20 in. (508 mm) diagonal* 24 in the...-8 dBm, 50 kΩ, negative sync., pin jack (L/R) x 2 Audio output -8 dBm, 1 kΩ, negative sync., pin jack (L/R) x 1 Audio output 0.5 V (p-p), 75 Ω, pin jack x 1 (DIGITAL COAXIAL) Supplied accessories Remote control (WC-SB1 1 Batteries (R03/AAA 2 300-75 Ω matching transformer 1 * Screen size is approximate. • This model complies with the above specifications. • Designs...


