
Owners Manual
Page 7
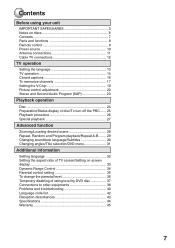
Contents Before using your unit IMPORTANT SAFEGUARDS 3 Notes on discs 6 Contents 7 Parts and functions 8 Remote control 9 Power source 10 Antenna connections 11 Cable TV connections 12 TV operation Setting the language 13 TV operation 14 Closed captions 16 To memorize ...
Contents Before using your unit IMPORTANT SAFEGUARDS 3 Notes on discs 6 Contents 7 Parts and functions 8 Remote control 9 Power source 10 Antenna connections 11 Cable TV connections 12 TV operation Setting the language 13 TV operation 14 Closed captions 16 To memorize ...

Owners Manual
Page 8
Parts and functions Front Power indicator POWER button AUDIO (L/R)/VIDEO IN jacks (LINE) STOP( ) button Disc tray Rear Headphone jack SKIP ( / ) buttons Remote sensor PLAY ( ) button OPEN/CLOSE ( ) button CHANNEL ( / ) buttons VOLUME ( / ) buttons AC power cord COAXIAL DIGITAL AUDIO OUT jack RF IN jack 8
Parts and functions Front Power indicator POWER button AUDIO (L/R)/VIDEO IN jacks (LINE) STOP( ) button Disc tray Rear Headphone jack SKIP ( / ) buttons Remote sensor PLAY ( ) button OPEN/CLOSE ( ) button CHANNEL ( / ) buttons VOLUME ( / ) buttons AC power cord COAXIAL DIGITAL AUDIO OUT jack RF IN jack 8
Owners Manual
Page 9
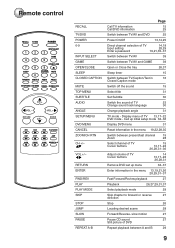
Remote control RECALL TV/DVD POWER 1 4 7 SLEEP INPUT SELECT 23 GAME 56 OPEN/CLOSE 89 CLOSED CAPTION MUTE 0 TOP MENU SUBTITLE AUDIO ANGLE SETUP/MENU DVD ...
Remote control RECALL TV/DVD POWER 1 4 7 SLEEP INPUT SELECT 23 GAME 56 OPEN/CLOSE 89 CLOSED CAPTION MUTE 0 TOP MENU SUBTITLE AUDIO ANGLE SETUP/MENU DVD ...
Owners Manual
Page 10
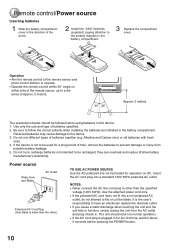
... power cord only. • If the polarized AC cord does not fit into a standard 120V 60Hz polarized AC outlet. The unit should be recharged; Remote control/Power source Inserting batteries 1 Slide the battery compartment cover in the direction of the arrow. 2 Install two "AAA" batteries (supplied), paying attention ...sure to other than the other.) TO USE AC POWER SOURCE Use the AC polarized line cord provided for operation on either side of the remote sensor, up to file or cut the blade. NOTES: • Never connect the AC line cord plug to follow the correct polarity when...
... power cord only. • If the polarized AC cord does not fit into a standard 120V 60Hz polarized AC outlet. The unit should be recharged; Remote control/Power source Inserting batteries 1 Slide the battery compartment cover in the direction of the arrow. 2 Install two "AAA" batteries (supplied), paying attention ...sure to other than the other.) TO USE AC POWER SOURCE Use the AC polarized line cord provided for operation on either side of the remote sensor, up to file or cut the blade. NOTES: • Never connect the AC line cord plug to follow the correct polarity when...
Owners Manual
Page 13
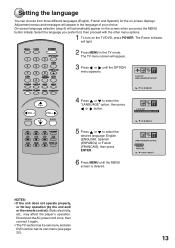
... ESPA„OL FRANCAIS < / / ENTER / MENU NOTES: • If the unit does not operate properly, or No key operation (by the unit and/ or the remote control): Static electricity, etc., may affect the player's operation. On-screen language selection (step 5) will light.
... ESPA„OL FRANCAIS < / / ENTER / MENU NOTES: • If the unit does not operate properly, or No key operation (by the unit and/ or the remote control): Static electricity, etc., may affect the player's operation. On-screen language selection (step 5) will light.
Owners Manual
Page 15
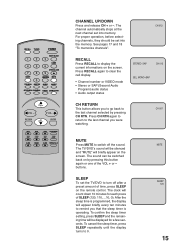
For proper operation, before selecting channels, they should be displayed for each press of the VOL + or - The clock will briefly appear on the remote control. Press CH RTN again to return to 0. To cancel the sleep timer, press SLEEP repeatedly until the display turns to the last channel you ...
For proper operation, before selecting channels, they should be displayed for each press of the VOL + or - The clock will briefly appear on the remote control. Press CH RTN again to return to 0. To cancel the sleep timer, press SLEEP repeatedly until the display turns to the last channel you ...
Owners Manual
Page 25
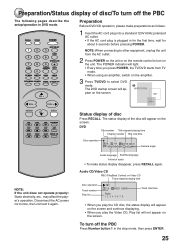
... screen and continue displaying. • When you press POWER, the TV/DVD starts from the AC outlet. 2 Press POWER on the unit or on the remote control to turn off the PBC The following pages describe the setup/operation in for the first time, wait for about 5 seconds before pressing POWER...
... screen and continue displaying. • When you press POWER, the TV/DVD starts from the AC outlet. 2 Press POWER on the unit or on the remote control to turn off the PBC The following pages describe the setup/operation in for the first time, wait for about 5 seconds before pressing POWER...
Owners Manual
Page 26
... 1 Press OPEN/CLOSE on the screen. VOL + RETURN CH - Resuming facility • The unit memorizes the stopped point and " " appears on the unit or the remote control. To turn off . The disc tray closes automatically and unit turns off the PBC, see pages 24 and 35). • Some discs may be...
... 1 Press OPEN/CLOSE on the screen. VOL + RETURN CH - Resuming facility • The unit memorizes the stopped point and " " appears on the unit or the remote control. To turn off . The disc tray closes automatically and unit turns off the PBC, see pages 24 and 35). • Some discs may be...
Owners Manual
Page 41
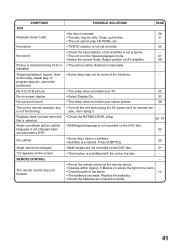
... selector is not set correctly. • Check the input selector of the amplifier is set properly. • The unit is selected. REMOTE CONTROL The remote control does not function. Replace the batteries. • Check the batteries are not recorded on the DVD disc. 31 • The function... The batteries are cleared. No picture No sound Picture is prohibited with the unit or the disc. - - • Aim at the remote control at the remote sensor. • Operate within Approx. 5 Meters or reduce the light in the Special playback mode. • Select the correct Audio Output...
... selector is not set correctly. • Check the input selector of the amplifier is set properly. • The unit is selected. REMOTE CONTROL The remote control does not function. Replace the batteries. • Check the batteries are not recorded on the DVD disc. 31 • The function... The batteries are cleared. No picture No sound Picture is prohibited with the unit or the disc. - - • Aim at the remote control at the remote sensor. • Operate within Approx. 5 Meters or reduce the light in the Special playback mode. • Select the correct Audio Output...


