

Owners Manual
Page 10
Front POWER indicator 20 AUDIO (L/R)/VIDEO IN jacks (LINE) 15 POWER button 18 Disc tray 28 STOP( ) button 28 Rear PHONES jack 21 SKIP ( / ) buttons 30 Remote sensor 12 PLAY ( ) button 28 OPEN/CLOSE ( ) button 28 CHANNEL ( / ) buttons 21 VOLUME ( / ) buttons 20 10 5K30501B [E] (P08-12) AC power cord 10 COAXIAL DIGITAL AUDIO OUT jack 16 RF IN jack 13 20/4/04, 15:31 Introduction Identification of controls See the page in for details.
Front POWER indicator 20 AUDIO (L/R)/VIDEO IN jacks (LINE) 15 POWER button 18 Disc tray 28 STOP( ) button 28 Rear PHONES jack 21 SKIP ( / ) buttons 30 Remote sensor 12 PLAY ( ) button 28 OPEN/CLOSE ( ) button 28 CHANNEL ( / ) buttons 21 VOLUME ( / ) buttons 20 10 5K30501B [E] (P08-12) AC power cord 10 COAXIAL DIGITAL AUDIO OUT jack 16 RF IN jack 13 20/4/04, 15:31 Introduction Identification of controls See the page in for details.
Owners Manual
Page 11
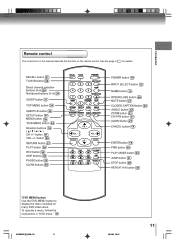
... STOP FWD PLAY MODE SKIP JUMP SLOW PAUSE SLOW REPEAT A-B *DVD MENU button Use the DVD MENU button to display the menu included on the remote control. To operate a menu, follow the instructions in for details. VOL + RETURN CH - See the page in "DVD menu." 34 5K30501B [E] (P08-12) 11 20...
... STOP FWD PLAY MODE SKIP JUMP SLOW PAUSE SLOW REPEAT A-B *DVD MENU button Use the DVD MENU button to display the menu included on the remote control. To operate a menu, follow the instructions in for details. VOL + RETURN CH - See the page in "DVD menu." 34 5K30501B [E] (P08-12) 11 20...
Owners Manual
Page 12
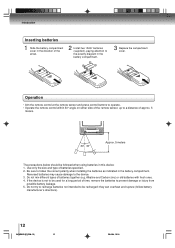
... time, remove the batteries to a distance of batteries together (e.g. Operation • Aim the remote control at the remote sensor and press control buttons to operate. • Operate the remote control within 30° angle on either side of the remote sensor, up to prevent damage or injury from possible battery leakage. 5. Be sure to...
... time, remove the batteries to a distance of batteries together (e.g. Operation • Aim the remote control at the remote sensor and press control buttons to operate. • Operate the remote control within 30° angle on either side of the remote sensor, up to prevent damage or injury from possible battery leakage. 5. Be sure to...
Owners Manual
Page 19
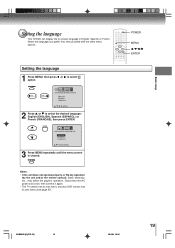
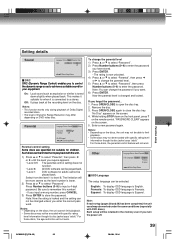
... menu screen is cleared. SETUP/MENU Notes: • If the unit does not operate properly, or No key operation (by the unit and/or the remote control): Static electricity, etc., may affect the player's operation. VOL + LANGUAGE/IDIOMA/LANGUE ENGLISH ESPAÑOL FRANCAIS /MENU 2 Press or to select option. POWER...
... menu screen is cleared. SETUP/MENU Notes: • If the unit does not operate properly, or No key operation (by the unit and/or the remote control): Static electricity, etc., may affect the player's operation. VOL + LANGUAGE/IDIOMA/LANGUE ENGLISH ESPAÑOL FRANCAIS /MENU 2 Press or to select option. POWER...

Owners Manual
Page 21
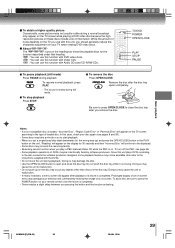
... plug into the PHONES jack on the screen. To confirm the sleep timer setting, press SLEEP and the remaining time will briefly appear on the remote control. If you to go back to the last channel selected by pressing this button again or one hour the Game timer display will appear...
... plug into the PHONES jack on the screen. To confirm the sleep timer setting, press SLEEP and the remaining time will briefly appear on the remote control. If you to go back to the last channel selected by pressing this button again or one hour the Game timer display will appear...
Owners Manual
Page 28
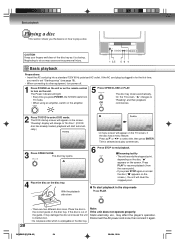
... need to set "Starting setup" (see page 18). • When connecting to other equipment, turn power off. 1 Press POWER on the unit or on the remote control to turn on the disc. With the playback side down 6 Press STOP to end playback. 3Resuming facility • The unit records the stopped point...
... need to set "Starting setup" (see page 18). • When connecting to other equipment, turn power off. 1 Press POWER on the unit or on the remote control to turn on the disc. With the playback side down 6 Press STOP to end playback. 3Resuming facility • The unit records the stopped point...
Owners Manual
Page 29
... disc is completed. In this , be sure to close the disc tray. Be sure to press OPEN/CLOSE to press the POWER button on your remote control once the movie is moving. CD : You can use this unit plays DVDs according to the type of an on the display for the...
... disc is completed. In this , be sure to close the disc tray. Be sure to press OPEN/CLOSE to press the POWER button on your remote control once the movie is moving. CD : You can use this unit plays DVDs according to the type of an on the display for the...
Owners Manual
Page 39
..., the unit can not be limited not to play back with DVD discs). If you enter the correct pass word. "PASSWORD CLEAR" appears on the remote control. For those discs, the age restriction will not work . English: To display OSD language is toned down on the front panel, press 7 on the...
..., the unit can not be limited not to play back with DVD discs). If you enter the correct pass word. "PASSWORD CLEAR" appears on the remote control. For those discs, the age restriction will not work . English: To display OSD language is toned down on the front panel, press 7 on the...
Owners Manual
Page 43
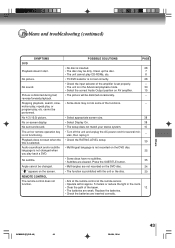
...and/or subtitle language is inserted. • The disc may be distorted occasionally. • Some discs may not do some of the functions. REMOTE CONTROL The remote control does not function. Clean up the disc. • The unit cannot play , etc. Picture is in the room. • Clear...set properly. • The unit is distorted during fast reverse/forward playback. The unit or remote operation key is prohibited with the unit or the disc. 30 • Aim at the remote control at the remote sensor. • Operate within approx. 5 meters or reduce the light in the Advanced ...
...and/or subtitle language is inserted. • The disc may be distorted occasionally. • Some discs may not do some of the functions. REMOTE CONTROL The remote control does not function. Clean up the disc. • The unit cannot play , etc. Picture is in the room. • Clear...set properly. • The unit is distorted during fast reverse/forward playback. The unit or remote operation key is prohibited with the unit or the disc. 30 • Aim at the remote control at the remote sensor. • Operate within approx. 5 meters or reduce the light in the Advanced ...
Owners Manual
Page 45
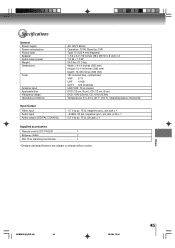
...˚F-104˚F), Operating status: Horizontal 1.0 V (p-p), 75 Ω, negative sync., pin jack x 1 -8 dBm, 50 kΩ, negative sync., pin jack (L/R) x 1 0.5 V (p-p), 75 Ω, pin jack x 1 Supplied accessories Remote control (DC-FN20S 1 Batteries (AAA 2 300-75 Ω matching transformer 1 • Designs and specifications are subject to change without notice. Specifications General Power supply Power...
...˚F-104˚F), Operating status: Horizontal 1.0 V (p-p), 75 Ω, negative sync., pin jack x 1 -8 dBm, 50 kΩ, negative sync., pin jack (L/R) x 1 0.5 V (p-p), 75 Ω, pin jack x 1 Supplied accessories Remote control (DC-FN20S 1 Batteries (AAA 2 300-75 Ω matching transformer 1 • Designs and specifications are subject to change without notice. Specifications General Power supply Power...


