
User Guide
Page 9
... customers to -landfill goal at the end of the licenses extend to provide such video. To learn more about Toshiba's sustainability commitment, visit us .toshiba.com/recycle. None of the life cycle. Intel, Intel Core, Celeron, Centrino and Pentium are trademarks or registered... PRO, and Memory Stick PRO Duo are registered trademarks of Sony Corporation. Computer Recycling Information As part of a commitment to people and the future, Toshiba promotes the efficient use of such marks by Toshiba is a registered trademark of their respective owners. Reuse, Donation, Recycling...
... customers to -landfill goal at the end of the licenses extend to provide such video. To learn more about Toshiba's sustainability commitment, visit us .toshiba.com/recycle. None of the life cycle. Intel, Intel Core, Celeron, Centrino and Pentium are trademarks or registered... PRO, and Memory Stick PRO Duo are registered trademarks of Sony Corporation. Computer Recycling Information As part of a commitment to people and the future, Toshiba promotes the efficient use of such marks by Toshiba is a registered trademark of their respective owners. Reuse, Donation, Recycling...

User Guide
Page 11
Contents 11 Adding optional external devices 29 Adding memory (optional 30 Installing a memory module 30 Removing a memory module 35 Checking total memory 37 Recovering the Internal Storage Drive 38 Recovering to out-of-box state (recommended recovery method 39 Recovering of factory default software with user's data ...
Contents 11 Adding optional external devices 29 Adding memory (optional 30 Installing a memory module 30 Removing a memory module 35 Checking total memory 37 Recovering the Internal Storage Drive 38 Recovering to out-of-box state (recommended recovery method 39 Recovering of factory default software with user's data ...
User Guide
Page 13
... or headphones............84 Using the Web Camera 85 Using the Memory card reader 85 Inserting memory media 86 Removing memory media 87 Toshiba remote control 88 Using the Toshiba remote control 88 Chapter 5: Utilities 89 TOSHIBA Assist 90 Connect 91 Secure 91 Protect & Fix 92 Optimize 93 TOSHIBA Application Installer 94 Setting passwords 95 Using a supervisor password...
... or headphones............84 Using the Web Camera 85 Using the Memory card reader 85 Inserting memory media 86 Removing memory media 87 Toshiba remote control 88 Using the Toshiba remote control 88 Chapter 5: Utilities 89 TOSHIBA Assist 90 Connect 91 Secure 91 Protect & Fix 92 Optimize 93 TOSHIBA Application Installer 94 Setting passwords 95 Using a supervisor password...
User Guide
Page 14
...problems 112 The Windows® operating system can help you 112 Fixing a problem with Device Manager 113 Checking device properties 113 Memory problems 114 Power and the battery 114 Keyboard problems 115 Display problems 115 Disk or storage drive problems 116 Error-checking 116 Optical... backup in the Windows® operating system ...........124 If you need further assistance 129 Contacting Toshiba 129 Other Toshiba Internet Web sites 129 Toshiba's worldwide offices 130 Appendix A: Hot Keys/TOSHIBA Cards 131 Hot Key Cards 131 Using the Hot Key Cards 132 Hot key functions 132 ...
...problems 112 The Windows® operating system can help you 112 Fixing a problem with Device Manager 113 Checking device properties 113 Memory problems 114 Power and the battery 114 Keyboard problems 115 Display problems 115 Disk or storage drive problems 116 Error-checking 116 Optical... backup in the Windows® operating system ...........124 If you need further assistance 129 Contacting Toshiba 129 Other Toshiba Internet Web sites 129 Toshiba's worldwide offices 130 Appendix A: Hot Keys/TOSHIBA Cards 131 Hot Key Cards 131 Using the Hot Key Cards 132 Hot key functions 132 ...
User Guide
Page 23
... up your software" on page 29 before adding external or internal components to check for viruses. NOTE Please handle your computer carefully to a printer and memory. You need a special program to your computer programs you buy from overheating when the power is turned on or when an AC adaptor is connected...
... up your software" on page 29 before adding external or internal components to check for viruses. NOTE Please handle your computer carefully to a printer and memory. You need a special program to your computer programs you buy from overheating when the power is turned on or when an AC adaptor is connected...
User Guide
Page 29
... connected to the Internet. Follow the on your selection. Failure to : ❖ Add more memory (see "Adding memory (optional)" on page 30) ❖ Connecting external devices (see "Connecting an external device" on page 56) Registering your computer with Toshiba Setting up the software. NOTE To register online, you through steps to set up...
... connected to the Internet. Follow the on your selection. Failure to : ❖ Add more memory (see "Adding memory (optional)" on page 30) ❖ Connecting external devices (see "Connecting an external device" on page 56) Registering your computer with Toshiba Setting up the software. NOTE To register online, you through steps to set up...

User Guide
Page 30
..., see the accessories information packaged with enough memory to room temperature before they have cooled. You may want to follow these directions could result in good condition. NOTE Before adding external devices, Toshiba recommends first setting up the software. You will damage the computer, the module, or both. Allow the module(s) to...minor bodily injury. Avoid touching the cover, the module(s), and the surrounding area before replacing it. Your computer comes with your system or visit accessories.toshiba.com. Installing a memory module Memory modules can be hot.
..., see the accessories information packaged with enough memory to room temperature before they have cooled. You may want to follow these directions could result in good condition. NOTE Before adding external devices, Toshiba recommends first setting up the software. You will damage the computer, the module, or both. Allow the module(s) to...minor bodily injury. Avoid touching the cover, the module(s), and the surrounding area before replacing it. Your computer comes with your system or visit accessories.toshiba.com. Installing a memory module Memory modules can be hot.

User Guide
Page 31
... will not be installed in Sleep or Hibernation mode, data will be lost . The computer could hang up the next time you install or remove a memory module while the computer is on and data in Sleep or Hibernation mode. If the computer is in Slot A. In either of the Start menu...) Shut down button 2 Click the Shut down the operating system, and then turns off the computer using the Start menu. You can install one memory module is in memory will be lost . If you turn off . 3 Unplug and remove any cables connected to be installed, it on , begin at step 1; NOTE For...
... will not be installed in Sleep or Hibernation mode, data will be lost . The computer could hang up the next time you install or remove a memory module while the computer is on and data in Sleep or Hibernation mode. If the computer is in Slot A. In either of the Start menu...) Shut down button 2 Click the Shut down the operating system, and then turns off the computer using the Start menu. You can install one memory module is in memory will be lost . If you turn off . 3 Unplug and remove any cables connected to be installed, it on , begin at step 1; NOTE For...
User Guide
Page 32
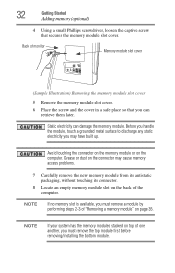
... before removing/installing the bottom module. 32 Getting Started Adding memory (optional) 4 Using a small Phillips screwdriver, loosen the captive screw that you may cause memory access problems. 7 Carefully remove the new memory module from its antistatic packaging, without touching its connector. 8...discharge any static electricity you can damage the memory module. Avoid touching the connector on the memory module or on the back of monitor Memory module slot cover (Sample Illustration) Removing the memory module slot cover 5 Remove the memory module slot cover. 6 Place the screw ...
... before removing/installing the bottom module. 32 Getting Started Adding memory (optional) 4 Using a small Phillips screwdriver, loosen the captive screw that you may cause memory access problems. 7 Carefully remove the new memory module from its antistatic packaging, without touching its connector. 8...discharge any static electricity you can damage the memory module. Avoid touching the connector on the memory module or on the back of monitor Memory module slot cover (Sample Illustration) Removing the memory module slot cover 5 Remove the memory module slot cover. 6 Place the screw ...

User Guide
Page 33
... A is the top slot. Slot B is the bottom slot. notch latch connector latch key (Sample Illustration) Aligning the memory module with its connector. If only one memory module is to be installed, it must be installed in the socket. Position the module toward the socket, aligning the connector...'s notch with the matching key in Slot A. 9 Pick up the memory module by its sides, avoiding any contact with the socket 10 Firmly press the memory module into the memory slot's socket at approximately a 30-degree angle (to the horizontal surface of the computer). ...
... A is the top slot. Slot B is the bottom slot. notch latch connector latch key (Sample Illustration) Aligning the memory module with its connector. If only one memory module is to be installed, it must be installed in the socket. Position the module toward the socket, aligning the connector...'s notch with the matching key in Slot A. 9 Pick up the memory module by its sides, avoiding any contact with the socket 10 Firmly press the memory module into the memory slot's socket at approximately a 30-degree angle (to the horizontal surface of the computer). ...

User Guide
Page 34
... into the latches at the sides of the socket. 34 Getting Started Adding memory (optional) 11 Once the module's connector is fully inserted into the socket, press downward on the memory module Do not force the memory module into position. latch latch (Sample Illustration) Pressing down on the top ...it must be completely inserted into the slot NOTE For this model, Slot A is the top slot. Slot B Slot A (Sample Illustration) Inserting the memory module into the socket and level when secured in place. If the latches and cutouts do not line up correctly, repeat steps 10-11. Slot...
... into the latches at the sides of the socket. 34 Getting Started Adding memory (optional) 11 Once the module's connector is fully inserted into the socket, press downward on the memory module Do not force the memory module into position. latch latch (Sample Illustration) Pressing down on the top ...it must be completely inserted into the slot NOTE For this model, Slot A is the top slot. Slot B Slot A (Sample Illustration) Inserting the memory module into the socket and level when secured in place. If the latches and cutouts do not line up correctly, repeat steps 10-11. Slot...
User Guide
Page 35
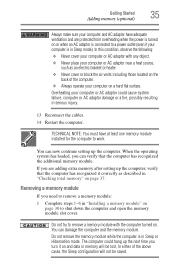
... if your computer or AC adaptor could hang up the computer, verify that the computer has recognized the additional memory module. You can damage the computer and the memory module. The computer could cause system failure, computer or AC adaptor damage or a fire, possibly resulting in ... ❖ Always operate your computer or AC adaptor near a heat source, such as described in "Checking total memory" on . Overheating your computer is connected to remove a memory module with any object. ❖ Never place your computer on or when an AC adaptor is in serious injury...
... if your computer or AC adaptor could hang up the computer, verify that the computer has recognized the additional memory module. You can damage the computer and the memory module. The computer could cause system failure, computer or AC adaptor damage or a fire, possibly resulting in ... ❖ Always operate your computer or AC adaptor near a heat source, such as described in "Checking total memory" on . Overheating your computer is connected to remove a memory module with any object. ❖ Never place your computer on or when an AC adaptor is in serious injury...

User Guide
Page 36
... of the slot. NOTE If your internal storage drive for errors or defragment the drive. 36 Getting Started Adding memory (optional) NOTE The following screen may need to scan your system has the memory modules stacked on the power: If "Start Windows® Normally" is best to press Enter to go into... Safe Mode, then shut down and restart the system, at which time Windows® should boot back up slightly. The memory module pops up normally. When Safe Mode is suggested, this could be a sign that you may appear when you must remove the top module first...
... of the slot. NOTE If your internal storage drive for errors or defragment the drive. 36 Getting Started Adding memory (optional) NOTE The following screen may need to scan your system has the memory modules stacked on the power: If "Start Windows® Normally" is best to press Enter to go into... Safe Mode, then shut down and restart the system, at which time Windows® should boot back up slightly. The memory module pops up normally. When Safe Mode is suggested, this could be a sign that you may appear when you must remove the top module first...
User Guide
Page 37
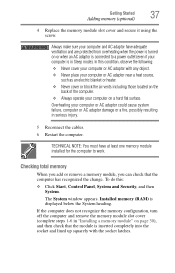
...you can check that the module is displayed below the System heading. Always make sure your computer and AC adaptor have at least one memory module installed for the computer to a power outlet (even if your computer or AC adaptor could cause system failure, computer or AC ...10070; Never cover your computer on page 30), and then check that the computer has recognized the change. Getting Started 37 Adding memory (optional) 4 Replace the memory module slot cover and secure it using the screw. TECHNICAL NOTE: You must have adequate ventilation and are protected from overheating when...
...you can check that the module is displayed below the System heading. Always make sure your computer and AC adaptor have at least one memory module installed for the computer to a power outlet (even if your computer or AC adaptor could cause system failure, computer or AC ...10070; Never cover your computer on page 30), and then check that the computer has recognized the change. Getting Started 37 Adding memory (optional) 4 Replace the memory module slot cover and secure it using the screw. TECHNICAL NOTE: You must have adequate ventilation and are protected from overheating when...

User Guide
Page 60
.... However, if your files to the internal storage drive at preset intervals. For more information, see "Data and system configuration backup in the computer's temporary memory until you save feature that can be activated. It is easy to put off backing up your internal storage drive suddenly fails, you will lose...
.... However, if your files to the internal storage drive at preset intervals. For more information, see "Data and system configuration backup in the computer's temporary memory until you save feature that can be activated. It is easy to put off backing up your internal storage drive suddenly fails, you will lose...

User Guide
Page 76
... clock (RTC) battery. When Hibernation mode is enabled and the RTC battery is powered off. The RTC battery powers the System Time Clock and BIOS memory used while the RTC battery is low, the real-time clock and calendar may vary by computer model. The RTC battery may only charge while...
... clock (RTC) battery. When Hibernation mode is enabled and the RTC battery is powered off. The RTC battery powers the System Time Clock and BIOS memory used while the RTC battery is low, the real-time clock and calendar may vary by computer model. The RTC battery may only charge while...

User Guide
Page 85
...field, type Web Camera. The Web Camera indicator light glows when the Web Camera is required. The Memory card reader may vary. To copy data from one media to the Internet. Using the Memory card reader (Available on your computer model, the process of sending email, taking pictures or recording ... Digital™ (SD™ / SDHC / SDXC), or MMC® (MultiMediaCard®) media. NOTE Do not use of media. Depending on certain models.) The Memory card reader supports the use the Copy Disk function for this Web Camera you can be used with others and have them see you while...
...field, type Web Camera. The Web Camera indicator light glows when the Web Camera is required. The Memory card reader may vary. To copy data from one media to the Internet. Using the Memory card reader (Available on your computer model, the process of sending email, taking pictures or recording ... Digital™ (SD™ / SDHC / SDXC), or MMC® (MultiMediaCard®) media. NOTE Do not use of media. Depending on certain models.) The Memory card reader supports the use the Copy Disk function for this Web Camera you can be used with others and have them see you while...

User Guide
Page 86
86 Exploring Your Computer's Features Using the Memory card reader Inserting memory media The following instructions apply to static electricity, which can destroy data. You could expose the storage area to all types of supported media devices. 1 Turn the media so that the contacts (metal areas) are face down. 2 Push the media into the adapter until it locks in place. (Sample Illustration) Inserting memory media When inserting memory media, do not touch the metal contacts.
86 Exploring Your Computer's Features Using the Memory card reader Inserting memory media The following instructions apply to static electricity, which can destroy data. You could expose the storage area to all types of supported media devices. 1 Turn the media so that the contacts (metal areas) are face down. 2 Push the media into the adapter until it locks in place. (Sample Illustration) Inserting memory media When inserting memory media, do not touch the metal contacts.

User Guide
Page 87
... pops out slightly. 3 Grasp the card and pull it . disappears, writing to go out. Exploring Your Computer's Features 87 Using the Memory card reader Removing memory media 1 Prepare the card for removal by clicking on the Show hidden icons button ( ), if necessary, in progress and your data could...® message "copying..." otherwise, skip to step 3. 2 Gently press the card inward to release it straight out. (Sample Illustration) Removing memory media Do not remove memory media while data is unable to prepare the media for safe removal, a message will tell you to Remove Hardware.
... pops out slightly. 3 Grasp the card and pull it . disappears, writing to go out. Exploring Your Computer's Features 87 Using the Memory card reader Removing memory media 1 Prepare the card for removal by clicking on the Show hidden icons button ( ), if necessary, in progress and your data could...® message "copying..." otherwise, skip to step 3. 2 Gently press the card inward to release it straight out. (Sample Illustration) Removing memory media Do not remove memory media while data is unable to prepare the media for safe removal, a message will tell you to Remove Hardware.
User Guide
Page 108
...logged on the computer's internal storage drive. It alerts users to help diagnose problems should the computer require service by TOSHIBA or TOSHIBA's authorized service providers. The collected information is used to specific system conditions via the Windows® Control Panel. It...the use , and also computer and device usage (e.g.: power settings, CPU, memory, and temperatures for quality assurance analysis. 108 Utilities TOSHIBA PC Health Monitor TOSHIBA PC Health Monitor The TOSHIBA PC Health Monitor software program monitors computer system functions such as required by your...
...logged on the computer's internal storage drive. It alerts users to help diagnose problems should the computer require service by TOSHIBA or TOSHIBA's authorized service providers. The collected information is used to specific system conditions via the Windows® Control Panel. It...the use , and also computer and device usage (e.g.: power settings, CPU, memory, and temperatures for quality assurance analysis. 108 Utilities TOSHIBA PC Health Monitor TOSHIBA PC Health Monitor The TOSHIBA PC Health Monitor software program monitors computer system functions such as required by your...