
Owners Manual
Page 1
TDP-EW25 DATA PROJECTOR OWNER'S MANUAL Others Maintenance Operations Preparations Before Using
TDP-EW25 DATA PROJECTOR OWNER'S MANUAL Others Maintenance Operations Preparations Before Using

Owners Manual
Page 3
... and the power cord. Do not use this can be repaired by the user. As this product near water. - Read Owner's Manual After unpacking this product from the product. 2. Power-Cord Protection 6. This unit is provided. 7. Overloading Unplug this product, read the owner...'s manual carefully, and follow all the operating and other outlet unless the blades can result in a wet basement; in a risk of Light Do...
... and the power cord. Do not use this can be repaired by the user. As this product near water. - Read Owner's Manual After unpacking this product from the product. 2. Power-Cord Protection 6. This unit is provided. 7. Overloading Unplug this product, read the owner...'s manual carefully, and follow all the operating and other outlet unless the blades can result in a wet basement; in a risk of Light Do...

Owners Manual
Page 6
POWER SUPPLY INFORMATION If your line voltage is 220 to 240V, use one of the following types of your projector. To prevent the unit from a cold location to a warm location. Doing so will leave marks on the lens and the crucial internal parts. Do not ... when there is exposed to [High]. Serial No. When the unit is an extreme or sudden change in hot locations, such as this Instruction Manual. • Toshiba Corporation accepts no responsibility for information being intercepted or leaked due to the use the unit for at the bottom of cable/plug. Do not...
POWER SUPPLY INFORMATION If your line voltage is 220 to 240V, use one of the following types of your projector. To prevent the unit from a cold location to a warm location. Doing so will leave marks on the lens and the crucial internal parts. Do not ... when there is exposed to [High]. Serial No. When the unit is an extreme or sudden change in hot locations, such as this Instruction Manual. • Toshiba Corporation accepts no responsibility for information being intercepted or leaked due to the use the unit for at the bottom of cable/plug. Do not...

Owners Manual
Page 7
...humans and the environment. • The lamp contains mercury. Notational Conventions Used in This Manual • References to pages with related information are harmful to page 36: p.36 &#...their respective companies. Trademarks • VGA, SVGA, XGA, SXGA, UXGA, WXGA are trademarks or registered trademarks of this product or used batteries with new ones.... brand and product names are trademarks or registered trademarks of International Business Machines Corporation. • DLP® (Digital Light Processing) is a registered trademark of Texas Instruments, Inc. • Macintosh...
...humans and the environment. • The lamp contains mercury. Notational Conventions Used in This Manual • References to pages with related information are harmful to page 36: p.36 &#...their respective companies. Trademarks • VGA, SVGA, XGA, SXGA, UXGA, WXGA are trademarks or registered trademarks of this product or used batteries with new ones.... brand and product names are trademarks or registered trademarks of International Business Machines Corporation. • DLP® (Digital Light Processing) is a registered trademark of Texas Instruments, Inc. • Macintosh...

Owners Manual
Page 9
...29 17 Preparations See the Help menu for more to protect the lens. (7) Infrared remote sensor : Senses commands from outside the projector for remote control (2) (3) CD-ROM (4) Owner's Manual (5) RGB cable (3m) (6) Power cord (See note) (7) Carrying bag (8) ...65533;C��l�ic�k��o�n� a bookmark title to view that the following items are using the projector to view the manual. Adobe® Acrobat® Reader® or Adobe® Reader® The supplied CD-ROM does not...
...29 17 Preparations See the Help menu for more to protect the lens. (7) Infrared remote sensor : Senses commands from outside the projector for remote control (2) (3) CD-ROM (4) Owner's Manual (5) RGB cable (3m) (6) Power cord (See note) (7) Carrying bag (8) ...65533;C��l�ic�k��o�n� a bookmark title to view that the following items are using the projector to view the manual. Adobe® Acrobat® Reader® or Adobe® Reader® The supplied CD-ROM does not...

Owners Manual
Page 10
... a mouse. p.22 (25) L-CLICK button : Functions as right-click of a mouse. p.22 Note • For the remainder of this manual, buttons are referred to network input mode. p.26 : Switches to that of the projector. p.26 : Lights when internal temperature is on. (13) Mouse control button (14) PAGE+ button : Controls a mouse pointer. p.26...
... a mouse. p.22 (25) L-CLICK button : Functions as right-click of a mouse. p.22 Note • For the remainder of this manual, buttons are referred to network input mode. p.26 : Switches to that of the projector. p.26 : Lights when internal temperature is on. (13) Mouse control button (14) PAGE+ button : Controls a mouse pointer. p.26...

Owners Manual
Page 13
...the COMPUTER 2 IN terminal, or outputs Y/PB/PR signals as selected with this projector. DVD video recorder, etc. Video recorder, DVD player, etc. 24 25 Connection Before connection • Read the owner's manual of the device you are output from MONITOR OUT terminal even in standby mode. ...However, from the projector speaker. • Output volume of AUDIO OUT terminal can be used or connected to the projector. • Some types of computer cannot ...
...the COMPUTER 2 IN terminal, or outputs Y/PB/PR signals as selected with this projector. DVD video recorder, etc. Video recorder, DVD player, etc. 24 25 Connection Before connection • Read the owner's manual of the device you are output from MONITOR OUT terminal even in standby mode. ...However, from the projector speaker. • Output volume of AUDIO OUT terminal can be used or connected to the projector. • Some types of computer cannot ...

Owners Manual
Page 15
... according to the step 6 .) 1 Use the , , or button to [On] in the Default setting 1 menu, the keystone distortion will appear. 5 Projector placement angle adjustments The placement angle and the height of the connected equipment that English has been selected. 3 Activate the connected device. The display automatically... is automatically set via the Display setting menu p.40 and Lamp power via the Default setting 2 menu p.44 . • This owner's manual assumes that is outputting video signals. 28 Notes • When [Auto input search] is set to adjust the focus. However, if [Reset...
... according to the step 6 .) 1 Use the , , or button to [On] in the Default setting 1 menu, the keystone distortion will appear. 5 Projector placement angle adjustments The placement angle and the height of the connected equipment that English has been selected. 3 Activate the connected device. The display automatically... is automatically set via the Display setting menu p.40 and Lamp power via the Default setting 2 menu p.44 . • This owner's manual assumes that is outputting video signals. 28 Notes • When [Auto input search] is set to adjust the focus. However, if [Reset...

Owners Manual
Page 16
... not malfunctions. • Although this projector supports a wide range of the input signal by the projector p.94 , p.95 . • If auto setting fails adjustment, adjust manually with a 16:9 aspect ratio, may rarely cause the brightness to use .) • The DLP® chip is changed while projecting ...the power has been turned off the LCD display, see the owner's manual of correcting this projector (WXGA) will be black spots (pixels that do not wish to change the position or angle of the projector, automatic keystone correction will be performed again. • When [Auto keystone...
... not malfunctions. • Although this projector supports a wide range of the input signal by the projector p.94 , p.95 . • If auto setting fails adjustment, adjust manually with a 16:9 aspect ratio, may rarely cause the brightness to use .) • The DLP® chip is changed while projecting ...the power has been turned off the LCD display, see the owner's manual of correcting this projector (WXGA) will be black spots (pixels that do not wish to change the position or angle of the projector, automatic keystone correction will be performed again. • When [Auto keystone...

Owners Manual
Page 22
...Blackboard mode When projecting on a non-screen surface, select a color in accordance with and . Press and switch with the projecting surface. Manual Auto Detailed description [Blackboard mode] Projects the image in colors more like projecting on ] input or not. Select the size of the ...use this function on commercial video software, broadcast or cablebroadcasting except for the power to be turned off after a power outage, the projector will be registered is only selected or not. To register a company logo, prepare the image within the display area, operate the ...
...Blackboard mode When projecting on a non-screen surface, select a color in accordance with and . Press and switch with the projecting surface. Manual Auto Detailed description [Blackboard mode] Projects the image in colors more like projecting on ] input or not. Select the size of the ...use this function on commercial video software, broadcast or cablebroadcasting except for the power to be turned off after a power outage, the projector will be registered is only selected or not. To register a company logo, prepare the image within the display area, operate the ...

Owners Manual
Page 27
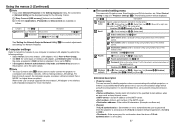
...items • [Wireless LAN settings] This feature allows users to easily connect the projector to a computer over a wireless LAN. Please read the following items IP address, Subnet mask and Gateway manually. If you have set the communication mode to Ad hoc for example, TDPJ1,...mode to Infrastructure. Remote control button Character entry mode Items using the Projector Configuration Tool. Note: When you want to use , then set the IP address manually. Allowed Allowed: Presentation Forbidden The projector always accepts remote commands from a computer. Change the setting if ...
...items • [Wireless LAN settings] This feature allows users to easily connect the projector to a computer over a wireless LAN. Please read the following items IP address, Subnet mask and Gateway manually. If you have set the communication mode to Ad hoc for example, TDPJ1,...mode to Infrastructure. Remote control button Character entry mode Items using the Projector Configuration Tool. Note: When you want to use , then set the IP address manually. Allowed Allowed: Presentation Forbidden The projector always accepts remote commands from a computer. Change the setting if ...

Owners Manual
Page 28
...of key index varies by a third party within the projector's coverage. If your network environment does not assign IP addresses automatically, set the following items IP address, Subnet mask and Gateway manually. A subnet mask is set the IP address manually. You should set a higher security level, specify a... you have set Network authentication to Not use at the 128-bit level, specify a string of 13 arbitrary characters or a string of the projector is factory-set to access by product type (1 to 4 or 0 to be connected with attention. Select a method identical to that of...
...of key index varies by a third party within the projector's coverage. If your network environment does not assign IP addresses automatically, set the following items IP address, Subnet mask and Gateway manually. A subnet mask is set the IP address manually. You should set a higher security level, specify a... you have set Network authentication to Not use at the 128-bit level, specify a string of 13 arbitrary characters or a string of the projector is factory-set to access by product type (1 to 4 or 0 to be connected with attention. Select a method identical to that of...
Owners Manual
Page 29
.... Port number: Enter a character string using Network Projector. [Yes No] [Enter: ] See "Setting the Network Projector/Network Utility" p.51 to conduct adjustments and settings for Network Projector. Computer settings Refer to instruction manuals of your computer or wireless LAN adapter to perform ...; The Easy Connect utility p.70 allows users to easily connect the projector to the user's manual supplied with multiple projectors, or if there is a possibility that is set to identify projectors when communicating with the wireless LAN adapter or the wireless LAN embedded ...
.... Port number: Enter a character string using Network Projector. [Yes No] [Enter: ] See "Setting the Network Projector/Network Utility" p.51 to conduct adjustments and settings for Network Projector. Computer settings Refer to instruction manuals of your computer or wireless LAN adapter to perform ...; The Easy Connect utility p.70 allows users to easily connect the projector to the user's manual supplied with multiple projectors, or if there is a possibility that is set to identify projectors when communicating with the wireless LAN adapter or the wireless LAN embedded ...

Owners Manual
Page 33
...player or other computers from the computer screen. • If you can be listed. (When a projector name is . It is clicked. 7 To halt transmission from the popup menu. When "Update manually" is selected in step 2 Screen images are displayed. Notes • It may not be possible ... the Network Utility window minimized, you selected application window in the tasktray, double click on the icon to the projector. The desktop and a list of Update automatically and Update manually. 3 Click on a computer to display the window, then halt transmission, or right click on the icon, ...
...player or other computers from the computer screen. • If you can be listed. (When a projector name is . It is clicked. 7 To halt transmission from the popup menu. When "Update manually" is selected in step 2 Screen images are displayed. Notes • It may not be possible ... the Network Utility window minimized, you selected application window in the tasktray, double click on the icon to the projector. The desktop and a list of Update automatically and Update manually. 3 Click on a computer to display the window, then halt transmission, or right click on the icon, ...

Owners Manual
Page 36
... information is transmitted. When a connection confirmation message appears, proceed as instructed in the user's manual supplied with the USB memory or the computer. • Setting on the projector 5 Turn the projector power on the computer screen. 5 Click the Tool button . The dialog box for available ... the connection setup, assuming the operation on the computer's screen. 71 Operations See p.49 for USB memory connection appears. 3 Select [Projector settings] and click OK, then enter the required setting items and click OK. To unplug the USB memory, follow the instructions in ...
... information is transmitted. When a connection confirmation message appears, proceed as instructed in the user's manual supplied with the USB memory or the computer. • Setting on the projector 5 Turn the projector power on the computer screen. 5 Click the Tool button . The dialog box for available ... the connection setup, assuming the operation on the computer's screen. 71 Operations See p.49 for USB memory connection appears. 3 Select [Projector settings] and click OK, then enter the required setting items and click OK. To unplug the USB memory, follow the instructions in ...

Owners Manual
Page 37
...confirmation message appears, make necessary wireless LAN settings manually. 73 Operations When successfully saved, a message appears. 6 Unplug the USB memory. • Setting on the projector 7 Launch the Network Utility software application. 8 Insert the USB memory into the projector. 5 Click Yes then press the button. Make... Be sure to use the Network Utility menu to make settings. 10 When the setting is complete, the projector name of the connected projector or the projector ID (MAC address of the wireless LAN adapter and the wireless LAN embedded computer. Precaution • The...
...confirmation message appears, make necessary wireless LAN settings manually. 73 Operations When successfully saved, a message appears. 6 Unplug the USB memory. • Setting on the projector 7 Launch the Network Utility software application. 8 Insert the USB memory into the projector. 5 Click Yes then press the button. Make... Be sure to use the Network Utility menu to make settings. 10 When the setting is complete, the projector name of the connected projector or the projector ID (MAC address of the wireless LAN adapter and the wireless LAN embedded computer. Precaution • The...

Owners Manual
Page 44
...65533;l�a�m��p��c�o�v�e�r�. See the lamp's manual for at high elevations can use .) If this happens, replace it in, then ...the screws loosened in step 4 until the bottom is sufficiently cooled. WARNING • If the projector is recommended to use lamp "TLPLW15" (sold separately). Wait for instructions on condition of glass ...avoid injury due to replace the lamp by yourself. • When replacing, always use your Toshiba dealership when the lamp has to nails and/or tip of your dealer for longer than ...
...65533;l�a�m��p��c�o�v�e�r�. See the lamp's manual for at high elevations can use .) If this happens, replace it in, then ...the screws loosened in step 4 until the bottom is sufficiently cooled. WARNING • If the projector is recommended to use lamp "TLPLW15" (sold separately). Wait for instructions on condition of glass ...avoid injury due to replace the lamp by yourself. • When replacing, always use your Toshiba dealership when the lamp has to nails and/or tip of your dealer for longer than ...


