Operation Manual
Page 6
...- The settings and management of the equipment can be done using the printing functions. This manual is necessary for Copying Functions. Be sure to use the equipment. Setup Guide for Copying Functions (Booklet, This manual) This manual describes the basic operations, mainly copying functions, of this before using the printing functions, such as the installation of the client software, use of the printer driver. Network Fax Guide (PDF file) This manual describes the operation necessary for using a Web browser. Printing functions The Network Printer Kit GA-1191 (optional) is...
...- The settings and management of the equipment can be done using the printing functions. This manual is necessary for Copying Functions. Be sure to use the equipment. Setup Guide for Copying Functions (Booklet, This manual) This manual describes the basic operations, mainly copying functions, of this before using the printing functions, such as the installation of the client software, use of the printer driver. Network Fax Guide (PDF file) This manual describes the operation necessary for using a Web browser. Printing functions The Network Printer Kit GA-1191 (optional) is...

Operation Manual
Page 7
...Quick Start Guide for configuring a network and using the scanning functions, such as troubleshooting. Control panel: This part describes how to read manuals in the PDF file format The operator's manual in your computer, download one of the following two parts. Setup Guide for using the scanning functions. Be sure to configure the scanner-related settings using a Web browser. Scanning Guide (PDF file) This manual describes the operation necessary for Scanning Functions (PDF file) This manual consists of them. This can be displayed/printed using the scanning functions...
...Quick Start Guide for configuring a network and using the scanning functions, such as troubleshooting. Control panel: This part describes how to read manuals in the PDF file format The operator's manual in your computer, download one of the following two parts. Setup Guide for using the scanning functions. Be sure to configure the scanner-related settings using a Web browser. Scanning Guide (PDF file) This manual describes the operation necessary for Scanning Functions (PDF file) This manual consists of them. This can be displayed/printed using the scanning functions...

Operation Manual
Page 12
... Paper to Make Margin - DUPLEX 92 Copying on one side 93 Copying on both sides 94 Copying booklet on Edge - ALTERNATION 85 Sorting in One Go - IMAGE SHIFT 88 Erasing Shadow on both the sizes of Card into 1 Page - DUAL PAGE 99 Printing Page Number, Date and Time - Using Bypass Tray 63 Bypass copying 64 Chapter 3 COPYING FUNCTIONS Before Making Copies 68 Default settings 68 Confirming set functions 68 Paper Selection 69 Automatic paper selection (APS 69 Manual paper selection 70 Copying Different Sizes in Magazine Type...
... Paper to Make Margin - DUPLEX 92 Copying on one side 93 Copying on both sides 94 Copying booklet on Edge - ALTERNATION 85 Sorting in One Go - IMAGE SHIFT 88 Erasing Shadow on both the sizes of Card into 1 Page - DUAL PAGE 99 Printing Page Number, Date and Time - Using Bypass Tray 63 Bypass copying 64 Chapter 3 COPYING FUNCTIONS Before Making Copies 68 Default settings 68 Confirming set functions 68 Paper Selection 69 Automatic paper selection (APS 69 Manual paper selection 70 Copying Different Sizes in Magazine Type...

Operation Manual
Page 13
... the "user functions mode" main screen 119 Operating buttons for changing the settings 120 Date and Time 121 Clock setting 121 Date and time display 123 Display Language Setting 124 Paper Size Setting 125 Walkup Screen Setting 127 Timer Setting 129 Time of automatic function clear 129 Time of automatic low power mode 130 Time of automatic sleep mode / super sleep mode 132 Energy Saving Mode Setting 134 Weekly Timer Setting 136 Volume Adjustment 139 Touch Key Tone Setting 141 Department Code 143 Setting department codes 143 Changing department names or codes 147 Deleting...
... the "user functions mode" main screen 119 Operating buttons for changing the settings 120 Date and Time 121 Clock setting 121 Date and time display 123 Display Language Setting 124 Paper Size Setting 125 Walkup Screen Setting 127 Timer Setting 129 Time of automatic function clear 129 Time of automatic low power mode 130 Time of automatic sleep mode / super sleep mode 132 Energy Saving Mode Setting 134 Weekly Timer Setting 136 Volume Adjustment 139 Touch Key Tone Setting 141 Department Code 143 Setting department codes 143 Changing department names or codes 147 Deleting...

Operation Manual
Page 30
... sheet after another. Automatic Duplexing Unit (optional, MD-0103) Install this to print on the original glass and start copying with the Reversing Automatic Document Feeder (MR-3023). Platen Cover (optional, KA-1650PC) Place an original on both sides of originals can be placed in this cover closed. 2. P.58 "Placing originals on special media types such as thick paper, overhead transparencies or tracing paper. Bypass tray Use this to make...
... sheet after another. Automatic Duplexing Unit (optional, MD-0103) Install this to print on the original glass and start copying with the Reversing Automatic Document Feeder (MR-3023). Platen Cover (optional, KA-1650PC) Place an original on both sides of originals can be placed in this cover closed. 2. P.58 "Placing originals on special media types such as thick paper, overhead transparencies or tracing paper. Bypass tray Use this to make...

Operation Manual
Page 32
... Reversing Automatic Document Feeder (optional, MR-3023)/Automatic Document Feeder (optional, MR-2020) are scanned here. Scanning area The data of the equipment ON or OFF with a PC directly by the USB Implementers Forum. 1 PREPARATION 1. A3, B4). 7. y Use a USB2.0 Hi-Speed certified cable: USB cable supporting the USB2.0 Hi-Speed mode (480 Mbps of paper (e.g. Receiving tray 10. P.202 "Daily Inspection" 11. P.54 "Placing Originals" 2. Turning Power ON" 6. Toner cartridge P.15 "Recommended toner cartridges" P.188 "Replacing Toner Cartridge" 5. Platen sheet P.202...
... Reversing Automatic Document Feeder (optional, MR-3023)/Automatic Document Feeder (optional, MR-2020) are scanned here. Scanning area The data of the equipment ON or OFF with a PC directly by the USB Implementers Forum. 1 PREPARATION 1. A3, B4). 7. y Use a USB2.0 Hi-Speed certified cable: USB cable supporting the USB2.0 Hi-Speed mode (480 Mbps of paper (e.g. Receiving tray 10. P.202 "Daily Inspection" 11. P.54 "Placing Originals" 2. Turning Power ON" 6. Toner cartridge P.15 "Recommended toner cartridges" P.188 "Replacing Toner Cartridge" 5. Platen sheet P.202...

Operation Manual
Page 34
... copying and making another one (= interrupt copying). MIXED-SIZE COPYING -" 3. [ENERGY SAVER] button Use this to copy originals whose sizes are different. Interrupt copy -" 5. [USER FUNCTIONS] button Use this to be used . P.69 "Paper Selection" Automatic magnification selection (AMS): Set the size of Each Component P.74 "Automatic magnification selection (AMS):" 2. [MIXED SIZE] button/lamp Use this to the copy paper. Energy saving mode -" 4. [INTERRUPT] button Use this to change , see the following page: P.117 "CHANGING EQUIPMENT'S SETTINGS" 32 Description of copy paper...
... copying and making another one (= interrupt copying). MIXED-SIZE COPYING -" 3. [ENERGY SAVER] button Use this to copy originals whose sizes are different. Interrupt copy -" 5. [USER FUNCTIONS] button Use this to be used . P.69 "Paper Selection" Automatic magnification selection (AMS): Set the size of Each Component P.74 "Automatic magnification selection (AMS):" 2. [MIXED SIZE] button/lamp Use this to the copy paper. Energy saving mode -" 4. [INTERRUPT] button Use this to change , see the following page: P.117 "CHANGING EQUIPMENT'S SETTINGS" 32 Description of copy paper...

Operation Manual
Page 35
... the lamp is required. 6. [SETTINGS] button Use this to check each menu and error messages displayed on it. e.g.) "Copy mode" main screen READY 100% ZOOM NONSORT FINISHING 1 EDIT Selecting buttons P.35 ""Copy mode" main screen" 8. For basic copy operations, see the following page: P.59 "Making Copies" Description of Fax data. 11. Copies can be started. Contrast adjustment volume Use this button to clear the set functions" 7. Items or operation corresponding to switch functions among copying, printing, scanning and Fax. Digital keys Use them to each button appears at the...
... the lamp is required. 6. [SETTINGS] button Use this to check each menu and error messages displayed on it. e.g.) "Copy mode" main screen READY 100% ZOOM NONSORT FINISHING 1 EDIT Selecting buttons P.35 ""Copy mode" main screen" 8. For basic copy operations, see the following page: P.59 "Making Copies" Description of Fax data. 11. Copies can be started. Contrast adjustment volume Use this button to clear the set functions" 7. Items or operation corresponding to switch functions among copying, printing, scanning and Fax. Digital keys Use them to each button appears at the...

Operation Manual
Page 85
... right side of copy paper. Selects the media type of paper. Function FINISHING ( P.84, P.85, P.86) IMAGE SHIFT ( P.88) EDGE ERASE ( P.90) PAPER TYPE ( P.63) DUPLEX ( P.92) DUAL PAGE ( P.99) ANNOTATION ( P.101) JOB BUILD ( P.103) 2IN1/4IN1 ( P.105) ID CARD ( P.108) XY ZOOM ( P.111) JOB MEMORY ( P.113) Description Selects finishing modes for each set between 4 mm and 15 mm. Scans and copies originals made of copy paper. Copy function list The copying functions displayed on the copy menu are copied...
... right side of copy paper. Selects the media type of paper. Function FINISHING ( P.84, P.85, P.86) IMAGE SHIFT ( P.88) EDGE ERASE ( P.90) PAPER TYPE ( P.63) DUPLEX ( P.92) DUAL PAGE ( P.99) ANNOTATION ( P.101) JOB BUILD ( P.103) 2IN1/4IN1 ( P.105) ID CARD ( P.108) XY ZOOM ( P.111) JOB MEMORY ( P.113) Description Selects finishing modes for each set between 4 mm and 15 mm. Scans and copies originals made of copy paper. Copy function list The copying functions displayed on the copy menu are copied...
Operation Manual
Page 121
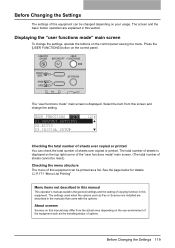
... "user functions mode" main screen. (The total number of sheets ever copied or printed. Press the [USER FUNCTIONS] button on the control panel. USER FUNCTIONS 01.DEFAULT SETTINGS 02.LISTS 03.INITIAL SETUP 1216 Checking the total number of sheets ever copied or printed You can be reset.) Checking the menu structure The menu of this equipment can check the total number of sheets cannot be printed as Fax or Scanner are installed are explained in this screen and change the settings, operate the buttons on your usage. The settings used when...
... "user functions mode" main screen. (The total number of sheets ever copied or printed. Press the [USER FUNCTIONS] button on the control panel. USER FUNCTIONS 01.DEFAULT SETTINGS 02.LISTS 03.INITIAL SETUP 1216 Checking the total number of sheets ever copied or printed You can be reset.) Checking the menu structure The menu of this equipment can check the total number of sheets cannot be printed as Fax or Scanner are installed are explained in this screen and change the settings, operate the buttons on your usage. The settings used when...

Operation Manual
Page 130
y "SCAN" is displayed only when the Scanner Upgrade Kit (optional) is set and the screen returns to the menu in step 4. 6 Press the [USER FUNCTIONS] button or The screen returns to the "copy mode" main screen. (copy mode) button. The walkup screen is installed. After the mode has been changed and the time of the automatic function clear has passed, the setting becomes enabled. 128 Walkup Screen Setting WALKUP SCREEN 1.COPY 2.FAX 3.SCAN y "FAX" is displayed only when the Fax Kit (optional) is installed. Choose one among COPY, FAX or SCAN. 5 CHANGING EQUIPMENT...
y "SCAN" is displayed only when the Scanner Upgrade Kit (optional) is set and the screen returns to the menu in step 4. 6 Press the [USER FUNCTIONS] button or The screen returns to the "copy mode" main screen. (copy mode) button. The walkup screen is installed. After the mode has been changed and the time of the automatic function clear has passed, the setting becomes enabled. 128 Walkup Screen Setting WALKUP SCREEN 1.COPY 2.FAX 3.SCAN y "FAX" is displayed only when the Fax Kit (optional) is installed. Choose one among COPY, FAX or SCAN. 5 CHANGING EQUIPMENT...
Operation Manual
Page 149
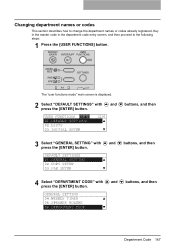
... [USER FUNCTIONS] button. GENERAL SETTING 04.WEEKLY TIMER 05.SPEAKER VOLUME 06.DEPARTMENT CODE Department Code 147 Key in the master code in the department code entry screen, and then proceed to change the department names or codes already registered. DEFAULT SETTINGS 01.GENERAL SETTING 02.COPY SETUP 03.FAX SETUP 4 Select "DEPARTMENT CODE" with and press the [ENTER] button. The "user functions mode" main screen is displayed. 2 Select "DEFAULT SETTINGS" with and buttons, and then press the [ENTER] button. USER FUNCTIONS 01.DEFAULT SETTINGS 02.LISTS...
... [USER FUNCTIONS] button. GENERAL SETTING 04.WEEKLY TIMER 05.SPEAKER VOLUME 06.DEPARTMENT CODE Department Code 147 Key in the master code in the department code entry screen, and then proceed to change the department names or codes already registered. DEFAULT SETTINGS 01.GENERAL SETTING 02.COPY SETUP 03.FAX SETUP 4 Select "DEPARTMENT CODE" with and press the [ENTER] button. The "user functions mode" main screen is displayed. 2 Select "DEFAULT SETTINGS" with and buttons, and then press the [ENTER] button. USER FUNCTIONS 01.DEFAULT SETTINGS 02.LISTS...
Operation Manual
Page 176
... the display. Do not replace the toner cartridge until "Toner empty" appears on the bypass tray. 6 TROUBLESHOOTING When This Message Appears A message appears when a problem occurs on the list below and take a countermeasure accordingly. Set paper in the cartridge does not lie evenly. Time for maintenance BYPASS empty Toner is low This appears when the maintenance by your service technician is jammed at the place indicated by "***". Never attempt to copy the data scanned...
... the display. Do not replace the toner cartridge until "Toner empty" appears on the bypass tray. 6 TROUBLESHOOTING When This Message Appears A message appears when a problem occurs on the list below and take a countermeasure accordingly. Set paper in the cartridge does not lie evenly. Time for maintenance BYPASS empty Toner is low This appears when the maintenance by your service technician is jammed at the place indicated by "***". Never attempt to copy the data scanned...
Operation Manual
Page 190
... to scroll up and down the procedure. y Before inserting a new toner cartridge, check the product name of used toner cartridges. y Do not dispose of the cartridge. y Do not touch the parts on the circuit board mounted on the display. Contact your service representative. 6 TROUBLESHOOTING Replacing Toner Cartridge When the toner cartridge runs out of toner, the procedure to replace the toner cartridge appears on the toner cartridge because they may be damaged. 188...
... to scroll up and down the procedure. y Before inserting a new toner cartridge, check the product name of used toner cartridges. y Do not dispose of the cartridge. y Do not touch the parts on the circuit board mounted on the display. Contact your service representative. 6 TROUBLESHOOTING Replacing Toner Cartridge When the toner cartridge runs out of toner, the procedure to replace the toner cartridge appears on the toner cartridge because they may be damaged. 188...

Operation Manual
Page 197
When the use . Countermeasure Turn ON the power of warm-up and then try again. For how to end the copy job. To delete them , select "Cancel job". (If "Print" is grayed out, only data deletion is full" appears on the control panel. Press the [CLEAR/STOP] button to cancel this mode, see the following page. Scanning stops before it is finished. ("Count over" appears on the LCD screen.) Scanning stops before it with the contrast...
When the use . Countermeasure Turn ON the power of warm-up and then try again. For how to end the copy job. To delete them , select "Cancel job". (If "Print" is grayed out, only data deletion is full" appears on the control panel. Press the [CLEAR/STOP] button to cancel this mode, see the following page. Scanning stops before it is finished. ("Count over" appears on the LCD screen.) Scanning stops before it with the contrast...

Operation Manual
Page 198
... display. A toner cartridge not recommended by a USB cable. In the department management menu, switching the department management to your PC with a USB cable, change the setting so that cannot be combined set . Use a USB2.0 Hi-Speed certified cable. Connect it has been already enabled, enter the master code in the print queue. The toner in the toner cartridge. Install the toner cartridge correctly. There are using a toner cartridge other than the one . Replace the toner cartridge with a PC directly by TOSHIBA is not installed...
... display. A toner cartridge not recommended by a USB cable. In the department management menu, switching the department management to your PC with a USB cable, change the setting so that cannot be combined set . Use a USB2.0 Hi-Speed certified cable. Connect it has been already enabled, enter the master code in the print queue. The toner in the toner cartridge. Install the toner cartridge correctly. There are using a toner cartridge other than the one . Replace the toner cartridge with a PC directly by TOSHIBA is not installed...

Operation Manual
Page 210
... sensor Scanning light source Resolution Scanning Writing Acceptable originals Acceptable original size Acceptable copy paper size Drawer Bypass Acceptable copy paper weight Drawer Bypass Warm-up time First copy time (A4 portrait) Continuous copy speed Multiple copying Excluded image width Copy Printer Reproduction ratio Storage capacity Paper supply Actual size Zoom Drawer Bypass Loading capacity for the receiving tray Toner density adjustment Exposure control Memory USB interface Environment (for Saudi Arabia 100 V version only) 208 e-STUDIO182/212/242 Specifications
... sensor Scanning light source Resolution Scanning Writing Acceptable originals Acceptable original size Acceptable copy paper size Drawer Bypass Acceptable copy paper weight Drawer Bypass Warm-up time First copy time (A4 portrait) Continuous copy speed Multiple copying Excluded image width Copy Printer Reproduction ratio Storage capacity Paper supply Actual size Zoom Drawer Bypass Loading capacity for the receiving tray Toner density adjustment Exposure control Memory USB interface Environment (for Saudi Arabia 100 V version only) 208 e-STUDIO182/212/242 Specifications

Operation Manual
Page 217
... IMAGE MODE LIGHT/DARK FINISHING FAX SETUP LINE MONITOR : 112MB : A4 : : COPY : 45SEC : 15MIN : 15MIN : OFF : 0 : 1 : 4 : 4 : FINISHING : APS : TEXT/PHOTO : AUTO : NON SORT : OFF XXXXX XXXXXX XXXXXXXXXXX XXXXX XXXXXX XXXXX PAGE : 001 TIME : 02-10-2009 09:30 TEL NUMBER : XXX-XXX-XXXX NAME : XXXXXXXXXX RECOVERY TX TTI SEND AFTER SCAN ACCOUNT CODE SEPARATOR PAGE SECURE RX MEMORY RX REDUCTION DISCARD PRIVILEGED RX RTI REPORTS & LIST JOURNAL MANUAL OUTPUT AUTO COMMUNICATION REPORT DOCUMENT TX MEMORY...
... IMAGE MODE LIGHT/DARK FINISHING FAX SETUP LINE MONITOR : 112MB : A4 : : COPY : 45SEC : 15MIN : 15MIN : OFF : 0 : 1 : 4 : 4 : FINISHING : APS : TEXT/PHOTO : AUTO : NON SORT : OFF XXXXX XXXXXX XXXXXXXXXXX XXXXX XXXXXX XXXXX PAGE : 001 TIME : 02-10-2009 09:30 TEL NUMBER : XXX-XXX-XXXX NAME : XXXXXXXXXX RECOVERY TX TTI SEND AFTER SCAN ACCOUNT CODE SEPARATOR PAGE SECURE RX MEMORY RX REDUCTION DISCARD PRIVILEGED RX RTI REPORTS & LIST JOURNAL MANUAL OUTPUT AUTO COMMUNICATION REPORT DOCUMENT TX MEMORY...

Operation Manual
Page 221
... calling service technician 195 Bypass copying 63, 64 Bypass tray 28, 63 C CANCEL button 34 Cartridge detecting function 15 Certification label 22 Changing the settings 119 Charger 203 Checking the menu structure 119 Cleaning 202 Cleaning (charger 203 Cleaning (transfer charger 204 CLEAR/STOP button 33 Clock setting 121 Configuration of options 31 Confirming set functions 68 Continuous copying speed 209 Contrast adjustment volume 33 Control panel 30, 32 COPY button/lamps 34 Copy menu 82 Copy mode main screen 35 Copy quantity 35, 59 Copying function combination...
... calling service technician 195 Bypass copying 63, 64 Bypass tray 28, 63 C CANCEL button 34 Cartridge detecting function 15 Certification label 22 Changing the settings 119 Charger 203 Checking the menu structure 119 Cleaning 202 Cleaning (charger 203 Cleaning (transfer charger 204 CLEAR/STOP button 33 Clock setting 121 Configuration of options 31 Confirming set functions 68 Continuous copying speed 209 Contrast adjustment volume 33 Control panel 30, 32 COPY button/lamps 34 Copy menu 82 Copy mode main screen 35 Copy quantity 35, 59 Copying function combination...

Operation Manual
Page 222
... Side cover 28 Sleep mode 25, 37 Sort copying 84 Specifications 208, 210 Specifications of options 210 START button 33 Sticker labels 39 Stopping copying 61 Storing paper 40 Super sleep mode 25, 37 T Thick paper 39, 63 Time display format 123 Time of automatic function clear 129 Time of automatic low power mode 130 Time of automatic sleep mode / super sleep mode 132 Timer setting 129 Toner cartridge 15, 30, 188, 190 Toner remaining check function 15 Total number copied or printed 119 Touch key...
... Side cover 28 Sleep mode 25, 37 Sort copying 84 Specifications 208, 210 Specifications of options 210 START button 33 Sticker labels 39 Stopping copying 61 Storing paper 40 Super sleep mode 25, 37 T Thick paper 39, 63 Time display format 123 Time of automatic function clear 129 Time of automatic low power mode 130 Time of automatic sleep mode / super sleep mode 132 Timer setting 129 Toner cartridge 15, 30, 188, 190 Toner remaining check function 15 Total number copied or printed 119 Touch key...


