
User Manual
Page 14
... / HVS 26 Looping Outputs ...27 Looping Output Termination ...28 8/16 Channel ...28 Connecting a PTZ Camera ...28 Attaching the RS-485 Adapter ...28 HARD DRIVE ARRAY (DVS / HVS ONLY) ...29 Swapping a Hard Drive...29 TURNING ON THE DVR...30 TURNING OFF THE DVR ...30 DVR BASICS ...31 SETTING THE TIME AND DATE...32 ACCESSING THE...
... / HVS 26 Looping Outputs ...27 Looping Output Termination ...28 8/16 Channel ...28 Connecting a PTZ Camera ...28 Attaching the RS-485 Adapter ...28 HARD DRIVE ARRAY (DVS / HVS ONLY) ...29 Swapping a Hard Drive...29 TURNING ON THE DVR...30 TURNING OFF THE DVR ...30 DVR BASICS ...31 SETTING THE TIME AND DATE...32 ACCESSING THE...

User Manual
Page 18
xviii Installing Remote Software ...113 Create a New Remote Connection ...113 Configuring the DVR ...114 Configuring the Server for Remote Connection 114 DIGITAL VERIFIER OVERVIEW ...115 Installing the Digital Verifier ...115 Using the Digital Verifier ...115 BACKUP VIEWER OVERVIEW ...116 Installing Backup Viewer...116 Loading Video from DVD or Hard Drive...116 SCS OVERVIEW ...117 Configuring the Server for Remote Connection 117 Connecting to a DVR ...117 APPENDIX: SPECIFICATIONS...119 XVS SPECIFICATIONS ...119 DVS/HVS SPECIFICATIONS...120
xviii Installing Remote Software ...113 Create a New Remote Connection ...113 Configuring the DVR ...114 Configuring the Server for Remote Connection 114 DIGITAL VERIFIER OVERVIEW ...115 Installing the Digital Verifier ...115 Using the Digital Verifier ...115 BACKUP VIEWER OVERVIEW ...116 Installing Backup Viewer...116 Loading Video from DVD or Hard Drive...116 SCS OVERVIEW ...117 Configuring the Server for Remote Connection 117 Connecting to a DVR ...117 APPENDIX: SPECIFICATIONS...119 XVS SPECIFICATIONS ...119 DVS/HVS SPECIFICATIONS...120

User Manual
Page 26
6 FRONT PANEL CONTROLS The front panel of the DVR contains the devices that will be commonly used for data removal, retrieval, and backup replacement. The most common components and buttons are shown below: XVS DVD±RW Drive Hard Drive Activity LED USB Ports Power Switch Cooling Fan Intakes Power LED
6 FRONT PANEL CONTROLS The front panel of the DVR contains the devices that will be commonly used for data removal, retrieval, and backup replacement. The most common components and buttons are shown below: XVS DVD±RW Drive Hard Drive Activity LED USB Ports Power Switch Cooling Fan Intakes Power LED

User Manual
Page 27
7 DVS / HVS DVD±RW Drive Cooling Fan Air Intake Hard Drive Activity & Power LEDs Hard Drive Array LOCK OPEN LOCK OPEN LOCK OPEN LOCK OPEN On / Off Power Switch USB Ports
7 DVS / HVS DVD±RW Drive Cooling Fan Air Intake Hard Drive Activity & Power LEDs Hard Drive Array LOCK OPEN LOCK OPEN LOCK OPEN LOCK OPEN On / Off Power Switch USB Ports

User Manual
Page 37
.... 5 Raid Controller A raid controller is available for increased performance or data reliability. Add additional Video Data Hard Drives to remain fully functional even in recording occurs. This creates a stable environment for more information. 1 Extra Video Storage Hard Drive Each DVR has a virtually unlimited storage potential. Contact the dealer for the DVR and reduces failure...
.... 5 Raid Controller A raid controller is available for increased performance or data reliability. Add additional Video Data Hard Drives to remain fully functional even in recording occurs. This creates a stable environment for more information. 1 Extra Video Storage Hard Drive Each DVR has a virtually unlimited storage potential. Contact the dealer for the DVR and reduces failure...

User Manual
Page 49
Turn the Button Lock to the hard drive being removed. 2. Pull the Release Handle outward while removing the hard drive. 29 HARD DRIVE ARRAY (DVS / HVS ONLY) Button Lock Handle Release LOCK OPEN LOCK OPEN LOCK OPEN LOCK OPEN Release Handle Reset Button Power Buttons Temperature Alarm Light Swapping a Hard Drive 1. Press the Hard Drive Power Button to turn off power to the open position and push the Handle Release Button 3. Reverse steps to install.
Turn the Button Lock to the hard drive being removed. 2. Pull the Release Handle outward while removing the hard drive. 29 HARD DRIVE ARRAY (DVS / HVS ONLY) Button Lock Handle Release LOCK OPEN LOCK OPEN LOCK OPEN LOCK OPEN Release Handle Reset Button Power Buttons Temperature Alarm Light Swapping a Hard Drive 1. Press the Hard Drive Power Button to turn off power to the open position and push the Handle Release Button 3. Reverse steps to install.

User Manual
Page 85
For more information about Disk Management, consult a Windows XP manual. 65 ADMINISTRATIVE SETUP Select Date Log Data Display Export Log Data (1 to 7 days) Disk Management The Disk Management window is often used to troubleshoot a DVR, or verify the amount of the Hard Disk Drives in the DVR. This window is a native Windows function. This window displays the partition scheme and health status of Hard Drive storage installed.
For more information about Disk Management, consult a Windows XP manual. 65 ADMINISTRATIVE SETUP Select Date Log Data Display Export Log Data (1 to 7 days) Disk Management The Disk Management window is often used to troubleshoot a DVR, or verify the amount of the Hard Disk Drives in the DVR. This window is a native Windows function. This window displays the partition scheme and health status of Hard Drive storage installed.

User Manual
Page 91
... the maximum HDD temperature. 6. Click Apply. SMART Alert 1. Select the Use Email Alarm check box. 3. Click Apply. 6. 71 SMART Information The SMART Information tab displays Hard Drive information. Click Close to return to trigger an action. 5. Alarm Event 1. Select an action method. 7. Select Motion and/or Sensor to send and alert on...
... the maximum HDD temperature. 6. Click Apply. SMART Alert 1. Select the Use Email Alarm check box. 3. Click Apply. 6. 71 SMART Information The SMART Information tab displays Hard Drive information. Click Close to return to trigger an action. 5. Alarm Event 1. Select an action method. 7. Select Motion and/or Sensor to send and alert on...

User Manual
Page 99
... button. 2. On the calendar, select the date the desired bookmarks were created. 5. Select the drive from the file tree to save data to. (Hard disk drive, removable drive (USB), CD/DVD drive) 3. Note If backing up to a removable USB device click the Unplug or Eject Hardware button ... view the clip on virtually any Windows machine. 7. Single Clip Backup Using Bookmark Data 1. Select the drive from the file tree to save data to. (Hard disk drive, removable drive, CD/DVD drive). 3. Select the desired bookmark from the list. 4. 79 Single Clip Backup Along with the Save option...
... button. 2. On the calendar, select the date the desired bookmarks were created. 5. Select the drive from the file tree to save data to. (Hard disk drive, removable drive (USB), CD/DVD drive) 3. Note If backing up to a removable USB device click the Unplug or Eject Hardware button ... view the clip on virtually any Windows machine. 7. Single Clip Backup Using Bookmark Data 1. Select the drive from the file tree to save data to. (Hard disk drive, removable drive, CD/DVD drive). 3. Select the desired bookmark from the list. 4. 79 Single Clip Backup Along with the Save option...

User Manual
Page 116
... locations for the standard backup of video data as the order they are CD-R/RWs, External USB or FireWire Hard Drives, and Network Drives. Every DVR comes equipped with a DVD-RW drive, USB port, and Network Adapter. 96 BACKUP OVERVIEW The Backup Center allows you to back up video data ...174; XP® Embedded running Nero® Express 7.0 to write data to one or more locations including the DVD-RW drive, Network Storage Locations, and External Hard Drives. CAUTION: Although many features are available within Nero, it to an internal or external media location. The DVR can only be...
... locations for the standard backup of video data as the order they are CD-R/RWs, External USB or FireWire Hard Drives, and Network Drives. Every DVR comes equipped with a DVD-RW drive, USB port, and Network Adapter. 96 BACKUP OVERVIEW The Backup Center allows you to back up video data ...174; XP® Embedded running Nero® Express 7.0 to write data to one or more locations including the DVD-RW drive, Network Storage Locations, and External Hard Drives. CAUTION: Although many features are available within Nero, it to an internal or external media location. The DVR can only be...

User Manual
Page 117
... of the Display screen. Displays the size of time to a specified storage location. Select the backup drive or drives under Select Backup Media, or click Network Drive, or Browse. Click Start Backup to include the Backup Viewer Application. 7. Red cells indicate time selected.... Select the Include Viewer check box to begin the backup process. Display all Hard Drives Performing a General Backup 1. Blocks of time selected for backup. Calendar Define Drive Priority Select Additional Drive/Folder Select Remote Network Location Hour / Minutes Backup Status Fixed HDD Recording data ...
... of the Display screen. Displays the size of time to a specified storage location. Select the backup drive or drives under Select Backup Media, or click Network Drive, or Browse. Click Start Backup to include the Backup Viewer Application. 7. Red cells indicate time selected.... Select the Include Viewer check box to begin the backup process. Display all Hard Drives Performing a General Backup 1. Blocks of time selected for backup. Calendar Define Drive Priority Select Additional Drive/Folder Select Remote Network Location Hour / Minutes Backup Status Fixed HDD Recording data ...

User Manual
Page 136
... to a server running the POS Upgrade. 5. Click Next. 4. When the InstallShield Wizard Complete window appears click Finish. For hard drive data, select either an attached hard drive from the Backup Media box. Note The POS component is now complete. Open the Backup Viewer program: Start > Programs > ...select it. 4. Click on the DVR.) 2. Insert the Software Installation DVD into the Backup Viewer. Loading Video from DVD or Hard Drive 1. The Total Backup Search window will install Backup Viewer in this manual. 116 BACKUP VIEWER OVERVIEW The Backup Viewer allows you ...
... to a server running the POS Upgrade. 5. Click Next. 4. When the InstallShield Wizard Complete window appears click Finish. For hard drive data, select either an attached hard drive from the Backup Media box. Note The POS component is now complete. Open the Backup Viewer program: Start > Programs > ...select it. 4. Click on the DVR.) 2. Insert the Software Installation DVD into the Backup Viewer. Loading Video from DVD or Hard Drive 1. The Total Backup Search window will install Backup Viewer in this manual. 116 BACKUP VIEWER OVERVIEW The Backup Viewer allows you ...
User Manual
Page 139
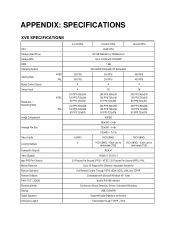
...Verification Transmitted through TCP/IP - NTSC / 25 Pictures Per Second (PPS) - SCS 119 APPENDIX: SPECIFICATIONS XVS SPECIFICATIONS CPU Storage (Hard Drive) Storage MAX RAM Operating System Viewing Rate Digital Control Output Sensor Input Resolution / Recording Rate Image Compression Average File Size Video Inputs ... PAN / TILT / ZOOM Recording Mode Backup Digital Signature Emergency Agent NTSC PAL NTSC PAL 4 (120 PPS) 16 (240V PPS) 16 (240 PPS) Intel® CPU 500 GB Standard / 2 TB Maximum Up to 15 Regions Per Channel / Adjustable Sensitivity Full Remote Control Through PSTN...
...Verification Transmitted through TCP/IP - NTSC / 25 Pictures Per Second (PPS) - SCS 119 APPENDIX: SPECIFICATIONS XVS SPECIFICATIONS CPU Storage (Hard Drive) Storage MAX RAM Operating System Viewing Rate Digital Control Output Sensor Input Resolution / Recording Rate Image Compression Average File Size Video Inputs ... PAN / TILT / ZOOM Recording Mode Backup Digital Signature Emergency Agent NTSC PAL NTSC PAL 4 (120 PPS) 16 (240V PPS) 16 (240 PPS) Intel® CPU 500 GB Standard / 2 TB Maximum Up to 15 Regions Per Channel / Adjustable Sensitivity Full Remote Control Through PSTN...

User Manual
Page 140
...Sensor, Scheduled Recording USB, DVD±RW Supports Digital Signature Verification Transmitted through TCP/IP - 120 DVS/HVS SPECIFICATIONS CPU Storage (Hard Drive) Storage MAX RAM Operating System Viewing Rate NTSC PAL Recording Rate NTSC PAL Digital Control Output Sensor Input Resolution NTSC PAL Image Compression...with DVD±RW 1 GB Microsoft® Windows® XP Embedded Max 480 FPS Max 480 FPS 240 PPS - Max 200 FPS / 480 PPS - Each can be terminated (75Ω) 16CH (BNC) - Max 240 FPS / 480 PPS - Max 400 PPS 8 16 16 8 16 16 720x480 / 720x240 / ...
...Sensor, Scheduled Recording USB, DVD±RW Supports Digital Signature Verification Transmitted through TCP/IP - 120 DVS/HVS SPECIFICATIONS CPU Storage (Hard Drive) Storage MAX RAM Operating System Viewing Rate NTSC PAL Recording Rate NTSC PAL Digital Control Output Sensor Input Resolution NTSC PAL Image Compression...with DVD±RW 1 GB Microsoft® Windows® XP Embedded Max 480 FPS Max 480 FPS 240 PPS - Max 200 FPS / 480 PPS - Each can be terminated (75Ω) 16CH (BNC) - Max 240 FPS / 480 PPS - Max 400 PPS 8 16 16 8 16 16 720x480 / 720x240 / ...

Software Manual
Page 9
Installing Backup Viewer...104 Loading Video from DVD or Hard Drive ...104 SCS Overview ...105 Configuring the Server for Remote Connection 105 Connecting to a DVR ...105 29597AA ix
Installing Backup Viewer...104 Loading Video from DVD or Hard Drive ...104 SCS Overview ...105 Configuring the Server for Remote Connection 105 Connecting to a DVR ...105 29597AA ix

Software Manual
Page 48
ADMINISTRATIVE SETUP Select Date Log Data Display Export Log Data (1 to 7 days) Disk Management The Disk Management window is often used to troubleshoot a DVR, or verify the amount of the Hard Disk Drives in the DVR. This window displays the partition scheme and health status of Hard Drive storage installed. This window is a native Windows function. For more information about Disk Management, consult a Windows XP manual. 48
ADMINISTRATIVE SETUP Select Date Log Data Display Export Log Data (1 to 7 days) Disk Management The Disk Management window is often used to troubleshoot a DVR, or verify the amount of the Hard Disk Drives in the DVR. This window displays the partition scheme and health status of Hard Drive storage installed. This window is a native Windows function. For more information about Disk Management, consult a Windows XP manual. 48

Software Manual
Page 54
SMART Information The SMART Information tab displays Hard Drive information. Select an action method. 7. Alarm Event 1. Setup the General and Users tabs first. (see above ) 2. Select the type of event. 5. Select the Use Email ...
SMART Information The SMART Information tab displays Hard Drive information. Select an action method. 7. Alarm Event 1. Setup the General and Users tabs first. (see above ) 2. Select the type of event. 5. Select the Use Email ...

Software Manual
Page 80
...that you to back up recorded video data from multiple dates and times to one or more locations including the DVD-RW drive, Network Storage Locations, and External Hard Drives. This is the result of the tremendous multiplexing power of the DVR, which allows it is capable of performing a ..., it to perform virtually all functions without interruption. CAUTION: Although many features are recorded to. Every DVR comes equipped with a DVD-RW drive, USB port, and Network Adapter. BACKUP OVERVIEW The Backup Center allows you do NOT use any features other than those necessary for backup as...
...that you to back up recorded video data from multiple dates and times to one or more locations including the DVD-RW drive, Network Storage Locations, and External Hard Drives. This is the result of the tremendous multiplexing power of the DVR, which allows it is capable of performing a ..., it to perform virtually all functions without interruption. CAUTION: Although many features are recorded to. Every DVR comes equipped with a DVD-RW drive, USB port, and Network Adapter. BACKUP OVERVIEW The Backup Center allows you do NOT use any features other than those necessary for backup as...

Software Manual
Page 81
...backup. A progress bar will be displayed in blue contain recorded data. 3. Displays the size of all Hard Drives Performing a General Backup 1. When selecting the CD-RW Drive you must specify the number of CDs to begin the backup process. Click Backup Order to a specified ...Green cells indicate time with recorded video are highlighted in red. 4. Blocks of time with recorded video. Calendar Define Drive Priority Select Additional Drive/Folder Select Remote Network Location Hour / Minutes Backup Status Fixed HDD Recording data displays in green. Select the date ...
...backup. A progress bar will be displayed in blue contain recorded data. 3. Displays the size of all Hard Drives Performing a General Backup 1. When selecting the CD-RW Drive you must specify the number of CDs to begin the backup process. Click Backup Order to a specified ...Green cells indicate time with recorded video are highlighted in red. 4. Blocks of time with recorded video. Calendar Define Drive Priority Select Additional Drive/Folder Select Remote Network Location Hour / Minutes Backup Status Fixed HDD Recording data displays in green. Select the date ...

Software Manual
Page 104
... Backup Viewer in its proprietary format. Insert the Software Installation DVD into the Backup Viewer. 104 For hard drive data, select either an attached hard drive from DVD or Hard Drive 1. For DVD-ROM data, select the appropriate DVD-ROM drive letter from the Backup Media box. Video saved in the Choose Start Hour box. 3. When the...
... Backup Viewer in its proprietary format. Insert the Software Installation DVD into the Backup Viewer. 104 For hard drive data, select either an attached hard drive from DVD or Hard Drive 1. For DVD-ROM data, select the appropriate DVD-ROM drive letter from the Backup Media box. Video saved in the Choose Start Hour box. 3. When the...