User Manual
Page 5
... to substitute Factory Refurbished Parts and / or Factory Refurbished Product in place of instructions furnished by checking the instruction manual and web site for the latest updates at (877) 855-1349 [877-855-1-FIX] to speak to a technical support representative and schedule service. [3] Arrange for the product to Obtain Warranty Service [1] Verify operation of the United States or any critical applications. Accordingly, Toshiba disclaims...
... to substitute Factory Refurbished Parts and / or Factory Refurbished Product in place of instructions furnished by checking the instruction manual and web site for the latest updates at (877) 855-1349 [877-855-1-FIX] to speak to a technical support representative and schedule service. [3] Arrange for the product to Obtain Warranty Service [1] Verify operation of the United States or any critical applications. Accordingly, Toshiba disclaims...
User Manual
Page 6
... unpacking this manual. 6. Read Owner's Manual - This product should be walked on the product. 11. The product should be blocked or covered. Accessories - The object may touch dangerous voltage points or short-out parts that produce heat. 5. Use a damp cloth for ventilation and to ensure reliable operation of the product and to your home or business, consult...
... unpacking this manual. 6. Read Owner's Manual - This product should be walked on the product. 11. The product should be blocked or covered. Accessories - The object may touch dangerous voltage points or short-out parts that produce heat. 5. Use a damp cloth for ventilation and to ensure reliable operation of the product and to your home or business, consult...

User Manual
Page 14
... ...32 Exporting DVR Settings ...32 Importing DVR Settings ...33 Changing Video Format...33 DISPLAY SCREEN ...34 Live Camera Options ...34 CAMERA VIEW...35 Recording Status Indicator ...35 Special Recording ...35 SCREEN DIVISION BUTTONS ...36 SETUP OPTIONS ...37 SETUP OVERVIEW ...38 CAMERA SETUP ...39 Set Up New Camera...39 NETWORK VIDEO...40 Connecting a Network Device ...40 Connecting Manually ...40 Connecting with Camera Finder ...41 Assigning a Network Device to a Channel ...41 Camera Configuration ...42 Displaying More Columns ...42 Accessing the Configuration Menu ...42 HVR Upgrade and...
... ...32 Exporting DVR Settings ...32 Importing DVR Settings ...33 Changing Video Format...33 DISPLAY SCREEN ...34 Live Camera Options ...34 CAMERA VIEW...35 Recording Status Indicator ...35 Special Recording ...35 SCREEN DIVISION BUTTONS ...36 SETUP OPTIONS ...37 SETUP OVERVIEW ...38 CAMERA SETUP ...39 Set Up New Camera...39 NETWORK VIDEO...40 Connecting a Network Device ...40 Connecting Manually ...40 Connecting with Camera Finder ...41 Assigning a Network Device to a Channel ...41 Camera Configuration ...42 Displaying More Columns ...42 Accessing the Configuration Menu ...42 HVR Upgrade and...

User Manual
Page 16
xvi Add a New User...67 User Rank...68 Changing the Administrator Password ...68 Default Administrator Password...68 Log Management...68 Setup Log Management Options ...68 Status Check / Email ...69 General ...69 Users ...69 Storage Check ...70 Recording Data Check...70 SMART Information ...71 SMART Alert...71 Alarm Event ...71 INSTANT RECORDING ...72 Activate Instant Recording...72 Searching 'Instant Recorded' Video ...72 SEARCH ...73 SEARCH OVERVIEW ...74 Play Controls ...74 Adjust the...
xvi Add a New User...67 User Rank...68 Changing the Administrator Password ...68 Default Administrator Password...68 Log Management...68 Setup Log Management Options ...68 Status Check / Email ...69 General ...69 Users ...69 Storage Check ...70 Recording Data Check...70 SMART Information ...71 SMART Alert...71 Alarm Event ...71 INSTANT RECORDING ...72 Activate Instant Recording...72 Searching 'Instant Recorded' Video ...72 SEARCH ...73 SEARCH OVERVIEW ...74 Play Controls ...74 Adjust the...

User Manual
Page 17
... A LAN USING TCP/IP ...102 Configuring TCP/IP Settings...102 WEB VIEWER...103 WEB VIEWER OVERVIEW...104 Configuring the Server for Remote Connection 105 Connecting to a DVR Using Web Viewer ...105 Closing the Web Viewer ...105 INCLUDED SOFTWARE SETUP ...107 EMERGENCY AGENT OVERVIEW...108 Configuring the DVR...108 Configuring the Client PC ...108 Setup Window ...109 EMERGENCY AGENT WINDOW ...109 Filter Event List...109 Add Items to Alarm Confirm List ...110 SEARCH ALARM WINDOW ...111 View Recorded Video ...111 Export Video ...111 REMOTE SOFTWARE OVERVIEW ...112 Remote Software Setup...113
... A LAN USING TCP/IP ...102 Configuring TCP/IP Settings...102 WEB VIEWER...103 WEB VIEWER OVERVIEW...104 Configuring the Server for Remote Connection 105 Connecting to a DVR Using Web Viewer ...105 Closing the Web Viewer ...105 INCLUDED SOFTWARE SETUP ...107 EMERGENCY AGENT OVERVIEW...108 Configuring the DVR...108 Configuring the Client PC ...108 Setup Window ...109 EMERGENCY AGENT WINDOW ...109 Filter Event List...109 Add Items to Alarm Confirm List ...110 SEARCH ALARM WINDOW ...111 View Recorded Video ...111 Export Video ...111 REMOTE SOFTWARE OVERVIEW ...112 Remote Software Setup...113

User Manual
Page 24
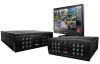
... Alarm Control • Remote System Operation & Configuration • Supports Multiple Simultaneous Remote Connections • PAN / TILT / ZOOM Controls • Simultaneous Video Search, Playback and Backup • Video Indexes for Easy Searching • Multiple Levels of Security Access • Up to 32 Looping Outputs • Up to 2 Composite Outputs • Up to 32 Network Recording Channels • Up to 8 Audio Inputs • High Performance, Durable, Rack mount Case • Output the Video to a NTSC/PAL Display...
... Alarm Control • Remote System Operation & Configuration • Supports Multiple Simultaneous Remote Connections • PAN / TILT / ZOOM Controls • Simultaneous Video Search, Playback and Backup • Video Indexes for Easy Searching • Multiple Levels of Security Access • Up to 32 Looping Outputs • Up to 2 Composite Outputs • Up to 32 Network Recording Channels • Up to 8 Audio Inputs • High Performance, Durable, Rack mount Case • Output the Video to a NTSC/PAL Display...

User Manual
Page 29
not used line level • Speaker Out • Microphone In - 4 Channel RJ-45 Network Jack AC Power Connector 9 BNC Connectors for Video Input Audio/Spot Monitor Output Cooling Fan DVI-D 1394 PS/2 Mouse Input PS/2 Keyboard Input DVI-D Port SVGA Output Fire Wire USB Ports Sensors & Control Outputs Audio RS-422 Interface • Line In -
not used line level • Speaker Out • Microphone In - 4 Channel RJ-45 Network Jack AC Power Connector 9 BNC Connectors for Video Input Audio/Spot Monitor Output Cooling Fan DVI-D 1394 PS/2 Mouse Input PS/2 Keyboard Input DVI-D Port SVGA Output Fire Wire USB Ports Sensors & Control Outputs Audio RS-422 Interface • Line In -

User Manual
Page 55
... camera recording and also flag the video for future searches using the Index Search feature. Special Recording There are the different states for motion detection) detects motion. Double Right-Click the video display to the DVR. Instant Recording is currently being recorded to activate and deactivate the Instant Recording option. The following are two types of the recording for each camera: Recording Motion Detection Display Displayed when the camera is a manual activation of DVR Special Recording...
... camera recording and also flag the video for future searches using the Index Search feature. Special Recording There are the different states for motion detection) detects motion. Double Right-Click the video display to the DVR. Instant Recording is currently being recorded to activate and deactivate the Instant Recording option. The following are two types of the recording for each camera: Recording Motion Detection Display Displayed when the camera is a manual activation of DVR Special Recording...
User Manual
Page 86
... Program Management (Etc) and enter the Administrator password when prompted. 4. On the Display screen, click Exit and choose Restart in as specified by setting it statically. On the General tab, click Internet Protocol (TCP/IP) and then click Properties. 4. Subnet Mask: This should be changed. Once DDNS and port forwarding have been configured, the DVR will need to time). Note Ensure the DVR has an IP address...
... Program Management (Etc) and enter the Administrator password when prompted. 4. On the Display screen, click Exit and choose Restart in as specified by setting it statically. On the General tab, click Internet Protocol (TCP/IP) and then click Properties. 4. Subnet Mask: This should be changed. Once DDNS and port forwarding have been configured, the DVR will need to time). Note Ensure the DVR has an IP address...

User Manual
Page 108
.... 5. Inside the DVR PTZ Setup, select the PTZ camera using 22 Gauge Twisted Pair. Select the appropriate Protocol and set the PTZ Driver Address and Serial Port Settings (See Advanced PTZ Setup in this manual. 4. Using the PTZ controls, move the PTZ around. SETTING UP A PTZ CAMERA Setting up to the Connections section of the recorded video. Enable the PTZ Settings 1. Refer to the DVR. From the Display screen, click PTZ (See the chapter on connecting the PTZ camera to the Supported Protocols list in this software. The cabling may be...
.... 5. Inside the DVR PTZ Setup, select the PTZ camera using 22 Gauge Twisted Pair. Select the appropriate Protocol and set the PTZ Driver Address and Serial Port Settings (See Advanced PTZ Setup in this manual. 4. Using the PTZ controls, move the PTZ around. SETTING UP A PTZ CAMERA Setting up to the Connections section of the recorded video. Enable the PTZ Settings 1. Refer to the DVR. From the Display screen, click PTZ (See the chapter on connecting the PTZ camera to the Supported Protocols list in this software. The cabling may be...

User Manual
Page 125
... a DVR Using Web Viewer 1. Click Apply. 6. Connecting to this is to add the IP address of the DVR to adjust the port settings on both the DVR and the Firewall. One way to do not allow you to download Active X components then you will need to receive incoming connections. Click Network. 3. Contact the Network Administrator for the first time on the main display screen. 2. Contact the System administrator for Remote Connection 1. The cameras will...
... a DVR Using Web Viewer 1. Click Apply. 6. Connecting to this is to add the IP address of the DVR to adjust the port settings on both the DVR and the Firewall. One way to do not allow you to download Active X components then you will need to receive incoming connections. Click Network. 3. Contact the Network Administrator for the first time on the main display screen. 2. Contact the System administrator for Remote Connection 1. The cameras will...

User Manual
Page 132
... the connection type and speed. It is allowed to view live video Export images and video clips Control relay outputs Setup administration Basics: The DVR can be assigned different privileges that users not be made for the user. The appearance of it matches the DVR almost identically; In order to log in . The Surveillix Remote software allows you to access setup or control a PTZ camera at any given time. Each user can pose a security...
... the connection type and speed. It is allowed to view live video Export images and video clips Control relay outputs Setup administration Basics: The DVR can be assigned different privileges that users not be made for the user. The appearance of it matches the DVR almost identically; In order to log in . The Surveillix Remote software allows you to access setup or control a PTZ camera at any given time. Each user can pose a security...

User Manual
Page 133
... Site Info window. 3. Click New to open installation windows. By default the DVR is specified on the newly created connection and enter the login username and password. (case sensitive) 8. Select the Site Type and enter a Site Name. Enter the Center Port. The Site Name will be the name displayed inside the connection box to connect using DHCP. 5. This setting is set to help identify the unit. 4. Click OK...
... Site Info window. 3. Click New to open installation windows. By default the DVR is specified on the newly created connection and enter the login username and password. (case sensitive) 8. Select the Site Type and enter a Site Name. Enter the Center Port. The Site Name will be the name displayed inside the connection box to connect using DHCP. 5. This setting is set to help identify the unit. 4. Click OK...
Software Manual
Page 7
... a Graphic Search ...66 Object Search...67 Performing an Object Search...67 Motion Search ...68 Performing a Motion Search ...68 Audio Playback...68 Search in Live...69 PAN / TILT / ZOOM ...71 Pan / Tilt / Zoom Overview ...72 Setting up a PTZ Camera...72 Enable the PTZ Settings ...72 Supported PTZ Protocols...73 Advanced PTZ Setup ...74 Creating and Viewing Preset Positions ...74 Creating a Preset...74 Viewing a Preset...74 PTZ Address Settings ...75 Accessing PTZ Menus ...75 Controlling a ptz camera ...76 Using the Graphical PTZ Controller ...76 Using the On-Screen Compass ...77 29597AA vii
... a Graphic Search ...66 Object Search...67 Performing an Object Search...67 Motion Search ...68 Performing a Motion Search ...68 Audio Playback...68 Search in Live...69 PAN / TILT / ZOOM ...71 Pan / Tilt / Zoom Overview ...72 Setting up a PTZ Camera...72 Enable the PTZ Settings ...72 Supported PTZ Protocols...73 Advanced PTZ Setup ...74 Creating and Viewing Preset Positions ...74 Creating a Preset...74 Viewing a Preset...74 PTZ Address Settings ...75 Accessing PTZ Menus ...75 Controlling a ptz camera ...76 Using the Graphical PTZ Controller ...76 Using the On-Screen Compass ...77 29597AA vii

Software Manual
Page 8
... Connection 93 Connecting to a DVR Using Web Viewer...93 Closing the Web Viewer...93 INCLUDED SOFTWARE SETUP ...95 Emergency Agent Overview ...96 Configuring the DVR ...96 Configuring the Client PC ...96 Setup Window...97 Emergency Agent Window ...97 Filter Event List ...97 Add Items to Alarm Confirm List ...98 Search Alarm Window...99 View Recorded Video ...99 Export Video ...99 Remote Software Overview...100 Remote Software Setup...101 Installing Remote Software...101 Create a New Remote Connection 101 Configuring the DVR...102 Configuring the Server for Remote Connection 102 Digital...
... Connection 93 Connecting to a DVR Using Web Viewer...93 Closing the Web Viewer...93 INCLUDED SOFTWARE SETUP ...95 Emergency Agent Overview ...96 Configuring the DVR ...96 Configuring the Client PC ...96 Setup Window...97 Emergency Agent Window ...97 Filter Event List ...97 Add Items to Alarm Confirm List ...98 Search Alarm Window...99 View Recorded Video ...99 Export Video ...99 Remote Software Overview...100 Remote Software Setup...101 Installing Remote Software...101 Create a New Remote Connection 101 Configuring the DVR...102 Configuring the Server for Remote Connection 102 Digital...

Software Manual
Page 15
... each camera: Recording Motion Detection Display Displayed when the camera is currently being recorded to the DVR. Displayed when the camera is activated. INSTANT is a manual activation of DVR Special Recording. Instant Recording is displayed when a user activates the instant recording option. Regardless of Special Recording is displayed in the upper right corner on the Video Display Area. CAMERA VIEW Recording Status Special Recording Type INSTANT Camera No. and Name Recording Status Indicator The camera status for each camera is...
... each camera: Recording Motion Detection Display Displayed when the camera is currently being recorded to the DVR. Displayed when the camera is activated. INSTANT is a manual activation of DVR Special Recording. Instant Recording is displayed when a user activates the instant recording option. Regardless of Special Recording is displayed in the upper right corner on the Video Display Area. CAMERA VIEW Recording Status Special Recording Type INSTANT Camera No. and Name Recording Status Indicator The camera status for each camera is...

Software Manual
Page 49
... DDNS). 5. a. Subnet Mask: This should be configured to forward ports 80 and 4000 to time). Enter the following IP address. 5. IP Address: The first three sets of the DVR. Once DDNS is configured, the router the DVR connects to will be accessible from any remote site by setting it statically. The Network settings may need to be a unique number between 1-254. Click Administrative. 3. This service is most useful for network administration). Enter the ID, Password...
... DDNS). 5. a. Subnet Mask: This should be configured to forward ports 80 and 4000 to time). Enter the following IP address. 5. IP Address: The first three sets of the DVR. Once DDNS is configured, the router the DVR connects to will be accessible from any remote site by setting it statically. The Network settings may need to be a unique number between 1-254. Click Administrative. 3. This service is most useful for network administration). Enter the ID, Password...

Software Manual
Page 93
... inside Internet Explorer® settings. Select the Web Viewer (iDVR) check box. 5. When attempting this for more cameras (or select a screen division button). 5. Contact the Network Administrator for the first time on a computer a window will open and you receive a message saying Internet Explorer® security settings do this . Click Network. 3. Connecting to adjust port settings if necessary. Without a user account, the Administrator account must be allowed to a DVR Using Web Viewer 1. Configuring the Server for additional help with adjusting Internet Explorer®...
... inside Internet Explorer® settings. Select the Web Viewer (iDVR) check box. 5. When attempting this for more cameras (or select a screen division button). 5. Contact the Network Administrator for the first time on a computer a window will open and you receive a message saying Internet Explorer® security settings do this . Click Network. 3. Connecting to adjust port settings if necessary. Without a user account, the Administrator account must be allowed to a DVR Using Web Viewer 1. Configuring the Server for additional help with adjusting Internet Explorer®...

Software Manual
Page 100
... DVR server, a user account must be fully operated and maintained remotely. The Surveillix Remote software allows you to view cameras 4, 8 and 16. In addition, each user can perform functions on the connection type and speed. The appearance of it matches the DVR almost identically; Each user can be assigned different privileges that users not be denied Searching and Setup privileges and only granted access to view live video Export images and video...
... DVR server, a user account must be fully operated and maintained remotely. The Surveillix Remote software allows you to view cameras 4, 8 and 16. In addition, each user can perform functions on the connection type and speed. The appearance of it matches the DVR almost identically; Each user can be assigned different privileges that users not be denied Searching and Setup privileges and only granted access to view live video Export images and video...

Software Manual
Page 101
... Remote Center. By default the DVR is specified on the newly created connection and enter the login username and password. (case sensitive) 8. The CD should play automatically. 2. The Surveillix Remote Software opens and the Local Connection window opens. 2. Enter the Center Port. Click on the server. 6. Create a New Remote Connection DVR Site List Selected Site Information Import/Export saved configurations 1. Click OK. 7. When prompted, select the Install Remote Software option. Remote Software Setup Installing Remote Software...
... Remote Center. By default the DVR is specified on the newly created connection and enter the login username and password. (case sensitive) 8. The CD should play automatically. 2. The Surveillix Remote Software opens and the Local Connection window opens. 2. Enter the Center Port. Click on the server. 6. Create a New Remote Connection DVR Site List Selected Site Information Import/Export saved configurations 1. Click OK. 7. When prompted, select the Install Remote Software option. Remote Software Setup Installing Remote Software...
