Owners Manual
Page 1
PM0004737??? © 2003 Toshiba Corporation Function setup Others Introduction Recording Playback Editing Library DIGITAL VIDEO DVD VIDEO RECORDER D-R1SU OWNER'S MANUAL 3 ABLE BOX ONTROL OPERATIONS Read "INSTALLATION GUIDE" first.
PM0004737??? © 2003 Toshiba Corporation Function setup Others Introduction Recording Playback Editing Library DIGITAL VIDEO DVD VIDEO RECORDER D-R1SU OWNER'S MANUAL 3 ABLE BOX ONTROL OPERATIONS Read "INSTALLATION GUIDE" first.

Owners Manual
Page 4
Introduction Caution for safety Read "SAFETY PRECAUTIONS", "IMPORTANT SAFETY INSTRUCTIONS", "Precautions" and others of the "INSTALLATION GUIDE" first. 4
Introduction Caution for safety Read "SAFETY PRECAUTIONS", "IMPORTANT SAFETY INSTRUCTIONS", "Precautions" and others of the "INSTALLATION GUIDE" first. 4
Owners Manual
Page 13
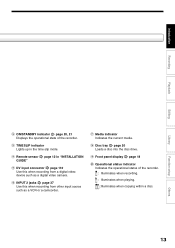
... indicator page 20, 21 Displays the operational state of the recorder. É TIMESLIP indicator Lights up in the time slip mode. Ñ Remote sensor GUIDE" page 12 in "INSTALLATION Ö DV input connector page 110 Use this when recording from a digital video device such as a digital video camera. Ü INPUT 2 jacks page...
... indicator page 20, 21 Displays the operational state of the recorder. É TIMESLIP indicator Lights up in the time slip mode. Ñ Remote sensor GUIDE" page 12 in "INSTALLATION Ö DV input connector page 110 Use this when recording from a digital video device such as a digital video camera. Ü INPUT 2 jacks page...
Owners Manual
Page 14
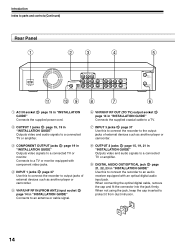
...INPUT3 S-VIDEO VHF / UHF RF IN (FROM ANT.) RF OUT (TO TV) 11 10 9 1 AC IN socket page 15 in "INSTALLATION GUIDE" Connects the supplied power cord. 2 OUTPUT 1 jacks page 15, 19 in "INSTALLATION GUIDE" Outputs video and audio signals to a connected TV or amplifier. 3 COMPONENT OUTPUT jacks page 19 in... player or camcorder. 5 VHF/UHF RF IN (FROM ANT.) input socket page 14 in "INSTALLATION GUIDE" Connects to an antenna or cable signal. 8 7 6 6 VHF/UHF RF OUT (TO TV) output socket page 14 in "INSTALLATION GUIDE" Connects the supplied coaxial cable to a TV. 7 INPUT 3 jacks page 37 Use this ...
...INPUT3 S-VIDEO VHF / UHF RF IN (FROM ANT.) RF OUT (TO TV) 11 10 9 1 AC IN socket page 15 in "INSTALLATION GUIDE" Connects the supplied power cord. 2 OUTPUT 1 jacks page 15, 19 in "INSTALLATION GUIDE" Outputs video and audio signals to a connected TV or amplifier. 3 COMPONENT OUTPUT jacks page 19 in... player or camcorder. 5 VHF/UHF RF IN (FROM ANT.) input socket page 14 in "INSTALLATION GUIDE" Connects to an antenna or cable signal. 8 7 6 6 VHF/UHF RF OUT (TO TV) output socket page 14 in "INSTALLATION GUIDE" Connects the supplied coaxial cable to a TV. 7 INPUT 3 jacks page 37 Use this ...
Owners Manual
Page 15
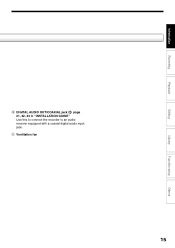
Introduction Recording Playback Editing Library Function setup Ä DIGITAL AUDIO OUT/COAXIAL jack page 21, 22, 23 in "INSTALLATION GUIDE" Use this to connect the recorder to an audio receiver equipped with a coaxial digital audio input jack. Å Ventilation fan 15 Others
Introduction Recording Playback Editing Library Function setup Ä DIGITAL AUDIO OUT/COAXIAL jack page 21, 22, 23 in "INSTALLATION GUIDE" Use this to connect the recorder to an audio receiver equipped with a coaxial digital audio input jack. Å Ventilation fan 15 Others
Owners Manual
Page 16
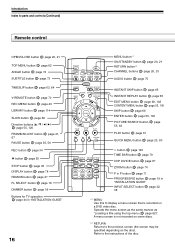
...35 DISPLAY button page 78 REMAIN button page 27 FL SELECT button page 18 DIMMER button page 18 Buttons for TV operation page 44 in "INSTALLATION GUIDE" 16 IP FRAME OPEN/CLOSE DVD TOP MENU MENU RETURN ANGLE SUBTITLE AUDIO CHANNEL V-REMOTE TIMESLIP INSTANT REPLAY INSTANT SKIP REC MENU EDIT MENU ... page 120 TIME BAR button page 79 CHP DIVIDE button page 87 ZOOM button page 74 P in P button page 71 PROGRESSIVE button page 19 in "INSTALLATION GUIDE" INPUT SELECT button 38 page 32, *1 MENU Use this to display a menu screen that is not recorded on some discs. *2 RETURN Returns to the ...
...35 DISPLAY button page 78 REMAIN button page 27 FL SELECT button page 18 DIMMER button page 18 Buttons for TV operation page 44 in "INSTALLATION GUIDE" 16 IP FRAME OPEN/CLOSE DVD TOP MENU MENU RETURN ANGLE SUBTITLE AUDIO CHANNEL V-REMOTE TIMESLIP INSTANT REPLAY INSTANT SKIP REC MENU EDIT MENU ... page 120 TIME BAR button page 79 CHP DIVIDE button page 87 ZOOM button page 74 P in P button page 71 PROGRESSIVE button page 19 in "INSTALLATION GUIDE" INPUT SELECT button 38 page 32, *1 MENU Use this to display a menu screen that is not recorded on some discs. *2 RETURN Returns to the ...
Owners Manual
Page 17
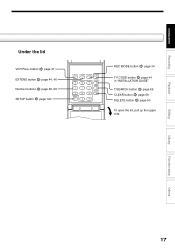
Editing Library Function setup Others 17 Introduction Recording Playback Under the lid VCR Plus+ button page 47 EXTEND button page 44, 46 Number buttons page 48, 69 SETUP button page 120 VCR Plus+ EXTEND REC MODE TV CODE 1 2 4 5 7 8 SETUP 0 T.SEARCH 3 CLEAR 6 DELETE 9 +10 REC MODE button page 34 TV CODE button page 44 in "INSTALLATION GUIDE" T.SEARCH button page 69 CLEAR button page 69 DELETE button page 50 To open the lid, pull up the upper side.
Editing Library Function setup Others 17 Introduction Recording Playback Under the lid VCR Plus+ button page 47 EXTEND button page 44, 46 Number buttons page 48, 69 SETUP button page 120 VCR Plus+ EXTEND REC MODE TV CODE 1 2 4 5 7 8 SETUP 0 T.SEARCH 3 CLEAR 6 DELETE 9 +10 REC MODE button page 34 TV CODE button page 44 in "INSTALLATION GUIDE" T.SEARCH button page 69 CLEAR button page 69 DELETE button page 50 To open the lid, pull up the upper side.
Owners Manual
Page 20
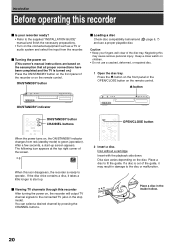
...disc to the connected TV (also in the stop mode). page 6, 7) Caution • Keep your recorder ready? • Refer to the supplied "INSTALLATION GUIDE" manual and finish the necessary preparations. • Turn on the remote control. Viewing TV channels through this recorder After turning the power on , the ...beforehand ( and use a cracked, deformed, or repaired disc. 1 Open the disc tray. Keep a close watch on the front panel of the guide, it takes a little longer to the disc or malfunction. The following icon appears at the top right corner of the disc tray. You can select...
...disc to the connected TV (also in the stop mode). page 6, 7) Caution • Keep your recorder ready? • Refer to the supplied "INSTALLATION GUIDE" manual and finish the necessary preparations. • Turn on the remote control. Viewing TV channels through this recorder After turning the power on , the ...beforehand ( and use a cracked, deformed, or repaired disc. 1 Open the disc tray. Keep a close watch on the front panel of the guide, it takes a little longer to the disc or malfunction. The following icon appears at the top right corner of the disc tray. You can select...
Owners Manual
Page 26
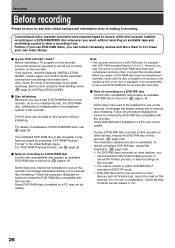
... an available tape and confirming a point to be formatted for program recording. Set the clock using the Initial Settings menu ( page 30, INSTALLATION GUIDE). For DVD-RAM disc, initialization is displayed. A message will appear asking you want to the database system of this recorder. Before recording ... a DVD-RW disc if recorded in DVD-VR mode. • DVD-RW discs which are correctly tuned in , read the separate "INSTALLATION GUIDE" volume again, and confirm all the necessary connections and settings have complicated contents (often, to use a new DVD-RAM disc for use...
... an available tape and confirming a point to be formatted for program recording. Set the clock using the Initial Settings menu ( page 30, INSTALLATION GUIDE). For DVD-RAM disc, initialization is displayed. A message will appear asking you want to the database system of this recorder. Before recording ... a DVD-RW disc if recorded in DVD-VR mode. • DVD-RW discs which are correctly tuned in , read the separate "INSTALLATION GUIDE" volume again, and confirm all the necessary connections and settings have complicated contents (often, to use a new DVD-RAM disc for use...
Owners Manual
Page 32
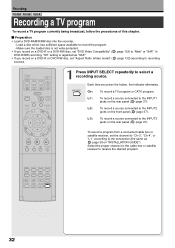
... QUICK MENU To record a program from a connected cable box or satellite receiver, set the channel to "Ch-3", "Ch-4", or "L-1" according to the INPUT3 jacks on "INSTALLATION GUIDE"). Load a disc which has sufficient space available to "Main" or "SAP." L-3: To record a source connected to the connection (the same as "SAP." • If you...
... QUICK MENU To record a program from a connected cable box or satellite receiver, set the channel to "Ch-3", "Ch-4", or "L-1" according to the INPUT3 jacks on "INSTALLATION GUIDE"). Load a disc which has sufficient space available to "Main" or "SAP." L-3: To record a source connected to the connection (the same as "SAP." • If you...
Owners Manual
Page 40
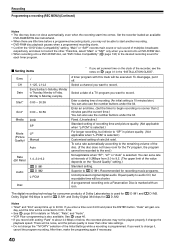
....) You can also use the number buttons under the lid. "Date" will gain one day, and the time will be able to "SP" in the "INSTALLATION GUIDE". Set the recorder loaded an available DVD-RAM/R/RW disc beforehand. • When there are little time before a programmed recording starts, you enter a time over...
....) You can also use the number buttons under the lid. "Date" will gain one day, and the time will be able to "SP" in the "INSTALLATION GUIDE". Set the recorder loaded an available DVD-RAM/R/RW disc beforehand. • When there are little time before a programmed recording starts, you enter a time over...
Owners Manual
Page 46
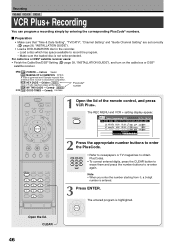
... program is not write-protected. Preparation • Make sure that "Time & Date Setting", "TV/CATV", "Channel Setting" and "Guide Channel Setting" are set correctly ( page 28, "INSTALLATION GUIDE"). • Load a DVD-RAM/R/RW disc in the recorder. - ENTER Open the lid. VCR Plus+ The REC MENU and ...setting display appear. For cable box or DSS® satellite receiver users: • Finish the Cable Box/DSS® Setting ( page 38, "INSTALLATION GUIDE"), and turn on the cable box or DSS® satellite receiver. 5PM FAM POPEYE Cartoon 725692 HBO MAKING OF A CHAMPION 237945 A look at...
... program is not write-protected. Preparation • Make sure that "Time & Date Setting", "TV/CATV", "Channel Setting" and "Guide Channel Setting" are set correctly ( page 28, "INSTALLATION GUIDE"). • Load a DVD-RAM/R/RW disc in the recorder. - ENTER Open the lid. VCR Plus+ The REC MENU and ...setting display appear. For cable box or DSS® satellite receiver users: • Finish the Cable Box/DSS® Setting ( page 38, "INSTALLATION GUIDE"), and turn on the cable box or DSS® satellite receiver. 5PM FAM POPEYE Cartoon 725692 HBO MAKING OF A CHAMPION 237945 A look at...

Owners Manual
Page 47
...8226; While displaying the REC MENU, the VCR Plus+ programming is not available. • When recording onto a DVD-R/RW disc, set to "Use" ( page 38, "INSTALLATION GUIDE"), "3", "4" or "L1" is in "CH" according to your entries, press REC MENU. ENTER 6 To enter another program, repeat steps 1 to 5. 7 After completing ... program starts even if when the start time arrives prior to the end of an entry is automatically entered in error. - when the guide channel has not yet been set the item, if necessary. REC MENU The REC MENU disappears. For details, see page 41. when an...
...8226; While displaying the REC MENU, the VCR Plus+ programming is not available. • When recording onto a DVD-R/RW disc, set to "Use" ( page 38, "INSTALLATION GUIDE"), "3", "4" or "L1" is in "CH" according to your entries, press REC MENU. ENTER 6 To enter another program, repeat steps 1 to 5. 7 After completing ... program starts even if when the start time arrives prior to the end of an entry is automatically entered in error. - when the guide channel has not yet been set the item, if necessary. REC MENU The REC MENU disappears. For details, see page 41. when an...
Owners Manual
Page 72
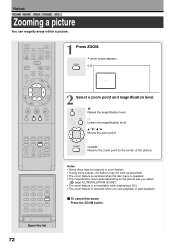
...; The zoom feature is canceled when the disc menu is operated. • The magnification level varies depending on the picture size you select ( page 42,"INSTALLATION GUIDE"). • The zoom feature is not available while displaying a GUI. • The zoom feature is canceled when you stop playback or start playback.
...; The zoom feature is canceled when the disc menu is operated. • The magnification level varies depending on the picture size you select ( page 42,"INSTALLATION GUIDE"). • The zoom feature is not available while displaying a GUI. • The zoom feature is canceled when you stop playback or start playback.
Owners Manual
Page 121
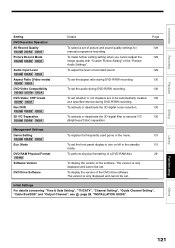
... quality settings for 129 manual programme recording. Initial Settings For details concerning "Time & Date Setting", "TV/CATV", "Channel Setting", "Guide Channel Setting", "Cable Box/DSS" and "Output Channel", see page 28, "INSTALLATION GUIDE". To make further setting setting when you cannot adjust the 129 image quality with "Custom Picture Setting" of recorded sound...
... quality settings for 129 manual programme recording. Initial Settings For details concerning "Time & Date Setting", "TV/CATV", "Channel Setting", "Guide Channel Setting", "Cable Box/DSS" and "Output Channel", see page 28, "INSTALLATION GUIDE". To make further setting setting when you cannot adjust the 129 image quality with "Custom Picture Setting" of recorded sound...
Owners Manual
Page 127
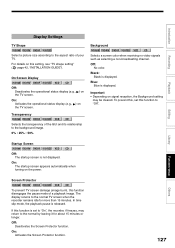
... when the recorder remains idle for about 15 minutes or longer. Blue: Blue is displayed. To prevent this setting, see "TV shape setting" ( page 42, "INSTALLATION GUIDE"). On: The startup screen appears automatically when turning on this , set to "On", the recorder, if freezes, may be cleared. On Screen Display DVD-RAM...
... when the recorder remains idle for about 15 minutes or longer. Blue: Blue is displayed. To prevent this setting, see "TV shape setting" ( page 42, "INSTALLATION GUIDE"). On: The startup screen appears automatically when turning on this , set to "On", the recorder, if freezes, may be cleared. On Screen Display DVD-RAM...
Owners Manual
Page 128
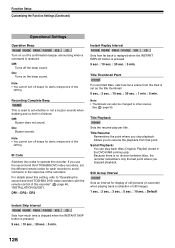
... Because there is no division between titles, the recorder remembers only the last point where you use the second and third TOSHIBA DVD video recorders, set the different remote codes for each recorder to set as the title thumbnail. 0 sec. : ... sec. : 1 min. : 5 min. Serial Playback: You can also be changed to "Operating the second and third TOSHIBA DVD video recorders with the remote control of this setting. Function Setup Customizing the Function Settings (Continued) Operational Settings Operation Beep... (in the response of this recorder" ( page 46, "INSTALLATION GUIDE").
... Because there is no division between titles, the recorder remembers only the last point where you use the second and third TOSHIBA DVD video recorders, set the different remote codes for each recorder to set as the title thumbnail. 0 sec. : ... sec. : 1 min. : 5 min. Serial Playback: You can also be changed to "Operating the second and third TOSHIBA DVD video recorders with the remote control of this setting. Function Setup Customizing the Function Settings (Continued) Operational Settings Operation Beep... (in the response of this recorder" ( page 46, "INSTALLATION GUIDE").
Owners Manual
Page 135
...). • The disc may be completed. • Clock setting has not been completed. → Complete the clock setting ( page 30, "INSTALLATION GUIDE"). • The programs list is full. → Cancel unwanted programs ( page 43). Program Timer programming cannot be damaged, dirty, and scratched... format on the disc ( page 29). VCR Plus+ Recording does not work properly. • Guide channel setting is not completed. → Complete the Guide channel setting ( page 36, "INSTALLATION GUIDE"). • TV/CATV setting is not completed. → Complete the physical format on the disc...
...). • The disc may be completed. • Clock setting has not been completed. → Complete the clock setting ( page 30, "INSTALLATION GUIDE"). • The programs list is full. → Cancel unwanted programs ( page 43). Program Timer programming cannot be damaged, dirty, and scratched... format on the disc ( page 29). VCR Plus+ Recording does not work properly. • Guide channel setting is not completed. → Complete the Guide channel setting ( page 36, "INSTALLATION GUIDE"). • TV/CATV setting is not completed. → Complete the physical format on the disc...
Owners Manual
Page 136
... work. • The batteries in the remote control are exhausted. → Replace all the batteries in the remote control ( page 12, "INSTALLATION GUIDE"). • The light emitter of the remote control is not pointed at the receptor of this unit. → Point the emitter of the ... mode is not appropriate. → Adjust the remote mode of the remote control and this unit ( page 46, "INSTALLATION GUIDE"). Clock The clock blinks. → Complete the initial setting again ( page 46, "INSTALLATION GUIDE"). The clock does not keep time. → Set the Time and Date Setting manually ( page 32...
... work. • The batteries in the remote control are exhausted. → Replace all the batteries in the remote control ( page 12, "INSTALLATION GUIDE"). • The light emitter of the remote control is not pointed at the receptor of this unit. → Point the emitter of the ... mode is not appropriate. → Adjust the remote mode of the remote control and this unit ( page 46, "INSTALLATION GUIDE"). Clock The clock blinks. → Complete the initial setting again ( page 46, "INSTALLATION GUIDE"). The clock does not keep time. → Set the Time and Date Setting manually ( page 32...