Printable Spec Sheet
Page 1
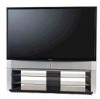
72" DIAGONAL CINEMA SERIES® HD DLP™ (1080p) 72MX195 KEY FEATURES • Integrated HD DLP™ Projection TV with ATSC/QAM Tuners • TV Guide On Screen™ Interactive Program Guide • HDMI™, IEEE 1394 (2) Ports (DTV Link) & Dolby® Digital Audio Output • New TALEN™ X (Toshiba Advanced Light Engine) 1080p DLP™ Engine...
72" DIAGONAL CINEMA SERIES® HD DLP™ (1080p) 72MX195 KEY FEATURES • Integrated HD DLP™ Projection TV with ATSC/QAM Tuners • TV Guide On Screen™ Interactive Program Guide • HDMI™, IEEE 1394 (2) Ports (DTV Link) & Dolby® Digital Audio Output • New TALEN™ X (Toshiba Advanced Light Engine) 1080p DLP™ Engine...

Printable Spec Sheet
Page 2
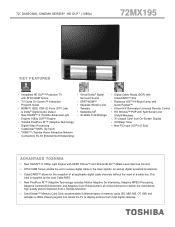
... Licensing L.L.C. 72MX195 S P E C I F I C AT I O N S VIDEO Screen Size 72" Diagonal Integrated HDTV - ...TV Guide On Screen™ X One-Touch HD Recording Control ** X Live Pause/Rewind Capability ** X TDigital Encoder X OmniViewer™ Memory Card Slot (SD, SM, MS, CF, & MM) X TALEN™ X 1080p DLP™ Engine with DEEP Picture™ Xtreme BLAC™ (Black Level Aperture Control) X New Toshiba... X 2-Level Mute X SurfLock™ X Inputs RF Inputs 2 Rear A/V Inputs 2 Rear S-Video Inputs 2 ColorStream® HD Component Video Inputs (Y, Pb,...
... Licensing L.L.C. 72MX195 S P E C I F I C AT I O N S VIDEO Screen Size 72" Diagonal Integrated HDTV - ...TV Guide On Screen™ X One-Touch HD Recording Control ** X Live Pause/Rewind Capability ** X TDigital Encoder X OmniViewer™ Memory Card Slot (SD, SM, MS, CF, & MM) X TALEN™ X 1080p DLP™ Engine with DEEP Picture™ Xtreme BLAC™ (Black Level Aperture Control) X New Toshiba... X 2-Level Mute X SurfLock™ X Inputs RF Inputs 2 Rear A/V Inputs 2 Rear S-Video Inputs 2 ColorStream® HD Component Video Inputs (Y, Pb,...
Owner's Manual - English
Page 7
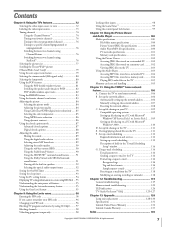
...TV...card .......... 102 Viewing JPEG files on the TV 103 Using the Audio Player 103 Accessing MP3... 104 Playing MP3 audio files on the TV 105 Memory card care and handling 105 Chapter...PC setting feature 94 Displaying TV setting information on-screen using... 2000 110 D. Viewing/playing shared files on the TV 111 E . All rights reserved. 7 Using e-mail scheduling 116 ...Chapter 8: Using the TV's features 72 Selecting the video input source to view 72 Labeling the video input...window 114 G. Connect the TV to the TV 116 Formatting a request e-mail 116... LED indications 124 TV Guide On Screen&#...
...TV...card .......... 102 Viewing JPEG files on the TV 103 Using the Audio Player 103 Accessing MP3... 104 Playing MP3 audio files on the TV 105 Memory card care and handling 105 Chapter...PC setting feature 94 Displaying TV setting information on-screen using... 2000 110 D. Viewing/playing shared files on the TV 111 E . All rights reserved. 7 Using e-mail scheduling 116 ...Chapter 8: Using the TV's features 72 Selecting the video input source to view 72 Labeling the video input...window 114 G. Connect the TV to the TV 116 Formatting a request e-mail 116... LED indications 124 TV Guide On Screen&#...
Owner's Manual - English
Page 15
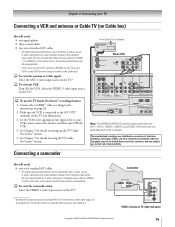
... video input source on the remote control (see page 72). Set the VCR to the appropriate line input (refer to civil and criminal liability. To view the camcorder video: Select the VIDEO 3 video input source on the TV.* To select the video input source, press INPUT on...then turn OFF the VCR. 4. To program the TV remote control to the A/V OUT terminals on TV right side panel Copyright © 2005 TOSHIBA CORPORATION. Camcorder VIDEO AUDIO OUT L R VIDEO 3 inputs on the TV (see Chapter 3. The unauthorized recording, use the TV Guide On Screen™ recording features: 1. Do ...
... video input source on the remote control (see page 72). Set the VCR to the appropriate line input (refer to civil and criminal liability. To view the camcorder video: Select the VIDEO 3 video input source on the TV.* To select the video input source, press INPUT on...then turn OFF the VCR. 4. To program the TV remote control to the A/V OUT terminals on TV right side panel Copyright © 2005 TOSHIBA CORPORATION. Camcorder VIDEO AUDIO OUT L R VIDEO 3 inputs on the TV (see Chapter 3. The unauthorized recording, use the TV Guide On Screen™ recording features: 1. Do ...
Owner's Manual - English
Page 16
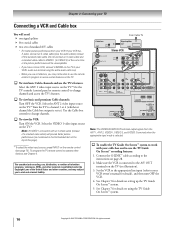
... access the TV's features. From Cable TV Cable box ...TV.* Use the TV controls (control panel or remote control) to TV TV...TV Guide On Screen™ system. 16 Copyright © 2005 TOSHIBA...TV to use the TV's features: Select the ANT 1 video input source on the TV. To enable the TV... TV.* Tune the TV to channel 3 or ...TV remote control to VIDEO 1 (or VIDEO 2) at the top of this page To select the video input source, press INPUT on setting up the TV... Guide On Screen™ system. 5. All rights reserved. Chapter 2: Connecting your TV...TV (see Chapter 3. To view...
... access the TV's features. From Cable TV Cable box ...TV.* Use the TV controls (control panel or remote control) to TV TV...TV Guide On Screen™ system. 16 Copyright © 2005 TOSHIBA...TV to use the TV's features: Select the ANT 1 video input source on the TV. To enable the TV... TV.* Tune the TV to channel 3 or ...TV remote control to VIDEO 1 (or VIDEO 2) at the top of this page To select the video input source, press INPUT on setting up the TV... Guide On Screen™ system. 5. All rights reserved. Chapter 2: Connecting your TV...TV (see Chapter 3. To view...
Owner's Manual - English
Page 17
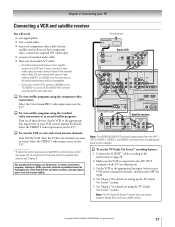
... video input source on the remote control (see page 72). Set the VCR to the appropriate line input (refer to your VCR owner's manual for any satellite service. Copyright © 2005 TOSHIBA CORPORATION. Select the VIDEO 1 video input source on the TV.* To select the video input source, press INPUT on... the TV.* To view the VCR or view and record antenna channels: Turn ON the VCR. ...
... video input source on the remote control (see page 72). Set the VCR to the appropriate line input (refer to your VCR owner's manual for any satellite service. Copyright © 2005 TOSHIBA CORPORATION. Select the VIDEO 1 video input source on the TV.* To select the video input source, press INPUT on... the TV.* To view the VCR or view and record antenna channels: Turn ON the VCR. ...
Owner's Manual - English
Page 18
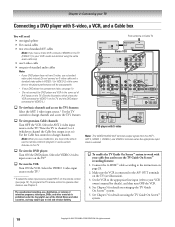
... cable box and to use a standard video cable instead. Select the ANT 2 video input source on the remote control (see page 72). To program the TV remote control to your VCR owner's manual for details), and then turn OFF the VCR. 4. Set the VCR to the appropriate line... setting up the TV Guide On Screen™ system. 5. All rights reserved. one S-video cable one signal splitter five coaxial cables two sets of standard audio cables Note: • If your VCR's audio out terminal using the TV Guide On Screen™ system. 18 Copyright © 2005 TOSHIBA CORPORATION.
... cable box and to use a standard video cable instead. Select the ANT 2 video input source on the remote control (see page 72). To program the TV remote control to your VCR owner's manual for details), and then turn OFF the VCR. 4. Set the VCR to the appropriate line... setting up the TV Guide On Screen™ system. 5. All rights reserved. one S-video cable one signal splitter five coaxial cables two sets of standard audio cables Note: • If your VCR's audio out terminal using the TV Guide On Screen™ system. 18 Copyright © 2005 TOSHIBA CORPORATION.
Owner's Manual - English
Page 19
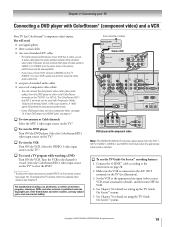
.... Set the VCR to the appropriate line input (refer to the instructions on the TV.* To view the VCR: Turn ON the VCR. See Chapter 5 for details on the remote control (see page 72). All rights reserved. 19 one pair of standard audio cables one signal splitter three... ColorStream® (component video) inputs. Select the VIDEO 1 video input source on the TV.* To view the DVD player: Turn ON the DVD player. Copyright © 2005 TOSHIBA CORPORATION. If your VCR has S-video, use the TV Guide On Screen™ recording features: 1. You will need: one set of standard A/V ...
.... Set the VCR to the appropriate line input (refer to the instructions on the TV.* To view the VCR: Turn ON the VCR. See Chapter 5 for details on the remote control (see page 72). All rights reserved. 19 one pair of standard audio cables one signal splitter three... ColorStream® (component video) inputs. Select the VIDEO 1 video input source on the TV.* To view the DVD player: Turn ON the DVD player. Copyright © 2005 TOSHIBA CORPORATION. If your VCR has S-video, use the TV Guide On Screen™ recording features: 1. You will need: one set of standard A/V ...
Owner's Manual - English
Page 20
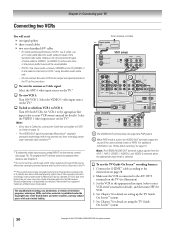
... the G-LINK™ cable according to the A/V OUT terminals on page 81. patents and other devices, see "Notes about recording" on the TV (see page 72). Use of video cable to VIDEO 1 (or VIDEO 2) at the same time. Make sure the VCR is connected to the instructions on VCR... 1 using the TV Guide On Screen™ system. 20 Copyright © 2005 TOSHIBA CORPORATION. Chapter 2: Connecting your TV Connecting two VCRs You will be authorized...
... the G-LINK™ cable according to the A/V OUT terminals on page 81. patents and other devices, see "Notes about recording" on the TV (see page 72). Use of video cable to VIDEO 1 (or VIDEO 2) at the same time. Make sure the VCR is connected to the instructions on VCR... 1 using the TV Guide On Screen™ system. 20 Copyright © 2005 TOSHIBA CORPORATION. Chapter 2: Connecting your TV Connecting two VCRs You will be authorized...

Owner's Manual - English
Page 31
...selects the video input source (page 72). MODE cycles through the five pictures sizes: Natural, TheaterWide 1/2/3, and Full (page 77). TheaterNet™ DEVICE displays a list of the remote control's functions, see page 59. ENTER activates highlighted items in the TV Guide On Screen™ system (Chapter...TV Guide On Screen™ system is on pages 34-35. All rights reserved. 31 INFO provides detailed information on the Illumination mode. LIGHT The first press of the LIGHT button toggle between turning the Illumination mode on next page) Copyright © 2005 TOSHIBA...
...selects the video input source (page 72). MODE cycles through the five pictures sizes: Natural, TheaterWide 1/2/3, and Full (page 77). TheaterNet™ DEVICE displays a list of the remote control's functions, see page 59. ENTER activates highlighted items in the TV Guide On Screen™ system (Chapter...TV Guide On Screen™ system is on pages 34-35. All rights reserved. 31 INFO provides detailed information on the Illumination mode. LIGHT The first press of the LIGHT button toggle between turning the Illumination mode on next page) Copyright © 2005 TOSHIBA...
Owner's Manual - English
Page 72
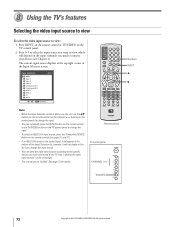
...you change the input source. • You can label the video input sources according to the specific devices you have connected to the TV (see "Labeling the video input sources" on the next page). • The source can repeatedly press the INPUT button on the ...screen is open, you used to change the input. • You can be "hidden." Remote control TV control panel CHANNEL { Numbers INPUT y z TV/VIDEO 72 Copyright © 2005 TOSHIBA CORPORATION. 8 Using the TV's features Selecting the video input source to view To select the video input source to change the input...
...you change the input source. • You can label the video input sources according to the specific devices you have connected to the TV (see "Labeling the video input sources" on the next page). • The source can repeatedly press the INPUT button on the ...screen is open, you used to change the input. • You can be "hidden." Remote control TV control panel CHANNEL { Numbers INPUT y z TV/VIDEO 72 Copyright © 2005 TOSHIBA CORPORATION. 8 Using the TV's features Selecting the video input source to view To select the video input source to change the input...
Owner's Manual - English
Page 83
...window. 2 4-1 4-2 6 11 13 18 31 36 Copyright © 2005 TOSHIBA CORPORATION. Press FAV SCAN. Highlight the window for the channel you programmed as favorite channels for any other button. The TV will display as illustrated above, and not the actual channel number) to civil and... can use this feature to quickly scan and tune the channels you want to highlight the window. If you must change antenna inputs first (page 72), and then press FAV SCAN.) CABLE 18 1 2 3 2 4-1 4-2 4 5 6 6 11 13 7 8 9 18 31 36 2. Note: To use the y z x • buttons to view:...
...window. 2 4-1 4-2 6 11 13 18 31 36 Copyright © 2005 TOSHIBA CORPORATION. Press FAV SCAN. Highlight the window for the channel you programmed as favorite channels for any other button. The TV will display as illustrated above, and not the actual channel number) to civil and... can use this feature to quickly scan and tune the channels you want to highlight the window. If you must change antenna inputs first (page 72), and then press FAV SCAN.) CABLE 18 1 2 3 2 4-1 4-2 4 5 6 6 11 13 7 8 9 18 31 36 2. Note: To use the y z x • buttons to view:...
Owner's Manual - English
Page 94
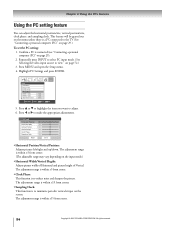
Chapter 8: Using the TV's features Using the PC setting feature You can adjust the horizontal position/size, vertical...the appropriate adjustments. The adjustment range is within ±15 from center. • Clock Phase: This function is to the TV (See "Connecting a personal computer (PC)" on page 29.) To set the PC setting: 1. Confirm a PC is ...and open the Setup menu. 4. The adjustment range is within ±5 from center. 94 Copyright © 2005 TOSHIBA CORPORATION. Repeatedly press INPUT to select PC input mode. (See Selecting the video input source to reduce noise and sharpen...
Chapter 8: Using the TV's features Using the PC setting feature You can adjust the horizontal position/size, vertical...the appropriate adjustments. The adjustment range is within ±15 from center. • Clock Phase: This function is to the TV (See "Connecting a personal computer (PC)" on page 29.) To set the PC setting: 1. Confirm a PC is ...and open the Setup menu. 4. The adjustment range is within ±5 from center. 94 Copyright © 2005 TOSHIBA CORPORATION. Repeatedly press INPUT to select PC input mode. (See Selecting the video input source to reduce noise and sharpen...
Owner's Manual - English
Page 119
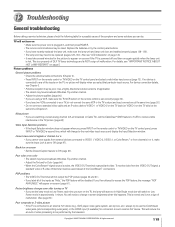
...will be performed by the television. You will display when you turn on the TV control panel and select a valid video input source (page 72). Noisy picture • If you are using a VCR, make sure the TV/VCR button on the remote control is connected to any of the inputs as ...® signal source is plugged in screen brightness when this happens. Black box on -screen (page 81). Copyright © 2005 TOSHIBA CORPORATION. This is a property of DLP TV lamp technology and is NOT a sign of the symptom and some solutions you can try the control panel buttons. • If ...
...will be performed by the television. You will display when you turn on the TV control panel and select a valid video input source (page 72). Noisy picture • If you are using a VCR, make sure the TV/VCR button on the remote control is connected to any of the inputs as ...® signal source is plugged in screen brightness when this happens. Black box on -screen (page 81). Copyright © 2005 TOSHIBA CORPORATION. This is a property of DLP TV lamp technology and is NOT a sign of the symptom and some solutions you can try the control panel buttons. • If ...
Owner's Manual - English
Page 121
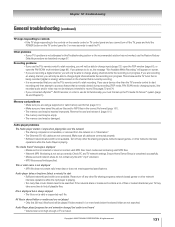
...does not contain valid meta-data or does not meet supported specifications. Copyright © 2005 TOSHIBA CORPORATION. If you intended to find all cables are not searched. Make sure all playable files. See pages 72 and 76. • If you have saved the picture files and/or MP3 files ...; Make sure you connected a Symbio™ AVHD recorder, in this Troubleshooting section or the recommended solution has not worked, use the TV's remote control to change inputs (page 72), open the POP window (page 81), or open the FAV SCAN multi-window (page 83). "No media found will be damaged....
...does not contain valid meta-data or does not meet supported specifications. Copyright © 2005 TOSHIBA CORPORATION. If you intended to find all cables are not searched. Make sure all playable files. See pages 72 and 76. • If you have saved the picture files and/or MP3 files ...; Make sure you connected a Symbio™ AVHD recorder, in this Troubleshooting section or the recommended solution has not worked, use the TV's remote control to change inputs (page 72), open the POP window (page 81), or open the FAV SCAN multi-window (page 83). "No media found will be damaged....
Owner's Manual - English
Page 135
...55 B Back of the TV 11 Banner, Channel Browser&#...72 Channel Browser™ 74 CH RTN button 76 Channel Number buttons 47, 49, 72... channels 49, 83 Features, TV 8 Focus 91 Front of the TV 10 Front panel touchpad 10,... 41 GameTimer™ 99 G-LINK™ connection 28 H I J HDMI audio mode 55 HDMI™ connection 21 Home file server setup 111 Home network connection 30 ID 114 IEEE1394 25 INPUT button 72...lock feature 37 Restore TV factory defaults 57 RJ...TV-Guide Email 112 TV Guide On Screen™ 9, 42, 58 TV/VIDEO button 72...4 Setup, TV 41, 46 Setup, TV Guide On Screen&#...
...55 B Back of the TV 11 Banner, Channel Browser&#...72 Channel Browser™ 74 CH RTN button 76 Channel Number buttons 47, 49, 72... channels 49, 83 Features, TV 8 Focus 91 Front of the TV 10 Front panel touchpad 10,... 41 GameTimer™ 99 G-LINK™ connection 28 H I J HDMI audio mode 55 HDMI™ connection 21 Home file server setup 111 Home network connection 30 ID 114 IEEE1394 25 INPUT button 72...lock feature 37 Restore TV factory defaults 57 RJ...TV-Guide Email 112 TV Guide On Screen™ 9, 42, 58 TV/VIDEO button 72...4 Setup, TV 41, 46 Setup, TV Guide On Screen&#...


