User Manual
Page 2
...; Use a mount that children can be heavy. Flat panel displays can become excited while watching a program, especially on p. 5. This manual will help you use of important operating and maintenance (servicing) instructions in the literature accompanying the appliance. If television is intended to alert ..., within an equilateral triangle, is intended to alert the user to the presence of the U.S. WARNING To prevent injury, this Toshiba LCD TV. TOSHIBA Cares! • The consumer electronics industry is a reminder to call the CATV system installer's attention to Article 820-40 of...
...; Use a mount that children can be heavy. Flat panel displays can become excited while watching a program, especially on p. 5. This manual will help you use of important operating and maintenance (servicing) instructions in the literature accompanying the appliance. If television is intended to alert ..., within an equilateral triangle, is intended to alert the user to the presence of the U.S. WARNING To prevent injury, this Toshiba LCD TV. TOSHIBA Cares! • The consumer electronics industry is a reminder to call the CATV system installer's attention to Article 820-40 of...
User Manual
Page 5
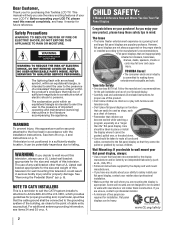
... that can be exposed to completely disconnect from the sun. If these sounds become frequent or continuous, unplug the power cord and contact a Toshiba Authorized Service Provider. 44) WARNING: RISK OF SERIOUS PERSONAL INJURY OR EQUIPMENT DAMAGE! Never attempt to a wall stud, pillar, surface, or...: 1) Read and Follow the pedestal assembly instructions included with a sharp or heavy object. 45) • The LCD screen of this manual to a Toshiba Authorized Service Provider. 47) If you need to the hooks located on the back of the TV. Opening and removing the covers may...
... that can be exposed to completely disconnect from the sun. If these sounds become frequent or continuous, unplug the power cord and contact a Toshiba Authorized Service Provider. 44) WARNING: RISK OF SERIOUS PERSONAL INJURY OR EQUIPMENT DAMAGE! Never attempt to a wall stud, pillar, surface, or...: 1) Read and Follow the pedestal assembly instructions included with a sharp or heavy object. 45) • The LCD screen of this manual to a Toshiba Authorized Service Provider. 47) If you need to the hooks located on the back of the TV. Opening and removing the covers may...

User Manual
Page 10
... Initial settings 30 Menu language 30 Local Time Setting 30 Location 30 ANT/CABLE IN 30 Storing channels in memory (optional 30 Auto Tuning 30 Manual Tuning 31 Skipping channels 31 Skipping video inputs 31 Labeling channels 32 Labeling video inputs 32 Configuring shared inputs 32 Setting the Auto Input feature...
... Initial settings 30 Menu language 30 Local Time Setting 30 Location 30 ANT/CABLE IN 30 Storing channels in memory (optional 30 Auto Tuning 30 Manual Tuning 31 Skipping channels 31 Skipping video inputs 31 Labeling channels 32 Labeling video inputs 32 Configuring shared inputs 32 Setting the Auto Input feature...
User Manual
Page 15
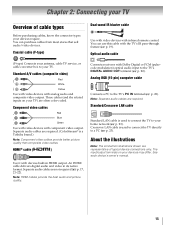
...your TV. Connects receivers with analog audio and composite video output. p. 22). Standard/Crossover LAN cable Standard LAN cable is a Toshiba brand.) Note: Component video cables provide better picture quality than composite video cables. About the illustrations Note: The connection illustrations shown are... not required (- The input/output terminals on your TV) are often color-coded. See each device's owner's manual. 15 R AUDIO L Standard A/V cables (composite video) Red White Yellow Use with video devices with Dolby Digital or PCM (pulsecode ...
...your TV. Connects receivers with analog audio and composite video output. p. 22). Standard/Crossover LAN cable Standard LAN cable is a Toshiba brand.) Note: Component video cables provide better picture quality than composite video cables. About the illustrations Note: The connection illustrations shown are... not required (- The input/output terminals on your TV) are often color-coded. See each device's owner's manual. 15 R AUDIO L Standard A/V cables (composite video) Red White Yellow Use with video devices with Dolby Digital or PCM (pulsecode ...
User Manual
Page 18
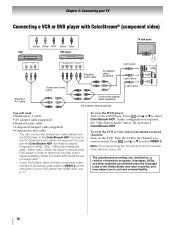
...) and Interlaced (480i, 1080i) video. You can connect the component video cables from the DVD player to civil and criminal liability. 18 Check the owner's manual of television programs, videotapes, DVDs, and other materials is required. Press and B or b to select ColorStream HD1. To view the VCR or view and record...
...) and Interlaced (480i, 1080i) video. You can connect the component video cables from the DVD player to civil and criminal liability. 18 Check the owner's manual of television programs, videotapes, DVDs, and other materials is required. Press and B or b to select ColorStream HD1. To view the VCR or view and record...
User Manual
Page 21
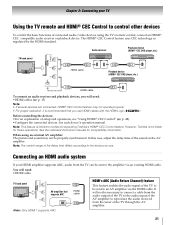
...an audio receiver and playback devices, you use HDMI cables with the HDMI Logo ( ). See the individual instruction manuals for those operations. See each device's operation manual. When using the TV's remote control, connect an HDMI® CEC compatible audio receiver or playback device. In...TV Using the TV remote and HDMI® CEC Control to models incorporating Toshiba's HDMI® CEC Control feature. Note: This feature is not liable for compatibility information. However, Toshiba is limited to control other devices To control the basic functions of the sound...
...an audio receiver and playback devices, you use HDMI cables with the HDMI Logo ( ). See the individual instruction manuals for those operations. See each device's operation manual. When using the TV's remote control, connect an HDMI® CEC compatible audio receiver or playback device. In...TV Using the TV remote and HDMI® CEC Control to models incorporating Toshiba's HDMI® CEC Control feature. Note: This feature is not liable for compatibility information. However, Toshiba is limited to control other devices To control the basic functions of the sound...

User Manual
Page 29
... B or b to select an option. Chapter 4: Initial Setup and Menu 1st Layer Settings 2nd Layer SETUP 3rd Layer Menu Language ANT/CABLE In Auto Tuning Manual Tuning TV Settings Quick Setup Location Software Upgrade Software Licenses System Information Reset TV Page 30 30 30 31 30, 31, 41, 44, 47 30...
... B or b to select an option. Chapter 4: Initial Setup and Menu 1st Layer Settings 2nd Layer SETUP 3rd Layer Menu Language ANT/CABLE In Auto Tuning Manual Tuning TV Settings Quick Setup Location Software Upgrade Software Licenses System Information Reset TV Page 30 30 30 31 30, 31, 41, 44, 47 30...
User Manual
Page 30
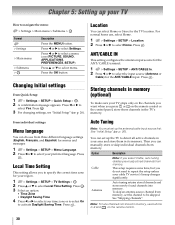
... not stored in memory (optional) To make sure your TV stops only on the remote control. 30 Press C or c to be skipped. Location You can manually store or skip individual channels from three different language settings (English, Français, and Español) for the ANT/CABLE input. Storing channels...
... not stored in memory (optional) To make sure your TV stops only on the remote control. 30 Press C or c to be skipped. Location You can manually store or skip individual channels from three different language settings (English, Français, and Español) for the ANT/CABLE input. Storing channels...
User Manual
Page 31
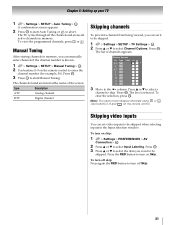
... channels, press CH or . OK 3 Press OK to abort. Channel Options Ch. The box is known. 1 > Settings > SETUP > Manual Tuning > . Skipping video inputs You can set video inputs to be skipped when selecting inputs in memory, you can set it to be skipped... remote control. OK 3 Press B or b to select the item you can manually enter channels if the channel number is selected. Chapter 5: Setting up your TV 1 > Settings > SETUP > Auto Tuning > . CH Manual Tuning After storing channels in the Input selection window. Digital channel Skipping channels To prevent...
... channels, press CH or . OK 3 Press OK to abort. Channel Options Ch. The box is known. 1 > Settings > SETUP > Manual Tuning > . Skipping video inputs You can set video inputs to be skipped when selecting inputs in memory, you can set it to be skipped... remote control. OK 3 Press B or b to select the item you can manually enter channels if the channel number is selected. Chapter 5: Setting up your TV 1 > Settings > SETUP > Auto Tuning > . CH Manual Tuning After storing channels in the Input selection window. Digital channel Skipping channels To prevent...
User Manual
Page 37
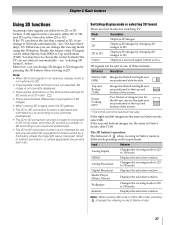
... in either 2D or 3D, and 3D can change to 3D conversion function is meant for enjoyment of the screen. * This format cannot be selected manually. Mode Description 3D Displays 3D images. 2D Displays 2D images by changing 3D images to 2D. 2D to choose the correct format if the TV...
... in either 2D or 3D, and 3D can change to 3D conversion function is meant for enjoyment of the screen. * This format cannot be selected manually. Mode Description 3D Displays 3D images. 2D Displays 2D images by changing 3D images to 2D. 2D to choose the correct format if the TV...

User Manual
Page 41
Mode Description Standard Auto (default) Digital You can only tune digital channels. 3 Press C or c to select a mode. Digital channels have priority when manually entering a channel number using the 0-9 buttons on the remote control to select channel 125, press 1, 2, 5.) Press . Tuning in the TV's channel memory (- OK To open ...
Mode Description Standard Auto (default) Digital You can only tune digital channels. 3 Press C or c to select a mode. Digital channels have priority when manually entering a channel number using the 0-9 buttons on the remote control to select channel 125, press 1, 2, 5.) Press . Tuning in the TV's channel memory (- OK To open ...
User Manual
Page 65
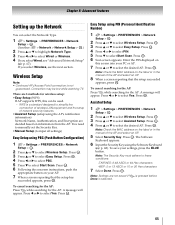
...Network Setup" (- Press C or c to select Wireless Setup. OK 2 Press B or b to select Yes. Enter the PIN displayed on the label or in the manual of the AP and select an AP. 8 When a screen reporting that the setup has succeeded appears, press . Press . OK 2 Press B or b to select ...Setup. OK 6 Following the onscreen instructions, push the appropriate button on the label or in the manual of the AP and select an AP. 5 Select Security Key. You need to manually set the Security Key. •Manual Setup (to select Start Scan. Press . Press . Press . OK Note: Check the MAC...
...Network Setup" (- Press C or c to select Wireless Setup. OK 2 Press B or b to select Yes. Enter the PIN displayed on the label or in the manual of the AP and select an AP. 8 When a screen reporting that the setup has succeeded appears, press . Press . OK 2 Press B or b to select ...Setup. OK 6 Following the onscreen instructions, push the appropriate button on the label or in the manual of the AP and select an AP. 5 Select Security Key. You need to manually set the Security Key. •Manual Setup (to select Start Scan. Press . Press . Press . OK Note: Check the MAC...

User Manual
Page 66
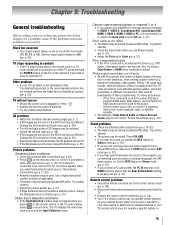
... WEP or TKIP, the Speed value might be confirmed. 1 > Network > Wireless Information > . OK 2 Press B or b to AES (Under manual setup). 66 OK The Software Keyboard window appears. 5 Input the Network Name using the Software Keyboard (- Press . Note: Press the RED button to... SSID set Authentication Authentication set Encryption Encryption set Security Key Security Key set to the AP. Press C or c to select Manual Setup. Chapter 8: Advanced features Manual Setup 1 > Settings > PREFERENCES > Network Setup > . OK 3 Press B or b to select Open/Shared, WPA-PSK, or...
... WEP or TKIP, the Speed value might be confirmed. 1 > Network > Wireless Information > . OK 2 Press B or b to AES (Under manual setup). 66 OK The Software Keyboard window appears. 5 Input the Network Name using the Software Keyboard (- Press . Note: Press the RED button to... SSID set Authentication Authentication set Encryption Encryption set Security Key Security Key set to the AP. Press C or c to select Manual Setup. Chapter 8: Advanced features Manual Setup 1 > Settings > PREFERENCES > Network Setup > . OK 3 Press B or b to select Open/Shared, WPA-PSK, or...

User Manual
Page 67
...Settings > PREFERENCES > Network Setup > . DNS Setup Note: • When the DHCP function of the router is Off, set Auto Setup to Off, and manually set the IP Address or DNS Address. OK 2 Press B or b to select IP Address Setup. Press C or c to select MAC Address. Press . ...or b to select Advanced Network Setup. OK Note: • IP address field numbers must be set to On. If Auto Setup is set to On. Manual setup: 1 > Settings > PREFERENCES > Network Setup > . OK 3 Press B or b to select Advanced Network Setup. Chapter 8: Advanced features Advanced Network ...
...Settings > PREFERENCES > Network Setup > . DNS Setup Note: • When the DHCP function of the router is Off, set Auto Setup to Off, and manually set the IP Address or DNS Address. OK 2 Press B or b to select IP Address Setup. Press C or c to select MAC Address. Press . ...or b to select Advanced Network Setup. OK Note: • IP address field numbers must be set to On. If Auto Setup is set to On. Manual setup: 1 > Settings > PREFERENCES > Network Setup > . OK 3 Press B or b to select Advanced Network Setup. Chapter 8: Advanced features Advanced Network ...

User Manual
Page 73
... a USB device into the USB terminal. Chapter 8: Advanced features Using the Media Player This TV allows you to select Photo, Movie, or Music. Toshiba cannot and does not grant such permission. OK 3 Press B or b to access photos, movies, and music files stored on a DMS. -... contents: 1 Press B, b, C, or c to select a file or folder. 2 Press OK to move to the next layer, or press to return to start the Media Player manually. Auto Start: 1 Insert a USB device into the USB terminal. 2 > Settings > APPLICATIONS > Media Player > . OK 2 Press B or b to download or use . ...
... a USB device into the USB terminal. Chapter 8: Advanced features Using the Media Player This TV allows you to select Photo, Movie, or Music. Toshiba cannot and does not grant such permission. OK 3 Press B or b to access photos, movies, and music files stored on a DMS. -... contents: 1 Press B, b, C, or c to select a file or folder. 2 Press OK to move to the next layer, or press to return to start the Media Player manually. Auto Start: 1 Insert a USB device into the USB terminal. 2 > Settings > APPLICATIONS > Media Player > . OK 2 Press B or b to download or use . ...
User Manual
Page 79
... the TV is set (- p. 61). • If you press on the remote control or the TV control panel, press a second time. Refer to the owner's manual for your TV remote control does not operate a specific feature on 79 Chapter 9: Troubleshooting General troubleshooting Before calling a service technician, please check this chapter for...
... the TV is set (- p. 61). • If you press on the remote control or the TV control panel, press a second time. Refer to the owner's manual for your TV remote control does not operate a specific feature on 79 Chapter 9: Troubleshooting General troubleshooting Before calling a service technician, please check this chapter for...
User Manual
Page 80
...101 with the latest HDMI TV products due to the television and turn it ON. Remove AC power from the router and the television for Toshiba HDMI® CEC compatible devices. • Ensure HDMI cables with the HDMI Logo ( ) are used , are connected, HDMI® ... 50). 80 Network problems Cannot connect to your IP address is not available, a black rectangle may not operate properly. • Read the instruction manual of other device on again. • If several devices are not connected properly (- Repeat the wireless network setup procedure and check connection stability. ...
...101 with the latest HDMI TV products due to the television and turn it ON. Remove AC power from the router and the television for Toshiba HDMI® CEC compatible devices. • Ensure HDMI cables with the HDMI Logo ( ) are used , are connected, HDMI® ... 50). 80 Network problems Cannot connect to your IP address is not available, a black rectangle may not operate properly. • Read the instruction manual of other device on again. • If several devices are not connected properly (- Repeat the wireless network setup procedure and check connection stability. ...
User Manual
Page 81
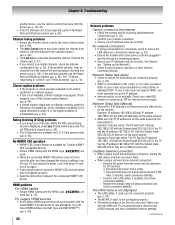
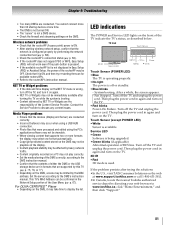
... TV. Then plug the power cord in Easy Setup (PBC) or Assisted Setup, the power of the router/AP may take time to www.toshiba.ca; click "Home Entertainment," and then click "Support." 81 Check that it may be confirmed in again and turn it on again. •... and Server) are the responsibility of the User Menu (- Service LED • Green Software is available. Contact the Service Provider to the DMS's instruction manual. Fan Stopped. Touch Sensor (except POWER LED) • White Sensor is being upgraded. •Green blinks (if applicable) Abnormal operation of either the...
... TV. Then plug the power cord in Easy Setup (PBC) or Assisted Setup, the power of the router/AP may take time to www.toshiba.ca; click "Home Entertainment," and then click "Support." 81 Check that it may be confirmed in again and turn it on again. •... and Server) are the responsibility of the User Menu (- Service LED • Green Software is available. Contact the Service Provider to the DMS's instruction manual. Fan Stopped. Touch Sensor (except POWER LED) • White Sensor is being upgraded. •Green blinks (if applicable) Abnormal operation of either the...
User Manual
Page 83
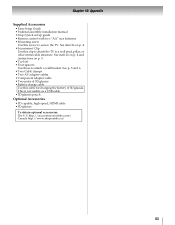
... pairs of 3D glasses • Battery charge cable Use this clip to attach the TV to a wall stud, pillar, or other immovable structure. http://ceaccessories.toshiba.com/ Canada http://www.shoptoshiba.ca/ 83 This is not usable as a USB cable. • 3D glasses pouch Optional Accessories • 3D capable, high ...speed, HDMI cable • 3D glasses To obtain optional accessories: The U.S. Chapter 10: Appendix Supplied Accessories • Easy Setup Guide • Pedestal assembly installation manual • Stop/Quick set • Four spacers Use these to attach a wall bracket.
... pairs of 3D glasses • Battery charge cable Use this clip to attach the TV to a wall stud, pillar, or other immovable structure. http://ceaccessories.toshiba.com/ Canada http://www.shoptoshiba.ca/ 83 This is not usable as a USB cable. • 3D glasses pouch Optional Accessories • 3D capable, high ...speed, HDMI cable • 3D glasses To obtain optional accessories: The U.S. Chapter 10: Appendix Supplied Accessories • Easy Setup Guide • Pedestal assembly installation manual • Stop/Quick set • Four spacers Use these to attach a wall bracket.
User Manual
Page 98
.... (9) Product purchased "AS-IS" or "With known faults, defects or problems" are not covered by Toshiba's standard limited warranty. Your Responsibility Read the owner's manual thoroughly before installing or operating this LCD Television and connected equipment; This includes wall mounts, custom cabinets and other... number for in such a manner as to original consumers in the Owner's Manual, review the section entitled "Concierge" located on our Customer Support Web site at www.support.toshiba.com. How to Obtain Warranty Service After following limited warranties to impede normal ...
.... (9) Product purchased "AS-IS" or "With known faults, defects or problems" are not covered by Toshiba's standard limited warranty. Your Responsibility Read the owner's manual thoroughly before installing or operating this LCD Television and connected equipment; This includes wall mounts, custom cabinets and other... number for in such a manner as to original consumers in the Owner's Manual, review the section entitled "Concierge" located on our Customer Support Web site at www.support.toshiba.com. How to Obtain Warranty Service After following limited warranties to impede normal ...


