
Printable Spec Sheet
Page 2
... (measured diagonally) REGZA® Bottom Deep LagoonTM Design 52.0" LCD PANEL: Resolution Dynamic Backlight Control Response Time CrystalCoatTM Contrast Enhancer...Pull-Down AUDIO: Speaker System Volume Limiter Mute/Half Mute Invisible Dolby® Volume • CONVENIENCE: Built-in TV Tuning Auto...Series, CineSpeed, ColorStream, PixelPure, and TheaterWide are trademarks of Toshiba America Consumer Products, L.L.C. Product design and specifications ...stabilized sound for 30%+ more film-like HD. 52XV648U The REGZA® XV648 Cinema Series® introduces CrystalCoat™...
... (measured diagonally) REGZA® Bottom Deep LagoonTM Design 52.0" LCD PANEL: Resolution Dynamic Backlight Control Response Time CrystalCoatTM Contrast Enhancer...Pull-Down AUDIO: Speaker System Volume Limiter Mute/Half Mute Invisible Dolby® Volume • CONVENIENCE: Built-in TV Tuning Auto...Series, CineSpeed, ColorStream, PixelPure, and TheaterWide are trademarks of Toshiba America Consumer Products, L.L.C. Product design and specifications ...stabilized sound for 30%+ more film-like HD. 52XV648U The REGZA® XV648 Cinema Series® introduces CrystalCoat™...
Owner's Manual - English
Page 7
...LCD TV 5 Chapter 1: Introduction 9 Features of your new TV 9 Overview of steps for installing, setting up, and using your new TV 9 TV front and side panel controls and connections . . . . 10 TV back panel connections 11 Chapter 2: Connecting your TV...to the HDMI input 15 REGZA-LINK® connection 16 Connecting a digital audio system 17 Connecting an audio system 17 Connecting a personal computer (PC 18 Chapter 3: Using the remote... 29 Setting the time zone 30 Selecting the location 30 Selecting the TOSHIBA Illumination mode 30 Selecting the Power-On Mode 30 Using Blue Screen ...
...LCD TV 5 Chapter 1: Introduction 9 Features of your new TV 9 Overview of steps for installing, setting up, and using your new TV 9 TV front and side panel controls and connections . . . . 10 TV back panel connections 11 Chapter 2: Connecting your TV...to the HDMI input 15 REGZA-LINK® connection 16 Connecting a digital audio system 17 Connecting an audio system 17 Connecting a personal computer (PC 18 Chapter 3: Using the remote... 29 Setting the time zone 30 Selecting the location 30 Selecting the TOSHIBA Illumination mode 30 Selecting the Power-On Mode 30 Using Blue Screen ...
Owner's Manual - English
Page 8
... 50 Using the HDMI™ settings feature 51 Setting the HDMI™ audio mode 51 Displaying TV status information 52 Understanding the auto power off feature 52 Understanding the last mode memory feature 52 Chapter 7: Using the TV's advanced features 53 Using the advanced picture settings features 53 Using the Resolution...IN and HDMI terminals 63 PC IN signal formats 63 HDMI signal formats 64 Limited United States Warranty for LCD Televisions 26" and Larger 65 Limited Canadian Warranty for Toshiba Brand Flat Panel Televisions 66 Index 69 8 XV648U_03TOC.pdf 2 2009/07/10 10:58:25
... 50 Using the HDMI™ settings feature 51 Setting the HDMI™ audio mode 51 Displaying TV status information 52 Understanding the auto power off feature 52 Understanding the last mode memory feature 52 Chapter 7: Using the TV's advanced features 53 Using the advanced picture settings features 53 Using the Resolution...IN and HDMI terminals 63 PC IN signal formats 63 HDMI signal formats 64 Limited United States Warranty for LCD Televisions 26" and Larger 65 Limited Canadian Warranty for Toshiba Brand Flat Panel Televisions 66 Index 69 8 XV648U_03TOC.pdf 2 2009/07/10 10:58:25
Owner's Manual - English
Page 9
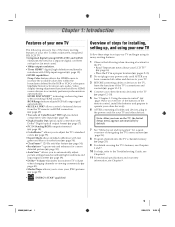
... page 57). • ENERGY STAR® qualified Overview of steps for installing, setting up your TV and begin using its many exciting features of your new Toshiba widescreen, integrated HD, LCD TV: •Integrated digital tuning (8VSB ATSC and QAM) eliminates the need for a separate digital converter... of the many exciting features. 1 Observe the following when choosing a location for a more detailed picture (- page 14). •Digital Audio Out optical audio connection with red, green and blue color selections (- pages 10-11). 4 Connect your other devices. page 49). •Two sets ...
... page 57). • ENERGY STAR® qualified Overview of steps for installing, setting up your TV and begin using its many exciting features of your new Toshiba widescreen, integrated HD, LCD TV: •Integrated digital tuning (8VSB ATSC and QAM) eliminates the need for a separate digital converter... of the many exciting features. 1 Observe the following when choosing a location for a more detailed picture (- page 14). •Digital Audio Out optical audio connection with red, green and blue color selections (- pages 10-11). 4 Connect your other devices. page 49). •Two sets ...
Owner's Manual - English
Page 10
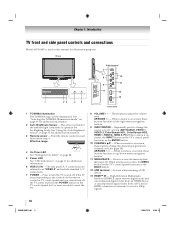
... Interface (HDMI 3) input receives digital audio and uncompressed digital video from an HDMI device or uncompressed digital video from a DVI device. These buttons adjust the volume level. ARROWS U u - Chapter 1: Introduction TV front and side panel controls and connections... Model 46XV648U is used in this remote sensor. TV front 1 23 45 Right side panel 7 8 10 11 9 6 12 13 Control panel 1 TOSHIBA Illumination The TOSHIBA logo will detect the ambient light conditions...
... Interface (HDMI 3) input receives digital audio and uncompressed digital video from an HDMI device or uncompressed digital video from a DVI device. These buttons adjust the volume level. ARROWS U u - Chapter 1: Introduction TV front and side panel controls and connections... Model 46XV648U is used in this remote sensor. TV front 1 23 45 Right side panel 7 8 10 11 9 6 12 13 Control panel 1 TOSHIBA Illumination The TOSHIBA logo will detect the ambient light conditions...
Owner's Manual - English
Page 11
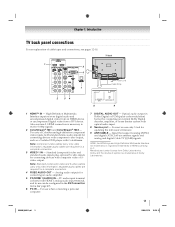
...video from Dolby Laboratories. Note: Component video cables carry only video information; separate audio cables are required for a complete connection. 4 FIXED AUDIO OUT - Chapter 1: Introduction TV back panel connections For an explanation of cable types and connections, see item ... personal computer. 7 DIGITAL AUDIO OUT - Note: Standard (composite) video and S-video cables carry only video information; For use only. separate audio cables are required for connecting devices with component video output, such as a Toshiba DVD player with standard stereo audio inputs) for a complete ...
...video from Dolby Laboratories. Note: Component video cables carry only video information; separate audio cables are required for a complete connection. 4 FIXED AUDIO OUT - Chapter 1: Introduction TV back panel connections For an explanation of cable types and connections, see item ... personal computer. 7 DIGITAL AUDIO OUT - Note: Standard (composite) video and S-video cables carry only video information; For use only. separate audio cables are required for connecting devices with component video output, such as a Toshiba DVD player with standard stereo audio inputs) for a complete ...

Owner's Manual - English
Page 12
Coaxial (F-type) cable Coaxial (F-type) cable is Toshiba's brand of component video.) These cables are required for stereo left (or mono) audio. These cables (and the related inputs on your TV) are for use with video devices with HDMI Logo " ") HDMI (High-Definition Multimedia Interface) ... sets of three and are typically colorcoded according to the ANT/CABLE input on your TV. Note: Component video cables provide better picture performance than a composite video cable. Note: Separate audio cables are typically color-coded red, green, and blue. Standard A/V cables (red...
Coaxial (F-type) cable Coaxial (F-type) cable is Toshiba's brand of component video.) These cables are required for stereo left (or mono) audio. These cables (and the related inputs on your TV) are for use with video devices with HDMI Logo " ") HDMI (High-Definition Multimedia Interface) ... sets of three and are typically colorcoded according to the ANT/CABLE input on your TV. Note: Component video cables provide better picture performance than a composite video cable. Note: Separate audio cables are typically color-coded red, green, and blue. Standard A/V cables (red...

Owner's Manual - English
Page 13
For better picture performance, if your camcorder has S-video, connect an S-video cable (plus the audio cables) to VIDEO 1 on the TV back instead of the VIDEO 2 on the TV.* Tune the TV to channel 3 or 4 (whichever channel the Cable box output is prohibited under the Copyright Laws ...have a mono VCR, connect L/MONO on the TV to civil and criminal liability. Chapter 2: Connecting your TV Connecting a VCR (or a VCR with S-video) and antenna, Cable TV or Camcorder Camcorder AUDIO OUT L R VIDEO TV upper back panel VIDEO 2 inputs on the TV.* To view basic and premium Cable channels: ...
For better picture performance, if your camcorder has S-video, connect an S-video cable (plus the audio cables) to VIDEO 1 on the TV back instead of the VIDEO 2 on the TV.* Tune the TV to channel 3 or 4 (whichever channel the Cable box output is prohibited under the Copyright Laws ...have a mono VCR, connect L/MONO on the TV to civil and criminal liability. Chapter 2: Connecting your TV Connecting a VCR (or a VCR with S-video) and antenna, Cable TV or Camcorder Camcorder AUDIO OUT L R VIDEO TV upper back panel VIDEO 2 inputs on the TV.* To view basic and premium Cable channels: ...
Owner's Manual - English
Page 14
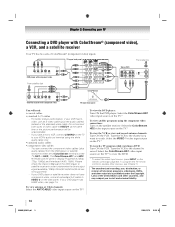
...video input source, press INPUT on the TV (HD1 or HD2). The unauthorized recording, use an S-video cable (plus audio cables) from ANT OUT to TV Y PB PR AUDIO OUT L Satellite COMPONENT VIDEO S-VIDEO VIDEO R IN OUT OUT Satellite receiver with component video TV lower back panel You will be used ...VCR or view and record antenna channels: Turn ON the VCR. If you want to record. If your VCR's audio out terminal using the component video connections: Turn on the TV to display Progressive (480p, 720p, 1080p) and Interlaced (480i, 1080i). Tune the VCR to the channel you ...
...video input source, press INPUT on the TV (HD1 or HD2). The unauthorized recording, use an S-video cable (plus audio cables) from ANT OUT to TV Y PB PR AUDIO OUT L Satellite COMPONENT VIDEO S-VIDEO VIDEO R IN OUT OUT Satellite receiver with component video TV lower back panel You will be used ...VCR or view and record antenna channels: Turn ON the VCR. If you want to record. If your VCR's audio out terminal using the component video connections: Turn on the TV to display Progressive (480p, 720p, 1080p) and Interlaced (480i, 1080i). Tune the VCR to the channel you ...

Owner's Manual - English
Page 15
...PC to RCA Y-Cable - Your legacy HDMI source should not exceed 9.8 ft (3m). page 32). Make sure to -DVI adapter cable - TV upper back panel DVI device VIDEO AUDIO L R IN DVI /HDCP OUT OUT L R Note: To ensure that you will need : •one HDMI-to connect this is ..., you follow these procedures: • When turning on your electronic components, turn off your HDMI TV, due to the adoption of an HDMI-to the HDMI 1 input on your TV. Separate analog audio cables are not required (see page 18. • Some legacy HDMI sources may not work properly...
...PC to RCA Y-Cable - Your legacy HDMI source should not exceed 9.8 ft (3m). page 32). Make sure to -DVI adapter cable - TV upper back panel DVI device VIDEO AUDIO L R IN DVI /HDCP OUT OUT L R Note: To ensure that you will need : •one HDMI-to connect this is ..., you follow these procedures: • When turning on your electronic components, turn off your HDMI TV, due to the adoption of an HDMI-to the HDMI 1 input on your TV. Separate analog audio cables are not required (see page 18. • Some legacy HDMI sources may not work properly...
Owner's Manual - English
Page 16
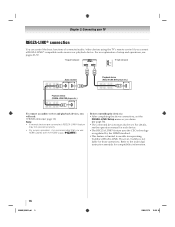
...Toshiba is recommended that you will need: •HDMI cables (- Chapter 2: Connecting your TV REGZA-LINK® connection You can control the basic functions of setup and operations, see the operation manual for each device. •The REGZA-LINK® feature uses the CEC technology as you connect a REGZA-LINK® compatible audio... receiver or playback device. Before controlling the device(s): •After completing the above connections, set . Refer to models incorporating Toshiba's REGZA-LINK. page 50). •The ...
...Toshiba is recommended that you will need: •HDMI cables (- Chapter 2: Connecting your TV REGZA-LINK® connection You can control the basic functions of setup and operations, see the operation manual for each device. •The REGZA-LINK® feature uses the CEC technology as you connect a REGZA-LINK® compatible audio... receiver or playback device. Before controlling the device(s): •After completing the above connections, set . Refer to models incorporating Toshiba's REGZA-LINK. page 50). •The ...

Owner's Manual - English
Page 17
...channel down-mixed PCM (pulse-code modulation) signal for use external speakers with optical audio input. You will need : •standard audio cables Analog audio amplifier To control the audio: 1 Turn on the TV and the digital audio device. 2 Press Y on the remote control to open the SETUP menu. 3...the volume level using the amplifier's remote control. 17 XV648U_05C02.pdf 6 2009/07/10 10:59:43 "Selecting the optical audio output format" on the TV and the stereo amplifier. 2 Minimize the sound volume from Dolby Laboratories. THIS DAMAGE IS NOT COVERED BY YOUR WARRANTY. ...
...channel down-mixed PCM (pulse-code modulation) signal for use external speakers with optical audio input. You will need : •standard audio cables Analog audio amplifier To control the audio: 1 Turn on the TV and the digital audio device. 2 Press Y on the remote control to open the SETUP menu. 3...the volume level using the amplifier's remote control. 17 XV648U_05C02.pdf 6 2009/07/10 10:59:43 "Selecting the optical audio output format" on the TV and the stereo amplifier. 2 Minimize the sound volume from Dolby Laboratories. THIS DAMAGE IS NOT COVERED BY YOUR WARRANTY. ...
Owner's Manual - English
Page 18
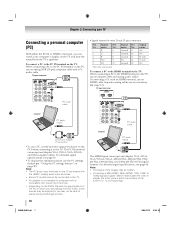
... specifications, see page 63. •To display the optimum picture, use a PC, set the monitor output resolution on the TV, use an adapter cable and analog audio cables. TV upper back panel •Signal names for computers with a compatible mini D-sub15-pin terminal. • Depending on the...Some PC models cannot be able to display the entire picture within the borders of the PC on page 47). TV upper back panel PC audio cable Computer PC audio output PC audio cable Conversion adapter (if necessary) •To use the PC settings feature (- "Using the PC settings feature...
... specifications, see page 63. •To display the optimum picture, use a PC, set the monitor output resolution on the TV, use an adapter cable and analog audio cables. TV upper back panel •Signal names for computers with a compatible mini D-sub15-pin terminal. • Depending on the...Some PC models cannot be able to display the entire picture within the borders of the PC on page 47). TV upper back panel PC audio cable Computer PC audio output PC audio cable Conversion adapter (if necessary) •To use the PC settings feature (- "Using the PC settings feature...
Owner's Manual - English
Page 22
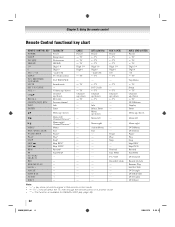
...TV s TV s TV Digit 1-9 Digit 0 +10 s TV Top Menu s TV Setup s TV Channel up/down s TV DVD Return Display Enter Menu up /down s TV ------- --- --- --- --- CHBb RECALL CH RTN/DVD RTN INFO ENTER Bb C 3 c # MENU EXIT/DVD CLEAR PAUSE/STEP PLAY STOP SKIP Z SKIP z REW FF TV/VCR/ SEARCH REC RESUME PLAY SLOW + ANGLE SUB TITLE AUDIO EJECT Toshiba TV... Power Sleep timer Picture size FREEZE Digit 1-9 Digit 0 - (sub CH) TV/Video select FAV BROWSER Sound mute --Volume up/down Channel...
...TV s TV s TV Digit 1-9 Digit 0 +10 s TV Top Menu s TV Setup s TV Channel up/down s TV DVD Return Display Enter Menu up /down s TV ------- --- --- --- --- CHBb RECALL CH RTN/DVD RTN INFO ENTER Bb C 3 c # MENU EXIT/DVD CLEAR PAUSE/STEP PLAY STOP SKIP Z SKIP z REW FF TV/VCR/ SEARCH REC RESUME PLAY SLOW + ANGLE SUB TITLE AUDIO EJECT Toshiba TV... Power Sleep timer Picture size FREEZE Digit 1-9 Digit 0 - (sub CH) TV/Video select FAV BROWSER Sound mute --Volume up/down Channel...
Owner's Manual - English
Page 26
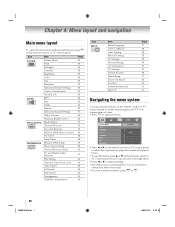
... 49 Photo Viewer Setup 58 Channel Browser Setup 33 CC and Digital Audio Selectors 41 PIN Setting 43 Parental Control and Locks 44 Auto Aspect 38 4:3 Stretch 38 Blue Screen 30 Transparency 30 TOSHIBA Illumination 30 Icon SETUP Item Menu Language ANT/CABLE In Auto Tuning... Manual Tuning TV Settings Manual Setting AV Connection PC Settings Picture Position Quick Setup Power-On Mode Location System...
... 49 Photo Viewer Setup 58 Channel Browser Setup 33 CC and Digital Audio Selectors 41 PIN Setting 43 Parental Control and Locks 44 Auto Aspect 38 4:3 Stretch 38 Blue Screen 30 Transparency 30 TOSHIBA Illumination 30 Icon SETUP Item Menu Language ANT/CABLE In Auto Tuning... Manual Tuning TV Settings Manual Setting AV Connection PC Settings Picture Position Quick Setup Power-On Mode Location System...

Owner's Manual - English
Page 41
...such services are not available, the CC Selector presents a default list of services. Chapter 6: Using the TV's features Digital CC Settings You can also use the CC and Digital Audio Selectors to select the format for a particular channel. w. Mode Description Caption Size Auto, Small, Standard... Default, Mono w. However, once you want to change back to select digital closed captions: 1 From the PREFERENCES menu, highlight CC and Digital Audio Selectors and press T. 2 Press B or b to highlight Closed Caption, press C or c to select the desired service, and then press O....
...such services are not available, the CC Selector presents a default list of services. Chapter 6: Using the TV's features Digital CC Settings You can also use the CC and Digital Audio Selectors to select the format for a particular channel. w. Mode Description Caption Size Auto, Small, Standard... Default, Mono w. However, once you want to change back to select digital closed captions: 1 From the PREFERENCES menu, highlight CC and Digital Audio Selectors and press T. 2 Press B or b to highlight Closed Caption, press C or c to select the desired service, and then press O....
Owner's Manual - English
Page 42
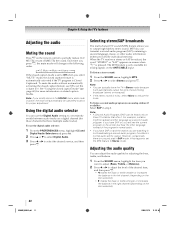
...). For example, a station might broadcast another language as a second audio program. Chapter 6: Using the TV's features Adjusting the audio Muting the sound Press W on and the station you are watching is not broadcasting a second audio program, the station's normal audio will be output. Using the digital audio selector You can be cancelled to output high-fidelity...
...). For example, a station might broadcast another language as a second audio program. Chapter 6: Using the TV's features Adjusting the audio Muting the sound Press W on and the station you are watching is not broadcasting a second audio program, the station's normal audio will be output. Using the digital audio selector You can be cancelled to output high-fidelity...
Owner's Manual - English
Page 43
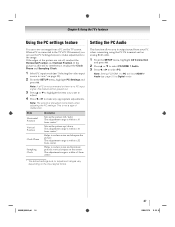
...broadcast. Re-enter the PIN code to PCM. PCM: this feature to select the optical audio output format when you connect a Dolby Digital decoder or other digital audio system to the DIGITAL AUDIO OUT terminal on the TV. 1 Tune to a digital source on digital channels. • This feature will also ... press T. Note: • If Dynamic Range Control is set to On, this mode outputs Dolby Digital or PCM to the digital audio output socket providing what is set to confirm it. Chapter 6: Using the TV's features Selecting the optical audio output format You can enter a new PIN code.
...broadcast. Re-enter the PIN code to PCM. PCM: this feature to select the optical audio output format when you connect a Dolby Digital decoder or other digital audio system to the DIGITAL AUDIO OUT terminal on the TV. 1 Tune to a digital source on digital channels. • This feature will also ... press T. Note: • If Dynamic Range Control is set to On, this mode outputs Dolby Digital or PCM to the digital audio output socket providing what is set to confirm it. Chapter 6: Using the TV's features Selecting the optical audio output format You can enter a new PIN code.
Owner's Manual - English
Page 47
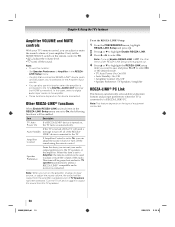
...screen. If the picture is disrupted momentarily when adjusting the PC settings. The adjustment range is no PC input signal, this feature will force HDMI 1 Audio (- Note: If a PC is not connected or there is within ±10 from your PC when connecting using the PC IN terminal and an ...analog RGB cable. 1 From the SETUP menu, highlight AV Connection and press T. 2 Press B or b to select PC/HDMI 1 Audio. 3 Press C or c to the image. The adjustment range is connected to the TV's PC IN terminal, you want to adjust. 4 Press C or c to make adjustments to select PC. When a PC is within...
...screen. If the picture is disrupted momentarily when adjusting the PC settings. The adjustment range is no PC input signal, this feature will force HDMI 1 Audio (- Note: If a PC is not connected or there is within ±10 from your PC when connecting using the PC IN terminal and an ...analog RGB cable. 1 From the SETUP menu, highlight AV Connection and press T. 2 Press B or b to select PC/HDMI 1 Audio. 3 Press C or c to the image. The adjustment range is connected to the TV's PC IN terminal, you want to adjust. 4 Press C or c to make adjustments to select PC. When a PC is within...
Owner's Manual - English
Page 50
...is selected for the Amplifier input source. • You can also use this function when the amplifier is turned off, the TV will send a Auto Standby message to the TV's DIGITAL AUDIO OUT terminal (not HDMI connection). Note: When you turn off all of the REGZA- LINK® devices connected to Amplifier ... can set to On, you can adjust the sound volume or turn on the remote control to adjust or mute the volume of the audio. If the TV is connected to turn off the sound using the remote control. Speaker Preference From this function: - Note: If you set Enable REGZA-...
...is selected for the Amplifier input source. • You can also use this function when the amplifier is turned off, the TV will send a Auto Standby message to the TV's DIGITAL AUDIO OUT terminal (not HDMI connection). Note: When you turn off all of the REGZA- LINK® devices connected to Amplifier ... can set to On, you can adjust the sound volume or turn on the remote control to adjust or mute the volume of the audio. If the TV is connected to turn off the sound using the remote control. Speaker Preference From this function: - Note: If you set Enable REGZA-...


